Contents
Summary: While doing a malicious Email Investigation in Office 365, specific prerequisites need to be followed first, such as the organization must have Microsoft 365 Advanced Threat Protection. Apart from this, policies should be defined for anti-malware, anti-spam, anti-phishing, and other cybersecurity risks. Using Threat Explorer to Investigate Suspicious Emails and analyze Phishing URLs are some of the crucial steps a SOC analyst should take to mitigate the after-effects of a cyberattack. A third-party email forensics software, such as Stellar Email Forensic, supports the investigation and digital evidence collection at the granular level.
Organizations and businesses today rely on emails for their day-to-day communication, making them vulnerable to various cybersecurity threats, such as phishing, malware attacks, etc. In light of these threats, Microsoft offers most of its products, including Office 365, with built-in security features. For example, if your organization has Microsoft 365 Advanced Threat Protection, then you?ve access to a built-in security tool ? Threat Explorer, that can help protect your organization against malicious emails.
In this guide, we?ll discuss how Micorsoft 365 Threat Explorer protects your organization from cybersecurity threats and helps you to investigate malicious emails.
Prerequisites
You can use Office 365 Threat Explorer to strengthen email security by finding and deleting malicious emails, curbing phishing attacks, etc. However, it would help if you met a few conditions first:
- Your organization has Microsoft 365 Advanced Threat Protection.
- You have defined policies for anti-malware, anti-spam, anti-phishing, and other risks.
- You can use Security & Compliance Center to do it in case you haven?t already.
- You have enabled the audit log search. If not, you can do it manually in Security & Compliance Centre or use the PowerShell command: Set-AdminAuditLogConfig -UnifiedAuditLogIngestionEnabled $true.
- You are a global administrator.
Use Threat Explorer to Investigate Suspicious Emails
To find and study suspicious emails in the mailboxes of recipients, follow these steps:
1. Go to Threat Explorer
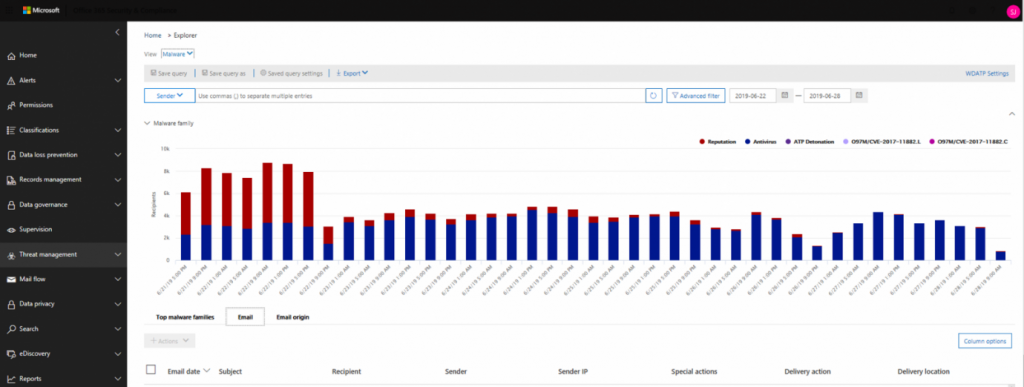
Reach Office 365 Security & Compliance Center by visiting this link and signing in with your Microsoft 365 account. After logging in, select Threat management > Explorer in the quick-launch section on the left side of the screen.

2. Select “All email” View
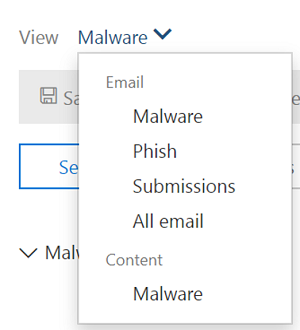
The dashboard offers multiple views such as:
- Malware
- Phish
- Submissions
- All email
The emails are filtered based on the selected view, and you can investigate emails for different threats accordingly. For example, if you want to do a forensic analysis of emails where a malware threat is detected, choose Malware view. Select Phish view if you wish to investigate emails where a phishing threat is detected. On the other hand, if you want to view emails that admins or users submit to Microsoft for forensic investigation, select Submissions view.

If you select All email view, it lists all emails received by your organization. Also, you may receive an error that reads ?Too much data to display? if there are bulk emails to process. To fix this error, you can narrow the date range or add a search filter to limit data for the view.
Note: You can select the All email view only if your organization has subscribed to Advanced Threat Protection Plan 2 (ATP P2).
3. Use Search Filters
Threat Explorer allows you to search and filter emails based on sender, subject, attachment file name, etc. You can apply multiple filters at a time. You can also attach multiple values (keywords) to each filter (separated by commas) in the search bar to narrow down the results.


4. Study Email Fields
At the bottom of the Threat explorer window, you can find crucial security-related information in different columns. First, there are columns for the essential details, like Recipient, Sender, Sender IP, etc. Then, there are also columns for additional information, like:
- Delivery Location: You can find where a suspicious email has ended (Inbox, Junk folder, Deleted Items folder, etc.). You can also learn what happened to the email ? if it is in quarantine and not in the user?s mailbox or if it has failed to reach the intended mailbox.
- URL Threat: This field indicates the form of threat presented by a URL, such as Phish, Malware, or Spam. If there is a URL with no threat, then the field is set to None.
- Overrides: This field displays overridden actions on emails as per configured company policy. This field can help you check how the security policies you define are performing in an actual work environment. Here, you can find statutes, like allowed by org policy, blocked by org policy, file extension blocked by org policy, etc.
5. Check Email Timeline View
To delve deeper into an email?s status and transmission path, you can check its timeline. You can click the subject of an email and click Email timeline. This opens a table that displays all events that took place during and after email delivery. You can study this information to understand exactly what happened to an email after it was delivered.
6. Take Action
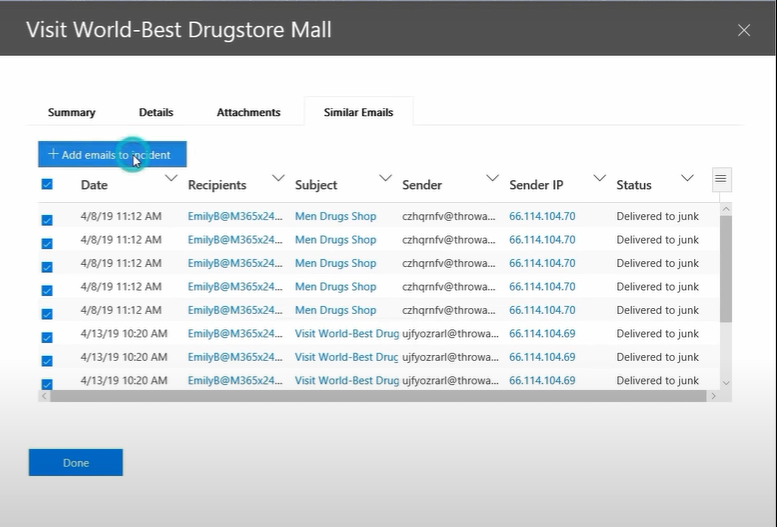
Using the above tools and techniques, if you come across a particular email, click on it to take a closer look. A new window will open where you can find details like return path, recipients, etc. You will also find the Similar Emails option, which is quite important. If you select this option, it will display a list of other emails that were sent to your organization. These emails may have similar senders, IP addresses, subject content, etc. You can select all or some of these emails and add them to the incident. You can then name the incident and attach a severity level.

Once an incident is created, go to Threat management > Review. You can then select the incident and take appropriate actions on the suspicious emails.
Analyzing Phishing URLs
You can use Threat Explorer to prevent phishing attacks by analyzing email URLs. However, you must meet the following requirements first:
- You have to configure Advanced Threat Protection (ATP) Safe links. This ensures that when a user clicks a malicious link in an email that is blacklisted as per your security policy, a warning page opens up, and the link is blocked.
- You have to set up ATP Safe Links policies for time-of-click protection (for verification of URLs in real-time) and also the logging of click verdicts by the links (registration of link actions viz. blocked or overridden).
To study phishing URLs in emails, following these steps:
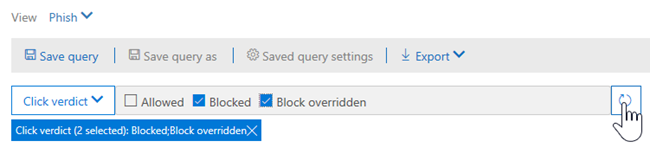
- Select Phish view in the Threat Explorer dashboard.
- Change Sender option to URLs > Click Verdict.
- Select the desired filter(s): Allowed, Blocked, or Block overridden (you can also pick multiple filters simultaneously), which will display a list of phishing URLs that were allowed, blocked, or overridden, respectively, in accordance with your security policy. Click the refresh button.

You will see two URL tables on the URL tab ? Top URLs and Top clicks. The Top URLs tab contains genuine URLs (attackers generally use a mix of genuine and malicious URLs in emails to improve the rate of successful deliveries). The Top clicks tab shows URLs clicked by users that are sorted by click count. These URLs are more likely to be malicious.
You can click a URL that you want to inspect. It will open a fly-out dialog that provides additional details that give you an insight into the URL?s impact on your email communication system.
Using a third-party software
While Security Operations Center (SOC) analysts are investing their time and efforts to prevent numerous cyber threats in office 365, hackers are also coming up with improvised, new methods. It seems that all efforts to mitigate cyberattacks are not sufficient.
The number of organizations where Microsoft 365 is an integral part of their business development is on the rise; a third-party email forensics software may be required to help stop the spread of after-effects of such cyberattacks in the organization. Stellar Email Forensic is one such software. Stellar Email Forensics is an advanced software for email search, which supports investigation at the granular level and helps in digital evidence collection. This means that Boolean and Regular Expression search is accomplished in a few clicks.
In order to produce the evidence in a court of law, bulk email forensics is also required, as there are high chances that the after-effects of the cyberattacks have spread at a large scale. Another great feature of Stellar Email Forensics is that it allows case management during criminal investigations through tagging, bookmarking, and logs.
| Would like to try Stellar Email Forensic? You can now use it for free for up to 60 days! Download the software here. |

