Summary: This is a step-by-step guide to migrate Exchange 2013 to 2016. It includes the setup of a CAS co-existence environment, migration of mailboxes, and finally the withdrawal of Exchange 2013. To migrate Exchange 2013 to 2016, you need to first install Exchange 2016 and then migrate data from Exchange 2013 to 2016 version.


Contents
Well, the first thing for Exchange 2013 to 2016 migration is Environment Preparation, which is as follows:
Environment Preparation to Migrate Exchange Server 2013 to 2016
Before you migrate Exchange 2013 to 2016, you need to ensure that Exchange 2013 to 2016 migration checklist is in place. Also, you need to ensure that they have the right environment for the system requirements to be met.
Thereafter, you should go through the Release Notes and make sure you would not have any issues after the completion of the migration process. Further, you should determine the significant parameters of the Exchange Server correctly. Then make sure that parameters, such as RAM, CPU, and storage space available for the server are adequate to perform correctly. Next, ?Exchange 2016 and Exchange 2013 multirole server? should be of the same size. However, it requires additional resources.
| Try Stellar Converter for EDB for Exchange 2013 to 2016 migration. The software exports Exchange Mailboxes from Exchange Server 2013 to 2016 directly in a few clicks. |
Before Exchange 2013 to 2016 migration, ensure that all the requirements are in place. It would be better to refer the Exchange Deployment Assistant in advance, which is a web-based tool. It guides you through the step-by-step deployment of the Exchange Server in your on-premises organization. Also, check out the Exchange Deployment Assistant checklist.
Further, users should find out whether their clients are supported by Exchange 2016 or not. The clients who are not on the list of supported clients should be upgraded. Install a supported Operating System that can be Windows Server 2012 Standard/Datacenter or Windows Server 2012 R2 Standard/Datacenter. After installation, users need to join the server to the domain.
You may take help from the Microsoft Exchange Server Deployment Assistant tool that will guide you to deploy different versions of Exchange Server.
Installing Prerequisites and Exchange Server 2016
The second step is to install Exchange 2016. However, before doing that the users should have appropriate permissions to do it. Before beginning, users should ensure that the prerequisites are installed. The prerequisites are as follows:
2.1. Install Prerequisites
2.1.1. Install and configure Microsoft .NET Framework 4.5.2 version.
2.1.2. Install and configure Windows Management Framework 4.0 version.
2.1.3. Install and configure Microsoft Unified Communications Managed API 4.0 Runtime version.
2.1.4. Install those features of Windows that are required. To install the required Windows feature, use the below-stated commands. Users need to run these commands on a single line from the PowerShell window with eminent privileges.

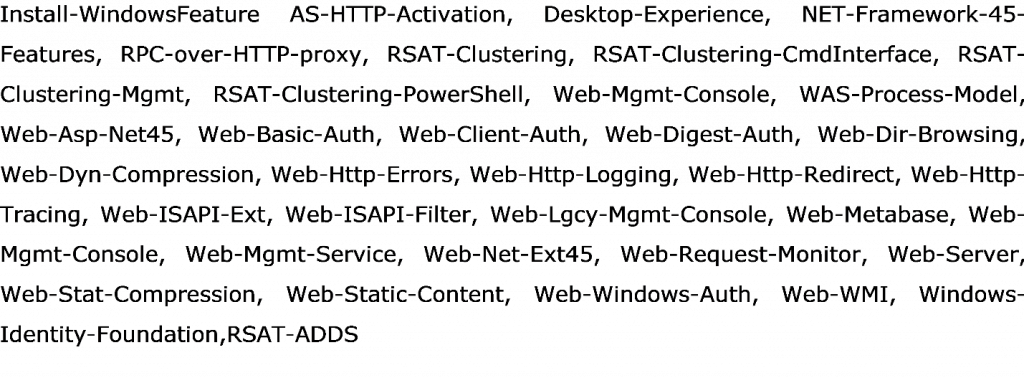

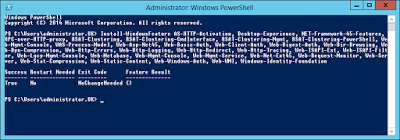
Note: The AD tools are included in the commands stated above that stop issues with Active Directory operations and the EXSetup program.
2.2 Install Exchange Server 2016
2.2.1. Download Exchange Server 2016.


2.2.2. Extract the setup file.
2.2.3. After extraction of the file, run Exchange Setup (Setup.exe) file to start the installation of the Exchange Server.
2.2.4. ?Check for Updates?? screen comes up. Check the first option: Connect to the Internet and check for updates and click on the Next tab.
2.2.5. If updates are found, download them.
2.2.6. The ?Setup? copies the files.
2.2.7. The installation process is initialized.
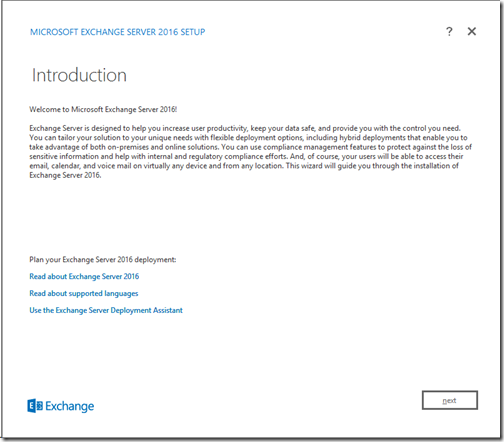
2.2.8. Next, the Introduction page appears. Here, click on the Next tab.

2.2.9. The License Agreement page opens up wherein users need to accept the license. Then, click on the Next tab to proceed.
2.2.10. Under Recommended Settings, select ?Use recommended settings’ and click on the Next tab.
2.2.11. The Server Role Selection screen appears. Check the ?Mailbox role? checkbox and click on the Next tab.
2.2.12. State the location for installation of the software. The software can be installed at the default or a different location. For installation at a different location specify the location using the Browse tab.
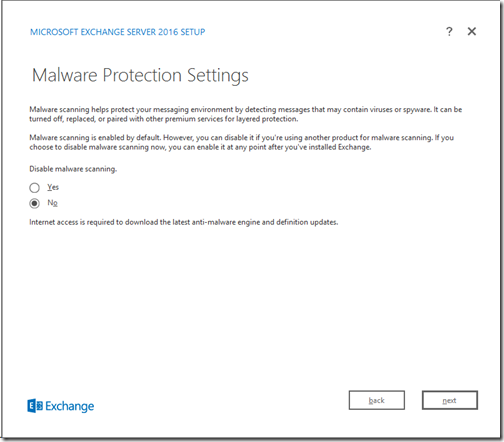
2.2.13. Under Malware Protection Settings, select Yes or No for ?Disable malware scanning? depending on the requirement. By default, the settings are enabled. However, it can be enabled at any given point in time. Click on the Next tab.
2.2.14.The Setup performs a ?readiness check? of the system and configures the prerequisites.
2.2.15. The setup process progresses and finally a window pops up stating that Exchange Server 2016 has been installed successfully.
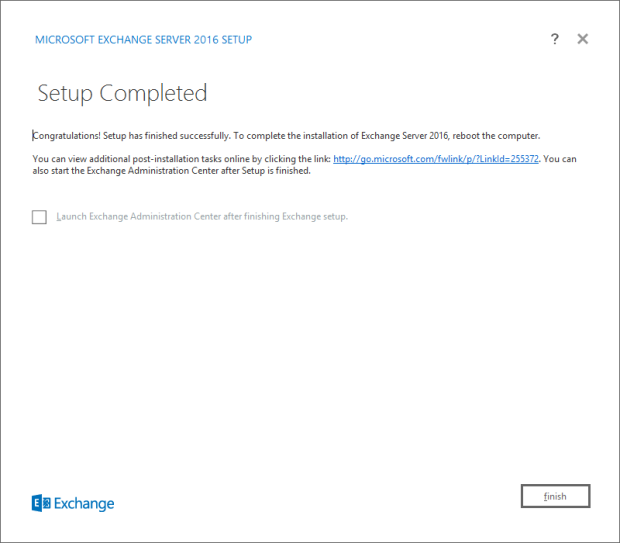
2.2.16. The Setup Completed message appears. Here, click on the Finish tab.

Setup the Service Connection Point
The next and final step to migrate Exchange 2013 to 2016 is the setup of Service Connection Point (SCP), which is Exchange?s object in Active Directory directing domain-joined Outlook clients to a URL. This is to receive auto-discover settings. By default, the characteristic is the Fully Qualified Domain Name of the server. This should be immediately changed to stop Outlook clients from connecting to it and getting a certificate warning. The warning is generally issued when they are presented with the default self-signed certificate installed by Exchange Server. In this case, the SCP should be configured to reference the Exchange 2013 Endpoint.


Migrate Exchange Mailboxes
There are many methods to move user mailboxes from Exchange Server 2013 to 2016. You can export mailboxes to PST and then migrate them individually or export and migrate all mailboxes in one go.
Stellar Converter for EDB is one such software that has been designed to migrate all mailboxes from one Exchange version to another directly. For this, you only need to scan the Exchange database file, select user mailboxes, enter Exchange Server login credentials, and export mailboxes from Exchange 2013 to the new live Exchange 2016 Server database.
The software auto-maps the source and destination mailboxes, provides an option to create a new mailbox, and map mailboxes manually. The software automates the mailbox migration process, which saves time and helps minimize downtime.

The Bottom Line
By following this guide, you can migrate Exchange 2013 to 2016. You can follow the manual approach, which is time taking and involves thorough technical knowledge. A better and more convenient approach to migrate Exchange 2013 mailboxes to Exchange Server 2016 is to use an EDB to PST Converter. The software virtually automates the Exchange 2013 to 2016 migration process.

