Summary: Have you just encountered the "Recovery Server Could Not Be Contacted on Mac" error during the macOS update? This error occurs due to several issues. This guide will discuss its reasons and ways to fix the problem. Make sure you are prepared and have specific software like Stellar Data Recovery Professional to recover your files if something goes wrong.

![Fix The Recovery Server Could Not Be Contacted [The Ultimate Guide]](https://www.stellarinfo.com/public/frontEnd/images/product/free-download-mac-blue-button.png)
Contents
The “recovery server could not be contacted” issue is a common error Mac users may encounter when restoring or upgrading their systems. When performing tasks such as installing the newest macOS or attempting to recover data on your Mac, the computer must communicate with Apple Server. However, if there is a problem connecting to servers, you may see the “recovery server could not be contacted” issue. If you encounter this error, follow our guide with working solutions.
Why does the ?The Recovery Server Could Not Be Contacted? issue occur?
When using macOS, you may encounter the “recovery server could not be contacted” issue on Mac if your device cannot connect with the servers.
Here are some potential causes of this issue:
- Unstable network: If your device’s internet connection is unstable and lacks sufficient bandwidth, you may be unable to connect to the servers.
- Date and time sync: If your device’s date and time settings are not synchronized with Apple’s recovery server, it could cause the “recovery server could not be contacted on Mac” error.
- Outdated macOS: If your macOS is obsolete, you may not be able to connect to the recovery server.
- High user traffic: If too many users are trying to update their macOS simultaneously, it may overload the Apple server and cause the “recovery server could not be contacted on Mac” issue.
How to Fix the “Recovery Server Could Not Be Contacted” Problem?
Now let?s move to solutions for fixing the “recovery server could not be contacted” issue.
Solution 1: Update Date & Time
To correct the “recovery server could not be contacted on Mac” error caused by incorrect date and time settings, follow these steps:
- Close the error message window by clicking OK and return to the macOS Utilities.
- Click on Utilities from the top Apple menu bar and select Terminal to open it.


- Type sudo ntpdate -u time.apple.com command in Terminal and hit Enter.


If the above command doesn’t work, follow these steps:
- Open the Terminal again.
- Type date and press Enter to check your Mac’s current date and time.
- If the date and time are incorrect, use the command date


- Hit Enter and exit Terminal.
- Click Reinstall macOS to run the macOS installer again.
Note: In case you need to change the date, use this command: date [MM][DD][HH][MM][YY], where you need to replace the data with the current date and time. For example,


Solution 2: Check Internet Connection
To resolve the “recovery server could not be contacted on Mac” issue, ensure your Mac is properly connected to the internet. If using a wired connection, try re-plugging the Ethernet cable.
You may also check the available Wi-Fi networks. To do that:
- Click the Wi-Fi at the menu bar to see the list of available networks.
- If the Wi-Fi is turned off, you need to move the tumbler to turn it on..

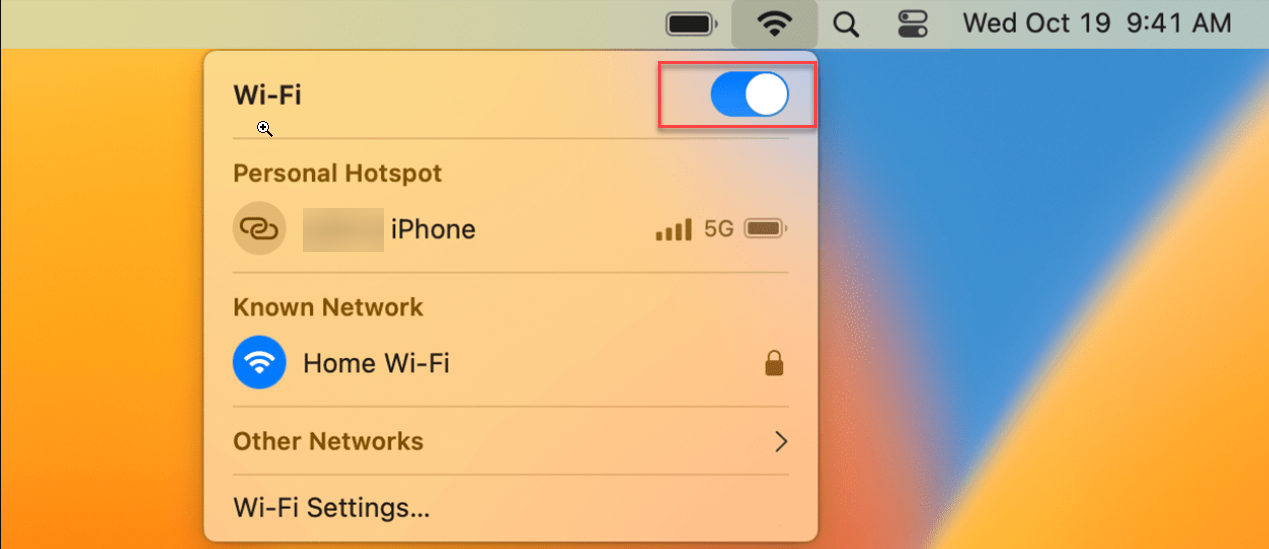
- Wait and see whether your Mac is connected to an available Wi-Fi.
A faster internet connection will allow quicker access to the needed Apple servers.
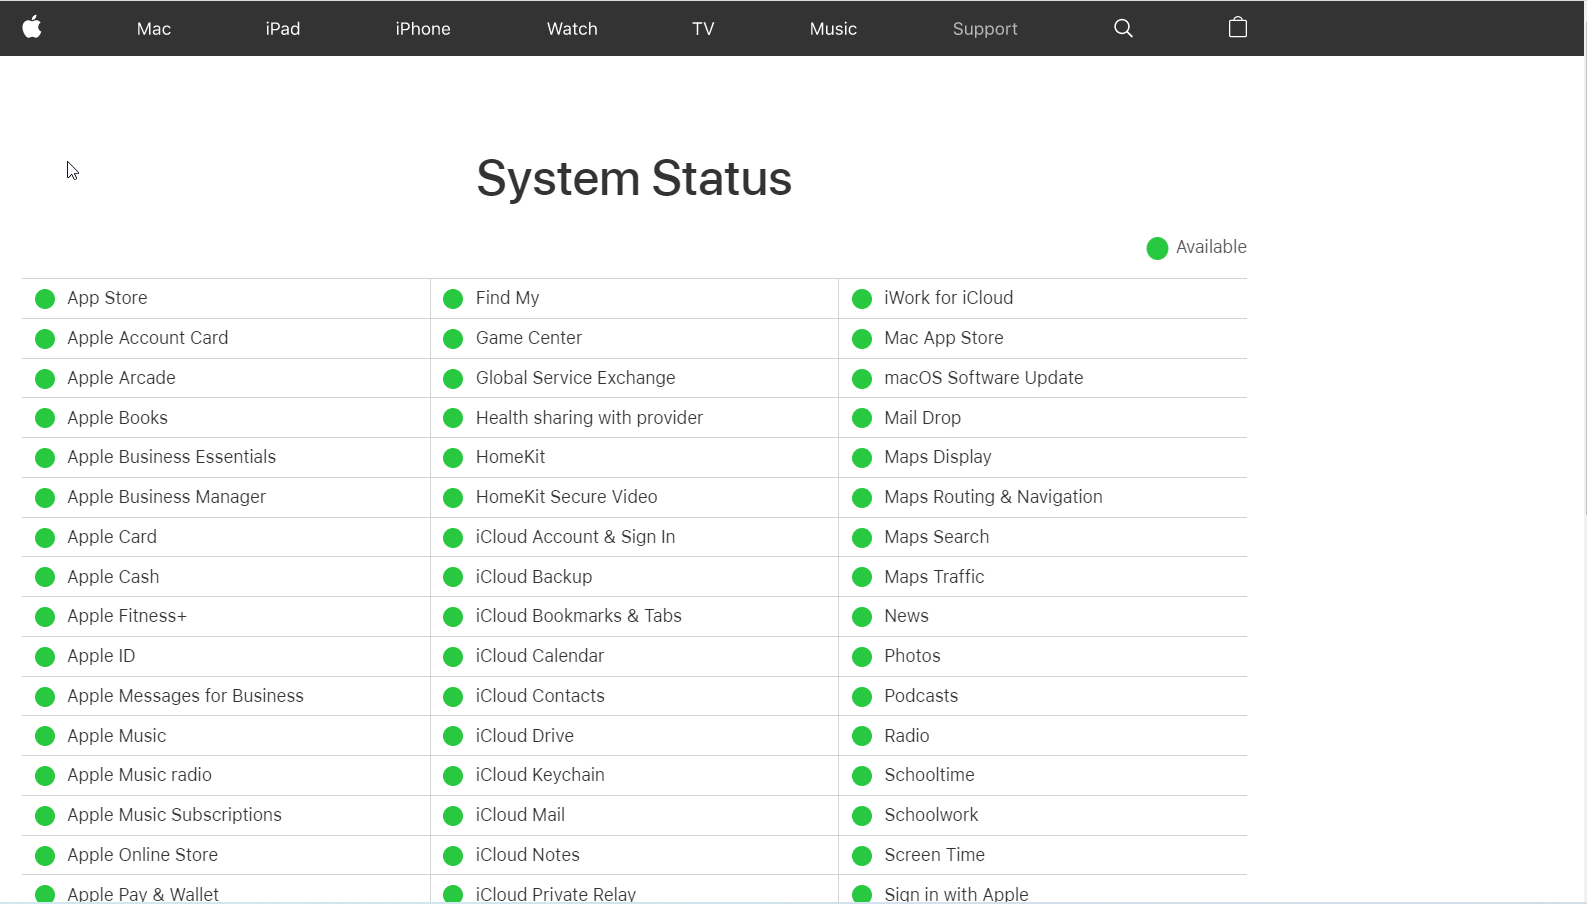
Solution 3: Check Apple Services
Apple has a status page where it records any problems with its web server and online services. If the problem is with services, you may need to wait for them to be fixed to resolve the “the recovery server could not be contacted” error.

Solution 4: Run the Full Installer
If you encounter the error message “the recovery server could not be contacted” when installing a macOS update using the App Store update installer, downloading the full version of the macOS installer might solve the issue. This workaround has proven to be effective for many users. Follow these steps to download the full version of the macOS Ventura update:
- Open Terminal from the Utilities.
- Type in the following command to run the full installer:
sudo softwareupdate –fetch-full-installer [OS version].


- Press Enter and wait for the download to complete.
Solution 5: Erase Disk and Reinstall macOS
If none of the above methods work, You will need to erase your Mac disk and reinstall macOS. Here is how to do it:
- Before erasing the hard drive, make sure to prepare your Mac and create a backup of your files.
- Open Disk Utility from the Recovery Mode.


- Select the hard drive you want to erase.
- Click on the Erase button.
- In the pop-up window, you will need to select the following options:
Name: Macintosh HD.
Format: APFS.

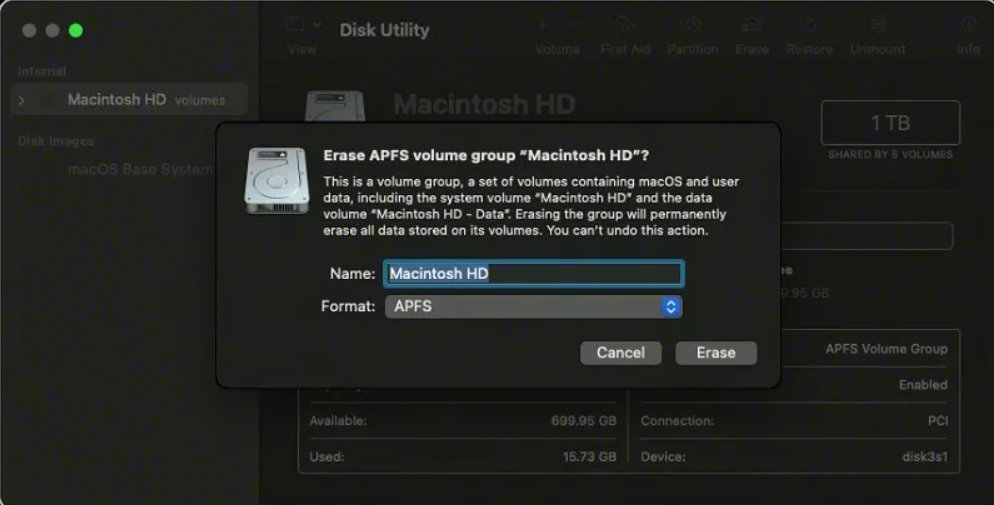
- Click on the Erase button to confirm and follow the instructions on the screen to complete the process.
Then you will need to recover your macOS with all the necessary data.
To recover your Mac from the backup, follow these steps:
- Open the Utility window.
- For Intel-based Mac users: press Command + R.
- If your Mac is with Apple Silicon, press and hold the Power key.
- Choose Restore from Time Machine backup and click Continue.

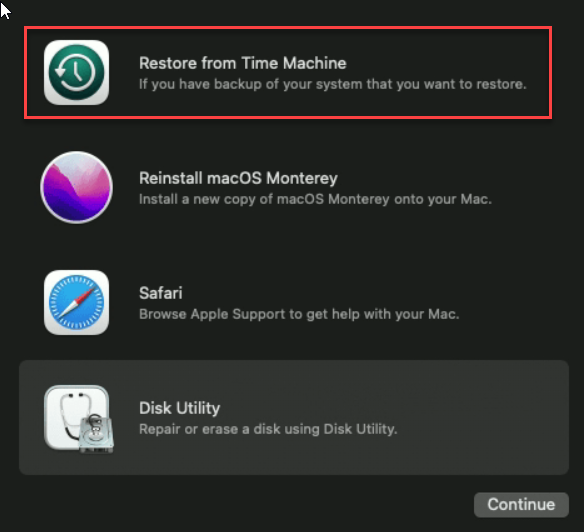
- Select the disk you want to restore your files from. This should be the hard drive where you made the backup.
- Choose the backup date you want to restore from and select the destination on your Mac.
- Click Restore to start the recovery process.
- Finally, restart your Mac.
Alternatively, you can recover your Mac using a specialized application like Stellar Data Recovery Professional.
To recover your disk with Stellar Data Recovery Professional, follow these steps:
1. Download and install the Stellar Data Recovery Professional for Mac software.


2. Open the application and select the file types you want to recover. You can choose specific files or recover everything.


3. When you have chosen the file types to recover, click the Next button.
4. Select the disk where to do a search for the lost data and click on Scan.


5. After the scan, perform a preview of the files and choose the required ones.


6. After selecting the required files, click on Recover to finish.
Wrapping Up
In conclusion, encountering the “recovery server could not be contacted” error on your Mac can be frustrating, but there are several methods to resolve it. Each solution can help you get your Mac back up and running smoothly, from checking your internet connection to erasing and restoring your hard disk.
Remember to always back up your important files before attempting any of these solutions, and don’t hesitate to seek further assistance if needed. With the right steps and a little patience, you can overcome this error and confidently use your Mac.
Read more:


