Summary: Organizing and restoring photos from the huge number of files extracted in a data recovery process can be challenging. This post shares how to use EXIF metadata of an image file to filter or restore photos from recovered data. Also, learn how Stellar Photo Recovery software saves you from this pain of sorting data after recovery.


?I managed to recover lots of photos from a failing hard drive using a recovery software. It created a lot of files with some filenames using #. But it is now difficult to sort the files into their appropriate folders or rename them to their original name. Is there any automated method to sort photos via their EXIF data??


Often it gets challenging to restore specific photos from the enormous recovered data. You may have used a recovery software, which might have restored the files but not their original file name, file structure, or directories.
Hence, organizing and restoring photos from these hundreds of thousands of recovered files can be a strenuous task.
Addressing the problem, here we share how you can restore photos using EXIF metadata embedded in an image file after data recovery.
What is EXIF Metadata?
An image file has metadata information stored in it. It includes the details of the image, such as camera name, model, date and time the photo was taken, compression type, exposure, frames per second, aperture, copyright information, ISO settings, etc. This data embedded in the image file is called EXIF metadata.
You can use relevant information about a photo to search and organize specific files recovered after using recovery software.
How to use EXIF metadata to sort the recovered photos
There are two ways to restore photos using EXIF metadata ?
- Via file manager on your computer or
- Third-party photo organizing tool.
1. Use File Explorer to use EXIF metadata for restoring photos after data recovery
Windows have a default File Explorer as a file manager, which is used for managing and viewing files, folders, partitions, etc. File Explorer can help to display EXIF metadata along with the file name on your computer. Once the metadata of the recovered files is visible, you can filter the recovered images.
Steps to view EXIF metadata information of an image in File Explorer:
- Go to the recovered folder or volume in File Explorer.
- Click on the View tab.
- Select Details view.


- Right-click on column headers and select More. The Choose Details box opens with a list of information. Select the required options that you want to display with the file name. You can select the file type, size, creation dates, modification dates, camera model, lens type, and other information related to image file creation.
- Click OK.The files will now show up with the chosen details.
Now look for the images in the File Explorer search pane using any of the listed metadata information. You can search and restore the photos by their creation dates, file extension, camera name, model, and so on.
For example, use the *<image file search> like *2018 or *Canon-EOS. The File Explorer will list all photos present in that folder or sub-folders having 2018 as the year of creation or Canon EOS in the metadata.
Next, select all the image files and copy them to a new folder. You can create folders based on image file extension, month/ year of creation, etc.
2. Use third-party tools that restore files using EXIF metadata
There are free tools such as PhotoMove and Elodie, which could organize your recovered photos using the EXIF metadata.
They are advanced and faster than File Explorer. These tools automatically move photos to folders, and some even find and remove duplicate image files.
Recommended: Recover deleted photos with original file name and folder structure
Why take so much pain in filtering the desired photos after recovery? You can easily avoid the hassle of restoring photos from the huge number of recovered files from a hard drive, SSD, USB drives, SD card, or other media.
Just make an informed decision while choosing a recovery software. Go for a tool that can restore the deleted photos with the original name, date, timestamp, and folder structure. Try one such Stellar Photo Recovery ? an advanced tool that customizes the recovery process.
Before saving the photos in your system, you can sort them based on file type, creation dates, etc. You can also preview the pictures to check if it?s the right file.
Stellar Photo Recovery can restore photos of any camera and file type, be it JPEG, JPG, TIFF, RAW, DNG, CR3, CR2, NEF, ORF, SR2, BMP, GIF, PNG, PSD, Adobe EPS, etc.

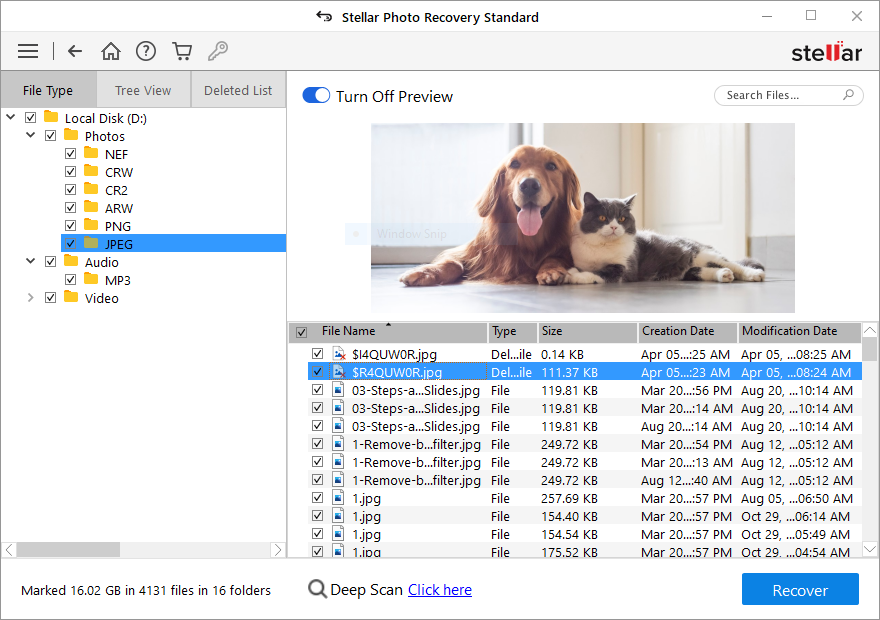
Moreover, to ease the post-recovery process, once the software completes the scan, you can view the scan results in three formats:
- File Type: In this view, files/folders are listed according to their type such as photos, audio, and videos along with their file formats.
- Tree View: In this view, folders are listed in a hierarchical arrangement. You can view the original folder structure.
- Deleted List: All the files and folders deleted from the drive are listed in this view.
The different types of scan views helps to sort, select, and recover pictures based on file type, name, size, date of creation, etc. You can restore exactly those photos that you want to keep while discarding the others.
Stellar Photo Recovery has both Mac and Windows version. It?s recommended to get the free trial and asses the recovery capabilities of the software.


Finally
You should avoid the stressful sorting and photo recovery process in the first place itself. Always use a recovery software such as Stellar Photo Recovery that can restore exactly what you want, bypassing the unwanted files.
Nevertheless, if you already have a huge number of recovered files and want to restore photos from it, use File Explorer. The EXIF metadata options in File Explorer makes it easy to sort and restore the image files from the recovered data. If you are looking for a quicker way, opt for any file organizer software. They are equipped to sort, filter, and manage your photos based on EXIF metadata in image files.


