Photos are captured on different devices, of varying file systems and formats. These pictures are then converted into other formats, managed, stored, and shared across different platforms every day. The more photos are processed, the more frequently users come across issues like abrupt data loss, file transfer errors, image corruption, etc. all leading to loss of your precious memories or work-related projects.
While there are native tools and backup available to restore your lost pictures, you need special recovery tools to extract permanently deleted photos (with no backup) from deep inside the storage. A photo recovery software works well only when the deleted data has NOT been overwritten with new data. Therefore, the sooner you use a recovery tool, the more chances you have of successfully recovering your photo.
In this blog post, we have shared step-by-step recovery instructions and procedures that will assist you in restoring deleted images from various sources, such as Windows and Mac computers, Android phones, iPhones, or digital camera memory cards (SD).
Quick Action – When Data Loss Happens
Lost your photos from Windows, Mac or a DSLR? Immediately stop using the device further to avoid overwriting. Next steps will vary based on the device and storage type from where the data is lost.
|
Device Type |
Primary Storage Type |
Action |
Best Recovery Method / Tool |
|
Windows PC |
HDD / SSD |
Check Recycle Bin & File History. |
Stellar Photo Recovery or Recuva |
|
Mac |
SSD (APFS) |
Check Trash & iCloud backup. |
iCloud backup or Mac Photo Recovery Tool |
|
iPhone |
Internal Flash Memory |
Check Recently Deleted folder in Photos. |
iCloud or iPhone Data Recovery tool |
|
Android |
Internal Flash Memory |
Check Recently Deleted Folder |
Google Drive Backup or Android Data Recovery Tool |
|
SD card |
Flash Memory Memory |
Immediately stop using the card |
Stellar Photo Recovery or SanDisk RescuePRO |
Can You Recover Permanently Deleted Photos?
Yes, you can recover permanently deleted photos if the storage space hasn’t been overwritten by new data. Here’s the best approach you should take depending on your particular scenario.
|
Scenario |
Can Data Be Recovered? |
Best Approach |
|
Files deleted within 30 days from device’s internal storage- not removed from Trash/Bin yet from |
Yes |
Trash / Recently Deleted |
|
Cloud backup existed before deletion |
Yes |
Restore from iCloud / Google Photos / OneDrive or others |
|
Permanently deleted, data not overwritten |
Likely yes |
Photo Recovery Software- Scan immediately |
|
SD card formatted once, minimal new data written |
Likely yes |
Photo Recovery software - SD card scan |
|
Device used heavily since deletion (many new photos/files) |
Partial |
Deep scan - some files may be recovered |
|
Storage Drive is physically damaged and inaccessible |
Unlikely |
Professional data recovery service may help |
Recovering Deleted Photos on Windows
Losing chunks of old photos from your Windows PC during a random clean-up Sunday is not unheard of. Shift deleting a set of photos accidentally, hitting “format all” without double-checking are all common occurrences that lead to loss of important photos & videos from Windows. When you don’t find files in Recycle Bin… that’s when backup & other advance recovery methods come into play. Here’s what all you can try.
Method 1: Restore From Backup
Another way to recover lost photos on Windows computer is by searching in your backup files.
- Search “Control Panel” in the Windows search bar.
- Now look for System and Security > File History. If you’ve enabled it previously, you’ll see options to restore personal files.
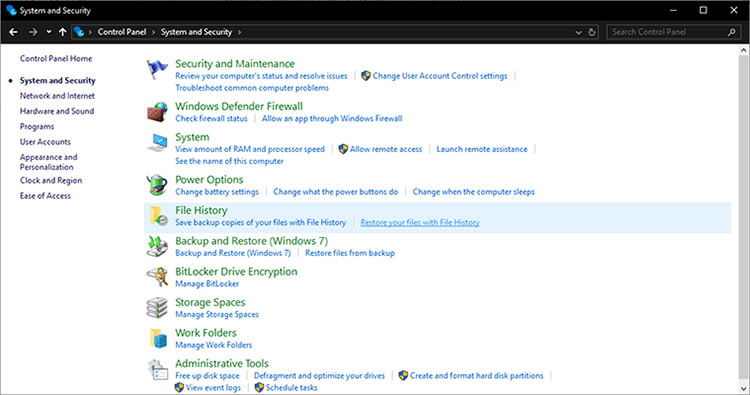
- Browse through the backed-up folders and look for your missing photos.
- Select the ones you need, and hit Restore.
If you don’t have a backup ready, don’t worry there are other methods you can try next.
Method 2: Use Photo Recovery Software for Windows
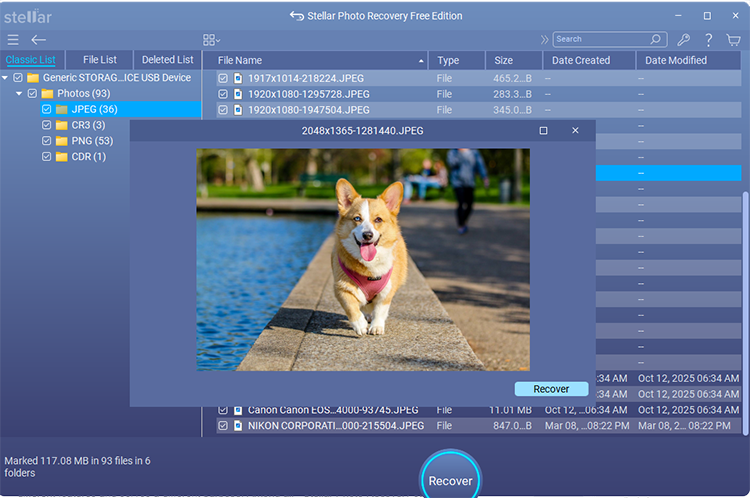
Now, if the Recycle Bin and backups didn’t prove useful to you, it’s time to bring in free photo recovery software. As a data care company we have designed and launched the Stellar photo recovery tool for such complicated recovery tasks. The tool can scan your storage devices and pull out deleted or corrupted photos, even if they’ve been removed from the Recycle Bin or lost due to an OS or other technical error. It can also recover videos and audio files.
There’s a free version that software's free trial recovers 10 files, each 100 MB.
- Download and launch Stellar Photo Recovery software on your Windows computer.
- Select the “Photos” option for recovery.

- Next, choose the drive or location where your photos were stored before they vanished.
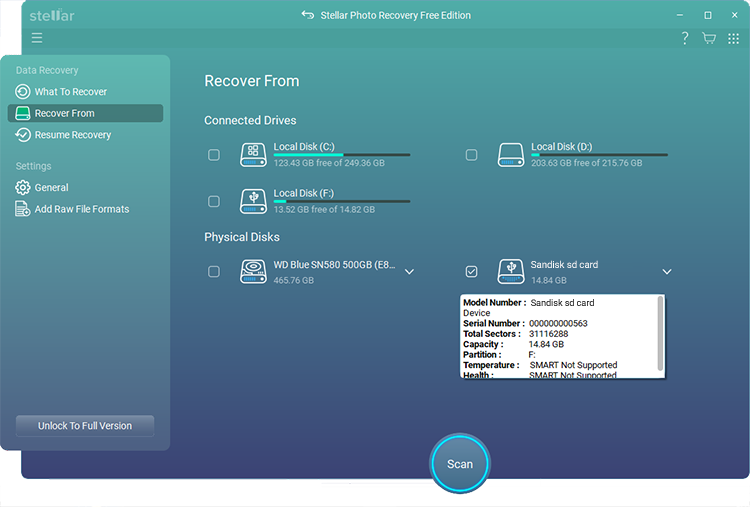
- Hit scan, and wait for some time; you’ll see a list of recoverable images.
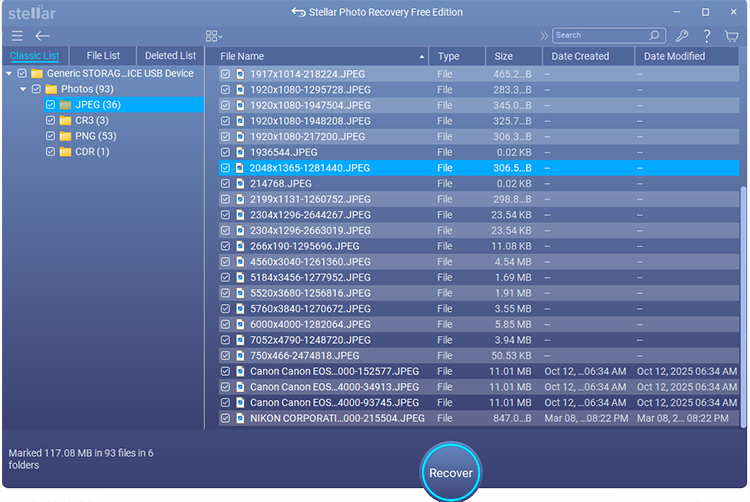
- Click on a file to preview it. Then select and Recover.
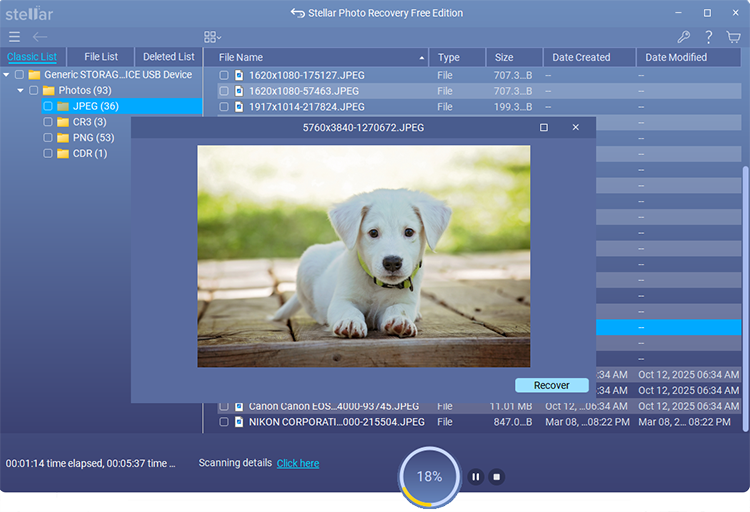
- Select a location to save the files. Make sure to not save the photos on the same drive from where they were deleted.

This utility has more than 200 supported file types including JPEG, PNG, RAW, CR2, NEF, ARW (SONY), RAF (FUJI), DNG (Adobe), TIFF, GIF, BMP and others (for a full file format list see here). It allows you to scan and preview files for free; however, if your Windows hard drive has become totally corrupt, the utility may not recover your files. In this case, it may make sense to seek out a professional data recovery service.
Method 3: Via a Data Recovery Service
Data recovery services are meant to assist you in scenarios where the hard drive or storage of your computer is badly damaged. Examples include a fire-damaged, water-damaged, severely corrupted, or broken hard drive. There are experts who can extract data from your damaged storage drive by rebuilding the sectors of your storage drive.

How to Recover Deleted Photos on Mac?
Losing photos on your Mac is significantly more critical than on Windows PC – because of how Apple handles data security and storage. While Windows generally uses software encryption - Modern Mac systems use secure enclave chip and hardware-level encryption. If your files don’t show up on Trash, they are probably permanently deleted or hidden. Here’s what else you can try.
Method 1: Restore From Time Machine Backup
Trash didn’t have your photos? Check the Time Machine backup. If you have created a copy of your files on an external drive, via Time Machine, simply restore from there.
- Click on the Time Machine icon on the top menu. If you don’t see it, search for Time Machine using Spotlight.

- Now connect the external drive (with the Time Machine backup) to your Mac.
- Next, click on the Browse Time Machine Backups options from the drop-down menu.
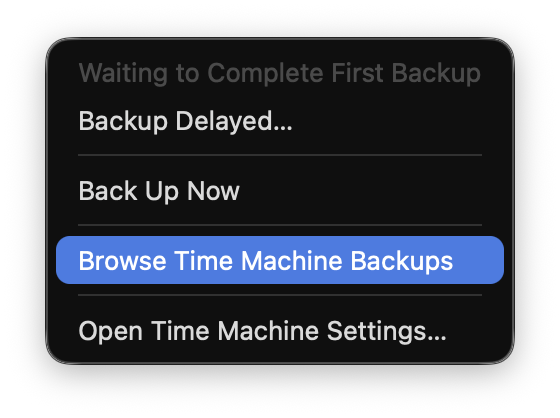
- Use the arrows on right side to find the folder with your photos, select the files, and click Restore.
Haven’t set up Time Machine? No worries, let’s move to another option that might work for you.
Method 2: Restore From iCloud Backup
Another way to recover deleted photos on a Mac is through iCloud. You can simply go to your iCloud and restore images via iCloud backup.
Method 3: Use Mac Photo Recovery Software
While cloud backups help 9 out of 10 times, sometimes a sync failure or an act of permanent deletion from all devices may drive you to look for professional free photo recovery tools. These tools are made to scan your Mac’s storage and bring back deleted files, even if they’ve been deleted from the Trash. Stellar Photo Recovery for Mac tool works best for recovering deleted photos on Mac systems.
- Just download the Stellar Photo Recovery tool and install it on your Mac.
- Open the software and select the type of files you want to recover.
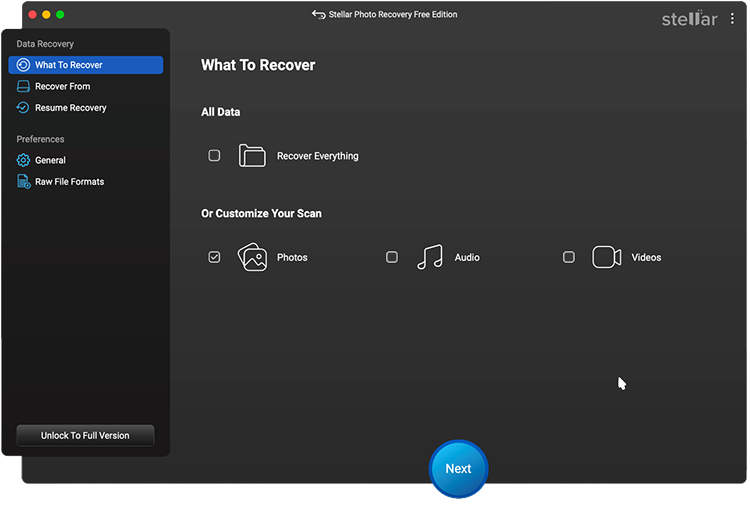
- Next, choose the storage drive where your photos were stored before being deleted.
- Hit the Scan button to search for deleted photos in the drive. You’ll see a list of recoverable photos. Click on any photo to preview it.
- Next, click on “Recover” and save them on your Mac at a different drive.
The free trial of the Stellar photo recovery tool lets you recover 10 deleted files (photos, videos or audio) of 100MB size on your Mac absolutely free of cost.
How to Recover Deleted Photos on Android Phone?
While Android phone users enjoy endless customization options with Android, the downside is the frequent OS glitches, app errors, and virus attacks, accidental deletions. Photos lost due to these reasons sometimes are not even found in the Recycle Bin or Trash apps. Here’s what you can do.
Method 1: From the Cloud (Google Photos)
Almost all Android devices come with pre-installed Google Photos. So, if you’ve enabled backup, you can restore photos from the Google Photos app.
- Open the Google Photos app on your phone.
- First, look for the Trash section inside the collections menu.

- If you find your photos, restore them with one click.
- Also, check the Google Photos app to find your deleted photos.

- If you find them, download them from there to your device.
If you can’t find the photos on Google Photos app, move on to the next method that might help.
Method 2: Recover Deleted Android Photos from Microsoft OneDrive
Some Android phones, especially older Samsung devices sync photos to Microsoft OneDrive. Many users don’t even realize as this happens in the background.
If you’ve ever signed in with a Microsoft account, there’s a good chance your photos were backed up automatically.
- Open the OneDrive app on your phone or log in to OneDrive from a browser.
- Go to the Photos section and check if your deleted images are there.
- Also, if the photos were deleted recently, open the Recycle Bin inside OneDrive.
- Select the photos you need and tap Restore.
If the One Drive does not have the photos or is empty, don’t worry. There’s one another cloud option to check.
Method 3: Recover Deleted Android Photos from Dropbox
Dropbox is also a very popular storage service, with plenty of people using it for their work and/or for backup purposes and/or to share files with other users. If you have ever enabled Camera Uploads in Dropbox then your photos could still be there.
Deleted files are temporarily stored in trash so act fast before it’s too late. After restoring, you can download the photos back to your device.
Method 4: From a Micro SD Card (Android)
If an SD card connected to your Android phone loses photos due to accidental deletion or formatting, or some other file transfer issues, unfortunately, you will not find those files in the Recycle Bin. In that case, you can try recovering them with a free photo recovery software. Stellar photo recovery tool allows you to recover deleted photos from SD Card and external drives.
- First, remove the SD card from your phone, then connect it to a computer. Most modern computers come with SD card connectors, if not, then use an external connector.
- Download and install the Stellar photo recovery tool on your Windows or Mac computer.
- Open the software and select what you want to recover. E.g., Photos.

- Next, select your SD card on which the photos were stored.

- Click Scan to start searching for deleted files from the SD card.
- After the scan, you’ll see a list of recoverable photos from your SD card.
- Click on the files to preview them, and then hit Recover to save them at a desired location on your computer.
You can recover 10files/100MB each for free from an SD card, and upgrade to a paid version for unlimited recovery. If you don’t use an SD card and the photos were stored in your Android phone’s internal storage, there’s still another way to recover deleted Android files.
Method 5: Recover Files Using Free Android Data Recovery Software
The last recovery option on your Android phone is using a specialized free Android data recovery software. Stellar Data Recovery for Android is equipped to recover deleted files from the device’s internal storage and pull out deleted photos.
Ensure that USB debugging is enabled on your Android device before you use this tool to search for your deleted or missing data.
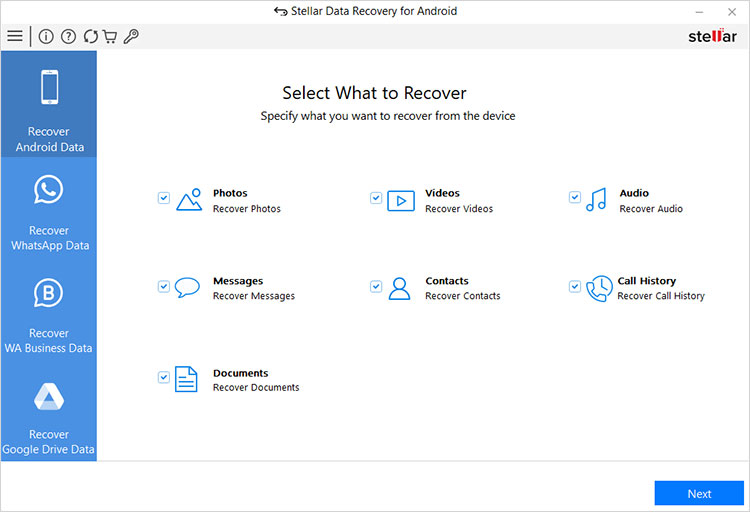
This tool is user friendly and really simple to use. It works great if the deleted data on your phone is not overwritten by new files. It’s capable enough to recover data from broken or damaged Android phone.
The tool works in the similar way to photo recovery tool but offers customized support for Android platform and storage. This tool comes with a free edition allowing free recovery of 10 photo or video files of 10MB each.
How to Recover Deleted Photos on iPhone?
iPhones are best known for their camera capability, most of us rely on iPhone to click professional grade high-quality photos. But what if you accidentally delete or lose your photos on your iPhone?
Don’t worry! Because iPhones also features some built-in safety nets, and there are tools to help recover your deleted iPhone photos. Let’s go over practical ways to recover deleted photos on an iPhone.
Method 1: Trash on iPhone
Like other devices, the first stop for recovering deleted photos on an iPhone is the Bin or Recently Deleted folder. The deleted photos are stored in your Trash for 30 days before being removed from the device.
- Open the Photos app on your iPhone.
- Scroll down and look for the Recently Deleted folder.
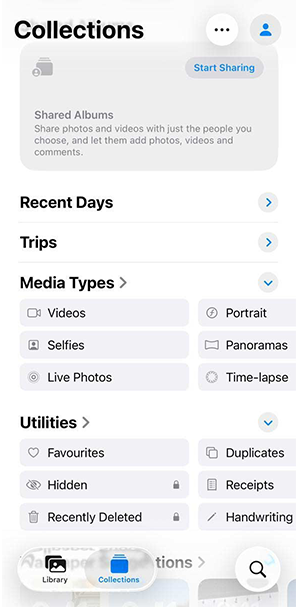
- Unlock it with your passcode or Face ID.
- Check the thumbnails of the deleted photos and restore them back to your device.
If the photos aren’t in the recycle bin, maybe they’ve been deleted for over 30 days now or you accidentally cleared the folder. But don’t worry, you can try other methods of photo recovery.
Method 2: From an iCloud Backup
If your iPhone creates regular backup of photos to iCloud, you might be able to restore them – but that will require you to erase your iPhone. If you have only a few photo files to recover you can check for them in iCloud Photos – and restore them individually. Similarly, if you have created a backup of your device on a Mac via Finder, you can restore the deleted iPhone photos.
- For iCloud restoration – First reset your iPhone and during the new setup – choose restore from iCloud backup.
- If you backed up your photos via Finder on a Mac computer, connect your iPhone to Mac with a cable.
- Open Finder, select your device, and look for the option to restore from a backup.
- Select a backup before the deletion, and follow the prompts to restore.
iCloud restoration will overwrite the data already stored on your iPhone – so only proceed if the photos were really important or else recover from iCloud Photos. Look for other iPhone data recovery options. If you aren’t comfortable with the above method.
Method 3: With an iPhone Data Recovery Tool
If recycle bin or backup didn’t help, you can consider using a free iPhone data recovery tool to recover deleted photos on your iPhone device. Stellar Data Recovery for iPhone is a specialized tool that can scan your iOS device and retrieve deleted files and photos.
The same rule applies everywhere. iPhone data recovery tools can only deliver satisfactory results unless the deleted data has been overwritten. Stellar Data Recovery for iPhone tool is compatible with all iPhone models, latest iOS, and iPadOS.
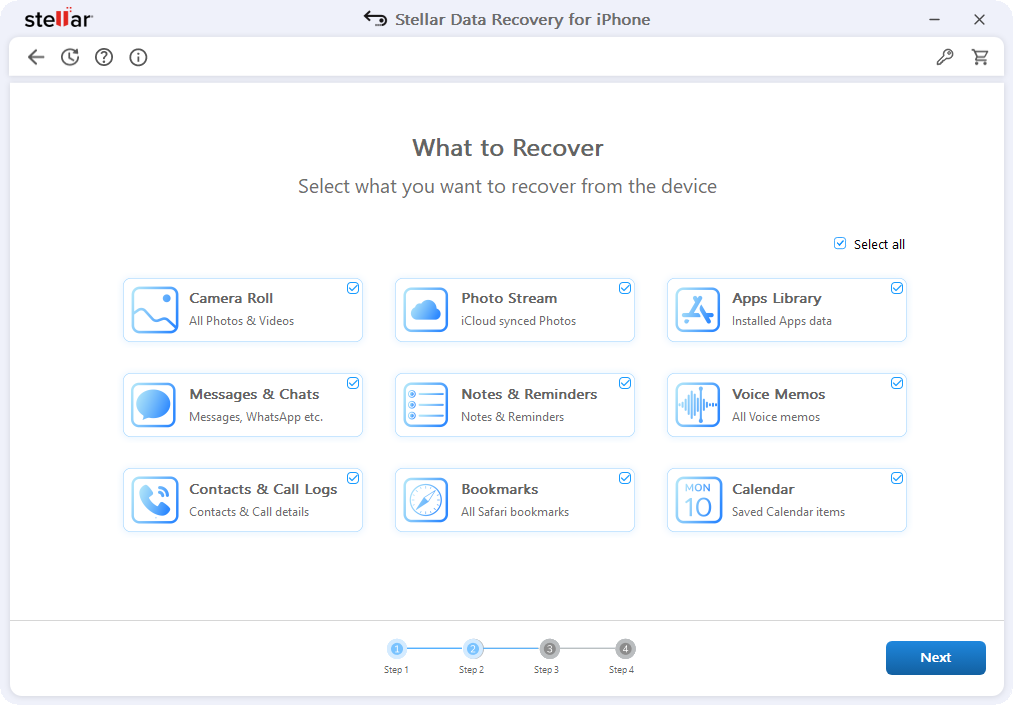
You can download and install it on your Windows and Mac computer. Connect your iPhone to the computer and then follow the simple recovery steps to restore your deleted pictures, even without a backup.
The Windows version of Stellar Data Recovery for iPhone allows you to scan the device for free. Whereas, the mac version of Stellar Data Recovery for iPhone also allows you to save 10 photo or video files with 10MB file size limit for free. For unlimited recovery, you can opt for a paid plan.
Method 4: From an iTunes Backup/Finder Backup
Some users also face errors with iTunes while recovering deleted photos, especially from an older iTunes backup. If you have got an iTunes backup but couldn’t restore it directly from your Windows computer, you can use the iTunes Recovery Module in Stellar Data Recovery for iPhone tool and extract your deleted photos from that backup.
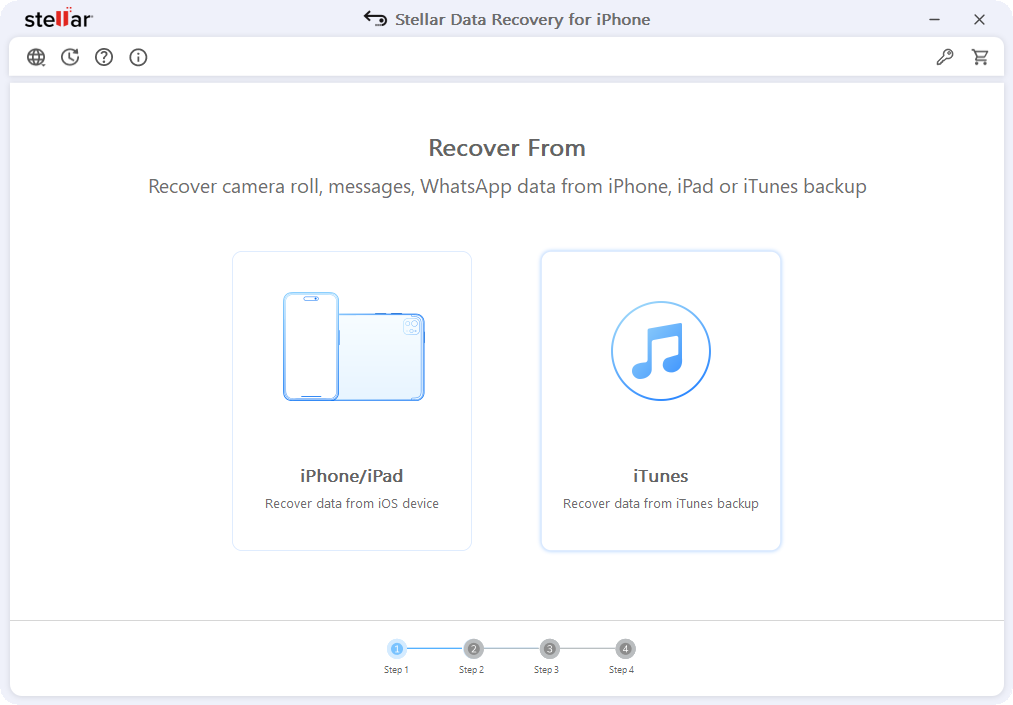
Install the Stellar Data Recovery for iPhone software on the same Windows PC where your iTunes backup lies. Go to the iTunes Recovery module of Stellar Data Recovery for iPhone. The software will search for the locally created iTunes backup on that device. Once found – you can preview and restore the backup at a desired location. If your iTunes backup was encrypted – you will require the encryption key to proceed with restoration.
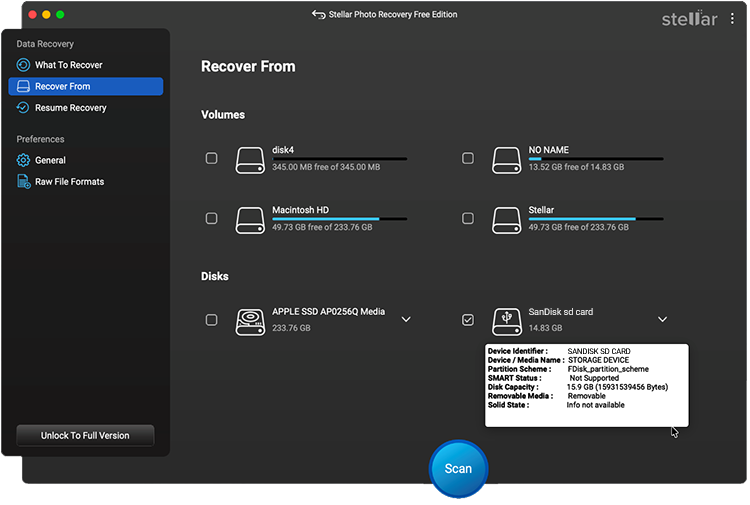
How to Recover Deleted Photos from Camera SD card?
Most digital cameras or DSLRs are dependent on external high- speed compatible SD cards to store clicked photos. However, either due to a glitch, SD card corruption, quick formatting, or accidental deletion, your photos may disappear from SD Card.
Stop using the SD card immediately after you realize your photos are deleted. If you continue taking pictures, the deleted data might get overwritten.
To recover deleted photos from a camera SD card:
Remove the SD card from your DSLR camera and connect it to your Windows or Mac computer, via a connector.
- Next, download and install the Stellar photo recovery tool.
- Open the software and select the types of file you want to recover.

- Now select your SD card in the Select Where to Recover page.
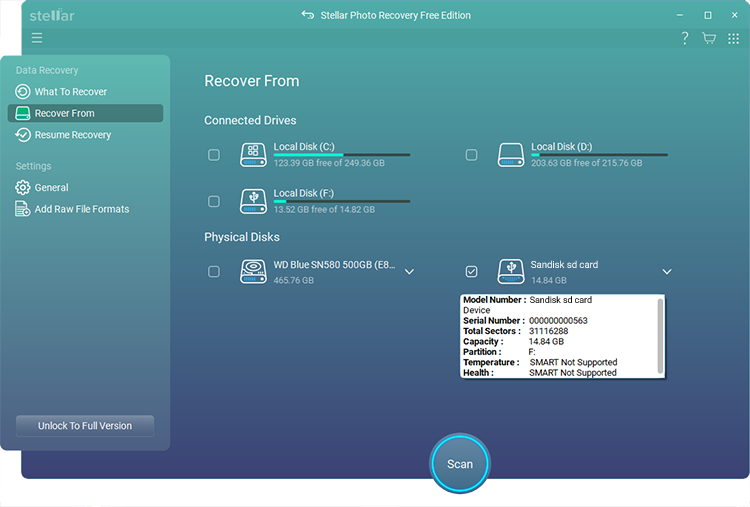
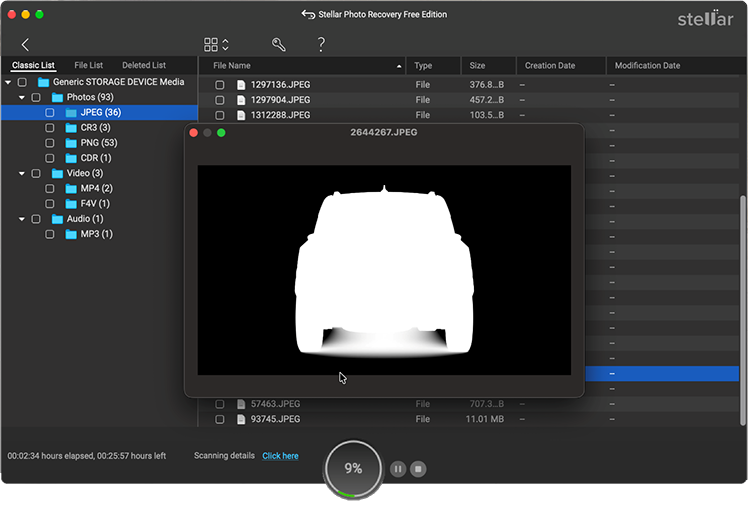
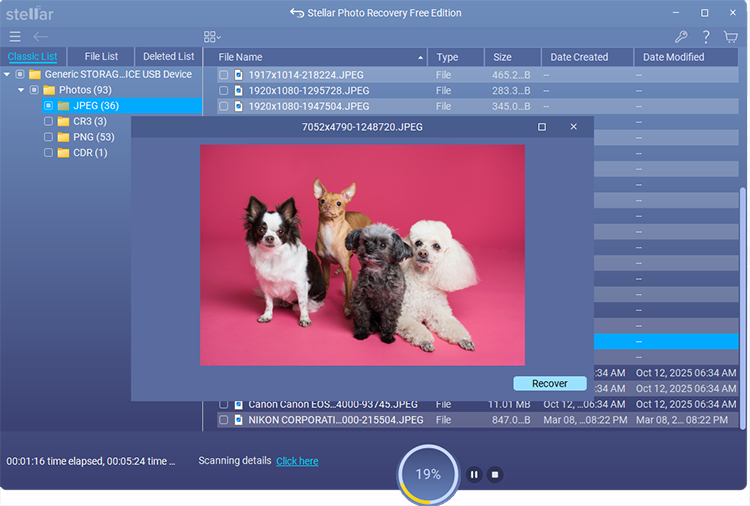
- Next, click on the Scan button to search for deleted or lost photos.
- Once the scan is done, you’ll see a list of recoverable files. Double-click on the photos to preview them.
- Hit Recover to save the photos to your computer.

The tool works with all types of storage memory cards and can even recover deleted files from SanDisk memory card. It’s designed to help even non-tech savvy users. If this method doesn’t work, you might need to consult a professional data recovery service, but software is a great first step for most people.
Why Choose Stellar photo recovery Over Other Recovery Tools?
Undoubtedly, there are several photo recovery tools, but not all are built equal. Each offers different features and serves a different purpose. Among all - Stellar photo recovery stands out because it is built for the specific purpose of recovering photos and videos and supports 100+ RAW Image formats. It stands out when it comes to free recovery of RAW images, previewing files before saving, or handling a wide range of formats.
Here's how Stellar photo recovery compares to the popular photo recovery software:
|
Feature |
Stellar photo recovery |
PhotoRec |
Recuva |
Disk Drill |
EaseUS |
Recoverit |
|
Tailored for Photo Recovery |
Yes |
No |
No |
No |
No |
No |
|
RAW Image Format Support |
200+ formats (CR2, NEF, ARW, etc.) |
Limited |
Limited |
Yes |
Yes |
Yes |
|
Graphical Interface (GUI) |
Yes |
Command-line only |
Yes |
Yes |
Yes |
Yes |
|
Free Preview Before Recovery |
Yes |
No |
No |
Yes |
Yes |
Yes |
|
Free File Recovery |
10 photos/videos/audio (up to 100MB each) |
Fully free |
Fully free |
Only 100MB |
2GB |
500 MB |
|
Deep Scan Mode |
Yes |
No |
Yes |
Yes |
Yes |
Yes |
|
SD Card & External Drive Recovery |
Yes |
Yes |
Yes |
Yes |
Yes |
Yes |
|
Platform |
Windows & Mac |
Windows, Mac & Linux |
Windows only |
Windows & Mac |
Windows & Mac |
Windows & Mac |
|
Ease of Use |
5 |
1 |
2 |
4 |
4 |
4 |
Conclusion
In most of the cases - deleted photos and images can be easily recovered with the help of the right tools and backups - unless they have been overwritten with a new file. You need to act quickly because any delay in recovering the files will only reduce the chances of recovery. Be it your Windows internal storage or an external SD card, a delay may make your files irrecoverable from any of these storage devices.
In case you deleted your photos mistakenly from any device - the recently deleted folder or trash bin is your first barrier between a simple deletion and permanent loss. If the trash can’t recover your files – look for the photos in your cloud backups – if created.
When these in-device recovery is exhausted - we suggest using the Stellar photo recovery tool’s free trial as it maximizes your chances of success. You can download the tool for free and recover any 10 files be it photos, videos and audio files of 100MB each - that’s enough to test the recovery tool’s capabilities and then - if required move ahead with upgrading to a paid plan.


Totan has spent years figuring out how data is lost, and more importantly, how to get it back. He covers file recovery, corrupted media, and SD card fixes across every major platform, writing guides that actually work for real people in a panic.

 9 min read