While most mobile phones lean on internal and cloud storage, SD cards are still the default storage for DSLR and digital cameras, drones, dash cams, or handheld camcorders. These cards have evolved significantly over the years, offering various capacities, speed classes, and bus interfaces.
However, they are prone to damage and corruption, with risks including accidental deletion, formatting, and other errors. If you’re reading this, chances are your photos and videos are deleted from an SD card, and you’re looking for ways to recover them.
Read this article to learn how photos are lost from an SD card, what happens to the deleted photos, how SD card formatting or corruption affects your files, and ways to restore deleted photos and videos from an SD card.
What Leads to Photo Loss on the SD Card?
In some cases, the card may still be detected but the files may be missing or inaccessible; in others, the SD card may stop being recognized altogether. You may face one or more of the following SD memory card data loss scenarios that require a recovery solution:
- Accidental deletion
- Formatting
- Virus or malware infection
- Card damage or corruption
- SD memory card loading errors (e.g., card not detected, card not readable, etc.)
- A broken or scratched SD memory card
- Deleted data overwritten
- SD card self-deleting files
You can try various troubleshooting steps shared in this article to restore deleted pictures on an SD card. However, make sure you stop using the SD card immediately when data loss occurs to avoid overwriting the existing files. Here’s what happens when overwriting strikes.
What Happens to Deleted Photos on SD Card?
When you format an SD card or delete photos in it, you only remove the pointers to their physical locations from the FAT (File Allocation Table) index. This leaves the actual data temporarily intact, but invisible, as the file system has marked that space available for new data.
The deleted data remains there until new files overwrite it permanently. This is why it is advised that you immediately stop using the SD memory card in the event of data loss to avoid overwriting.
Quick Troubleshooting to Fix SD card Photos Not Showing
Sometimes, a temporary glitch can also make your SD card look empty or undetectable. Before you assume that your photos are deleted or lost, apply these DIY troubleshooting steps to fix any SD card accessibility issues.
1. Remove SD card write-protection
Write protection in memory cards don’t allow users to add, delete, or edit photos & files saved on it. In rare cases, a failing or damaged SD card with write protection may also fail to get detected by the device.
- So, first check the lock switch on the side of your SD card.
- Slide it upwards to unlock.
- Now try to access the SD card photos.
2. Reinsert the SD card
If the device doesn’t recognize the SD card, remove it, and ensure it is properly aligned before reinserting into the mobile, camera, tab, or computer. Always insert the memory card gently without forcing it. If you feel an obstruction while inserting the card, ensure that the card is placed properly in the slot.
3. Unhide SD card files and folders
If the removable SD card shows used space but the files are missing when you look inside, most likely the files and folders are hidden.
Steps to unhide the hidden photos from SD card:
- Connect the SD card to PC.
- Go to the Control Panel, click File Explorer Options.
- Click on the View tab.
- Check Show hidden files, folders & drives.
- Click OK.
Photos disappeared or hidden from SD card should be visible now.
4. Restart device if pictures in SD card not showing
If photos on your SD card are not showing on your DSLR camera, Android phone, or computer, restarting the device often helps. Sometimes, background processes create log, cache, and temporary files that can cause system errors. Closing all active programs and rebooting your device clears this unwanted data and may make the pictures & videos on the SD card appear again.
5. Run an antivirus scan on your SD card
The photos in your SD card can get hidden if a virus or malicious program infects the card. In such cases, the removable drive will still show that storage space as occupied in the card, but the actual files and folders won’t be visible. Run an antivirus scan on the SD card first to rule out any virus infection.
6. Access the SD card using a different device
SD card photos may also not be accessible due to a damaged card reader or faulty SD card slot on your device. The easiest fix is to insert the SD memory card into another device, use a different slot on your computer, use a different SD card reader, etc. to see if it shows up.
If the SD memory card works on a different device, your original card reader is likely faulty and needs to be replaced. However, if the SD memory card is not recognized on other devices, the problem is likely with your card itself. You should move directly to corrupted SD card recovery methods.
These troubleshooting fixes can quickly resolve files not found or card not getting detected issues. If you are still facing errors finding your SD card or data, move on to scenario-based SD card photo recovery.
Recovering Deleted Photos from SD card
If you are unable to find your SD card photos even after trying the above troubleshooting steps, your photos are either deleted, or the SD card is formatted or corrupt. To get your photos back, see the recovery roadmap below to find the best method for your specific issue.
| Scenario | Recovery Possible | First Solution | Final Solution |
| Accidental Deletion | Yes | Check Trash folder (Only for Mac) | SD card recovery software |
| Quick Formatting | Yes | Check for Cloud or Local Backups | SD card recovery software |
| Full Formatting | No | Check for Cloud or Local Backups | NA |
| SD Card Damaged | Yes | Run SD card recovery software | Try Professional Data Recovery Services |
| SD Card Corrupt | Partial | Run Windows Error checking tool | Run CHKDSK command |
| SD Card self-deleting Files | Partial | Check for Cloud or Local Backups | SD card recovery software |
| SD Card not Accessible | Yes | Check for Cloud or Local Backups | SD card recovery software |
Cloud or Local Backups created before the files were deleted can help you restore them. But if you don’t have a cloud backup, you can go ahead with any top SD card recovery tool.
Recover SD Card Photos from Cloud/ Local Backup
If you regularly create a backup of your SD card, check your cloud storage or local backups to restore missing photos without using any paid photo recovery software.
Additionally, if you recently imported your photos to a computer, check Windows Backup or macOS Time Machine to see if the files are stored there, and simply re-download them.
To restore lost photos from a cloud backup, log into your backup account via a web browser or app. Go to the media library, and check the “Trash,” “Bin,” or “Recently Deleted” folders.
Most cloud services store deleted files for 30 to 60 days before erasing them permanently. Once you locate the deleted or missing images, select them and click “Restore” or “Download” to save them back to your computer or phone.
Recover Deleted Photos from SD Card Using Professional Software
Stellar Photo Recovery is a reliable photo recovery software that effectively scans the SD card of any capacity and recovers all your deleted photos while securing their original metadata information. It supports SD cards from all major brands, such as SanDisk, Samsung, Transcend, Panasonic, etc.
Lost photos of almost any file size and file format can be effortlessly recovered with Stellar Photo Recovery, provided the data has not been overwritten. Additionally, the software offers a free trial that helps you restore 10 files for free. You can restore photos, videos, and audio files of any format with 3 simple steps — Scan, Recover, and Save. If your deleted image file type is not in the supported format list, the software has a provision to add it.
Here’s the step-by-step method of recovering deleted photos on your SD card using Stellar Photo Recovery:
Step 1: Connect the SD card to the computer via a card reader.
Step 2: Download Stellar Photo Recovery Software on your PC / Mac.
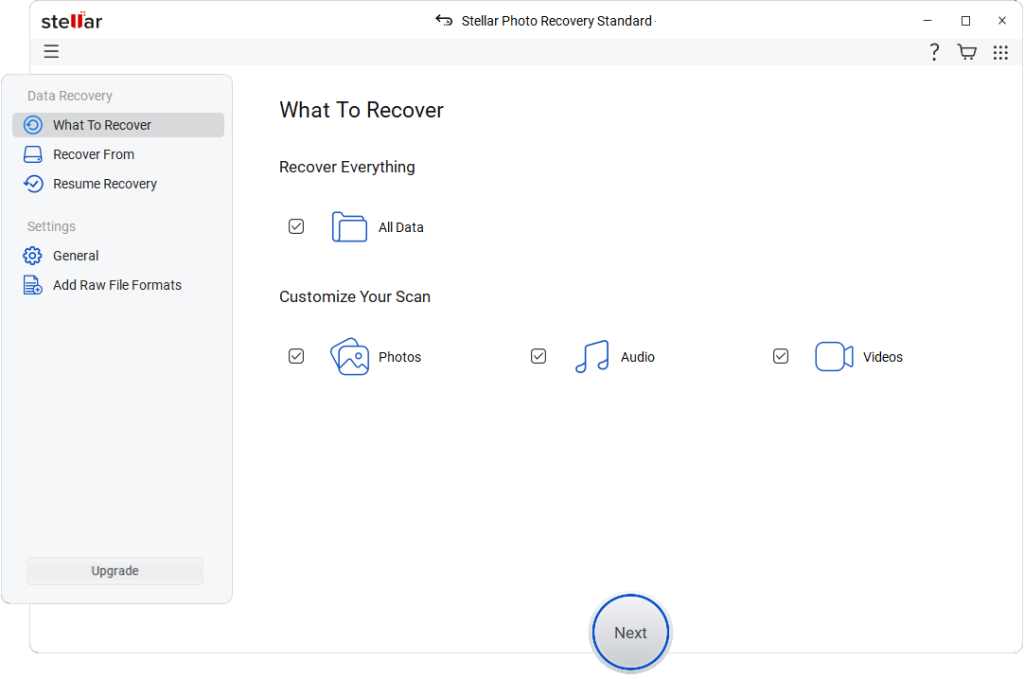
Step 3: On the home screen of Stellar Photo Recovery software, choose the File type to Scan.
Step 4: After selecting the drive location, click Scan to start searching for deleted images. Once the scanning is completed, you’ll be able to see all the existing as well as deleted photos on the drive. You can preview recoverable files on the right side of the window.
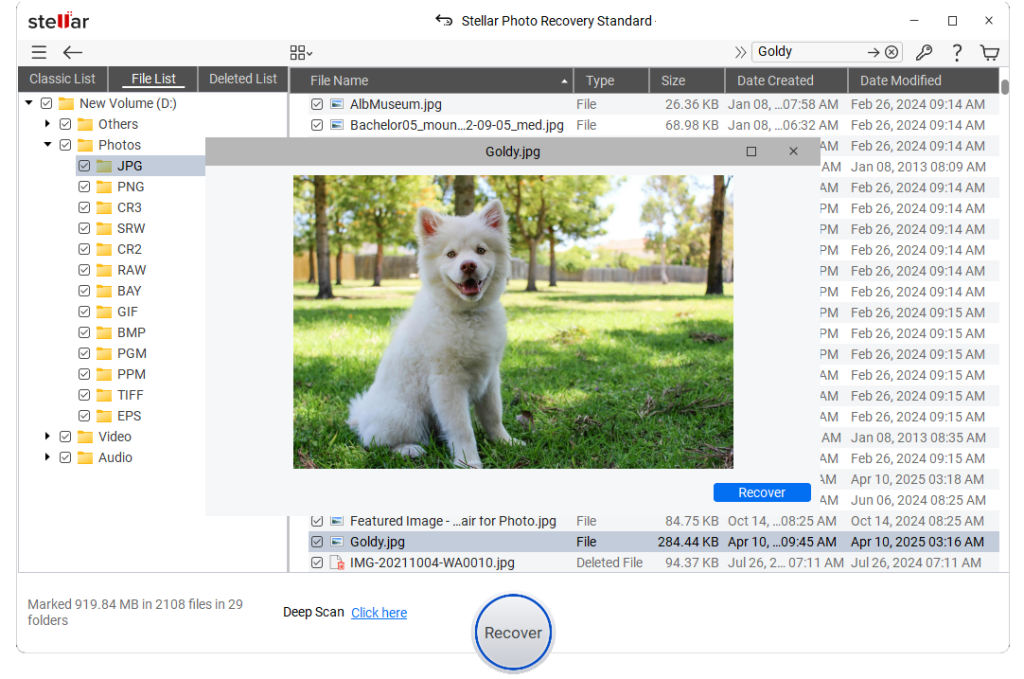
Step 5: Click Recover.
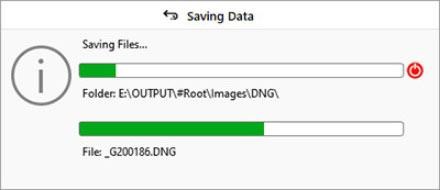
Step 6: In the dialog box, click Browse and select a location to save the recovered photos.
Recover Deleted SD card Photos from Trash (Only for Mac)
Recovering deleted photos from SD Card on Mac is easy. If you accidentally deleted photos from your SD memory card connected to your Mac, you’ll find the deleted photos in the Trash folder. However, the deleted folders only show up when your card is still connected with the system. So, if you are using a Mac, do not eject the SD card before checking the Trash folder.
Open the Trash Bin folder on your Mac. Look for your deleted photos. If you find them, right-click on the files and hit Put Back. Your photos will be restored to their original location.
How to Fix Minor Corruption in SD card and Restore Photos?
When an SD card suffers minor corruption, you won’t be able to view your files stored in it. This usually means the file allocation system has glitched, but your physical photos and videos are still safe. To rescue your data without causing further damage, extract and back up your files first with a photo recovery software. Then with the help of built-in Windows utility tools and system repair functions, you can proceed to fixing SD card errors.
Assign a New Drive Letter to the SD Card
Every SD memory card has a drive letter assigned to it. When you connect the SD memory card to a computer, the drive letter appears under available storage. If your computer recognizes the SD card but cannot access it, you should try assigning a new drive letter to it. Many users have reported that changing the drive letter made their SD card accessible. Below are the steps to assign a new driver letter to an SD memory card on Windows 10/11.
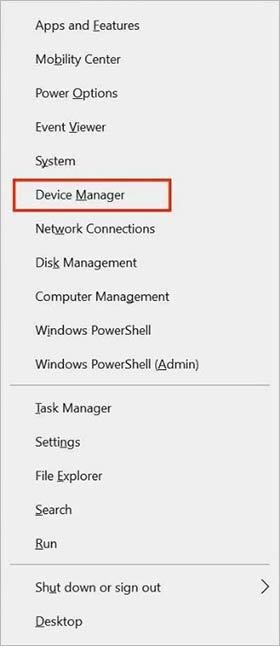
Step 1: Press the Win + X keys on your keyboard to open the WinX menu.
Step 2: From the menu options, select Disk Management. A list of all the internal and connected drives will be displayed.
Step 3: Select your SD memory card and right-click on it.
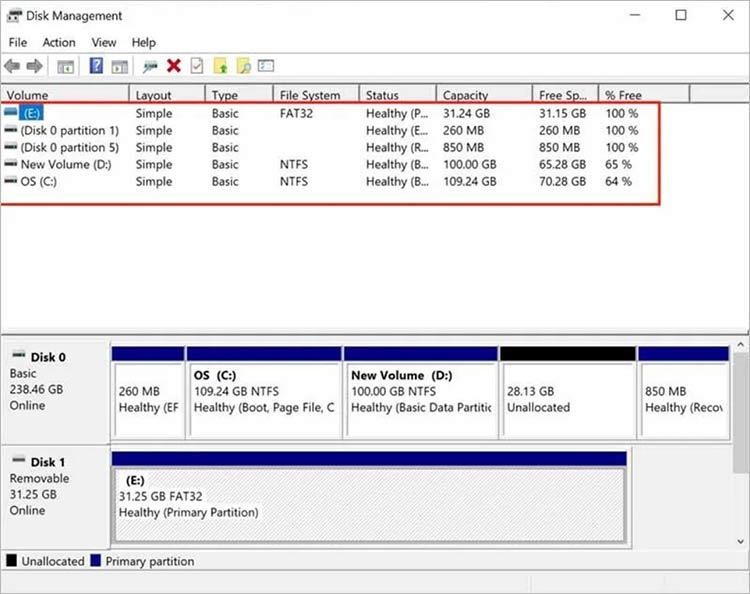
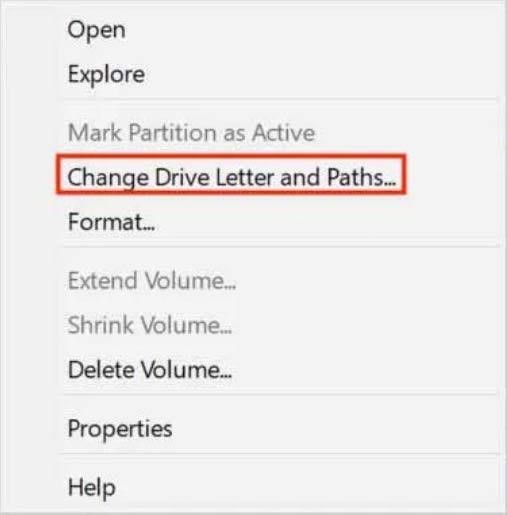
Step 4: Select Change Drive Letter and Paths.
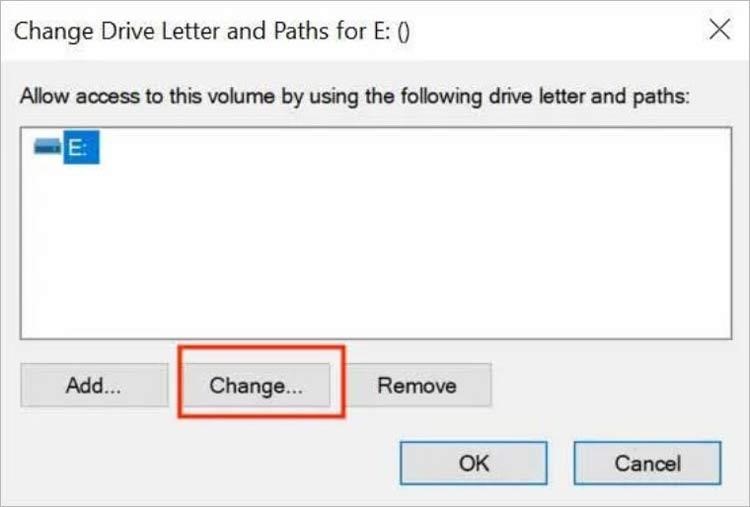
Step 5: On the next screen, click Change.
Step 6: Now, tap the drop-down menu icon next to Assign the following drive letter option.
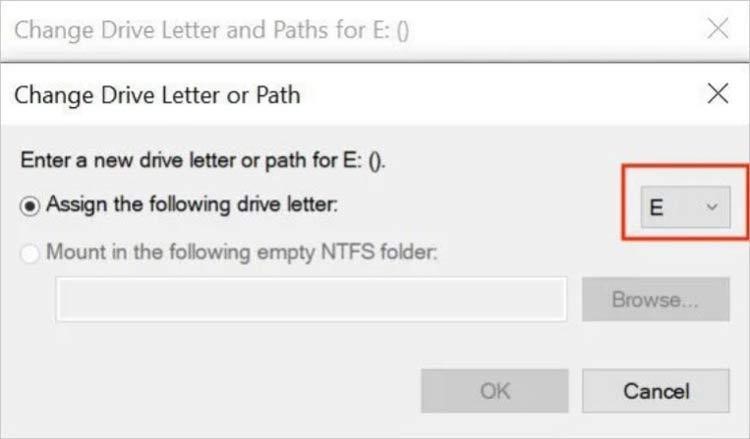
Step 7: Select a new drive letter of your choice from the list and tap OK.
Step 8: You may get a warning saying some programs that rely on drive letters might not run correctly. Click on Yes to give the confirmation.
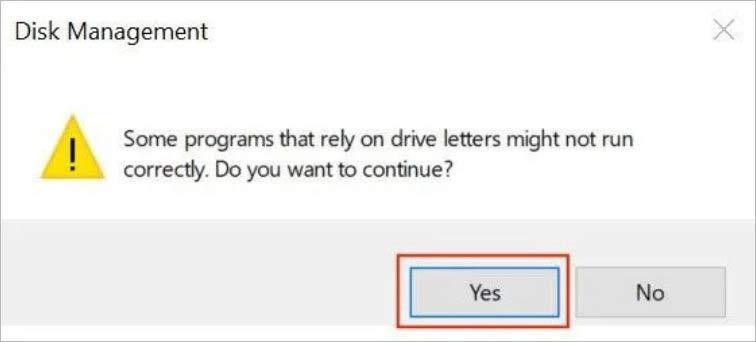
Once you confirm, the system will assign the selected letter to your SD memory card. The new letter will start appearing everywhere, and now, your SD memory card will become accessible.
Fix File Attributes to Unhide Hidden Files
Each file on your SD memory card has various attributes. These attributes define how a file will be displayed or manipulated. You may lose access to your files when the file attributes go wrong. Even the files may get hidden. Thankfully, it is possible to fix file attributes with a single command. This command can unhide the hidden files as well. Follow the below steps to fix file attributes on a Windows PC:
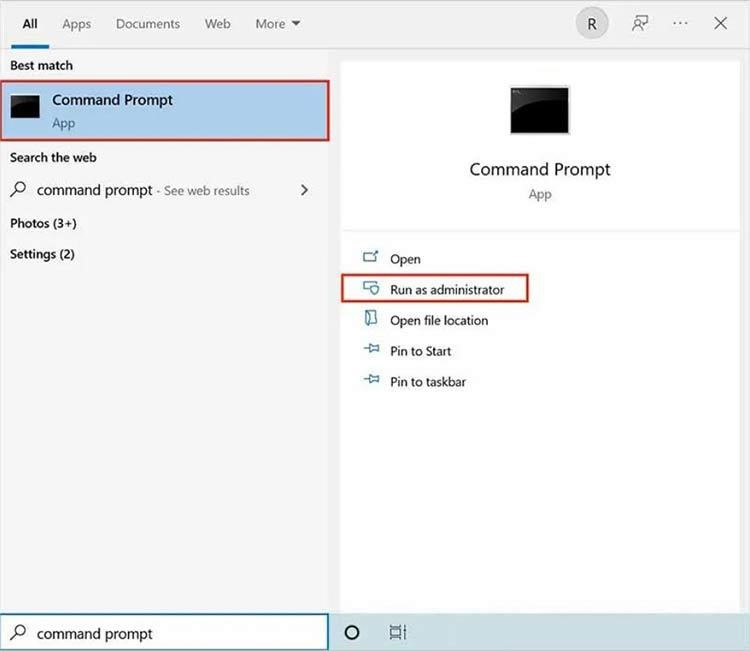
Step 1: Type Command Prompt in the Windows Search bar.
Step 2: Command Prompt will appear as the best match. On the right side, click on Run as administrator to run the Command Prompt with administrative rights.
Step 3: In the Command Prompt, enter the following commands and hit Enter: ATTRIB -H -R -S /S /D X:*.* Replace X with the drive letter assigned to your SD card.
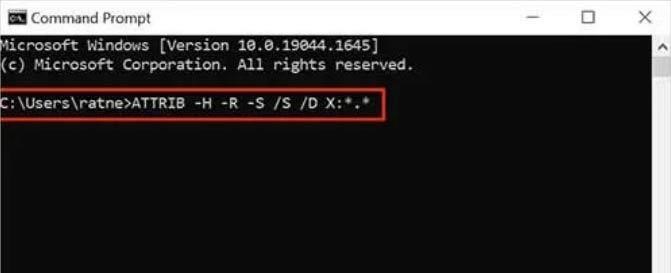
Running the above commands will fix the file attributes and unhide hidden files.
Note: Running this command on the wrong drive can also hide or alter files on that drive, so confirm the letter in File Explorer first.
Run Windows Error Checking Tool
Windows PCs come with a built-in error-checking tool. The tool checks for file system errors on a connected drive. If an SD memory card has file system errors, the tool immediately scans the errors and notifies. You can run this tool on your PC to see if your SD memory card has a file system error. Below are the steps.
Step 1: Launch File Explorer on your PC.
Step 2: In the left sidebar, click on This PC.
Step 3: The connected SD memory card will appear Under Devices and drives. Right-click on your SD memory card.
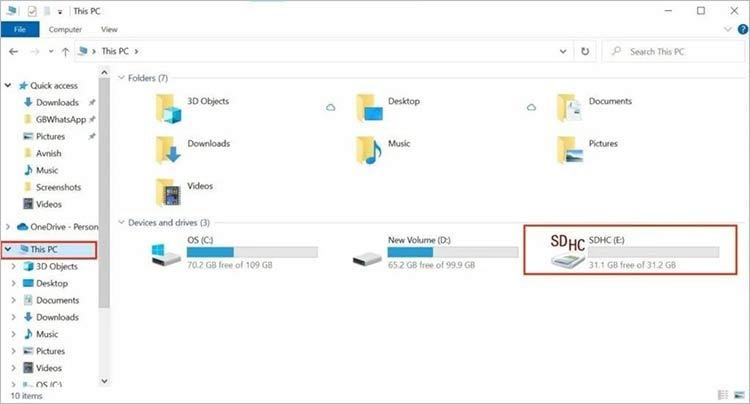
Step 4: From the menu options, click on Properties.
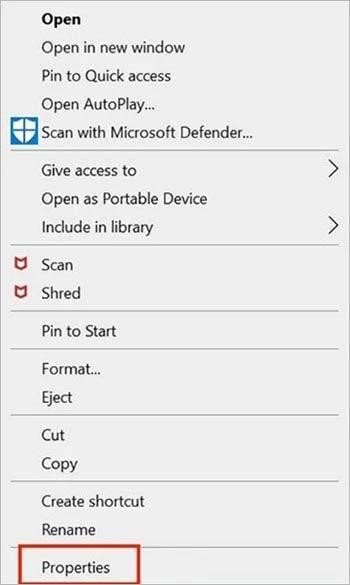
Step 5: In Properties, by default, you should land in the General tab. Switch to the Tools tab.
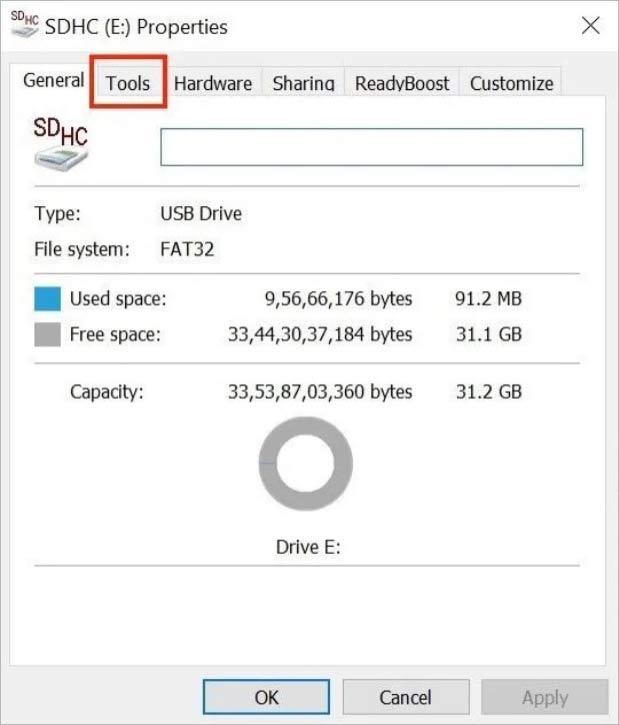
Step 6: In the Tools tab, you will find an Error checking section. Under Error checking, tap on the Check button.
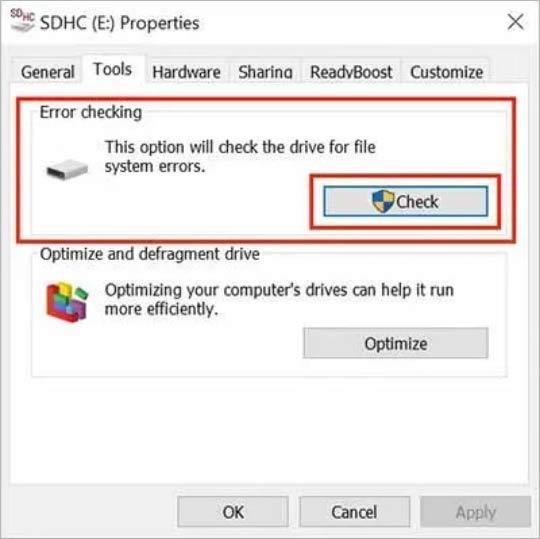
Step 7: The system will show if there’s an existing error on the SD memory card. If it doesn’t, click the Scan and repair drive option.
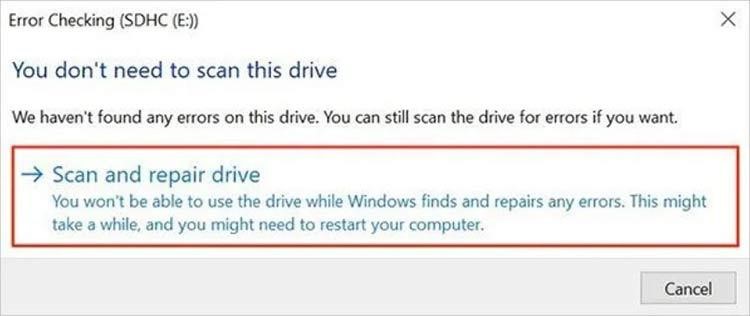
Now Windows will find and repair the errors on your SD memory card. In the meantime, the SD card will be unavailable for use. Depending on the size of your SD card, the process will take some time to complete. You might also need to restart your computer.
Scan the SD Card Using CHKDSK
If the Windows Error checking tool didn’t show any errors, there is yet another tool you can use to scan your SD memory card for errors. The tool is called CHKDSK and is available on most Windows PCs. It is more like an error checking tool, but instead of a graphical user interface,
CHKDSK works through Command Prompt. You can use it to recover data from an SD memory card with a single command.
The best part of CHKDSK is that it checks both logical and physical errors on a drive. Below are the steps to scan your SD memory card using CHKDSK.
Step 1: Type Command Prompt in the Windows Search bar.
Step 2: In the search results, Command Prompt will appear as the Best match. On the right side, click on Run as administrator.
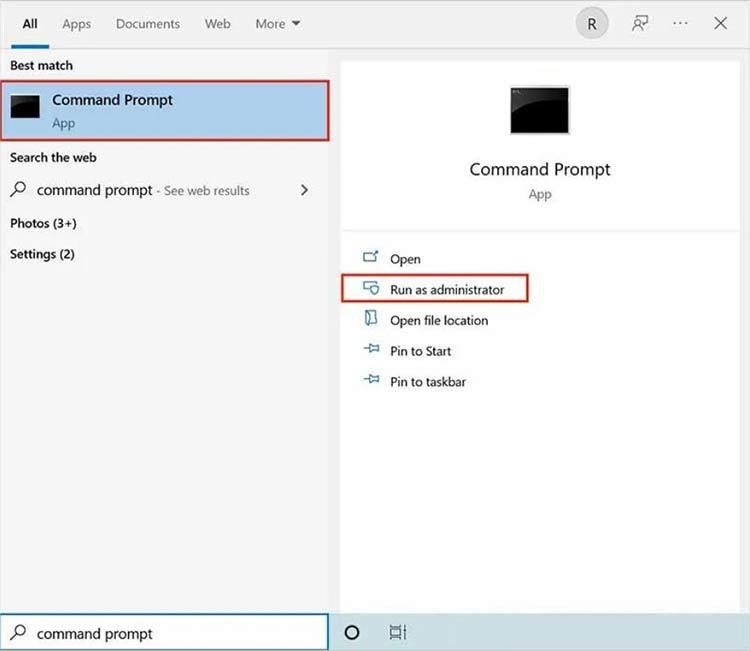
Step 3: In the Command Prompt, enter chkdsk X: /r command and hit Enter. (Make sure to replace X with the name assigned to your SD memory card).
Now the system will start scanning the SD memory card. Wait for the process to complete.
Note: CHKDSK can often rewrite data on damaged sectors, so recover your photos with a data recovery tool first if the card is already corrupt.
Update the SD Card Drivers
Like every other program and connected device, an SD memory card requires drivers to communicate with the operating system. Although drivers get updated with the Windows updates, you might not get updates for the SD memory card drivers as they are not always connected. So when you face an error on your SD memory card, you should update their drivers.
Step 1: Press the Win + X key on your keyboard to open the WinX menu.
Step 2: From the menu options, select Device Manager.
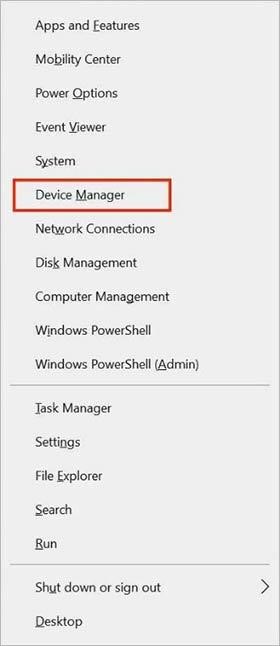
Step 3: In the Device Manager, expand the Portable Devices section.
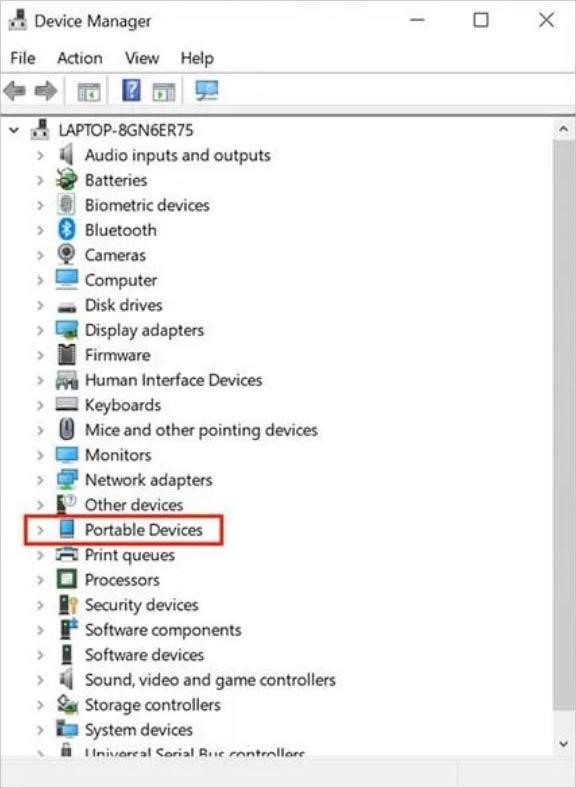
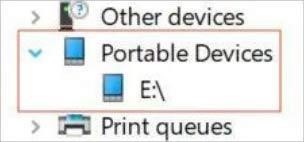
Step 4: You will see your SD memory card here. Right-click on it.
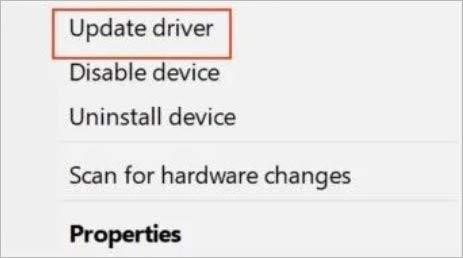
Step 5: A context menu will appear on the screen. From the menu options, click on Update driver.
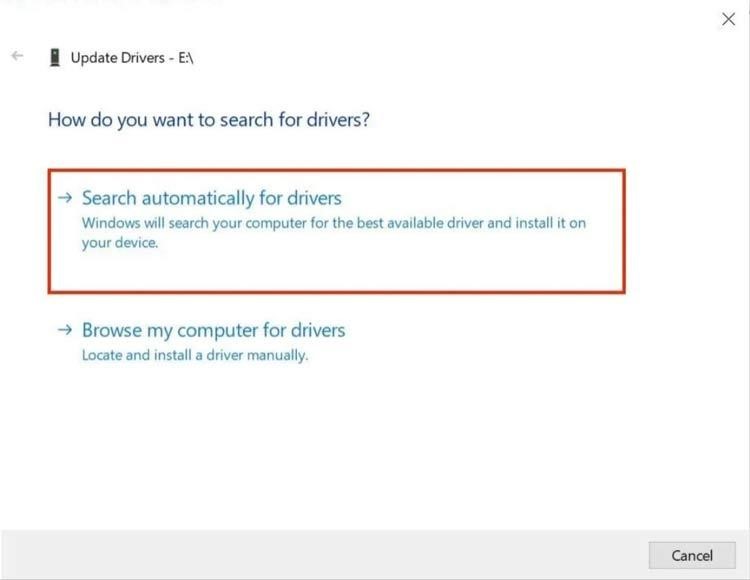
Step 6: Now, the system will ask “How do you want to search for drivers?”
Select Search automatically for drivers.
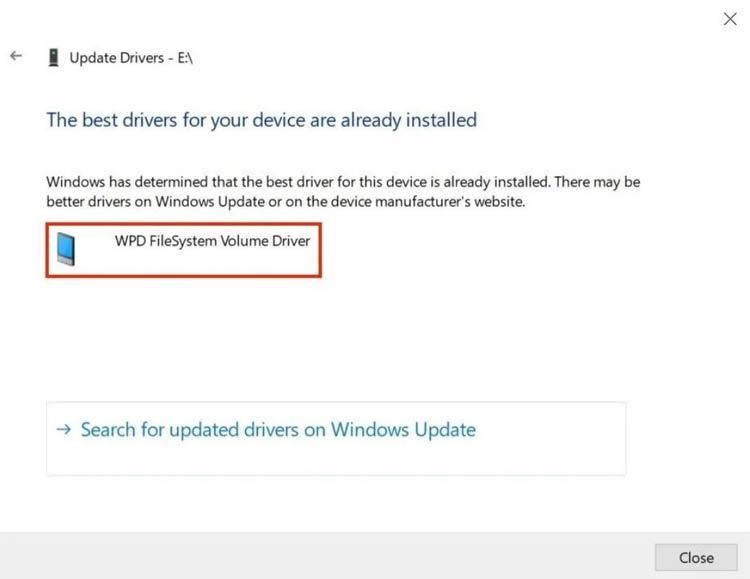
Step 7: The system will start searching for updates. If a driver update is available, download and install it.
Reinstall the SD Card Drivers
If updating the SD memory card drivers didn’t help, you should reinstall them. Reinstalling the drivers will ensure that you’ll get their latest version. This should allow you to access the contents of your SD memory card.
Step 1: Press the Win+X keyboard shortcut to open the WinX menu.
Step 2: From the WinX Menu, select Device Manager.
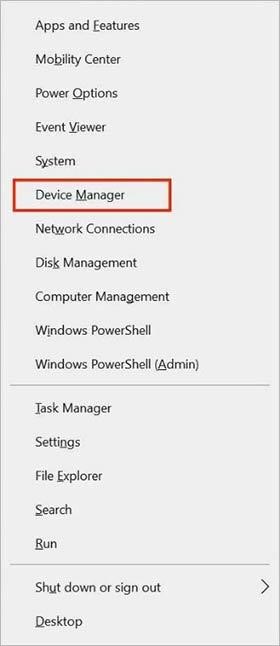
Step 3: Once the Device Manager opens, expand the Portable Devices section.
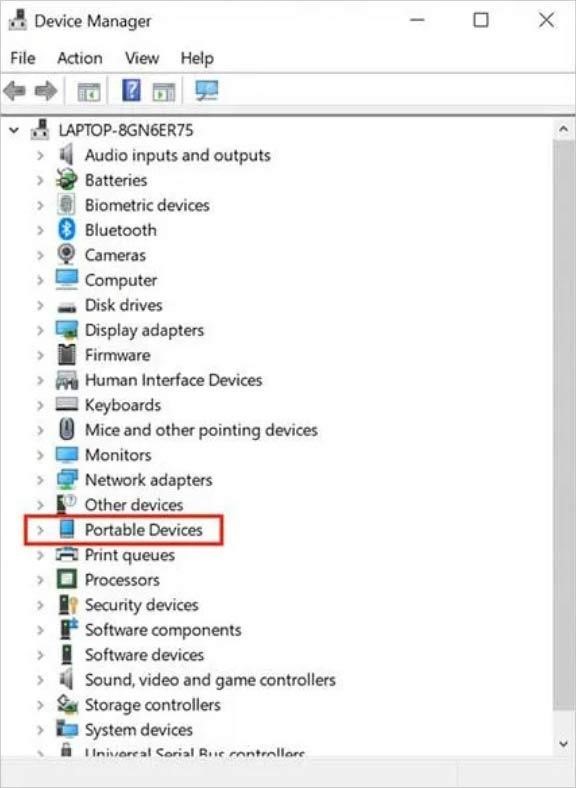
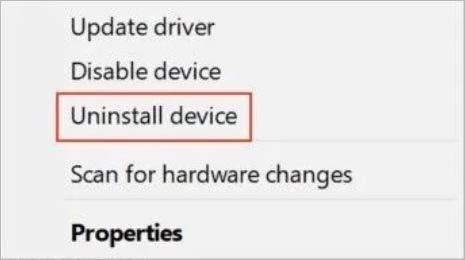
Step 4: Right-click on your SD memory card, and from the context menu, select Uninstall device.
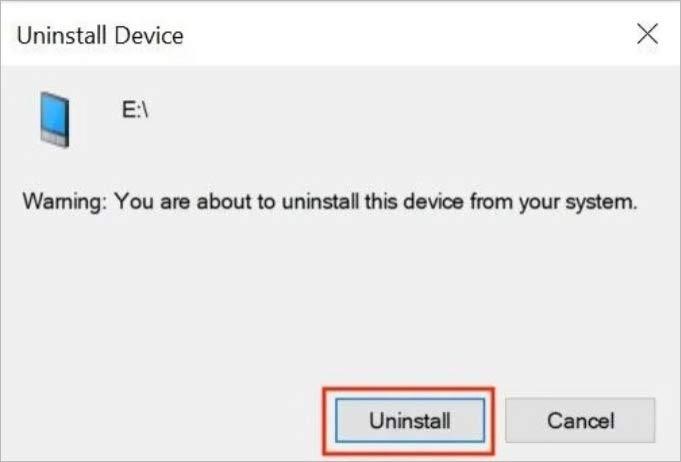
Step 5: A confirmation pop-up will appear on the screen. Click on Uninstall.
Step 6: Next, remove the SD memory card from your computer.
Step 7: Finally, restart your computer and reinsert the SD memory card.
The system will automatically install the required drivers for the SD memory card to run.
Bottom Line
If your photos are missing, stop using the SD card immediately to eliminate the risk of overwriting the deleted data. First, check available backups and try basic troubleshooting methods shared above. If the photos remain inaccessible or the card is corrupted, use reliable photo recovery software to recover your files before attempting repairs that could modify the card.
For physically damaged SD cards or cards that are not detected by any device, avoid repeated attempts to access or repair them, as this may make recovery more difficult. In such cases, professional data recovery services may be a safer option.
With the right approach and prompt action, you may be able to recover deleted or inaccessible photos from an SD card without losing them permanently.