While exploring this topic, we found that the query “Recover RAW files from SD card” can mean two different situations. Either your SD card itself shows up as “RAW” and Windows wants to format it, or your camera’s RAW photos, like CR2, NEF, ARW, or DNG, are missing. The fix is different for each, so the first step is figuring out which one you actually have. We resolve both of these issues with step-by-step fixes.
Which “RAW” Problem Do You Have?
Before you try anything, work out which situation matches your card.
Your card asks to be formatted, or shows as RAW in Disk Management: this is a file system problem. Jump to Section A.
Your card opens fine, but some CR2, NEF, ARW, or DNG photos are missing: this is a deleted file problem. Jump to Section B.
These two problems share the word RAW, but they need different fixes. Formatting a card when your photos are simply deleted, or trying to “recover” a file system error the way you’d recover a deleted photo, can make things harder than they need to be.
The same rule applies to both these situations. Immediately stop using the card.
- Don’t save any new file to your SD card.
- Don’t run chkdsk on it. Windows’ built-in repair tool can overwrite the data you’re trying to recover.
- Don’t format it, even if your computer keeps asking. Formatting rewrites the card’s index and can make deleted or inaccessible files harder to get back.
- Slide the lock switch on the SD card to block accidental writes.
- Use a card reader instead of connecting your camera directly, for a direct view of the storage, while some cameras behave unpredictably over USB.
- If your computer offers to “repair” or “format” the card in a pop-up, decline it and close the prompt.
The safest approach is to touch the card as little as possible until you have a full copy of it, which is Section A’s first step.
Section A: Recover Files from a RAW (Unreadable) SD Card
Why an SD Card Turns RAW
An SD card becomes RAW when something interrupts how the card communicates to your computer, and Windows loses track of the card’s file system. Common causes include:
- An interrupted write – pulling the card out mid-transfer, which damages the card’s file index.
- Unsafe removal, ejecting the card without using “Safely Remove Hardware,” which can break the link between files and where they’re stored.
- Power loss during a transfer, on either the camera or the computer side.
- Malware or a corrupted driver altering the card’s directory information.
- Switching a card between different camera models, or between a camera and a computer repeatedly, which sometimes triggers format errors.
- Physical damage: Dropping or exposing to dirt, moisture, or heat can damage the SD Card
Whatever the cause, the fix follows the same order: recover first, repair second.
Step By Step Recovery of Data from a RAW SD Card
Step 1: First Create a Byte-Level Disk Image or Clone Disk
Before running any recovery software, make an exact copy of the card. This is called a disk image or a disk clone, a byte-level clone of everything on the card, including both the readable sectors and the damaged ones.
A failing SD card has only a limited number of read attempts left before the damage gets worse. If you recover directly from the failing card and something interrupts the process, like the card disconnecting or your computer freezing, you may lose your only chance.
Working from a disk image or a clone disk means you can retry recovery as many times as needed; it’s a copy of the original disk that can’t get any more damaged.
Step 2: Recover Files with Recovery Software
If you’d rather work directly from the card and accept the small added risk, the next step is running photo recovery software.
Stellar Photo Recovery is built to handle photo and RAW files specifically, and it can scan a RAW SD card, which lines up directly with the safety step above.
A few features matter specifically for RAW recovery. Deep Scan searches sector by sector using file signatures, which is what lets the software rebuild CR2, NEF, ARW, and DNG files even when the card’s folder structure is gone.
Before saving anything, the software previews recoverable RAW photos so you can confirm a file is intact rather than guessing. And if a scan gets interrupted on a large or failing card, you can save the scan session and resume it later instead of starting over from zero.
| “A RAW-flagged card usually still has its file table somewhere on the storage. Signature-based scanning does not rely on that table at all, it reads the raw sectors directly and looks for the byte patterns that mark the start of a CR2, NEF, or DNG file. That is why RAW recovery can work even on a card Windows insists is unreadable.” – Santosh Kumar, Senior Software Architect, Stellar Data Recovery |
- Install Stellar Photo Recovery on your computer.
- Connect your card reader, with the card in it, or point the software at your disk image file.
- Select the card or image as the source, then start a scan.
- Let the scan finish. RAW file system scans usually take longer than a standard deleted-file scan, since the software has to rebuild the file structure from scratch.
- Preview the recovered photos, then save them to a different drive, never back onto the same card.
For first-time users, Stellar Photo Recovery recovers 10 files for free, up to 100MB each.
Step 3: After Recovery Try to Repair the Card
Once your files are safely copied elsewhere, you can try to bring the card itself back to a usable state.
- Open Command Prompt as an administrator.
- Type chkdsk X: /f (replace X with your card’s drive letter) and press Enter.
- If chkdsk fixes the card, it will show up as its normal file system again.
Note: If it doesn’t, reformat the card: right-click it in File Explorer, select Format, and choose FAT32 for cards under 32GB or exFAT for larger ones. It’s worth nothing that, certain older camera models may also not support exFAT at all regardless of card size.
Test the card in your camera before relying on it for a shoot. If it turns RAW again quickly, discard it. A card that keeps failing is a hardware problem, not something a repair can fix.
Free/Open-Source Alternative: TestDisk & PhotoRec
If you’d rather not use paid software, TestDisk (for fixing the file system) and PhotoRec (for recovering files) are two free, open-source tools built for exactly this kind of problem.
Both tools work entirely through a command-line based menu, with no graphical interface. TestDisk in particular expects you to recognize terms like partition table and boot sector, and picking the wrong menu option can make things worse instead of better.
If you’re comfortable following detailed instructions exactly, they’re very capable tools. If you’d rather not risk a mistake on the only copy of your photos, software with a visual interface, like Stellar Photo Recovery, is the safer choice.
Section B: Recover Deleted RAW Photos (CR2, NEF, ARW, DNG)
What’s RAW Photos and Camera Specific RAW Formats
A RAW file preserves all the uncompressed data captured by the camera across a high bit depth (typically 12 to 14 bits) to provide maximum dynamic range for editing of highlights, shadows, and white balance.
RAW files are larger than standard JPEGs, and require mandatory post-processing to convert them into shareable formats. If your card is readable but a batch of RAW camera photos is missing, this section is for you. Camera RAW files aren’t universal. Each manufacturer uses its own RAW format:
| Format | Brand | Notes |
| CR2 / CR3 | Canon | Canon’s RAW format, storing up to 14 bits of color data per channel versus JPEG’s 8-bit, which is why RAW files hold more detail. |
| NEF | Nikon | Usually stores a small preview JPEG inside the same file. |
| ARW | Sony | Sony’s RAW format across its Alpha camera line. |
| DNG | Adobe / DJI / Leica/ Apple | An open format, meaning it isn’t tied to one manufacturer. Apple, Samsung and most Android devices also use it. |
| ORF / RAF / RW2 | Olympus / Fujifilm / Panasonic | High-end camera formats offering rich, cinematic colors and massive editing flexibility without compromising quality. |
Knowing your format matters because recovery software needs to recognize a file’s signature to rebuild it correctly. Most modern recovery tools, including Stellar Photo Recovery, support all of the formats above.
Can Deleted RAW Photos Be Recovered?
In most cases, yes. When you delete a photo, or even format the card, the card doesn’t erase the photo data right away. It just marks that storage space as available to reuse. The file stays fully intact until something new gets written over it.
This is why the earlier advice to stop using the card matters here too. A deleted NEF file from this morning has a good chance of coming back if you haven’t shot anything since. That same file has a much lower chance if you’ve since filled the card with a full day’s shoot.
Step-by-Step Recovery of RAW Photos
First, stop shooting on the card as soon as you notice files are missing.
- Connect the card to your computer using a card reader.
- Run the tool and choose photos, or select “All Data” if you’re also missing other file types, like video.
- Now, select your SD card as the scan location.
- Run the scan and let it finish. The software will show a thumbnail for photos.
- Select the files you need and save them to your computer or another drive, not back to the SD card.
There’s an additional option to choose or add the RAW file type in Stellar Photo Recovery tool.
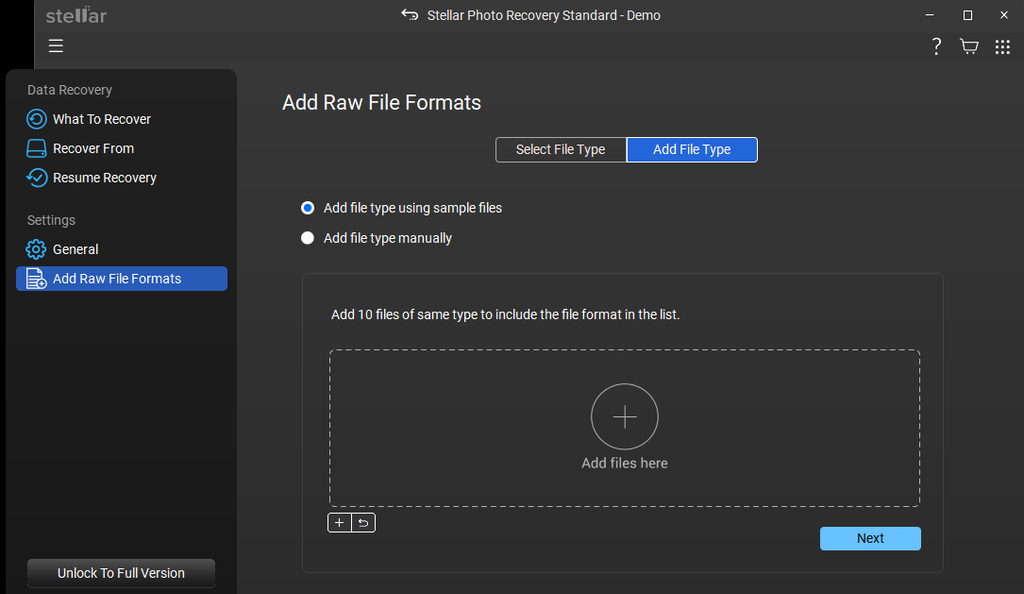
It helps find the deleted RAW files faster, since the software searches using the specific signatures unique to each RAW format instead of scanning for every file type at once.
| “Every RAW format, CR2, NEF, ARW, whichever brand you shoot, has its own signature at the start of the file. When you direct the scanner specifically at RAW and photo formats, it skips over everything that clearly is not one of those signatures. On a large card that can cut scan time meaningfully, it also cuts down on the false positives, you would otherwise have to sort through afterward.” – Santosh Kumar, Senior Software Architect, Stellar Data Recovery |
Recovering After an In-Camera Format
Formatting a card from inside your camera’s menu feels easier than deleting individual photos, but it works the same way underneath. An in-camera format clears the card’s index so it looks empty, but it doesn’t erase the actual photo data right away.
The steps are the same as above: connect it to a computer, and run a full scan with Stellar Photo Recovery software.
Recovered RAW Files Won’t Open? Here’s What to Do
This part trips a lot of people up, so it’s worth covering on its own. Sometimes, recovery software brings a RAW file back, but when you open it in Lightroom, Photoshop, or even your camera’s own software, it won’t load, or it opens as a gray box with no image.
This usually means the file was recovered, but its data is corrupted or incomplete, often because the file was partially overwritten before recovery, or because a full format rewrote more of the card than a quick format would have.
Here’s a detail most guides skip: RAW formats like NEF and DNG don’t only store sensor data, they also embed one or more JPEG previews inside the same file, usually a small thumbnail and a larger, near full-size preview meant for quick viewing in photo software. If the RAW data itself is too damaged to open, that embedded JPEG is sometimes still intact and extractable, giving you a usable image even when the full RAW file is a lost cause.
If the embedded preview is also damaged, a dedicated file repair tool built for photo files, rather than a general recovery scan, is the next step. These tools rebuild a file’s internal structure using a healthy reference file from the same camera model, instead of simply pulling raw data off the card.
What Not to Do
- Only format the card after all files have been recovered.
- Don’t run chkdsk on a card with deleted or RAW-flagged data you still need. Save that step for after recovery.
- Don’t recover files back onto the same card. Save them to your computer or a different drive.
- Never use your camera as a card reader for recovery. Connect the card directly through a reader instead.
- Avoid shooting on a problematic card or using it for tests.
How to Prevent SD Cards from Going RAW
- Always use “Safely Remove Hardware” (or your OS’s equivalent) before pulling the card out.
- Format new cards in-camera before their first use, rather than relying on how they arrive from the factory.
- Avoid letting your camera’s battery die mid-write. A photo write that gets cut off is one of the more common causes of a RAW error.
- Buy cards from established brands. Counterfeit or off-brand cards fail more often, and more unpredictably.
- Retire a card once it starts showing warning signs, like slow writes or occasional read errors, rather than waiting for it to fail completely.
FAQs