Summary: The Hypervisor error is an annoying issue, affecting a lot of Windows 11 users trying to run virtual machines on their computers. This article will discuss the causes behind this issue and methods to fix it. We shall also be looking at a complete data recovery solution for recovering data from a corrupted virtual machine image.


Contents
The Hypervisor is Microsoft?s in house technology that enables users to run virtual machines on their systems. This versatile technology is used by many application developers and advanced users to create and manage virtual machines easily. But like any other piece of code, this too has its flaws. Many users have recently reported encountering the Hypervisor error BSoD on their Windows 11 systems. Let?s look at this issue in detail.
What is the Hypervisor Error?
The Hypervisor error is a BSoD associated with Windows virtual machine platform. This error screen is generated when the Hypervisor stops working or crashes with a stop code HYPERVISOR_ERROR, having a bug check value of 0x00020001. This can happen due to outdated or incompatible device drivers, bad drive sectors, corrupted virtual machine image files, and more. It can also affect users using Windows Sandbox or any other third party virtual machine software. Let?s look at the causes behind the occurrence of this error screen in more detail.
What Causes the Hypervisor Error in Windows 11?
- Outdated device drivers/windows OS
- Bad drive sectors
- Corrupted system files
- Incorrect/conflicting settings
What are the Methods to Fix the Hypervisor Error?
Now that we know about the causes behind the Hypervisor error blue screen, let?s dive deeper and learn the methods to fix it. But before moving forward, do the following ?
- Reinstall Hyper-V from Windows features.
- Update BIOS
- Run Windows Driver Verifier
Method 1: Check if Your System Supports Virtualization
This is a basic check to see if your Windows 11 system supports virtualization. This is an easy way to fix the hypervisor error BSoD in Windows 11 computers. If your system supports Hyper-V, you can check if it is enabled or not. To do this ?
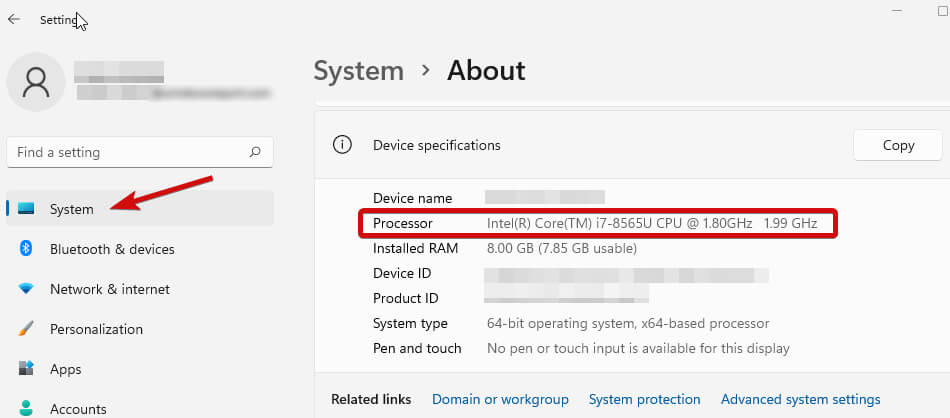
- Open the Settings app.
- Click on System and then About in the left pane.
- Copy the details of your processor and search for its specification on the internet to check if the manufacturer?s website lists virtualization under its specifications.

- If it does, make sure the virtualization is enabled on your system.
- If not, to enable virtualization, you need to access your system?s BIOS.
- Once inside system BIOS, go to the Advanced tab, and check the status of Intel (R) Virtualization Technology.

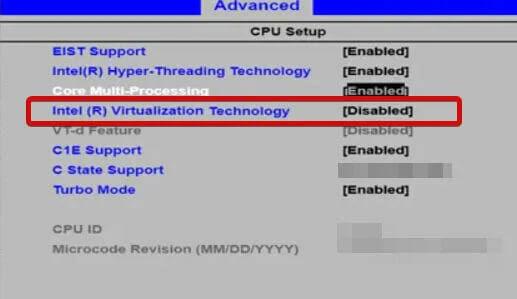
- If it is disabled, enable it.
- Save the changes and exit the BIOS.
Notes ?
- BIOS key is different for each device. Check yours by looking at the boot sequence. On some computers, virtualization is in the Performance section.
- The above method, however, is for intel users. AMD users will find different terminologies for this method. You can refer to the motherboard?s manual to learn more.
Method 2: Update Device Drivers & Windows OS
This is another simple way to eliminate the Hypervisor error BSoD on your Windows 11 computer. Outdated device drivers and OS can cause the system to generate this error screen, thereby hampering your work. Simply follow the steps mentioned below to update system drivers and Windows OS.
To update device drivers ?
- Press WIN + X and click on Device Manager from the list.
- Double-click on all the devices to expand them.
- Find all the entries with an exclamation mark.
- Right-click on each of them one-by-one and click on Properties.
- Under the Driver tab, click on Update driver.
To update Windows OS ?
- Press WIN + I to open Settings.
- Click Update & Security.
- Click Windows Update and then Check for updates.
Method 3: Use Command Prompt (Administrator)
Sometimes, the Hypervisor blue screen error is caused due to missing or damaged system files. This can lead to several other glitches and BSODs. Users can use the following commands in elevated command prompt to deal with this issue ?
Chkdsk and Deployment Imaging Servicing and Management scans check and repair the existing installed OS files along with the system files. Once inside, type chkdsk C: /f /r /x and hit Enter. Once done, restart your system and see if this resolves the issue.
After this, type the following commands and run them one by one ?
- DISM.exe /Online /Cleanup-image /Scanhealth and hit Enter.
- DISM.exe /Online /Cleanup-image /Restorehealth and hit Enter.
Finally, type the following command to ensure that Hyper-V service launches when the system boots up.
- bcdedit /set hypervisorlaunchtype auto
Method 4: Restart the Corresponding Service
Sometimes, when a user tries to run a virtual machine on the computer, it fails to do so and generates the hypervisor error blue screen, which leads to system crash. This can be fixed by starting the corresponding service related to Microsoft virtual machine platform. To do so ?
- Press WIN + R.
- Type services.msc and hit Enter.
- Locate Hyper-V Virtual Machine Management in the list and select it.


- Right-click on this entry and check its status. If it is running, stop it.

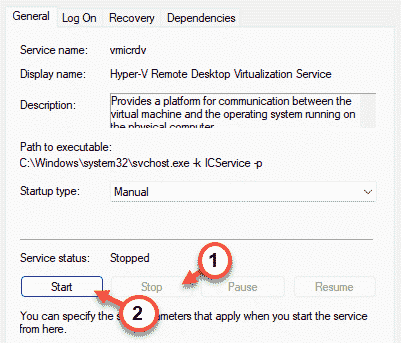
- Restart the service to see if this fixes the issue.
Pro Tip
If you are still encountering the HYPERVISOR_ERROR BSoD, then your virtual machine image might be corrupted. In such a case, you can use an all-in-one data recovery toolkit to recover your data.
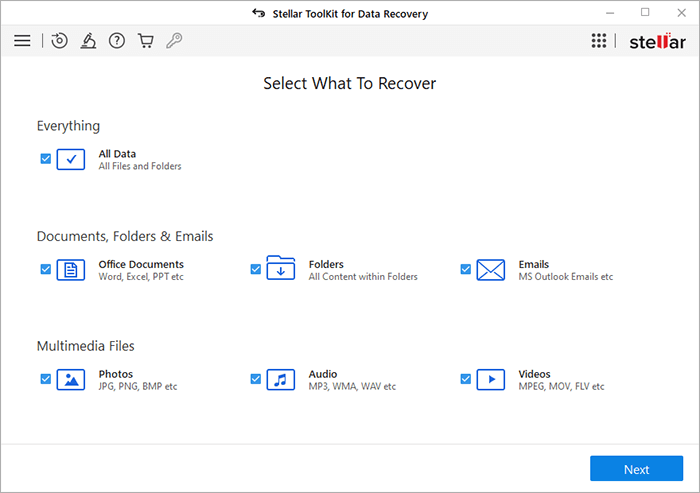
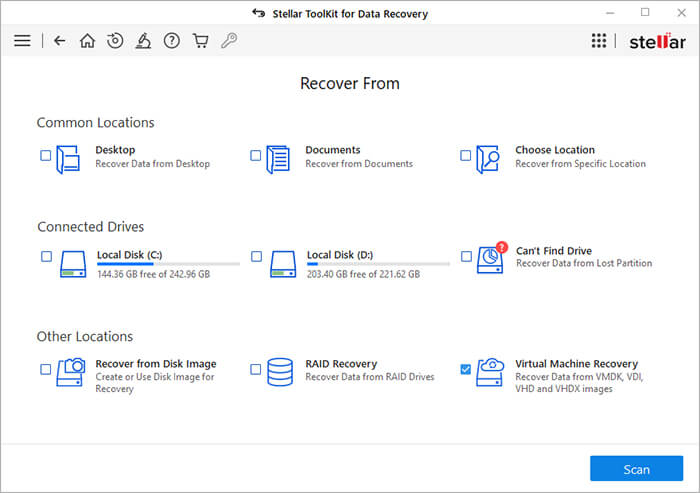
Stellar Toolkit for Data Recovery is a highly advanced data recovery software, which is used by industry experts to recover data from crashed NAS, RAID, Virtual machines, and other storage devices. This software offers a simple and clean UI, which makes it highly user friendly.
Its advanced data recovery algorithms easily help you recover data lost in numerous data loss scenarios like accidental deletion, drive crash, malware attack, and more. You can use it to recover data from your corrupted virtual machine in a couple of few easy to follow steps. To use this software ?
- Download Stellar Toolkit for Data Recovery from its official website and install it.
- Launch it and select the type of data you wish to recover.

- Select the location from where you wish to recover your lost data and click Scan.
- The software will scan for lost data and display it on the screen.

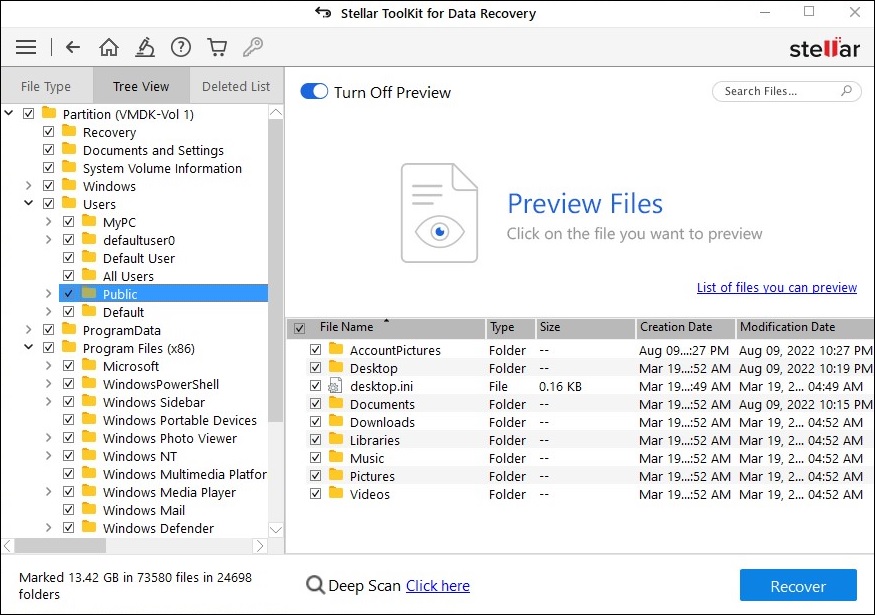
- You can preview the files to check them and if satisfied with the results, you can save them onto your desired storage media by clicking Recover.
Note ? If you are unable to find the desired files, you can perform Deep scan. During this, the software performs in-depth check in each sector of the drive and previews all the data that can be recovered.
Conclusion
The Hypervisor error blue screen on Windows 11 computers is a pestering issue, which is mostly generated in the case of when a virtual machine either doesn?t start or its image get corrupted. In this article, we discussed the causes behind this error and the ways to fix this issue. We also shared an ingenious way to recover lost data from a corrupted virtual machine image. We hope you found this article helpful and recovered your VM data easily using the above mentioned methods.


