Summary: Nobody wants to let go of the reins on their private or professional data stored on an external hard drive. If you back up your data regularly, you can avoid losing valuable items, such as essential documents, cherished photos, and videos. Use specific software like Stellar Data Recovery Professional to back up and restore your files if you delete them by mistake. It will keep your data secure.

![How to Easily Repair Disk Permissions on Mac [A Complete Guide]](https://www.stellarinfo.com/public/frontEnd/images/product/free-download-mac-blue-button.png)
Contents
When OS X starts to become unstable, the first thing that experts recommend doing is to check the disk for errors, fix them, or repair disk permissions. In this article, we will tell you how to do it.
What are the Disk Permissions and When to Use It?
On macOS, your disk’s permissions are used to control access to your files and keep them safe. They are designed so that specific apps (or other users, if you share your Mac) cannot modify a system file even if they have no business doing so. To carry out that action, they need to obtain permission first.
You can accomplish the following tasks with Disk Utility:
- Delete data from, format, or otherwise manage data stored on an internal drive or an external storage device.
- Identify and correct problems with a disk’s volume, including corruption.
- Add a password to the drive or encrypt the storage devices used to protect it.
- Mounting, unmounting, or ejecting a drive.
- Make changes to the file system to enable or disable journaling or other features.
- Working with RAID arrays. It is possible to improve performance, reliability, and storage capacity by combining multiple drives into a RAID set that behaves like a single drive.
- When you want to move files to another computer, archive them, or back them up, you should create a disk image of those files.
- In the past, the Disk Utility program was used to check and fix broken permissions.
How to Check the Disk Condition Using Disk Utility?
If you suspect a problem with the drive that is internal to your Mac or with an external storage device, you can use the First Aid feature found in the Disk Utility to investigate the issue.
The First Aid function found in Disk Utility will carry out a number of diagnostic tests, and if it discovers an issue with your drive, it will correct the issue.
It is important to keep in mind that you cannot use First Aid to repair a boot disk while an operating system is being used. Following that, we will discuss the steps involved in such an action.
To determine whether or not there is an issue with your external drive or Mac, you can run First Aid by following these instructions:
1. Open Disk Utility.

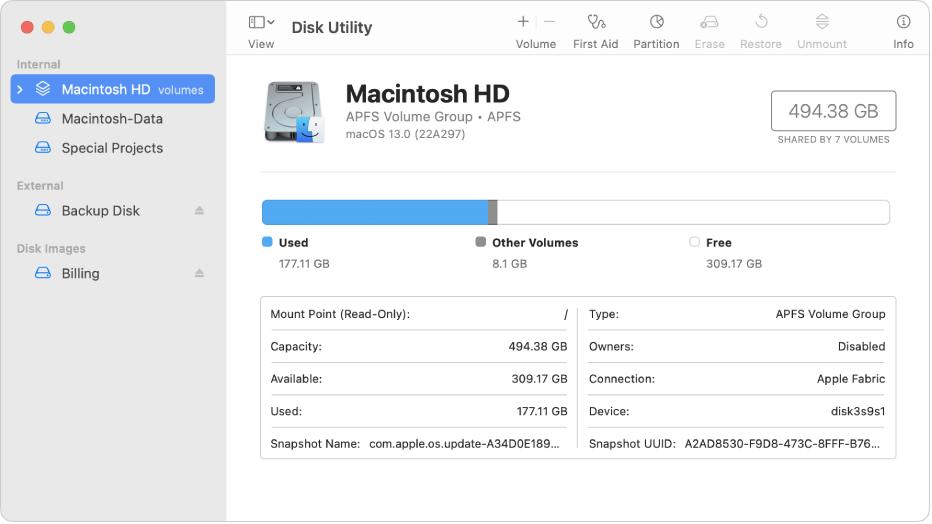
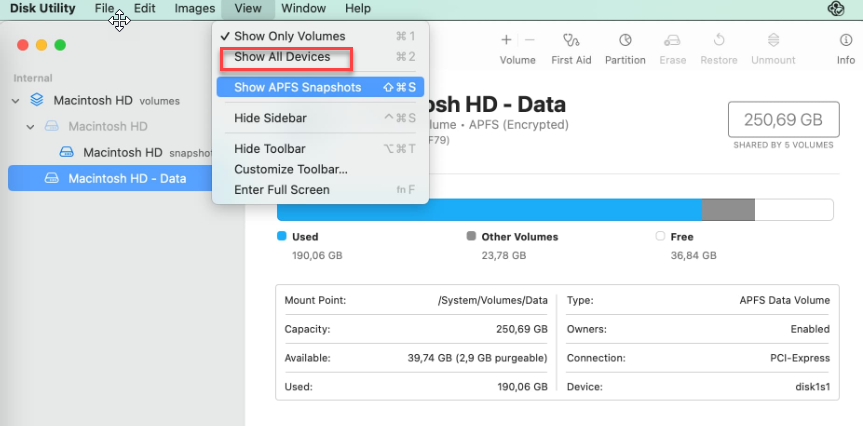
2. Choose the disk you’re having problems with from the drop-down menu in the sidebar. If you do not see it, select Show All Devices from the dropdown menu above the View button.

3. Select First Aid from the menu.

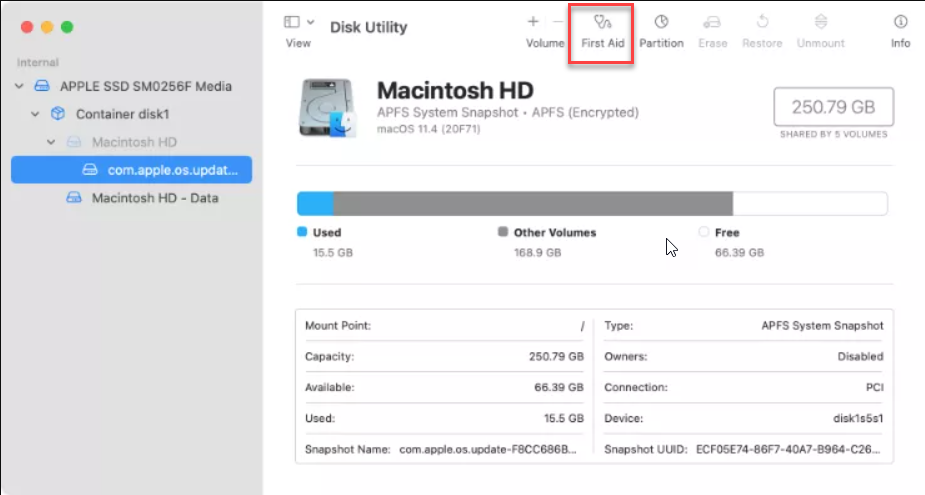
4. Disk Utility will perform an error check on the volume; if any are found, it will repair the volume. Click Run.
You won’t be able to use your Mac while the Disk Utility app is analyzing the disk’s contents.
Take into account that the procedure may take a very long time.
How to Repair Disk Permissions on Mac?
The process of repairing disk permissions differs according to your macOS. We will discuss the instructions on the most recent macOS versions, i.e. starting from macOS El Capitan.
I. Repair Disk Permissions Via Disk Utility
- To access the Disk Utility, navigate to Finder > Applications > Utilities > Disk Utility.
- Click on the First Aid tab,
- From the menu bar on the left choose the disk you need to repair the permissions and select Repair from the drop-down menu.
- Choose the Repair Disk or Verify Disk option from the drop-down menu to proceed.
II. Repair Disk Permissions Via Disk Utility in Recovery Mode
The way you can access Recovery Mode depends on your Mac model:
- If you own a Mac from the M1 series, you will need to turn off your computer, then press and hold the Power button while the computer boots up.
- Restart your Mac while holding down the Command and R keys on your keyboard if you have an Intel-based Mac.
Follow these steps to repair your disk:
- Follow the instructions above to start the Recovery Mode process.
- The Utilities screen will appear once you successfully entered Recovery Mode on your Mac. Choose the Disk Utility option.
- Click the First Aid button after deciding which drive you wish to recover from the drop-down menu.
- As mentioned, Disk Utility will run its checks and, if necessary, try to repair the affected files.
III. Repair Disk Permissions Via Disk Utility Via Terminal
To access the Terminal, do the following steps:
- Navigate to the Finder menu, then Applications, then Utilities.
- Enter the following command: sudo diskutil resetUserPermissions / ‘id -u’ in the Terminal box.
- Enter the administrative password for your Mac when prompted.
- If you receive the error code “Error -69841?, enter the following two commands: chflags -R nouchg and sudo diskutil resetUserPermissions / ‘id -u’.
What to Do if You Lost Data When Repairing Permissions?
In case you need to restore your files from Time Machine, you need to do the following:
1. Enter Recovery Mode.
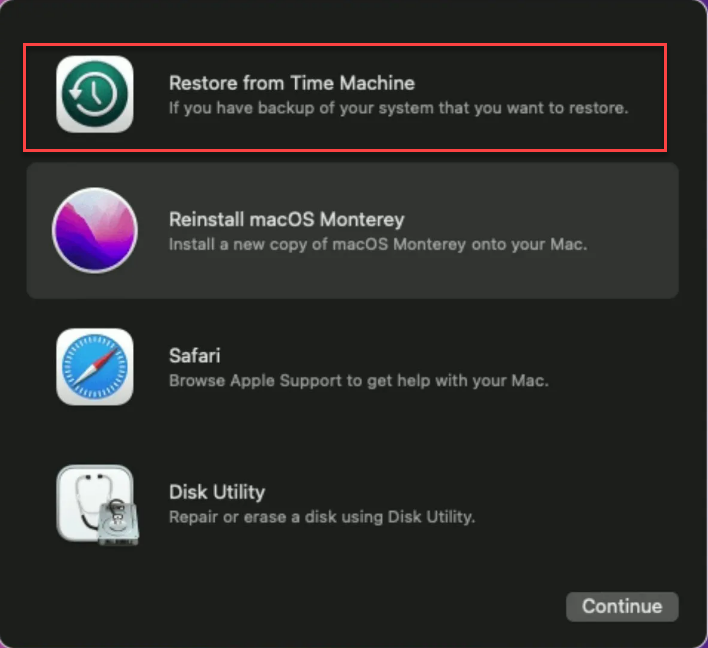
2. When you are in Recovery Mode select Options > Continue.
3. Choose Restore from the Time Machine Backup option.

4. Follow the onscreen instructions to restore the needed macOS version.
Recover Files with Stellar Data Recovery Professional
Stellar Data Recovery Professional is the most effective method for retrieving lost or deleted files on a Mac. It is possible to recover files even if they have been formatted, deleted, hidden, corrupted, or broken. It supports both internal and external drives, SD cards, USBs, and other storage devices. It is possible to quickly and effectively repair and recover the data regardless of the state in which it is currently stored.
The following steps need to be taken in order to recover your files:
1. Download and install Stellar Data Recovery Professional.


2. On the screen “Select What To Recover,” choose to Recover Everything or select the needed file types.


3. When you have chosen the needed file types to recover, click the Next button.
4. Select the disk where to do a search for the lost data and click on Scan.


5. After the scan, perform a preview of the files and choose the required ones.


6. Click the Recover button.
7. Click Save after you have selected an external hard drive to store the recoverable files on.
Wrapping Up
It is optional that repairing the permissions on your Mac be a required and regular part of system maintenance. It is fine to use this tool consistently because it will only be of use if there is a problem that you are experiencing. On the other hand, this is a safe operation, so there is no risk in repairing disk permissions if you think it might be helpful.
Read more:


