Summary: Are you facing issues like battery drainage, network connection error, third-party apps not working, or others after upgrading your Mac to macOS 12 Monterey? Downgrading to the older macOS Big Sur may be a quick solution for now until the new macOS is error free. Read this post to know how to step-by-step downgrade macOS Monterey to Big Sur and also get handy with the most reliable data recovery software in order to tackle any data loss situation.


Contents
It was hard to hold the excitement of a new macOS Monterey, and you upgraded to the latest macOS 12 as soon as it was released. However, soon the issues started surfacing on Mac after the upgrade. Some common problems reported are apps crashing after upgrade, cooling fan of Mac gets noisy, battery drains at an abnormal pace, Mac processing gets slower, apps not working properly and others.
Hence, if you are now missing your old macOS Big Sur for smooth functioning, it is better to downgrade to the older version.
This post will guide you in detail to move to the lower macOS Big Sur from Monterey.
Prepare your Mac System
Before you begin the procedure, you need to ensure the following three things:
1. Allow Booting from External Media for T2 Chip-powered Mac
You should first ensure that you haven?t disabled the booting from the external drive option on your Mac. To enable the booting from the external drive option, follow the steps below:
Step 1: Start your Mac and immediately press and hold the Command + R keys when you see the Apple logo to start your Mac in Recovery Mode.
Step 2: Select a User and enter the Admin password.
Step 3: In the macOS Utilities window, select Utilities and choose Startup Security Utility from the menu bar.

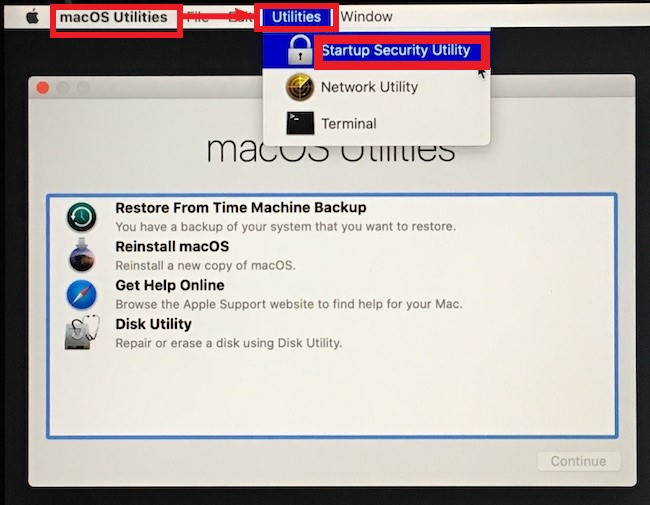
Step 4: Enter the macOS password when asked to Authenticate. Choose an account and enter the Admin password.
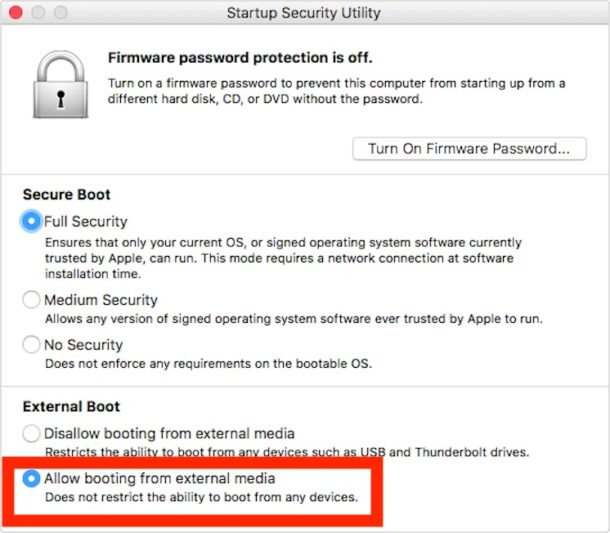
Step 5: Under the Allowed Boot Media section, select the Allow booting from external or removable media option.

Note:
- You may need to enter the Firmware Password to enable the booting from an external drive. The firmware password is different from the Apple ID password. So, make sure you remember it.
- Your Mac doesn?t support booting from a network volume, even if you have allowed the booting from external media.
2. Create Bootable macOS Big Sur USB Installer
If you have a Mac that came with macOS Big Sur and you upgraded to Monterey, then this is not needed for you. This is applicable if your Mac came with a macOS other than Big Sur. However, before you proceed to the downgrading procedure and erase the macOS Monterey, you should prepare an external macOS Big Sur USB installer. To create a macOS USB installer, you need to download the macOS Big Sur from Apple Store.
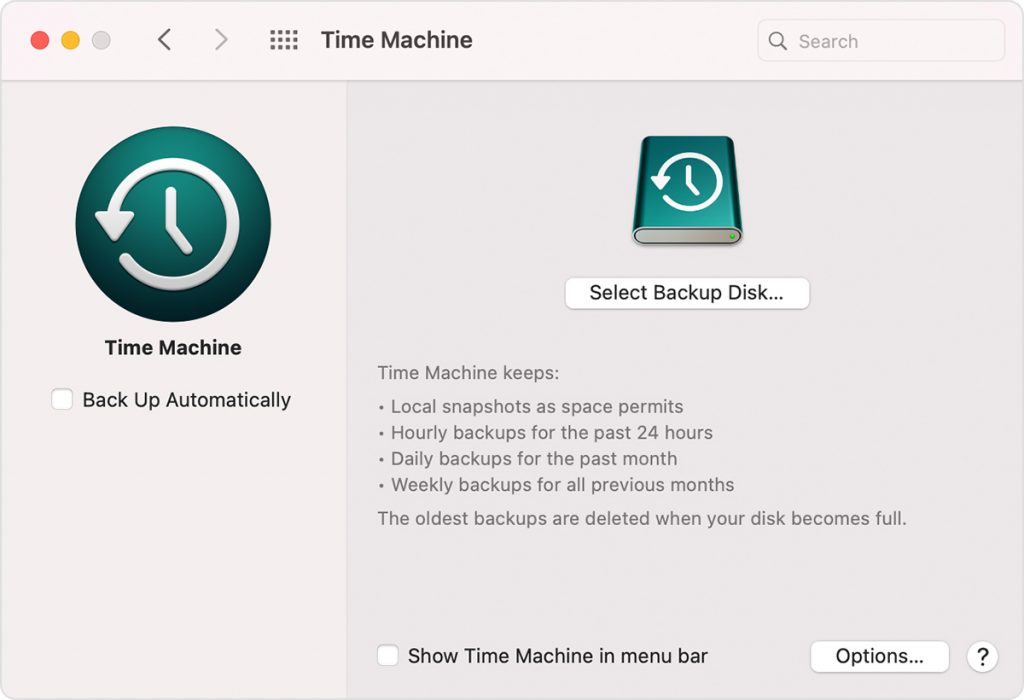
3. Take Backup of your Data
To install the macOS Big Sur, you will need to erase your macOS Monterey. Thus, there are chances of data loss. It is suggested that you backup the data using the Time Machine or iCloud features available on your Mac. Suppose you don?t use any of the above features and want to proceed with the downgrading procedure, then you keep Stellar Data Recovery Professional for Mac handy. It will help you easily recover any lost documents, photos, videos, etc. on your Mac without any assistance from an expert.

How to Downgrade from macOS Monterey to Big Sur?
Follow the methods below to downgrade your macOS 12 Monterey to macOS 11 Big Sur.
Caution: There are chances of losing data. So, make sure that you have either backup of your data or else you need to use the Stellar Data Recovery Professional Edition for Mac.
1. Erase your Mac Hard Drive
You need to erase your Mac?s hard drive to remove the macOS Monterey before installing the Big Sur OS. You need to ensure that a good internet connection is available on your Mac and then follow the steps below:
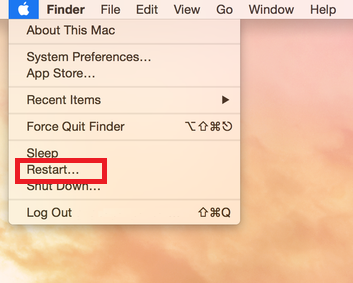
Step 1: Click on the Apple Menu icon and choose Restart from the dropdown options.

Step 2: Press and hold the Command + R keys while your system reboots to start your Mac in Recovery Mode.
Step 3: In the macOS Utilities window, choose the Disk Utility and click Continue.

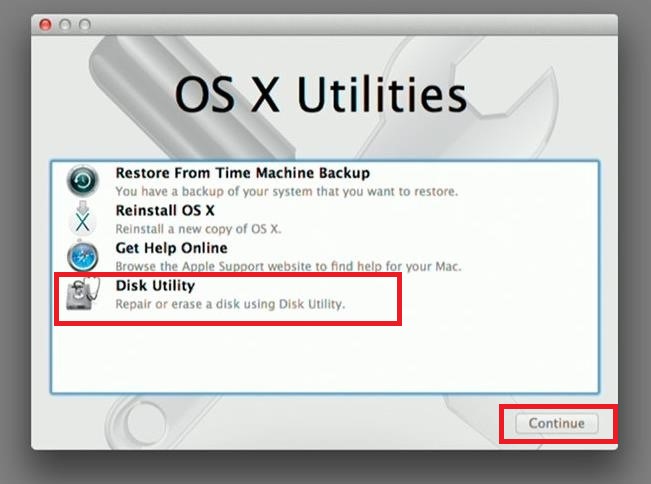
Step 4: Select the Startup Disk of your Mac and click the Erase button at the top.
Step 5: Assign a new name to your hard drive. When you are done erasing the hard drive, it will show the name you have assigned to it.
Note: If your Mac is using APFS, make sure to choose APFS from the format list. If it is using HFS+, you need to choose the macOS Extended (Journaled) from the format list.
Step 6: In the Scheme section, select GUID Partition Map.

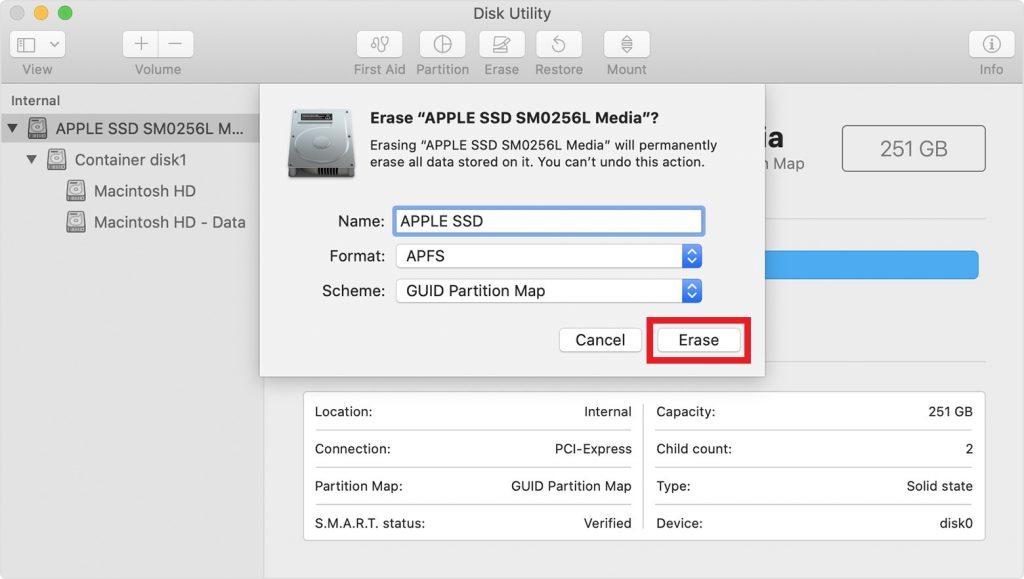
Step 7: Click Erase.
Once the erasing of the hard drive is complete, quit the Disk Utility using the dropdown menu in the upper left corner of the screen to return to the macOS X Utilities window.
Install macOS Big Sur
There are two possibilities with your Mac. Either it came with macOS Big Sur installed on it or without it. To install macOS Big Sur, follow the given methods according to your Mac?s scenario.
1. For Macs that came with Big Sur Operating System
If your Mac came installed with macOS Big Sur and you later on upgraded it to macOS Monterey, then it is quite easy to return to your old macOS. To install Big Sur, you need to follow the steps below:
Step 1: Shut down your Mac and again start it while holding the Shift + Option + Command + R keys.
Step 2: The above step will launch your Mac in Recovery Mode. Select the option Reinstall macOS Big Sur in the OS X Utilities selector window.

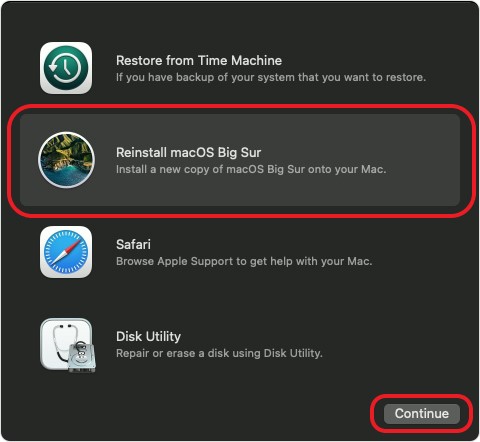
Step 3: Follow the on-screen instructions to reinstall macOS 11 Big Sur on your Mac.
2. For Macs that came without macOS Big Sur
If your system didn?t come with a preinstalled Big Sur, you need not worry. You can still downgrade your Mac from macOS Monterey to macOS Big Sur. Follow the steps mentioned as under:
Step 1: Click on the Apple Menu in the top left corner and select Restart from theoptions.
Step 2: Press and hold the Option key while Mac is restarting, until the Apple logo disappears.
Step 3: Select your bootable macOS Big Sur USB installer from the list of startup disk options.
Step 4: Click on the Continue button.
Big Sur operating system will be installed like a standard Mac update. Once the installation is complete, check the I Agree box to agree to the licensing terms and let your Mac reboot.
Recover your Data on Mac
If you have created a backup of your data on Time Machine or iCloud, you can now restore your data from the backup.
However, if you haven?t created the backup and want to recover your data available on Mac before erasing the hard drive, you can still get it back. Use Stellar Data Recovery Professional for Mac to retrieve all your lost data. It is an easy-to-use and powerful data recovery software that supports vast file types for recovery. If offers various amazing features, like:
- Recovers data of built-in apps, such as iMovie, Pages, TextEdit, etc.
- Restores data lost from APFS/HFS+ formatted partitions.
- Recovers data from deleted Mac partition.
- Option to create bootable drive to recover data from crashed Mac system.
- Creates Disk Image of hard drive, with bad sectors and prone to failure, to facilitate fast and secure recovery.
- Unlimited data recovery.


To Conclude
It is just a matter of time before macOS Monterey?s issues are fixed, and the features like FaceTime, upgraded Safari, and Focus etc. make the wait worth your troubles. However, most of us feel uncomfortable in shifting from our traditional UI to a new UI and in that case, we want to stick to the UI we are comfortable with.
The above-discussed procedure will help you to downgrade from Monterey to macOS Big Sur. At times, some bugs and initial glitches accompany the beta release and initial public release of macOS. Although Apple will soon launch updates to fix the ongoing issues with macOS 12 Monterey, we hope you will enjoy the brilliant features of this new macOS soon enough. Please share your thoughts with us on your experience with macOS Monterey in the comment section below.
FAQ
1. How do I go back to Big Sur from Monterey?
If your Mac came with the macOS Big Sur preinstalled, you could easily shift your Mac system from Monterey to Big Sur. Use the Shift + Option + Command + R keys to boot your Mac in Recovery Mode and select the Reinstall macOS Big Sur option from the Utilities selector options. For Macs that didn?t come with macOS Big Sur preinstalled, you will need a bootable macOS Big Sur USB installer.
2. How do I download Big Sur?
You can download the macOS Big Sur installer from the App Store directly. Alternatively, you can also download the macOS Big Sur by clicking Apple Menu > System Preference > Software Update. Once the update appears under the available updates option, click on the Install Updates button. It will only download the installer in your Applications folder. Once the download is complete, your Mac will ask for confirmation through a pop up. Decline the confirmation as agreeing will install the Big Sur on your current system and you cannot use the installer for other system. Now, you can copy the installer file from your Applications folder for further use.
3. How do I return my Mac to factory settings?
To reset your Mac to factory settings, follow the steps below:
- Click the Apple Menu icon and choose System Preferences.
- In the System Preferences window, select the Erase all contents and Settings option.
- When asked, enter your Admin Password and then click OK.
- Again, click the Erase All Content and Settings button.
Your Mac screen will first go black and then your system will restart more than once. Don?t interfere until you see the ?Hello? on your screen. Your Mac is now reset to factory settings.


