Summary: Exchange Server offers an option to export mailbox data to PST based on a specific date range. In this post, we’ll be discussing the detailed process of exporting mailbox data based on a specific data range using PowerShell commands. In addition, we’ll be mentioning an advanced EDB to PST converter tool that can help granularly export mailbox data to PST in just a few clicks.


Contents
In Exchange Server, there are multiple ways to export mailboxes from the mailbox database. You can also export mailboxes based on a specific criteria, such as data range. Below, we will be discussing the process of exporting mailbox in Exchange Server for a specific date range.
But before proceeding, let?s explore the scenarios where you would need to export from mailbox based on a date range.
- While exporting during a migration, you need to pre-populate emails from previous years so that the cutover migration will have minimal effort.
- You need to export based on a specific date range from a user?s mailbox after an investigation.
- You need to export yearly or bi-yearly from mailboxes for archiving purpose.
- Post a cutover migration, you don?t want to export emails older than 5 years or old data which is of no use to the company.
Exporting Mailbox from an Exchange Server based on a Date Range
For exporting a mailbox from the Exchange Server, there are two methods. You can export using the Exchange Admin Center (EAC) or using the PowerShell commands via the Exchange Management Shell (EMS). However, if you need to export based on a date range, then this cannot be achieved via the Exchange Admin Center (EAC). You can only do this by using the New-MailboxExportRequest PowerShell command in the Exchange Management Shell (EMS).
Before you start, there are some prerequisites you need to achieve. You need to ensure that you have the right permissions to do the export job. Even an Active Directory administrator doesn?t necessarily have the right permissions.
First, you need to create the role group and assign the roles.
New-RoleGroup "Mailbox Import-Export Management" -Roles "Mailbox Import Export"


Then, you need to assign the user to the role group.
Add-RoleGroupMember "Mailbox Import-Export Management" -Member Administrator


The next step is to ensure that you have the share created with the right permissions to host the PST files from the export. The share must be set with full permissions as given below.
- The user you will be using to export the mailboxes
- Exchange Trusted Subsystem
Once you have the above, you need to use the New-MailboxExportRequest command using the ContentFilter parameter. Since you will be extracting, you need to extract both the received and the sent items.
Example 1: Exporting received or sent emails till a particular date
New-MailboxExportRequest -ContentFilter {(Received -lt '01/01/2022')} -Mailbox <mailbox name> -Filepath "unc patch of destination file"


You can use the switch lt (Less Than) to export received emails till a particular date (for example; 01/01/2022). To export the sent items, you can change the Received parameter with Sent (see the below example).


Example 2: Exporting received or sent emails from a particular date onwards
New-MailboxExportRequest -ContentFilter {(Received -gt '01/01/2022')} -Mailbox <mailbox name> -Filepath "unc patch of destination file"


You can use the Greater Than (gt) switch, when you need to export the emails from a specific date onwards (for example; 01/01/2022). The counter command to export the sent items is given below.


Example 3: Exporting received or sent emails for a specific date range
To export emails for a specific date range, you can use the command with both the gt and lt switches (see the below example).
New-MailboxExportRequest -ContentFilter {(Received -lt '01/01/2022') -and (Received -gt '01/01/2021')} -Mailbox <mailbox name> -Filepath "unc patch of destination file"


As you can see, the command has the instruction to export all emails received on the said mailbox which are less than January 1, 2022 and are more than January 1, 2021. For the sent items, you can use the command as given below.
New-MailboxExportRequest -ContentFilter {(Received -lt '01/01/2022') -and (Received -gt '01/01/2021')} -Mailbox <mailbox name> -Filepath "unc patch of destination file"


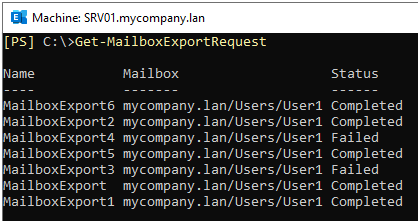
Once you have executed the command, you can use the Get-MailboxExportRequest command to get the status of the exports.

It is suggested to first run the command for one mailbox for testing. Then, you can run it for all the users one-by-one or using a script to loop into all mailboxes.


Alternative Method to Export Mailboxes based on Date Range
An alternative solution to export the mailboxes based on a specific criteria is by using a leading application, called Stellar Converter for EDB. With this tool, you will be able to automate exports from any version of EDB files, with no size limit. You even don?t need an Exchange Server running to do the export job. There is no need for expertise in scripting or re-confirmation that the right data is exported from the right mailbox. In addition, you don?t have to loop through the mailboxes. Further, if the database is not mounted, you can still be able to export the mailboxes.

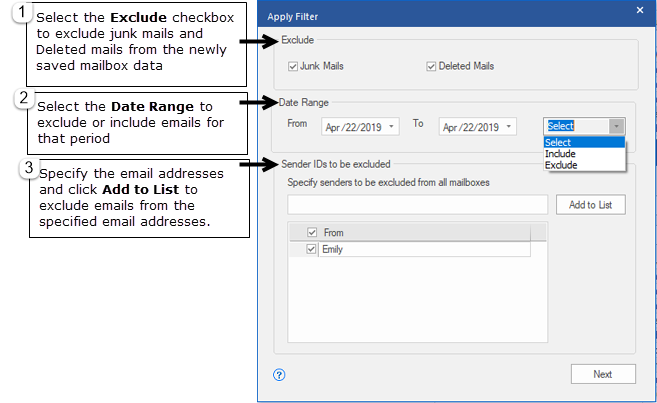
You can granularly export mailbox data to PST and other file formats, and directly to Office 365 or live Exchange Server database. This tool offers features such as automatic mailbox matching, parallel and priority exports, and continuation in case of interruption. The application is not limited to export user mailboxes, but it can also export shared mailboxes, disabled mailboxes, and even public folders.


