Summary: The blog post shares a few safe methods to format your Mac hard drive in the desired file system format, without the risk of any data loss. Download the free-to-try Mac data recovery software to recover your erased hard drive data.


An internal or external Mac storage drive requires a compatible file system format to be accessible in macOS. Different file system formats exist for different operating systems. For instance, you need:
- APFS format for macOS Ventura 13, Monterey 12, Big Sur 11, Catalina 10.15, or Mojave 10.14
- Mac OS Extended format for macOS Sierra 10.12 or earlier
- MS-DOS (FAT) or exFAT format to make your external storage drive cross-compatible with both macOS and Windows
A new Mac with its built-in solid-state drive or hard drive comes pre-formatted with a file system that contains the macOS. You may even need to manually format your internal or external Mac storage drive or volume in the compatible file system. Formatting is helpful for:
- Preparing the startup disk to reinstall macOS
- Resolving corruption or unreadable error of the storage drive
- Changing the file system format for cross-compatibility
- Perfecting the storage drive in case Disk Utility fails to repair it
But storage drive formatting involves certain risks. When your Mac storage drive has stored data on it, and you accidentally erase the drive in a new file system format, macOS removes all references to the data. So, you end up losing your data.
Also, when you connect a corrupt or unreadable external storage drive to your Mac, macOS will prompt you to initialize the disk. DO NOT click the Initialize button unless it?s a new drive or you have recovered data from it. The next section discusses the correct way to format your Mac storage drive without data loss.
Methods to Format Mac Storage Drive Without Data Loss
1. Back Up Your Mac Hard Drive before Formatting
Before erasing your Mac hard drive be it internal or external, you must back up the drive to ensure zero data loss. For an external or non-boot volume, copy all your valuable files and folders, and paste them to another external storage device. And, for Macintosh HD, the startup disk, you can use Time Machine to back up your macOS as well as its stored data. If you haven?t set up your Time Machine backup drive, you can set up the drive now.
Read More: How to Set Up Time Machine on Mac
2. Format the Startup Disk in macOS Recovery Mode
If you want to reinstall macOS or upgrade your macOS, you need to format your Macintosh HD startup disk. But you can?t format the startup disk while your macOS is running. So, you need to boot your Mac in macOS Recovery mode to access the startup disk and erase it using Disk Utility. Once you?ve backed up your Macintosh HD by using Time Machine, perform the following steps to format your startup disk and reinstall macOS:
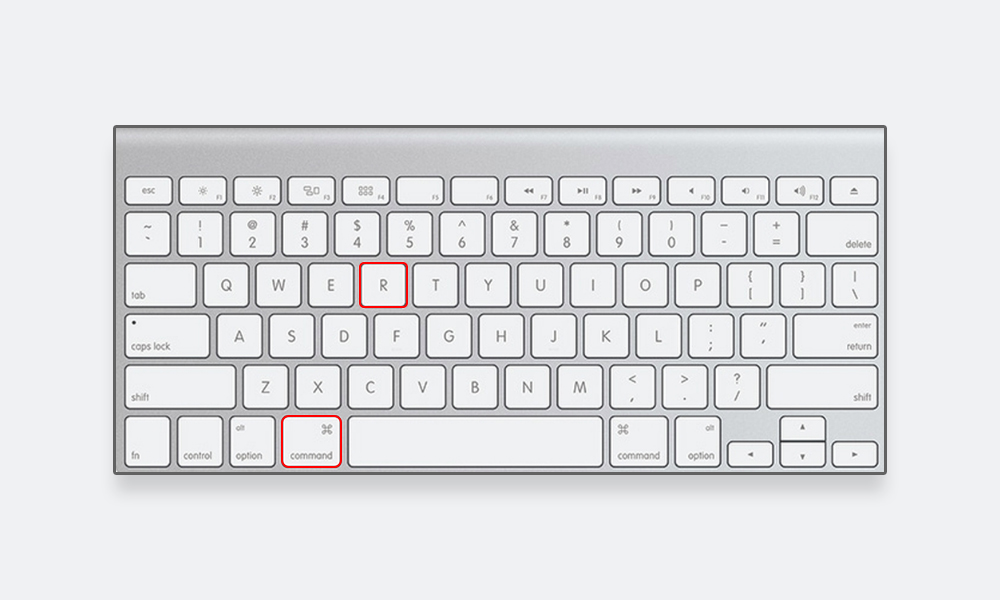
Step 1: Restart your Mac and immediately press and hold Command + R keys. Release the keys once you see the Apple logo or spinning globe.

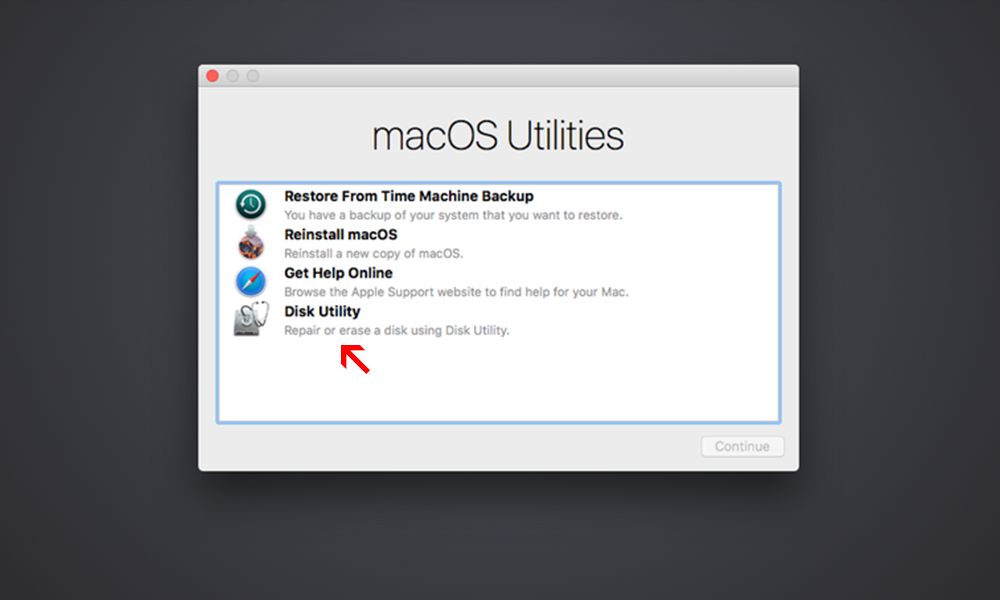
Step 2: In the macOS Utilities window, click Disk Utility, and then click Continue. In the Disk Utility window, choose View > Show All Devices.
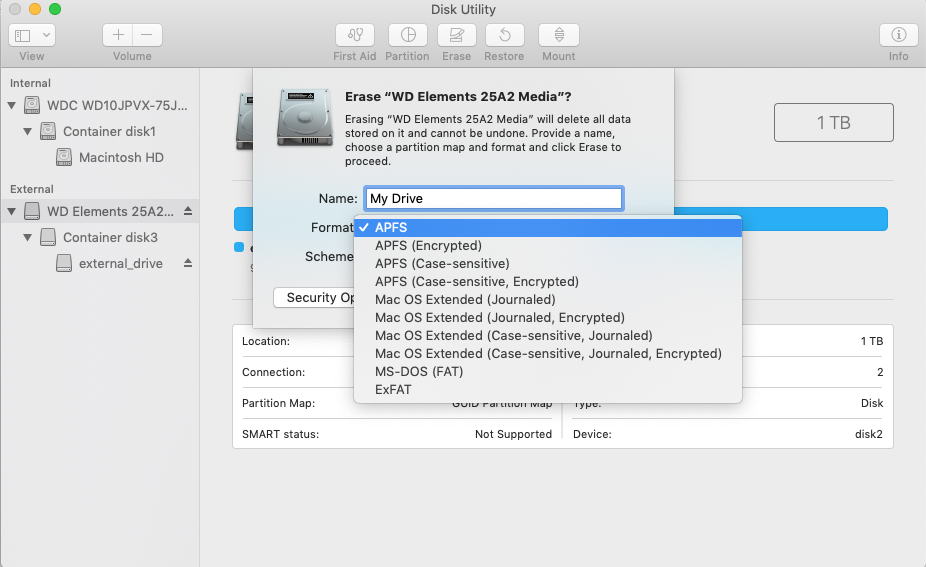
Step 3: From the left panel, select Macintosh HD and click the Erase tab. Provide the Name, Format, and Scheme in the respective field, then click Erase.

Step 4: Once Disk Utility formats the drive with a compatible file system, quit the app.
Step 5: Connect your Time Machine backup drive to your Mac. From macOS Utilities, select Restore from Time Machine Backup, and click Continue. Perform onscreen instructions to reinstall macOS and stored data.
Step 6: Alternatively, from macOS Utilities, select Reinstall macOS to install a fresh copy of macOS from the recovery drive or cloud. Perform the steps and restore data from backup.

3. Format a Mac External Hard Drive Using Terminal
To format Mac external storage drive or non-boot volume, you can open Disk Utility directly from Desktop and perform the erase operation. But sometimes Disk Utility throws an error while erasing an external storage drive. In that case, you can format the external drive on Mac by using Terminal, as described below:
- Press Command + Space Bar to open Spotlight. Type ?terminal? and hit Return to launch the Terminal application on your macOS.
- In the Terminal window, type diskutil list. Note the name and identifier of the external storage drive. Ensure you have backed up all the data from the external drive.
- Type diskutil eraseDisk FS DN D#. Here, replace the FS with the required file system format, DN with the name of the drive, and D# with the drive?s identifier.
When the process completes, Disk Utility erases the storage drive to the correct file system format. Now, you can restore the backed-up data to the storage medium.
4. Recover Data Lost due to Accidental Formatting
Did you accidentally format a wrong hard drive on your macOS? Or erased the Mac external storage drive without backing it up in the first place?
Data loss can happen due to accidental formatting. And, Disk Utility doesn?t provide any option to undo the format. But you can get back your formatted data from the Mac hard drive by using a Mac hard drive recovery software. Perform the following steps:
1. Download and install the *trial version of Stellar Data Recovery Professional for Mac on your Mac mini, MacBook, or iMac.


2. On the ?Select What To Recover? screen, let the default selection of Everything remain toggled on, and click Next.


3. On the ?Select Location? screen, select the formatted Mac hard drive, turn on Deep Scan, and click Scan.


4. Once the scan is over, preview all the recoverable files. Click Recover, specify the save location, and click Save. Navigate to the save location to check your recovered data.


*The trial version of Stellar Data Recovery Professional for Mac software can scan the media and show a preview of recoverable files. To save the files, you need to activate the software. And why wait if the software has a 30-day money-back guarantee.
Read More: How to Activate Stellar Data Recovery Professional on your Mac?
Conclusion
To format your Mac startup disk or external storage drive safely, you must back up the drive before erasing it with Disk Utility in a compatible file system format. In case Disk Utility fails to format the drive, use Terminal to perform the same task. But be careful while executing the Terminal commands, as any wrong operation can result in permanent data loss.
Also, when you?ve formatted your Mac hard drive or SSD accidentally without having any backup, use Stellar Data Recovery Professional for Mac, a specialized mac data recovery software to salvage your lost data. The tool supports a variety of hard drive brands, USB types (Thunderbolt, 3.0, 2.0), and Fusion Drives.


