Summary: Exporting mailboxes from Exchange 2013 to PST requires preparation, such as assigning roles, creating UNC path, etc. In this post, you will learn the stepwise process to export Exchange 2013 mailboxes to PST by using the Exchange Admin Center (EAC) and PowerShell cmdlets in the Exchange Management Shell (EMS). You’ll also get to know about an EDB to PST converter tool that can easily and quickly export mailboxes from online or offline EDB file to PST with complete precision.


Contents
Exchange administrators often need to export mailboxes from Exchange database (EDB) files to PST format due to various reasons. Some common reasons include:
- Back up the mailboxes which are not active anymore.
- Extract data from the offline EDB files and access it with MS Outlook.
- Archive mailboxes or date specific data.
- Migrate mailboxes to another Exchange Server or Office 365.
Whatever be the reason, they can export mailboxes from Exchange Server database to PST by using PowerShell commands in the Exchange Management Shell (EMS) or via the Exchange Admin Center (EAC). Below, we will discuss the step-by-step process to export Exchange 2013 mailboxes to PST using the EMS and the EAC.
Steps to Export Exchange 2013 Mailboxes to PST via PowerShell Cmdlets
You can use the New-MailboxExportRequest ? a PowerShell command introduced with Exchange Server 2010 SP1 – to export mailboxes from online Exchange database to PST format quickly. But before proceeding to export mailboxes to PST, the following conditions must be met:
- The account, which will be used to perform the export operation, should have permission to the Mailbox Import/Export request.
- The user should have access to the network location to save the PST file. The user must know the complete UNC path. For example, \\PCName111\C$\PST\tstmail.pst.
- The mailbox, to be exported, must exist in the Exchange database (EDB).
Now, follow the steps given below to export the mailboxes to PST in Exchange Server 2013.
Step 1: Assign the Required Permissions
You must assign the required permissions to the user account, which you will use to perform the Exchange 2013 mailbox export to PST format. Contrary to the perception, even the admin account doesn?t have the rights to perform the import/export operations by default. To assign the required permissions to the user account, execute the following command in PowerShell:
New-ManagementRoleAssignment ?Role ?Mailbox Import Export? ?User Exporter
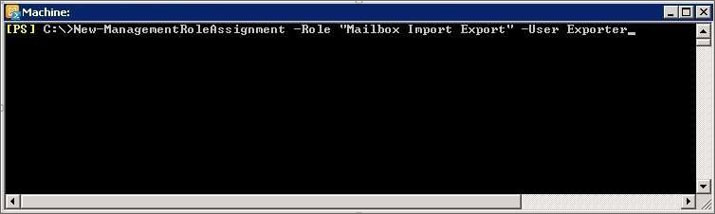
Here ?User Exporter? is the account name to which the rights are assigned.
Alternatively, you can assign these permissions to the AD group. This way, whenever you need to give the rights to a user account, you just have to add that account to this group. To assign the permissions to AD group, enter the following command in the PowerShell window:

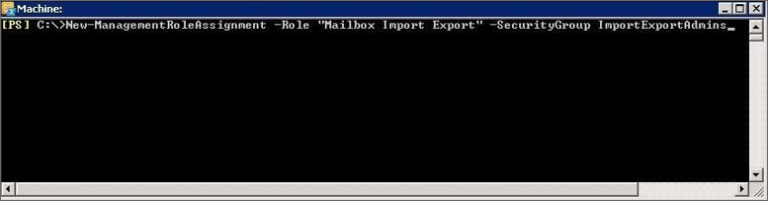
New-ManagementRoleAssignment -Role ?Mailbox Import Export? -SecurityGroup ExchangeAdmGroupHere ?ExchangeAdmGroup? is the name of the AD group.
Step 2: Create a UNC Folder Path to Save Exported PST Files
To save the exported mailboxes to PST files, you must create a UNC file path or shared folder location. The steps are as follows:
- Create a folder at any location on your Exchange Server.
- Right-click on the newly created folder and select Give access to > Specific People.

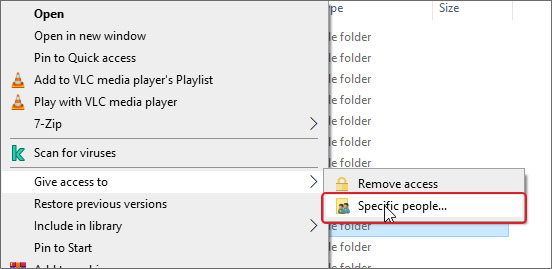
- Select Everyone (not recommended) or your username (recommended) from the dropdown and click Add.


- Select Read/Write permission and click Share.
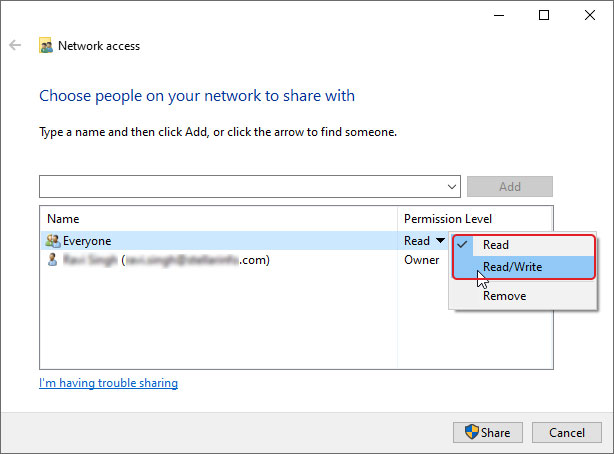
- Note down the shared network path. For example, \\exsrv2013\d$\pst.
Step 3: Export Exchange 2013 Mailboxes to PST
To export mailbox to PST in Exchange 2013, you can use the New-MailboxExportRequest PowerShell cmdlet in Exchange Management Shell (EMS). See the below example:
New-MailboxExportRequest ?Mailbox testdummy ?FilePath\\exsrv2013\d$\pst\TestDummy.pst

The above PowerShell command will export the entire mailbox to the mentioned shared folder path as a TestDummy.pst file.
Export Particular Mailbox Folder to PST
You can also export a particular folder to the PST. To do so, use the command as given below:
New-MailboxExportRequest ?Mailbox testdummy ?FilePath\\exsrv2013\d$\pst\TestDummy.pst -IncludeFolders ?#Inbox#?The command will export the Inbox folder in the Exchange 2013 mailbox to PST.
Exclude a Folder from PST Export
You can also exclude a folder from the PST export. For this, you can use the command as given below:
New-MailboxExportRequest ?Mailbox testdummy ?FilePath\\exsrv2013\d$\pst\TestDummy.pst -ExcludeFolders ?#DeletedItems#?The above command will export all the folders and mail items from the Exchange 2013 mailbox to PST, except the ?DeletedItems? folder.
Exclude and Include Multiple Folders
If you want to include or exclude multiple folders, you can use comma between the folder names in the command.
?#DeletedItems#?, ?#Spam#?Filter Mailbox Content
If you want to export only specific items from the mailbox, for example, mails received last year or between a certain date, you can use the ?ContentFilter parameter with the command.
-Content Filter {(Received ?gt ?01/01/2017)}-Content Filter {(Received ?lt ?01/01/2017) ?and (Received ?gt ?01/01/2016)}You can further customize the command as per your need. For example, to export all emails received after 1st January 2017 with the keywords ?London? and ?MSProject?, you can execute the command as given below:
New-MailboxExportRequest ?Mailbox mailtst ?FilePath \HQFS01\ExportPST\mailtst.pst ?ContentFilter {(body ?like ?MSProject?) ?and {body ?like ?London?) ?and (Received ?lt ?01/01/2017)}After creating the PST export request, you can check the status by executing the following command:
Get-MailboxExportRequestSteps to Export Exchange 2013 Mailboxes to PST via Exchange Admin Center
With Exchange Server 2013, Microsoft introduced Exchange Admin Center (EAC), a GUI-based web interface to manage Exchange Servers. You can use the EAC to export mailboxes to PST in Exchange 2013. However, you can?t filter content or include/exclude folders.
To export Exchange 2013 mailboxes to PST using the EAC, follow the given steps:
- Assign the Import/Export role to the user and create a UNC path.
- Open and log in to EAC as administrator.
- Then, navigate to recipients > mailboxes and click on the More options.
- Select Export to a PST file option from the dropdown


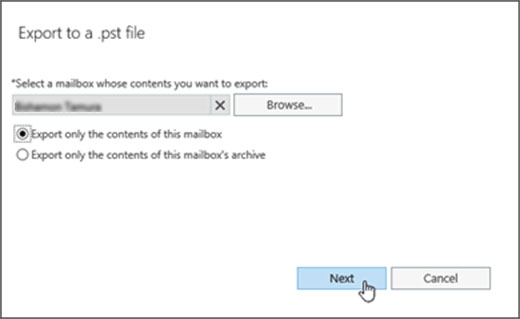
- In Export to a .pst file wizard, browse and choose the mailbox you want to export to PST and select the appropriate options to export only the contents of this mailbox or mailbox?s archive.

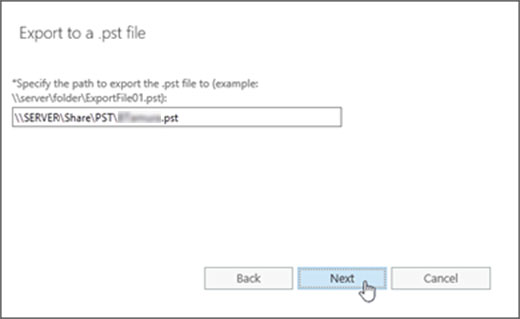
- Click Next and enter the UNC path (shared folder path on the network), along with the name of the .pst file. You can enter any name.
- Click Next and browse to select your user account. Exchange will send an email when mailbox export to PST is finished.

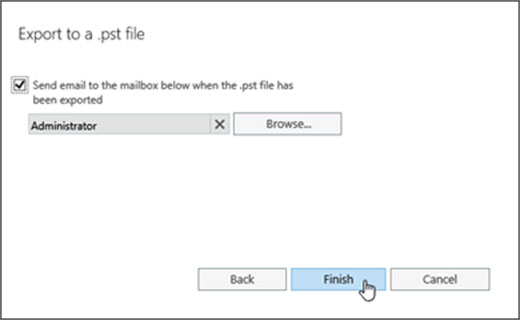
- Click ?Finish? to start the PST export.

Final Words
Above, we have explained the detailed process to export Exchange 2013 mailboxes to PST format using the PowerShell commands in Exchange Management Shell (EMS) and via Exchange Admin Center (EAC). However, executing PowerShell cmdlets requires some technical expertise to handle the process properly. If you make even a simple mistake such as spelling error while executing the commands, the results could be disastrous. Alternatively, you use the EAC. However, the EAC has limited export options. In addition, if you don?t have the required permissions to export the mailboxes to PST, you cannot use these methods to export the mailboxes to PST.
In such cases, you can use a trustworthy EDB to PST conversion tool, such as Stellar Converter for EDB. This tool converts all or selected items within the EDB to PST format accurately and in minimum time. It also shows preview of the mailbox items after the EDB scan and lets you filter, choose, and export the selected mail items from the listed mailboxes. It can export mailboxes from online and offline EDB files to PST. You can also export the converted mailboxes from offline EDB file to Office 365 or a live Exchange Server directly.
FAQs
A. Common issues involve network issues, misconfiguration of the share/security, and the Exchange Server Subsystem missing permissions.
A. You may face performance issues when dealing with large exports. So, you can consider splitting the export of the mailbox by year to limit having the entire mailbox in one PST file.
A. This can be done by using the New-MailboxImportRequest command in the Exchange Management Shell (EMS).
A. You should check the roles and group membership. When such permissions are given, they take some time to take effect. If all was done correctly, you would have to wait for about 1 to 2 hours before running the command. Also, you can close the PowerShell command window and re-open it again.
A. You can monitor the progress of PST export by running the Get-MailboxExportRequest command. This will show if the export is in-progress, suspended, completed, or failed.
A. You can run the Get-MailboxExportRequest command. This will give information about the issue. You can also check the event viewer for any indications. You must double check the Exchange Server permissions, the share, and the share/folder security access.

