Summary: PST files are often used for creating mailbox backups in Microsoft Exchange Server. In this article, you will learn about various PowerShell cmdlets to import or export PST files in Windows Small Business Server or SBS 2011. You can also use a GUI-based EDB to PST converter software, such as Stellar Converter for EDB, to export mailboxes from SBS 2011 databases to PST.


Contents
Microsoft SBS Server 2011 comes bundled up with Windows Server 2008 R2 and Exchange Server 2010. It is a combination of Microsoft?s finest server technologies and is best suited for small businesses who would like to have a Microsoft Exchange without having to go into a very expensive setup.
During your normal work as an admin, you need to also export and import data into Exchange Server. In this article, we will be going through the procedure to export and import mailboxes using PST files in SBS 2011.
There are two methods to export data from mailboxes. You can export the data from Outlook itself using the profile of the user. However, it is a clumsy thing to do apart from the fact that you might encounter a lot of issues. The same thing goes for the import of mailboxes. So what is the correct method to export or import a mailbox from an Exchange Server 2010 since the option is not available through the Exchange Management Console (EMC)?
In such a case, you need to use PowerShell.
Here is the step-wise procedure to export/import mailboxes by using the PowerShell commands:
Requirements – Before proceeding, you need to fulfill two requirements for exporting a mailbox:
1. Right Permissions:
You need to provide the permissions to export or import a mailbox. For this, you need to assign the role of Mailbox Import Export to the user you will be using to export the mailbox. This can be done by using the below given PowerShell commands.
New-RoleGroup "Mailbox Import-Export Management" -Roles "Mailbox Import Export"

Now you need to assign the newly created role to the user or group. In this case, I will be assigning the role to the Administrator.
Add-RoleGroupMember "Mailbox Import-Export Management" -Member Administrator

This will give the user or group the rights to import and export. This may take a few minutes to complete.
2. Shared Folder to Store the PST Files:
To export/ import PST files, you need to prepare a shared folder with the right permissions. Since, you can only export to a network path, you need to setup the share and security on that folder. Here are the steps to do so:
- Create the folder on any server in your network.
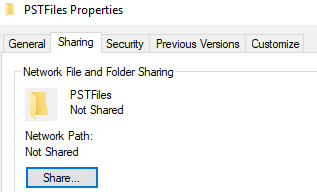
- Once the folder is created, right-click on the folder and click on Properties.
- Click on the Sharing tab and click Share.

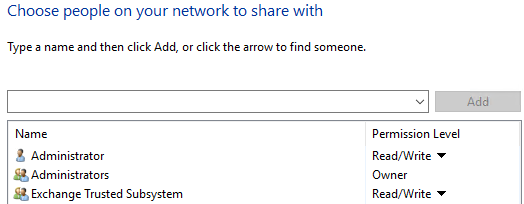
- In the window that opens, add the user you will be exporting with and the Exchange Trusted Subsystem with Read/Write permissions and click on the Share button.

Export Mailbox
To export a mailbox to a PST file, open the Exchange Management Shell from the Exchange Server and use the PowerShell cmdlet New-MailboxExportRequest as given below.
New-MailboxExportRequest -Mailbox '<mailbox>' -Filepath "<unc patch><pstfile>.pst"

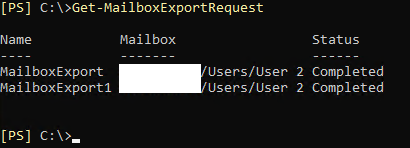
You?ll not see any status window for your exports. To see the status, you need to use the Get-MailboxExportRequest PowerShell cmdlet as given below.

You can also modify the command to use some filters for the exports, like date range and folders.
a. Include a folder or folders
Using the Include Folder (as per example below), you can export a specific folder or folders. To add more folders, you can add more folders, separated by comma.
New-MailboxExportRequest -Mailbox 'user2' -Filepath "\\ex01\PSTFiles\User2_Export.pst" -IncludeFolders "#Inbox#", "#Outbox#"

b. Exclude a folder or folders
Using the Exclude Folder (see the example below), you can export all the mailboxes, except the specified folder or folders. To add more folders, you can add more folders, separated by comma.
New-MailboxExportRequest -Mailbox 'user2' -Filepath "\\ex01\PSTFiles\User2_Export.pst" -ExcludeFolders "#Drafts#", "#Outbox#"

You can exclude or include the following items:
Inbox, SentItems, DeletedItems, Calendar, Contacts, Drafts, Journal, Tasks, Notes, JunkEmail, CommunicatorHistory, Voicemail, Fax, Conflicts, SyncIssues, LocalFailures, and ServerFailures.
c. Export by date or range
To export to a specific date, you can use the ContentFilter parameter with the lt (less than).
New-MailboxExportRequest -ContentFilter {(Received -lt '01/01/2018')} -Mailbox 'User2' -Filepath "\\EX01\PSTFiles\User1lt.pst"To export from a specific date onwards, you need to use the gt (greater than).
New-MailboxExportRequest -ContentFilter {(Received -gt '01/01/2018')} -Mailbox 'User2' -Filepath "\\EX01\PSTFiles\User1lt.pst"To export a date range, you need to combine the gt and lt (as given below).
New-MailboxExportRequest -ContentFilter {(Received -gt '01/01/2018') -and (Received -lt '01/01/2019'} -Mailbox 'User2' -Filepath "\\EX01\PSTFiles\User1_Range.pst"Import a mailbox
The method to import a mailbox is same as that of exporting a mailbox. But you need to use the New-MailboxImportRequest PowerShell cmdlet (as the below example).
New-MailboxImportRequest -FilePath \\Ex01\PSTFiles\User1.pst -Mailbox "User1"

When the command has been executed, you need to use the PowerShell cmdlet Get-MailboxImportRequest to view the progress (as given below). This will show the status as completed, in-progress, or failed.


Depending on the size of the mailbox or PST file, the importing process may take some time.
Alternate Method
There is another method to export and import that does not involve any scripting and assigning of permissions, while being reliable, fast, and effective. You can use Stellar Converter for EDB software that can instantly open any Exchange database file – from 2007 till 2019. It allows you to export EDB mailboxes to PST and other formats and also offers several filters to choose from. It can also export directly to a live Exchange Server database and Office 365 tenant.


