Contents
Email Spoofing is a social engineering attack, in which, attackers send illegitimate emails having fake or tampered email headers to trick the recipients into thinking that the message came from a user or organization they know. In this article, you?ll learn how to prevent email spoofing in Office 365.
Microsoft has programmed Office 365 domain spoof prevention measures to make it hard for attackers to exploit users. Network administrators of Office 365-based organizations need to understand the intricacies surrounding these layers of protection and implement them.
Preventing Email Spoofing in Office 365: Best Practices
Internet Service Providers (ISPs) and webmail service providers have set up solid authentication policies that scrutinize the legitimacy of mail senders. These policies are so strict that sometimes a genuine sender?s emails end up in spam. Nonetheless, these security protocols, known as Sender Policy Framework (SPF), Domain Keys Identified Mail (DKIM), and Domain-based Message Authentication Reporting and Conformance (DMARC), ensure successful delivery of emails post-authentication. They also ensure that no illegitimate source sends emails on your behalf. Users can work with only SPF if they have initiated the “hard fail” rule to cover the unavailability of DKIM and DMARC. However, that alone cannot keep your domain safe from spoofing, as attackers can still impersonate your domain for other receiving servers, which leads to distrust.
These three security protocols have to work together to protect your mails. While SPF only allows legitimate servers to send emails on your behalf, DKIM adds an extra layer of protection. It tells the recipient server that the message has the signature of a legitimate source. DMARC acts based on the results SPF and DKIM protocols have presented. Before discussing the process to set up these three security protocols, let us first understand, what they truly are.
What is SPF?
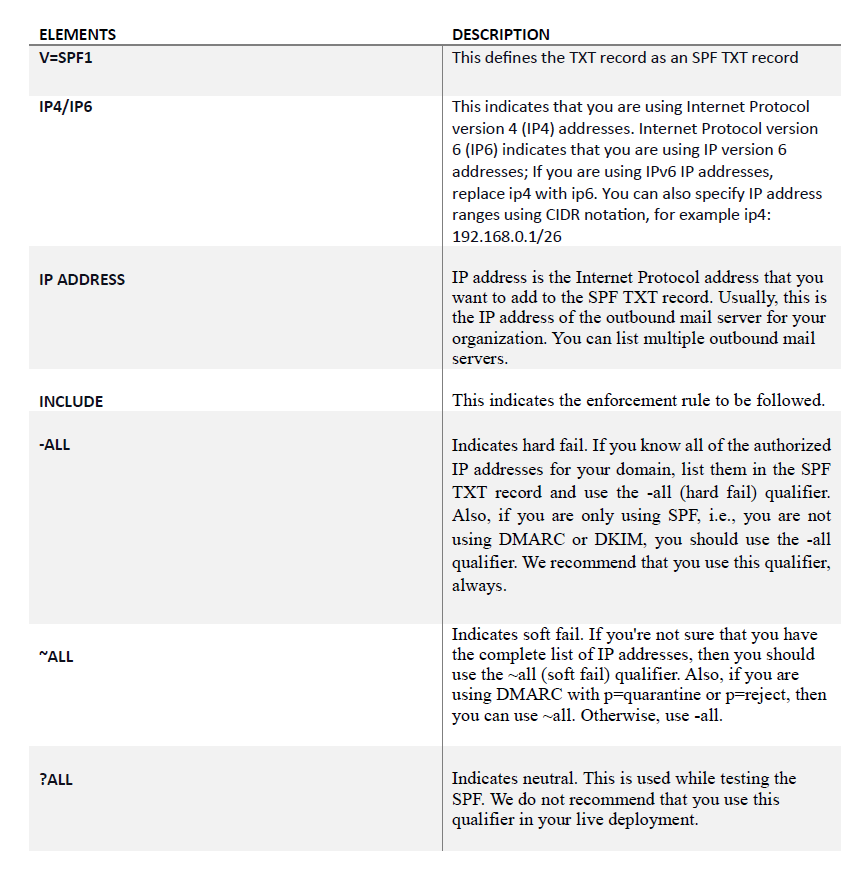
SPF is an email authentication protocol on recipient?s public domain as a TXT record that ensure the IP address of the sender is legitimate. When an email reaches the server having SPF protocol in place, the protocol effectively reveals the source of the email. It does this by extracting the return path of the sender (located in the email header) and queries the TXT record in the public domain to know if the source is legitimate. The email is dropped if the source is not on the TXT record. Nevertheless, the fate of the illegitimate email depends on the enforcement rule programmed by the network administrator.
Servers hosted on Office 365 premises do not require you to manually configure the SPF. All you need to do is update your TXT records. The SPF TXT file contains the information regarding authorized outbound (email) servers. An SPF TXT record is nothing but a DNS record. It verifies the domain name, from which email messages are sent. SPF checks the IP address of the sender and verifies its alignment with the sending domain.
Some organizations might have a subdomain that sends emails on their behalf. In this case, create a single SPF TXT record for all the subdomains, instead of creating a new TXT file for every subdomain.
However, it is critical to understand the syntax of an SPF and how to set it up.
Below is an example of an SPF TXT record syntax and a table to describe the nomenclature.
A typical SPF TXT record has the following syntax:
v=spf1 [<ip4>|<ip6>:<IP address>] [include:<domain name>] <enforcement rules>
SPF works in a simple and efficient way. For example, if sky.com sends a message to true.com, a verification process will commence. The server of true.com will attempt to know if sky.com is an authorized sender. It does this by comparing sky.com?s IP address with the TXT record. If the IP address of sky.com is in the TXT record, it will pass.
If your email is sent via Office 365, the syntax of the SPF TXT record will be the following:
v=spf1 include: spf.protection.outlook.com -all

What is DKIM?
DKIM is one of the security protocols that helps in preventing attackers from sending illegitimate or unsolicited emails. DKIM is an authentication mechanism that makes it difficult for the attackers to alter messages between two mail servers by generating a hash and encrypting the email. When the message reaches the recipient server, it is compared with the public domain record to confirm that the email is from a legitimate source.
Implementing DKIM helps in protecting from phishing and other social engineering attacks, by adding a digital signature to the outgoing message. Setting up DKIM, along with SPF, will further enhance the security structure of your mail server.
The significance of DKIM cannot be overemphasized. With DKIM in place, along with SPF and DMARC, it is difficult for hackers to impersonate your domain.
How to Configure DKIM for your Custom Domain?
DKIM signing can be enabled for your custom domain in the Microsoft 365 Defender portal, by visiting this link: Microsoft. You can configure this by going to email & collaboration > Policies & Rules > Threat policies > DKIM in the Rules section.
You can also visit DKIM portal at Microsoft DKIM Portal. Once you open the portal, click on the domain name for selecting the domain. A flyout will appear. The next step is to change the Sign messages for this domain in the DKIM signatures setting. This will switch ON the DKIM feature.
Once this is done, click the option – Rotate DKIM keys. You need to repeat this step for other custom domains (sending emails on your behalf), else they will be flagged as spam. If you are configuring DKIM for the first time, you might see an error – No DKIM keys saved for this domain. In such a scenario, you can use Windows PowerShell to enable the DKIM.
What is DMARC?
DMARC is a mechanism that unites the security protocols, SPF and DKIM, into one framework. Whenever SPF and DKIM authentication fails, it allows the domain owners to take action by reporting the failed emails. To enable DMARC, SPF and DKIM need to be enabled first.
How to Set up DMARC?
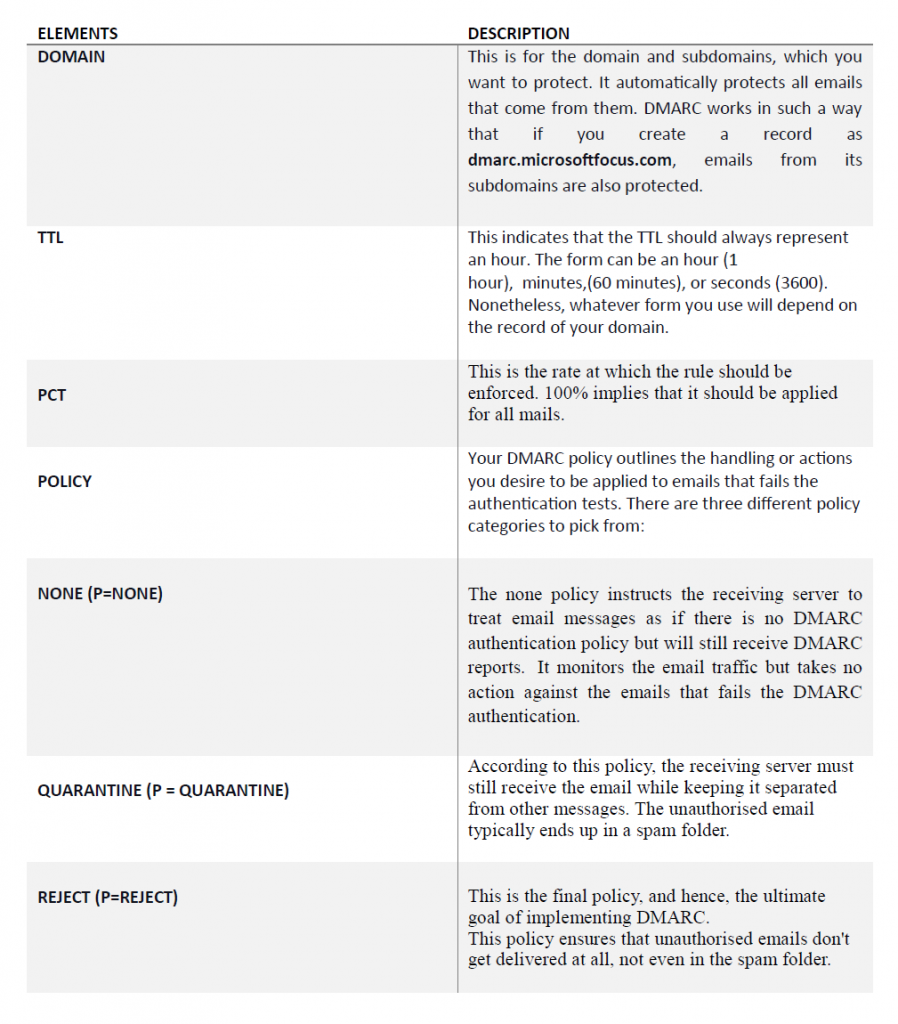
To set up DMARC on your custom domain, you are required to first confirm that your Office 365 account is linked to your domain. For this, login into your domain registrar and go to DNS management. DMARC policies are formatted as a TXT file. You can create a new policy by adding a new TXT file to your existing/current DNS records. A typical DMARC record looks like the following:
_dmarc.domain TTL IN TXT “v=DMARC1; p=policy; pct=100?
For example, to publish DMARC record for a domain, like microsoftfocus.com, the DNS administrator has to create an entry as follows:
_dmarc IN TXT (“v=DMARC1; p=none;”
“rua=mailto:dmarc-feedback@microsoftfocus.com”;
“ruf=mailto:auth-report@microsoftfocus.com”)

Importance of an Email Forensics Software
Sometimes, message headers of the emails are forged in such a way that they deceive the recipients. In order to mitigate the aftereffects of an email spoofing attack, you can take the help of an advanced eDiscovery and email forensics software, such as Stellar Email Forensic. The software effectively examines and analyzes the mailboxes to help you find the culprit. It also recover deleted emails and does effective case management.


