Summary: Have you just found that your WD external hard drive is greyed out in the Disk Utility? Unable to mount, now you are wondering how to bring an external hard drive back to life?
Don't worry; in this blog, we suggest some helpful methods to mount WD external hard drive, plus you can recover the contained data.
Not just Western Digital, but the shared methods apply to all brands of the storage drives.

![[Fixed] WD My Passport external hard drive greyed out in Mac (Mount and Recover Files)](https://www.stellarinfo.com/public/frontEnd/images/product/free-download-mac-blue-button.png)
Contents
How to Mount a WD My Passport External Drive?
When plugged into Mac’s USB port, a healthy external hard drive gets readily available on the Desktop, Finder, and Disk Utility section. Further, the transfer of files to-and-from the external hard drive is made possible when the device is successfully mounted on the Mac computer. Finally, after the job is done, you can safely remove the external storage device from Mac.

Why Isn’t WD External Hard Drive Recognized on Mac?
There are several possibilities for a WD My Passport hard drive going invisible on a Mac system. Those possibilities could range from:
- Corrupt partition table
- APFS or HFS file system
- Cryptic Disk errors
- Hard drive faulty cable
- Wear and tear
- Failed Restore
- Bad blocks on the surface
- Failed Partitioning on External Drive
Identifying an Unmounting WD My Passport?
You can try the below actions to determine if the WD external hard drive is mounting on your Mac:
1. Connect the WD My Passport external drive to your computer
2. Wait for the drive to appear in the Finder and Desktop. If the WD gives no response after getting connected with the Mac, go to Finder << Preferences and confirm if External Disks is selected.


On a healthier external drive, the above option works flawlessly. However, it may not work if your storage drive has one of those eight issues mentioned above.
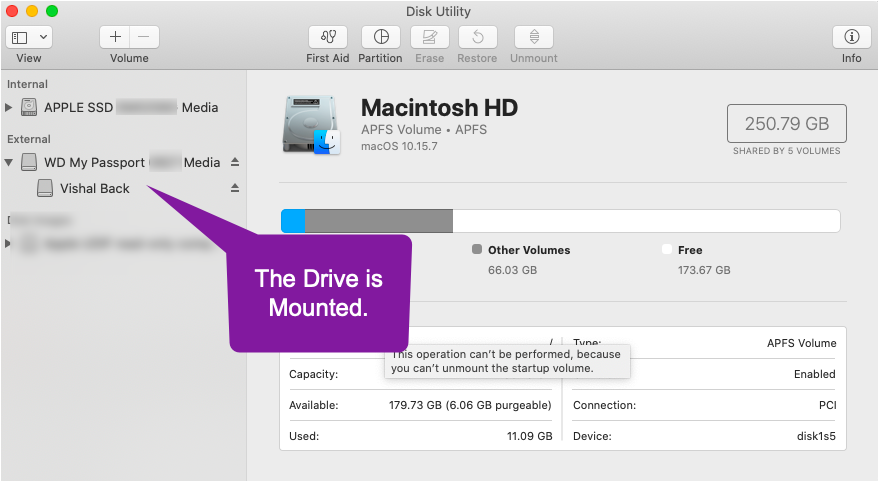
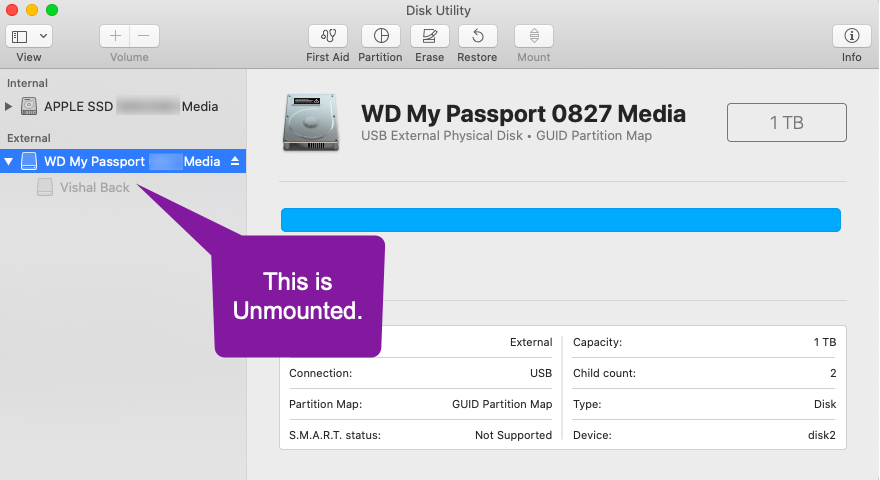
3. Go to Disk Utility and identify if your WD external hard drive is listed on the left-hand side of the interface. Again, if the external drive is Ok, it will get listed without any issue; however, if the WD device is logically corrupt, it might appear in Disk Utility though greyed out. Also, a physically damaged external hard drive will not appear in the Disk Utility panel. For such cases, you need to contact a reliable data recovery lab service.

Steps to Mount Back a Greyed out External Drive
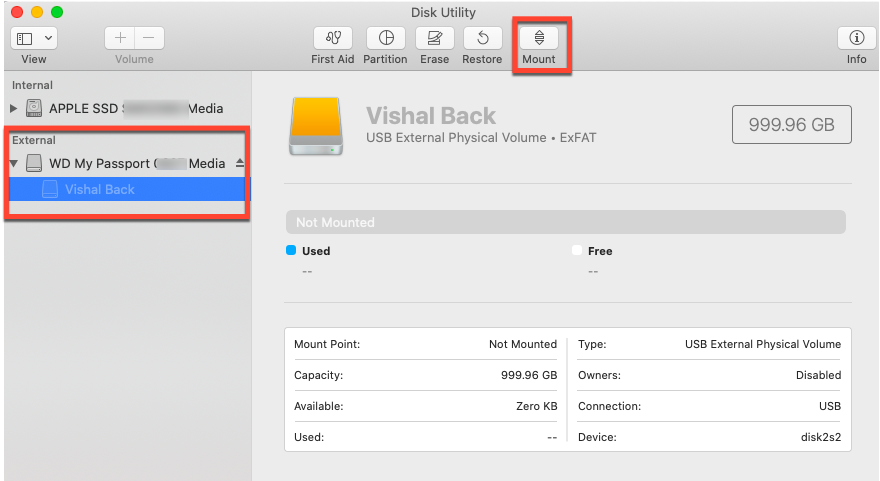
(i) Select & Click Mount ? Choose the external hard drive on the partition level and see if the Mount button is working? When clicked on a working device, the Mount button brings back the external hard drive for further access. However, if the disk is corrupt, then the Mount button may not offer any help. Try switching to the partition level and again press the Mount button.

(ii) To Erase or Not to Erase the External Drive? ? If you erase the non-mounting external hard drive with the Disk Utility, then it maps a new partition scheme on the device. Disk Utility will fix the problem, and you will be able to see your WD device again. But this operation will cause data loss on the external drive. Hence, this method is feasible only when the data inside the external hard drive is already secured somewhere, or data is of no use.

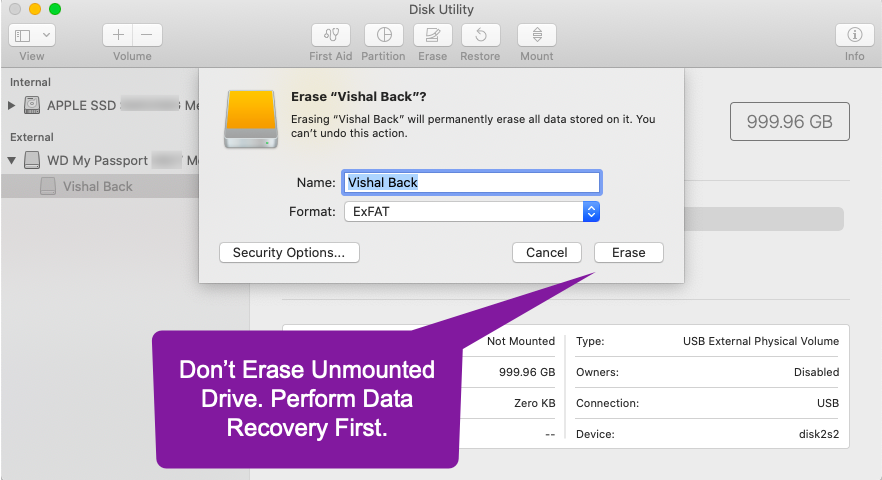
(iii) A Better Solution ? Ignore the Methods shared in (i) and (ii). Instead, try performing data recovery on the external hard drive first. Stellar Data Recovery offers a free version and a Pro version of data recovery software to help you recover files from an unmounted external drive. In the Free version, you can retrieve 1 GB of files from the external drive without any charge, whereas, in the Pro version, there is no limit of size. FYI, the Pro version comes with a cost of $79.99, and it has many benefits.
I recommend you try the Free Edition for your external hard drive recovery.
Step 1) Connect your external hard drive to Mac. Please ensure that your external device shows up in the Disk Utility, even as a greyed-out device.
Step 2) Download the software ? Stellar Data Recovery Free Edition on your Mac.


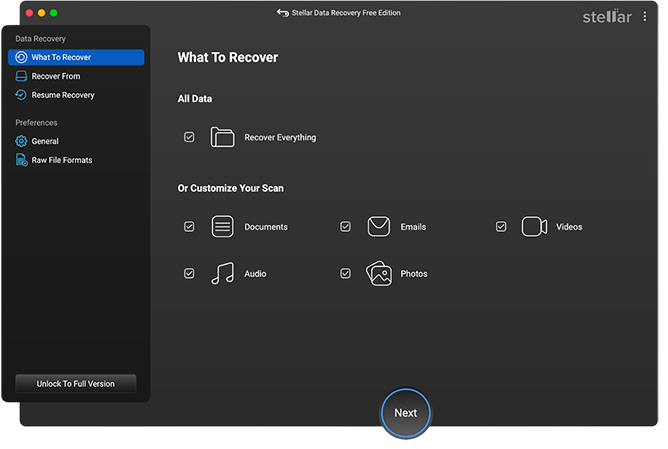
Step 3) Use the toggle buttons to unselect a data type you don’t want to restore.

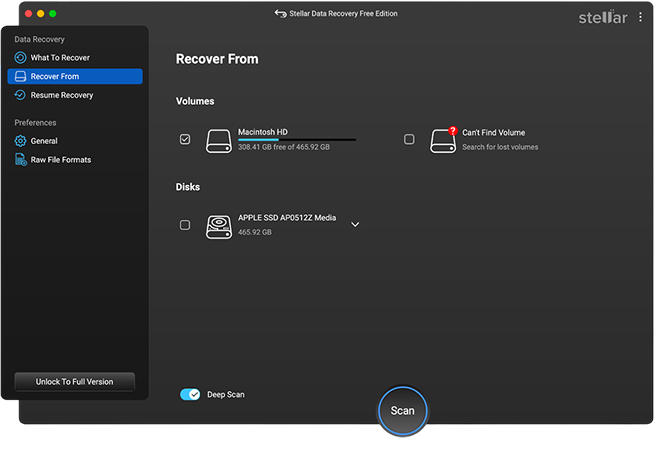
Step 4) Herein, select your greyed-out external hard drive and launch the scan.

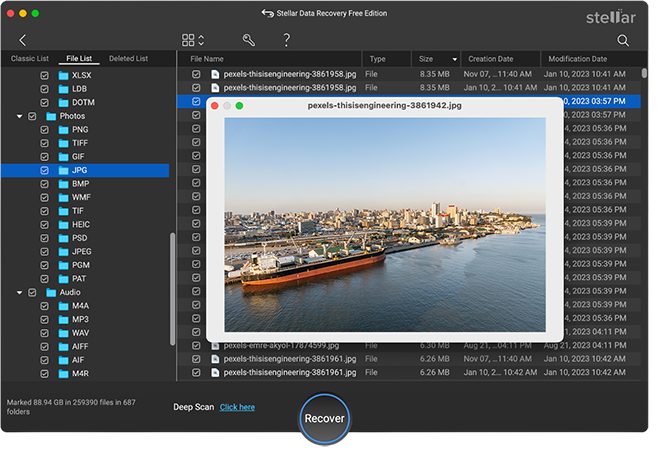
Step 5) After the scan completion, you can preview the files listed by the software for data recovery. Then, select, preview, and press the Recover button to save the file(s).

Many users prefer to use the Free Edition in the first place since it can quickly recover a few essential files without any activation or payment. However, advanced users opt for the Pro version of the software since there is no capping on the data size. If you want to go with the Pro version, then you can compare and upgrade.
Should I Erase the Disk Drive Now?
Yes, once you have recovered the files using Stellar Data Recovery software, you can erase the greyed-out external hard drive with a new partition scheme. A new partition scheme will bring your external hard drive back to life.
Conclusion
I hope this blog helped you resolve the greyed-out problem of your external hard drive. If you have any queries about data recovery, then feel free to connect with Stellar.


