Summary: The objective of this blog is to help Mac users remove a popular cloud-based application called Dropbox from their system. Follow the native method suggested in the blog to install and uninstall the application. Also, you can take the help of a free uninstaller provided by the SpeedUp Mac app to uninstall Dropbox on Mac without leaving any leftovers and traces.
Contents
Dropbox is a cloud storage solution like Google Drive, OneDrive, and iCloud. It is useful to sync all the important folders on your MacBook Pro/Air, iMac, or Mac mini to Dropbox. Mac users favor Dropbox due to simple UI, ease-of-use, and compatibility with Mac as well as iOS.
However, the chief reason behind Dropbox’s popularity is that it lets you share a single file and a folder in the same simplified manner. Apple has updated the iCloud app to do the same with enhanced integration with Mac and iOS devices, Dropbox might face stiff competition in the future. This is one of the many reasons we provide you with the methods to uninstall Dropbox on Mac.
Methods to Uninstall Dropbox on Mac?
Most of the users who have worked with the latest version of the iCloud app would want to shift their Mac’s default backup storage from Dropbox to iCloud. Being a native app from Apple, it has better integration with the OS used on Apple devices. In addition, you can uninstall Dropbox on Mac just like you uninstall any other application.
Method 1: Remove Dropbox without losing files
If you want to keep the files you stored on Dropbox but don’t want to use or keep Dropbox on your Mac anymore; you need to unlink the Dropbox before removing it. Unlinking your Dropbox will sign you out of the Dropbox app on your Mac, but the folders and files synced locally on Mac will be kept stored on your Mac. Follow the steps below.
Step 1: Run Dropbox on your Mac system.
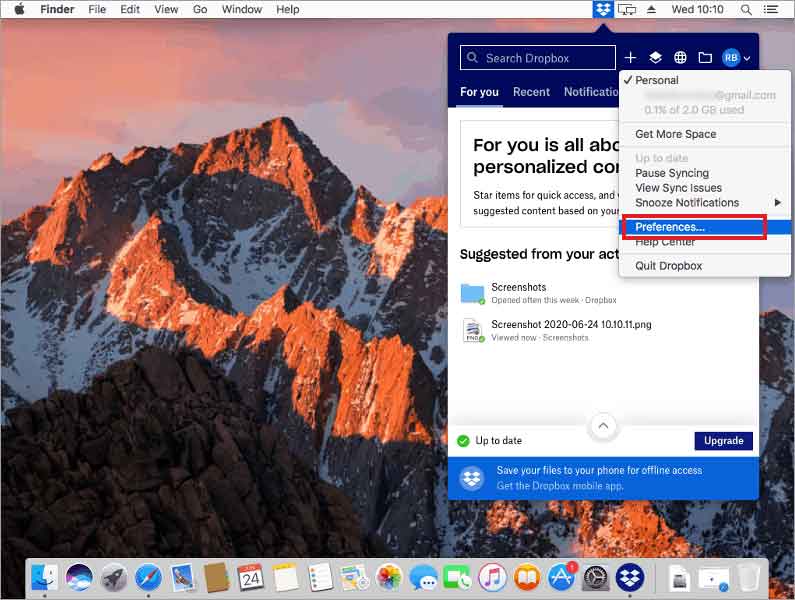
Step 2: Locate the Dropbox icon and select it. Now, click on the Settings icon and select Preferences.

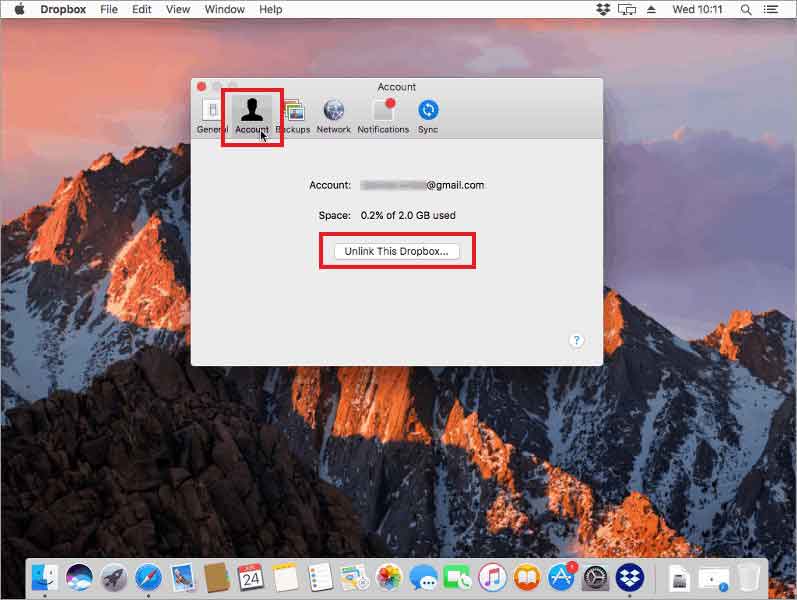
Step 3: Click the Account tab on top and click Unlink This Dropbox.

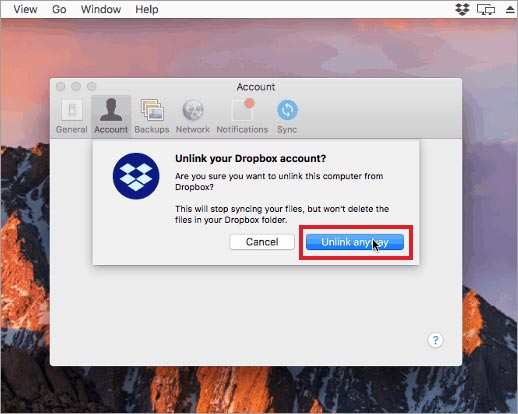
Step 4: In the confirmation dialog box, click Unlink anyway.

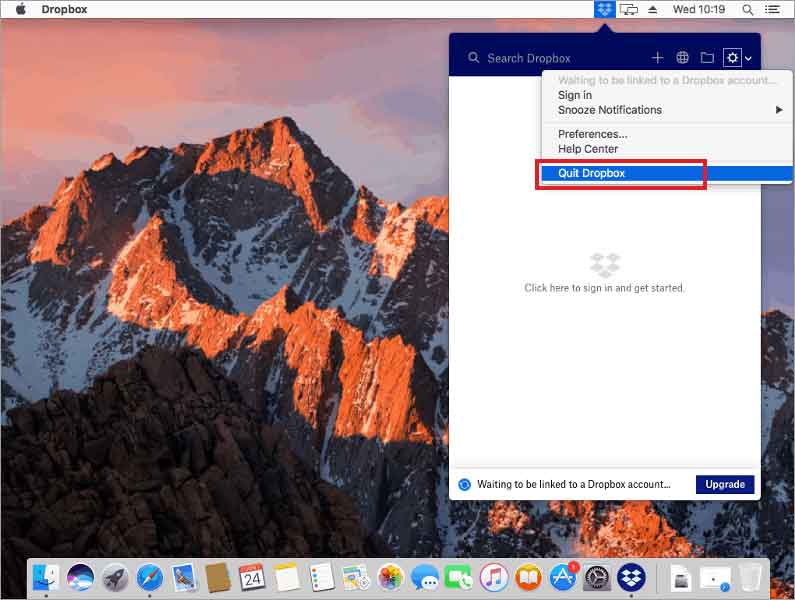
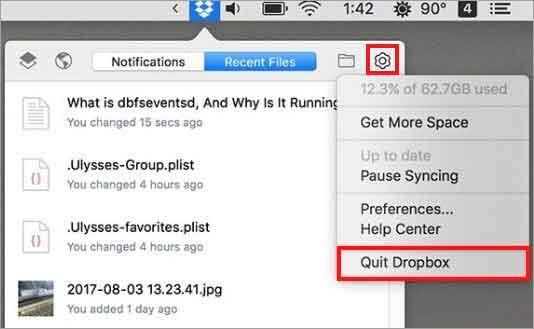
Step 5: Go back to the Dropbox icon in the menu bar. Click Settings and select Quit Dropbox.
The steps to uninstall Dropbox on Mac are as follows:
- First, go to the Application folder and right-click the Dropbox icon.
- Next, select the option ? Move to Trash. Or else, drag the Dropbox icon and drop it in the Trash folder.

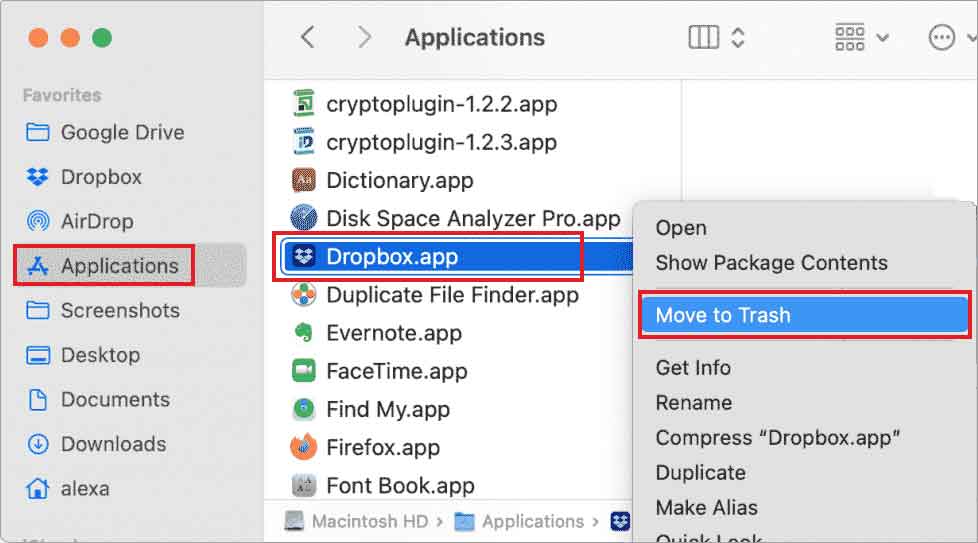
Note: Ensure all Dropbox windows are closed before sending the app to the Trash.
- Mac will ask you to enter the password to perform this action.
- Empty the Trash once Dropbox is moved to the Trash folder.
Method 2: Use Stellar SpeedUp Mac to uninstall Dropbox on Mac
Stellar SpeedUp Mac is a free Mac disk cleaner software that can help you uninstall Dropbox on Mac easily with a click of a button. It is also useful to remove redundant data, junks, large and old files, apps, widgets, extensions, leftovers from a Mac system. Try cleaning your Mac with SpeedUp Mac software if you are running out of space on HDD, SSD, and external media.
To uninstall the Dropbox app with SpeedUp Mac, perform the following steps:
Step 1: Install the Stellar SpeedUp Mac application and launch the software on your Mac.
Step 2: Click Uninstall tab from the top menu and select the Dropbox app.

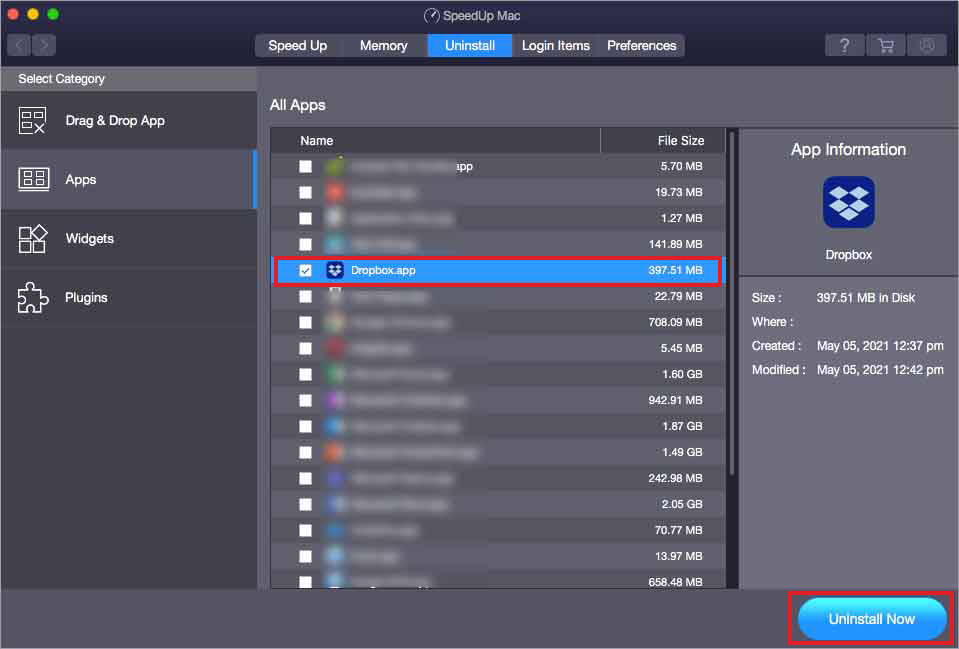
Step 3: Press the Uninstall Now button. A warning sign pops up. Proceed with caution.
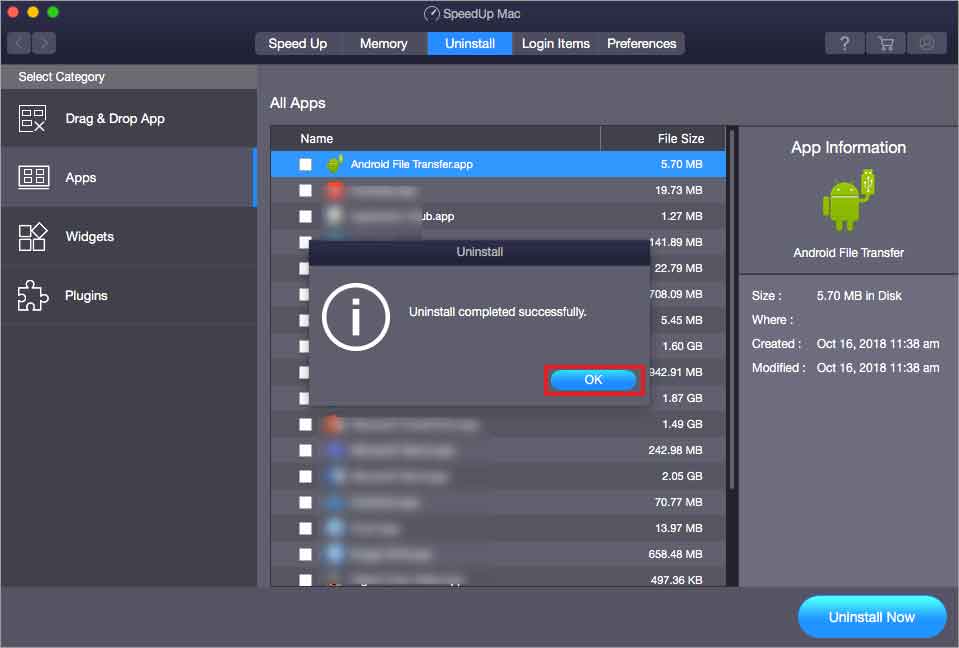
Step 4: Dropbox uninstallation is successful. Click OK on the message box.

SpeedUp Mac software is free for 30 days. However, once the trial period is over, you need to purchase a 1-year subscription plan to avail the service without any restriction.
Method 3: Uninstall and Remove Dropbox with plugins
If you have installed plugins for Dropbox, there are chances that you won?t be allowed to uninstall it directly. Instead, you need to delete the Plugin folder and then uninstall Dropbox in such a situation. Follow the steps below to remove the plugins and then uninstall Dropbox.
Step 1: Click the Dropbox icon in the menu bar and click Settings > Quit Dropbox.

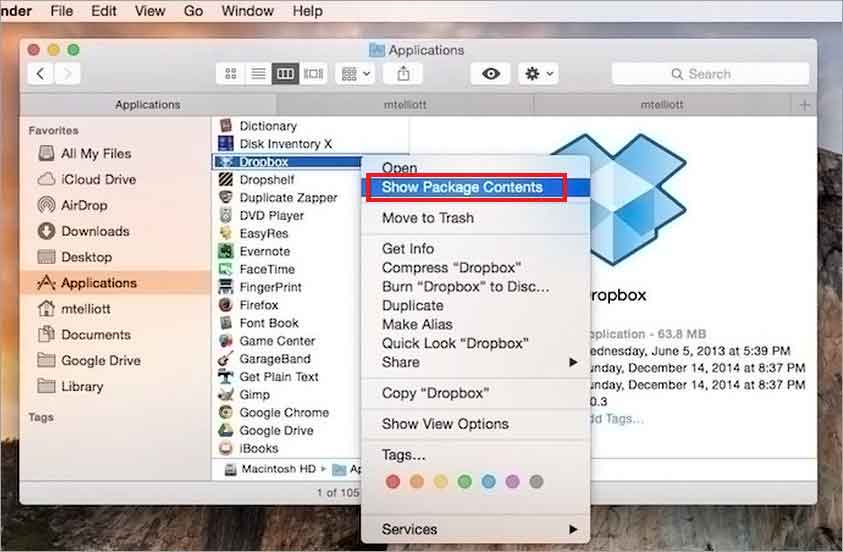
Step 2: Launch Finder and go to Applications. Locate the Dropbox icon, right-click on it and choose Show Package Contents.

Step 3: Click on the Contents folder to expand it. Right-click on the Plugins folder and choose Move to Trash from the right-click options to delete the Plugins.
Step 4: Again, click Finder > Applications and right-click on the Dropbox icon to move it to Trash.


Step 5: Open the Trash folder, right-click on the Dropbox icon and select Delete Permanently.
Conclusion
We hope the blog helped you uninstall Dropbox on your Mac easily. The native method is to trash the Dropbox icon and uninstall the application from your Mac. However, you need to empty Trash to remove the Dropbox app completely. An alternative software method that can help you uninstall applications on your Mac safely without leaving any traces and leftovers is by using the Speedup Mac app. All you need is to launch SpeedUp Mac software and use the Uninstall feature. Then, select the Dropbox app and click Uninstall Now to remove the app permanently from your Mac.
FAQ
1. How can I install Dropbox on my Mac?
To install the Dropbox folder on your Mac, you first need an account on Dropbox. The process to register for an account on Dropbox is simple:
- Visit Read More and sign up for a new account. If you already hold a Google account, just sign in with your Gmail account.
- After a successful login, go to your profile section and click ?Install Dropbox app?.
- Press the Download Dropbox button to download the dmg file on your Mac.
- Double-click the DropboxInstaller.dmg and again double-click the Dropbox app icon.
- Allow the process to complete.
- Sign in with your Apple or Google account.
Dropbox gets installed in Applications. Post-installation, the Dropbox folder will be available in the left pane of the Finder on your Mac. Once installed, you can sync your files to the Dropbox folder, which will get uploaded to the cloud.
2. Can I get back the files lost after the uninstallation of Dropbox?
If you have locally synced your files and other data stored on Dropbox, you can easily recover the lost data on your Mac. However, to recover the lost data on Mac, you will need the Stellar Data Recovery Professional for Mac. It is a powerful recovery software capable of dealing with almost any data loss situation and securely recovers your data with 100% integrity. The software is also used to keep a tap on the health of your Mac’s internal and external drives apart from recovery of data from a non-bootable or crashed mac system.
3. How can I recover my data if my Time Machine backup has failed?
It is easy to recover data using the Time Machine backup even if it has failed. The Time Machine backup can recover the data saved until you last took the backup on your Mac using the Time Machine app. If you face issues while retrieving the data due to Time Machine backup failure, you can recover your data using professional data recovery software. Alternatively, you can use the Disk Utility or other simple methods available on your Mac to fix the failed Time Machine backup and then try to recover your valuable data.

