Summary: You’ve just finished editing a video in iMovie on your Mac. But while exporting the file, you received an error message saying Exporting "Your File Name" has failed. You may also receive a message saying "The operation couldn't be completed" with an error code com.apple.Compressor.CompressorKit.ErrorDomainerror -1. The only option you get on the error screen is an OK button, and tapping on it brings you back to the editing screen. So how to resolve this error?
Thankfully, there are fixes available to get rid of the iMovie export not working error on Mac, and we have explained all the working ones in this article.
Fix iMovie Won’t Export Error on Mac
There could be many possible reasons for iMovie export not working. Storage space running out, corrupted video file in your iMovie project, an invalid export file name, or an unknown bug. But you don’t have to worry as the below fixes are enough to let you export projects in iMovie.
1. Check Storage Space
Among all the reasons for iMovie export failure, the most common one is running out of first thing you should do to eliminate the issue is to check the storage space on your Mac. Below are the steps to check storage space on Mac.
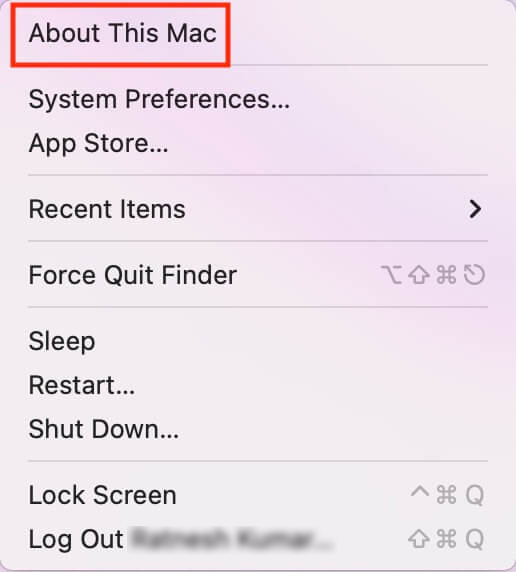
Step 1: Click the Apple logo in the top-left corner of the screen.

Step 2: From the Apple menu options, select the About This Mac option. It will open a pop-up window on the screen.

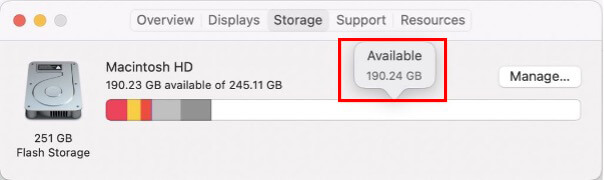
Step 3: By default, you will land in the Overview tab. Switch to the Storage tab and wait for a few seconds. Check the Available storage on your Mac.


If the available storage is less than the export file size, delete some unnecessary files, videos, or apps from your Mac. Once you?re sure you have enough available storage space, try to export the project again. Hopefully, you?ll be able to export your project now.

2. Check Export Settings
iMovie offers a plethora of export settings. A lousy configuration in export settings might lead to an error. So, check your iMovie export settings before you try any complex fixes. Make sure you use the correct video codec, audio bitrate, etc. Most importantly, check your export file name. iMovie doesn’t allow special characters like Hyphen, Colon, @, etc.
3. Restart iMovie
The practical yet straightforward fix for the iMovie export error is restarting iMovie. You will have to quit iMovie first and then relaunch it. But before you restart iMovie, make sure to save the project, so you don’t lose your work. Also, remember that clicking the red close icon in the top-left corner of iMovie doesn’t quit the app. To quit iMovie on your Mac:
Step 1: Find iMovie in Dock and double-click on it.
Step 2: On the next screen, select the Quit option.
Step 3: Once you have quit iMovie, please wait for a few seconds, and relaunch it.
Check if you can export your project now.
4. Update iMovie
Apple regularly updates iMovie to add new features and fix bugs present in the previous version. If you face issues in exporting a project and running an older version of iMovie, you should update iMovie to check if it makes any difference. To update iMovie on your Mac, follow the below steps.
Step 1: Open App Store on your Mac.

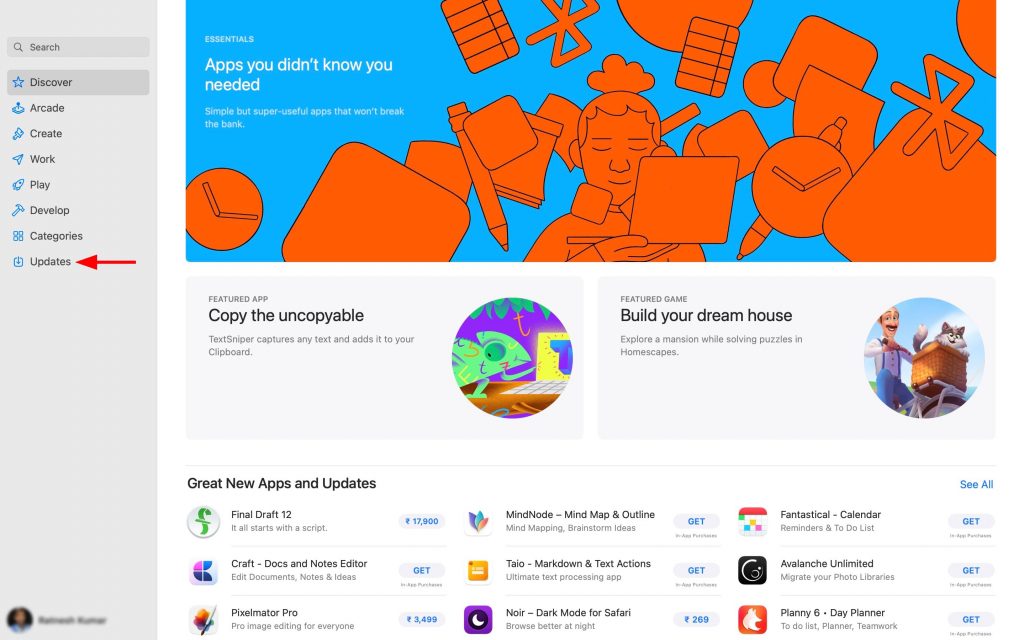
Step 2: In the App Store, tap on Updates on the left sidebar.

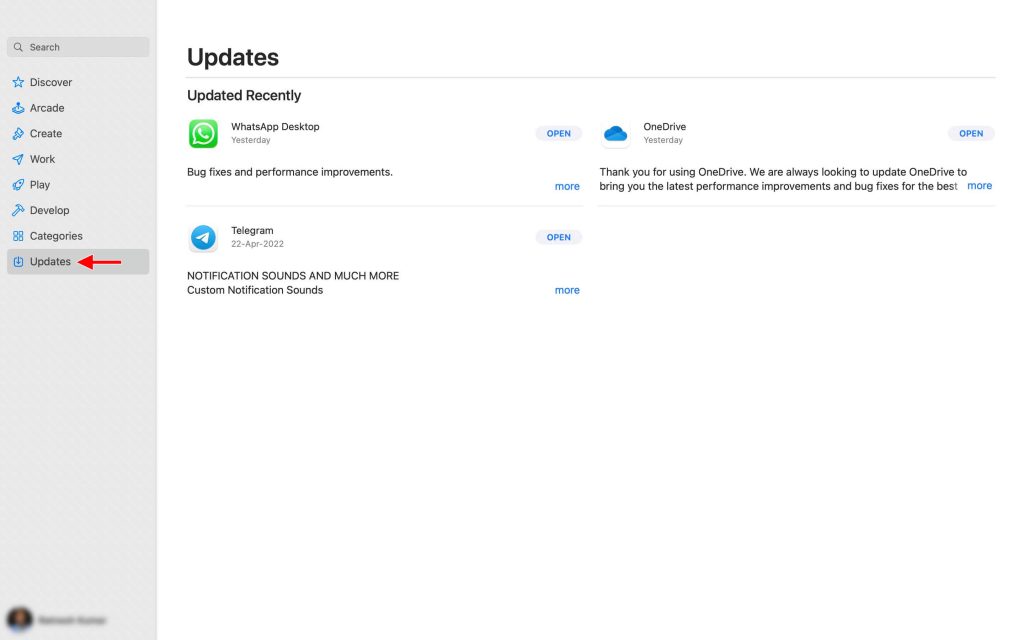
Step 3: On the Updates screen, check for updates available for iMovie.
If you see a new update waiting to be downloaded, download and install it. Once you have updated iMovie, relaunch it and try to export the project that was throwing errors earlier.
5. Create a New Project
The export error in iMovie might be project-specific. You can identify it by creating a new project with some different images and videos. If you can export the new project, the issue is with your current project, and iMovie has nothing to do with it. Mainly the project-specific problems in iMovie are caused by corrupted videos. If you find some files in your projects are corrupted, don’t worry, it’s not the end of the world. Our next fix will help you repair corrupt videos on Mac.
6. Repair Corrupt Videos
There are dozens of software claiming to repair corrupt videos on Mac. But when it comes to actual functioning, none of them even come close to our in-house Stellar Repair for Video software for Mac. It is a complete video repair solution for Mac. You can use it to fix all sorts of video corruption issues, whether it is a black screen, flickering, stuttering, video lag, or any other problem you might be facing.
The best part of Stellar Repair for Video software for Mac is that you can repair multiple corrupt videos simultaneously. It kills the competition by offering MOV, MP4, M4V, and 17 other formats when it comes to supporting video formats. Whether your videos were corrupted during editing, transfer, or conversion, Stellar Repair for Video software for Mac has got you covered. Last but not least, it has support for the latest macOS Monterey along with Big Sur, Catalina, and older macOS versions.
As you are impressed reading the features, you would like to try it out. Stellar Repair for Video software for Mac offers a three-step solution to repair corrupt videos on any Mac.
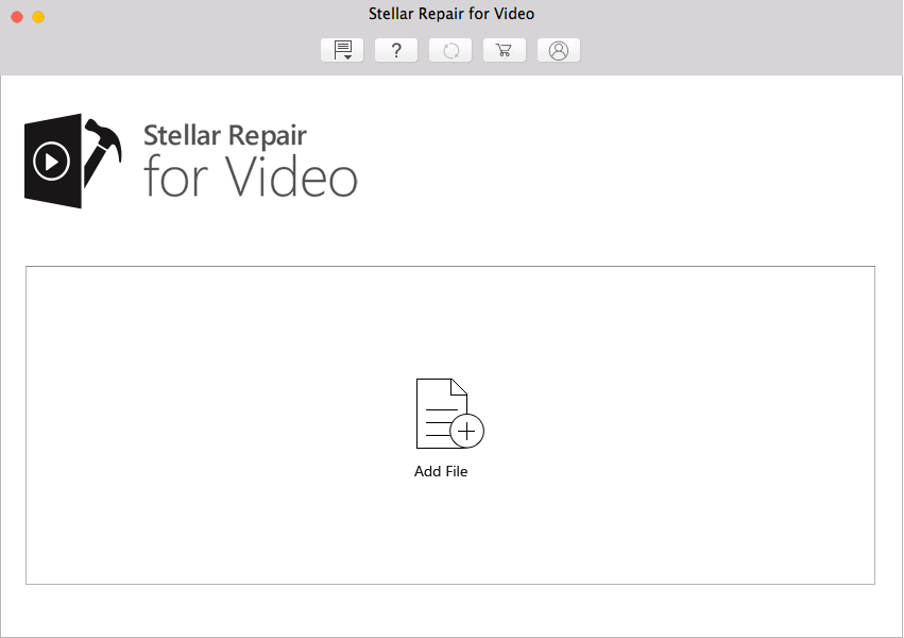
Step 1: Open Stellar Repair for Video software on your Mac and select Add file. Select all the corrupted video files that you want to repair.

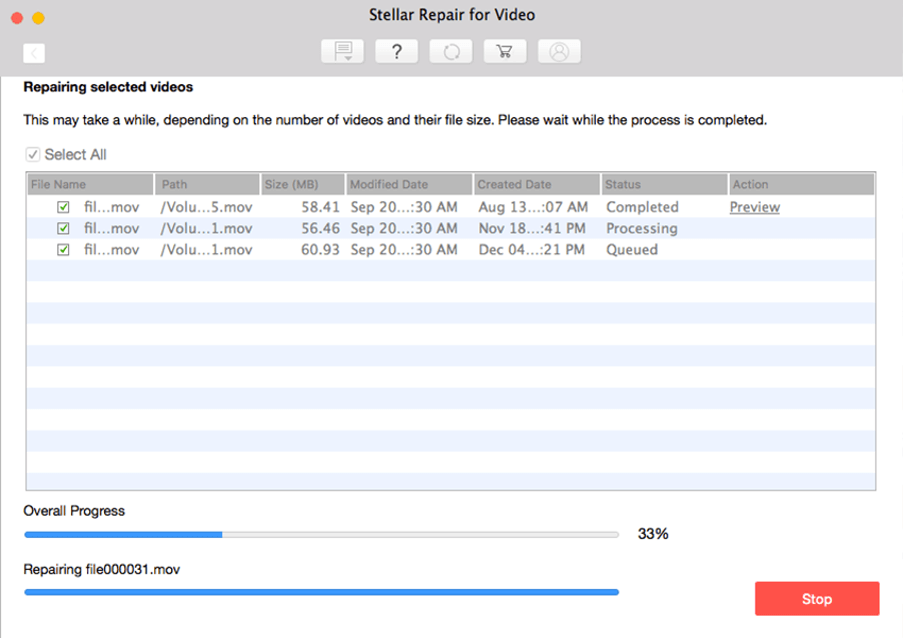
Step 2: Once you have selected the files, click Repair on the next screen.
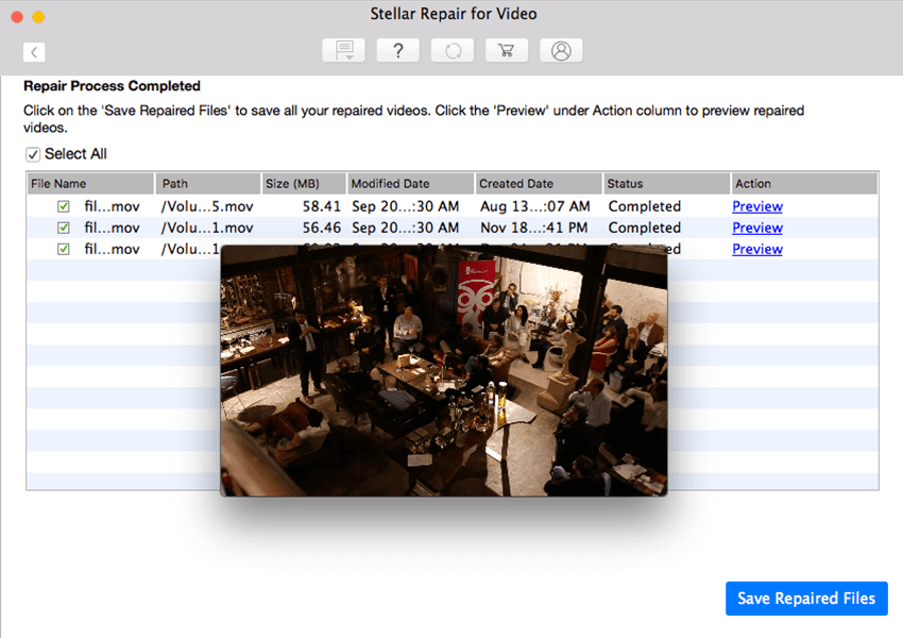
Step 3: Lastly, preview the repaired videos and save them in any directory on your Mac.

That’s how simple it is to repair corrupted videos on Mac. You can free download Stellar Repair for Video software for Mac. The free version allows you to preview repaired videos. After testing the free version, you can purchase the full version of the software to save the repaired files in any directory on your Mac.
Give it a go by downloading it from the below link.


7. Reset iMovie
If you have repaired corrupted videos but can still not export the project in iMovie, the next solution is to reset iMovie. If you are wondering, be assured that resetting iMovie will not affect your projects. Follow the below easy steps to reset iMovie on your Mac.
Step 1: Quit iMovie on your Mac.
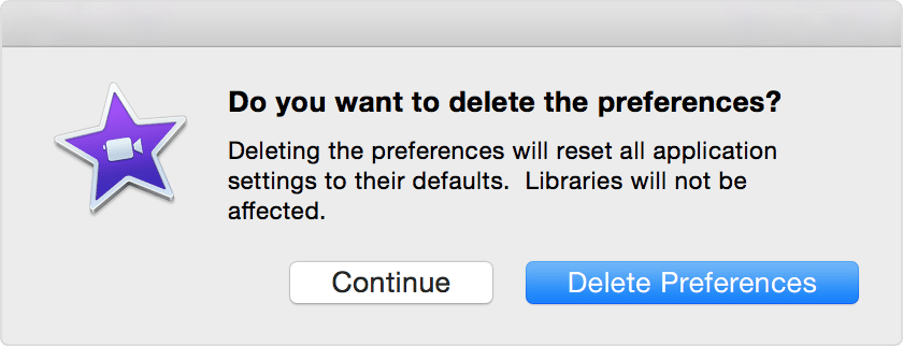
Step 2: Press and hold the Option+Command keys on your Mac keyboard, and while holding the keys, open iMovie again.
Step 3: On the confirmation screen, click Delete Preferences button to reset iMovie.

Once you have reset iMovie on your Mac, relaunch it as you usually do and try exporting your project. Hopefully, you?ll be able to export your iMovie project.
8. Boot in Safe Mode
When a Mac boots up in Safe Mode, It does a basic check of the Startup disk and deletes some system cache. Booting Mac in Safe Mode has fixed the iMovie export not working issue for many users. The steps to boot Apple silicon Mac differs a bit from Intel-based Macs. You can follow the below steps based on your Mac?s processor.
On Intel Mac
If you have an Intel-based Mac, follow the below steps to boot it in Safe mode.
Step 1: First of all, Shut down your Mac and wait for a few seconds.
Step 2: Turn on your Mac. Alternatively, you can Restart your Mac.
Step 3: Press and hold the Shift Key when your Mac restarts.
Step 4: Release the Shift key when you land on the login screen.
Step 5: Enter the Mac password to log in. You might be asked to log in again.
On Apple Silicon Mac
If you have an Apple Silicon Mac, follow the below steps to boot it in safe mode.
Step 1: Shut down your Mac.
Step 2: Turn on your Mac.
Step 3: While your Mac is turning on, press and hold the power button until you see startup options on the screen.
Step 4: Select “Continue in Safe Mode” under startup options and then press and hold the Shift key.
Step 5: Log in to your Mac. You might have to log in again.
On both Intel and Apple silicon-powered Macs, you will see a Safe Boot logo in the top-right corner of the screen on the first or second login screen. Now, Restart your Mac to come out of Safe Mode. When your Mac is in normal mode, open iMovie and try to export your project.
9. Reset NVRAM or PRAM
If you have tried booting your Mac in Safe mode, but the issue persists, the next fix you should try is resetting NVRAM or PRAM. It fixes many problems you face on your Mac, including iMovie export won’t work. It is only possible to reset NVRAM on Intel-based Macs. The new Apple-silicon-based Macs don’t have such an option. Below are the simple steps to reset NVRAM on an Intel-based Mac.
Step 1: Shut down your Mac and wait for a few seconds.
Step 2: Press and release the power button to turn on your Mac.
Step 3: When your Mac turns on, press and hold the Option+Command+P+R keys on your keyboard.
Step 4: Keep holding the keys for at least 20 seconds or until you see the Apple logo on your screen twice.
Following the above steps will reset NVRAM or PRAM on your Intel-based Mac. Now try to export your iMovie project, and hopefully, it should not fail this time.
Final Words
iMovie is hands down the best free video editing app available on Mac. Usually, it works flawlessly without any errors. But at times, you might face errors in exporting the projects. The errors are primarily caused by insufficient storage space, corrupt video files, or invalid export file names. You can delete files to make room for your new project and rename the export file to fix the issues. If the problem is due to corrupt videos, you have the solution in the form of our Stellar video repair software for Mac.
Which fix did work for you? Let us know by dropping a comment.

