Cutover migration is the best solution if you are migrating from an older version of Exchange Server to Office 365 (Exchange Online). In Cutover migration, the MX records changed to the new host (Exchange Online) and new emails start receiving in the new tenant. However, the issues arise when you need to run an incremental synchronization to synchronize the messages from the last seeding, after the migration is complete.
In this article, we will be going through the process of performing incremental synchronization after Office 365 or Microsoft 365 migration. We’ll also look into the issues that may arise and explore the possible solutions to resolve them.
It is always best to use the Exchange Management Shell (EMS) PowerShell to execute the synchronization in order to have more features and control. Here, we will be go through the commands to manage the migration batches, considering that the migrations have already been created.
Stop a Migration Batch
Stop the migration batch which is showing syncing. This means that the migration is currently running and data is being migrated. If, for a reason, you need to stop the migration batch, you can use the Stop-MigrationBatch PowerShell command as given below.
Stop-MigrationBatch -Identity "<Batch Name>"

This will stop any progress and halt the migration.
Start a Migration Batch
To start a migration batch, which is manually stopped or halted and is showing stopped in the status, you can use the Start-MigrationBatch PowerShell command as given below.
Start-MigrationBatch -Identity "<Batch Name>"

The specified batch will start migrating again and continue from where it was stopped.
Complete the Migration Batch
If you want to finalize the whole migration process of a particular migration batch, you need to use the Complete-MigrationBatch PowerShell command as given below.
Complete-MigrationBatch -Identity "<Batch Name>" -NotificationEmails "<email recipient>"

This command is to finalize the migration job. It means that the cutover migration is complete and all new emails are being received and sent from Exchange Online. When this is executed, this will run a final incremental synchronization. After this, you need to point the user’s Outlook account to the new host. You can convert the source mailboxes to a mail-enabled user account.
Remove the Migration Batches
You need to remove the completed migration batches to ensure that there is no error after re-execution or changes. After the migration batch is complete or not needed anymore, you can use the Remove-MigrationBatch PowerShell command as given below.
Remove-MigrationBatch -Identity "<Batch Name>"

Check the Synchronization Status
During the migration, you can view the status of the batches from the Exchange Admin Center by going to Recipients > Migrations. Here, you will be able to check and also execute an incremental synchronization of the mailboxes.
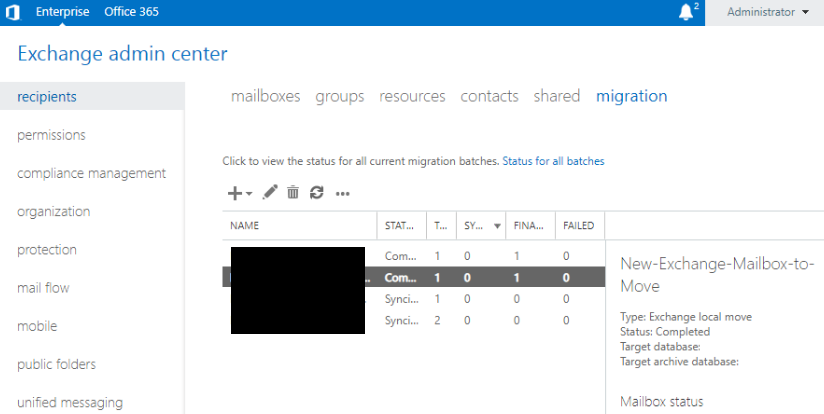
When running the migration and the incremental synchronization, you will be able to see the status and progress. Here, you will see the batches details as follows.
- Name: The name of the migration batch you have created.
- Status: This will show syncing (which means that the data is in transit) and synced (meaning that the batch is complete).
- Total: It will show the total number of mailboxes in the batch.
- Synced: It will show all the successfully migrated mailboxes.
- Finalized: It will show the number of mailboxes which have been successfully migrated in all batches.
- Failed: It will show the mailboxes that have failed.
Conclusion
Migrations can either go smooth or become a nightmare to the business and the migration team. There could be issues where the migration batch would not start or would not complete. There are various other things that could go wrong. You can look into any changes to the network, operating system firewall, or any issues with the current Exchange Server.
Natively, there isn’t much that you can do. However, you can use a specialized tool like Stellar Migrator for Exchange to make the migration process much smoother and more reliable. This powerful application ensures seamless migration even if the Exchange Server is down or the system is corrupted.
Stellar Migrator for Exchange supports all versions of Exchange Server and allows you to browse, select, and migrate mailboxes with ease. You can directly migrate mailboxes, shared mailboxes, archives, and public folders to Office 365 (Microsoft 365) or another live Exchange Server. The tool guarantees complete data integrity, zero downtime, and no data loss during migration.