&media=https://www.stellarinfo.com/public/image/article/How-to-Recover-Data-from-an-External-Drive-on-Mac-(2026-Edition)-1920.jpg&url=https://www.stellarinfo.com/article/recover-data-from-external-drive-on-mac.php)


Any storage device can fail – including external drives connected to your Mac, but in most cases these failures are logical rather than physical. More often than not, the drive itself works but the underlying data becomes inaccessible to macOS because of a corrupted file system, accidental format, unsafe ejection, damaged partitions, or mount errors.
There are plenty of other causes too, but recovery is still possible. You just need the right methods and tools to reclaim your lost files. We have put together a detailed guide to help you walk through the various methods to recover lost or deleted files from an external drive on Mac, using both built-in tools and recovery software.
Do These Things Before You Try Anything Else
Data recovery is a race against overwriting. Most people lose their files for good not because of the original problem, but because of what they did next. Read these before going further.
- Stop using the drive right away to prevent overwriting.
- Rule out a bad cable, port, or Mac before assuming the drive is dead. Try a different USB or Thunderbolt cable, a different port on the same Mac, and ideally a second Mac altogether.
- Don't install recovery software onto the affected drive. Install your recovery tool on your Mac's internal drive or a different external drive. Save the recovered files somewhere other than the source drive.
- Don't run Disk Utility's First Aid yet. First Aid is a repair tool, not a recovery tool. It rewrites file system structures, which can overwrite the metadata your recovery software needs. Recover first, then repair.
- Don't reformat or "initialize" the drive. If macOS prompts you to initialize an unreadable drive, click Ignore or Eject. Recovery software can often read drives that macOS itself refuses to mount – but only if you haven't formatted over them.
- Check the drive’s S.M.A.R.T. status before you commit to a DIY fix. Open Disk Utility, select the drive, and look at its S.M.A.R.T. status. If it reads Failing, treat the drive as hardware that is on its way out: prioritize cloning or image-based recovery immediately rather than running repeated repairs.
- Give your recovery software Full Disk Access before you scan. Recovery apps often fail to scan a drive properly without it. Grant it under System Settings > Privacy & Security > Full Disk Access, then add (or enable) your recovery tool in the list.
What Caused Your Data Loss — and Which Method Will Fix It
|
Scenario |
Most likely cause |
Where to start |
|
You deleted files by mistake |
User error |
Method 1: Check the Trash |
|
You emptied the Trash with the wrong files in it |
User error |
Method 2: Time Machine, then Method 3: Cloud backup, then Method 4: Recovery software |
|
You accidentally formatted or erased the drive |
User error in Disk Utility |
Method 4: Recovery software (do not write anything else to the drive) |
|
Drive shows up but files are missing or grayed out |
File system corruption |
Method 4: Recovery software, then Method 5: First Aid |
|
macOS prompts you to “initialize” the drive |
Corrupted partition table |
Method 4: Recovery software — do not initialize |
|
Drive doesn’t show up in Finder but appears in Disk Utility |
Mount error or logical corruption |
Method 5: First Aid (after recovering anything critical with Method 4), then Method 6: Terminal if First Aid fails |
|
Drive doesn’t appear anywhere, even in Disk Utility |
Bad cable, port, or hardware failure |
Troubleshoot connections (second cable, second Mac), then Method 7: Professional service |
|
Drive is clicking, grinding, or not spinning up |
Mechanical/physical failure |
Method 7: Professional service — stop trying DIY fixes |
|
Drive was exposed to water, fire, or a drop |
Physical damage |
Method 7: Professional service |
|
Files vanished after an unsafe ejection or power loss |
File system corruption |
Method 4: Recovery software, then Method 5: First Aid |
If you are not sure what kind of problem your external drive has, try plugging it into a different port or a different Mac with a working cable. If it doesn’t show up anywhere and you hear unusual sounds, treat it as physical and skip straight to Method 7. If it shows up somewhere, even just as an unmounted volume in Disk Utility, software recovery has a real chance.
How to Recover Files from a Mac External Drive?
The methods outlined below go from quickest and safest to more advanced recovery methods. Start with the first method and work your way downwards – each method explains when to use it, when to skip, and the exact steps you need to follow.
1. Check the Trash
macOS doesn't immediately erase the file which you delete from your external drive – it’s moved to the Trash folder. This is different from Windows, where files deleted from external drives skip the Recycle Bin and are removed straight away. Your files may simply be sitting in the Trash waiting to be restored.
- Make sure the external drive is connected to your Mac. The Trash only shows files from external drives when those drives are connected and working properly.
- Click the Trash icon in your Dock.
- Look for the files you want to recover. You can sort by Date Added to find deleted files faster.
- Right-click any selected file and choose Put Back. The file will go back to where it was on the drive.
2. Restore from a Time Machine Backup
Time Machine is a built-in feature on macOS which helps you take incremental backups of the files on your Mac. It is one of the fastest ways to get your files back if you had set it up beforehand. The catch is that Time Machine doesn't automatically back up external drives – you need to add each one manually.
For setup details, see Apple's official guide to Time Machine backups. Open System Settings > General > Time Machine and click Options. If your external drive is listed under "Exclude from backups," it wasn't backed up. If not, you’ve got backups to work with.
If the drive is on that exclusion list, or you never added it, here’s how to include it so it’s protected from now on:
- Open System Settings > General > Time Machine and click Options
- Select the external drive under “Exclude these items from backups”
- Click the (–) button to remove it from the exclusion list
- Click Done. Time Machine will now include that drive in its future backups
Keep in mind this only helps going forward. It can’t recover data that was lost before the drive was backed up.
- Click the Time Machine icon in the menu bar
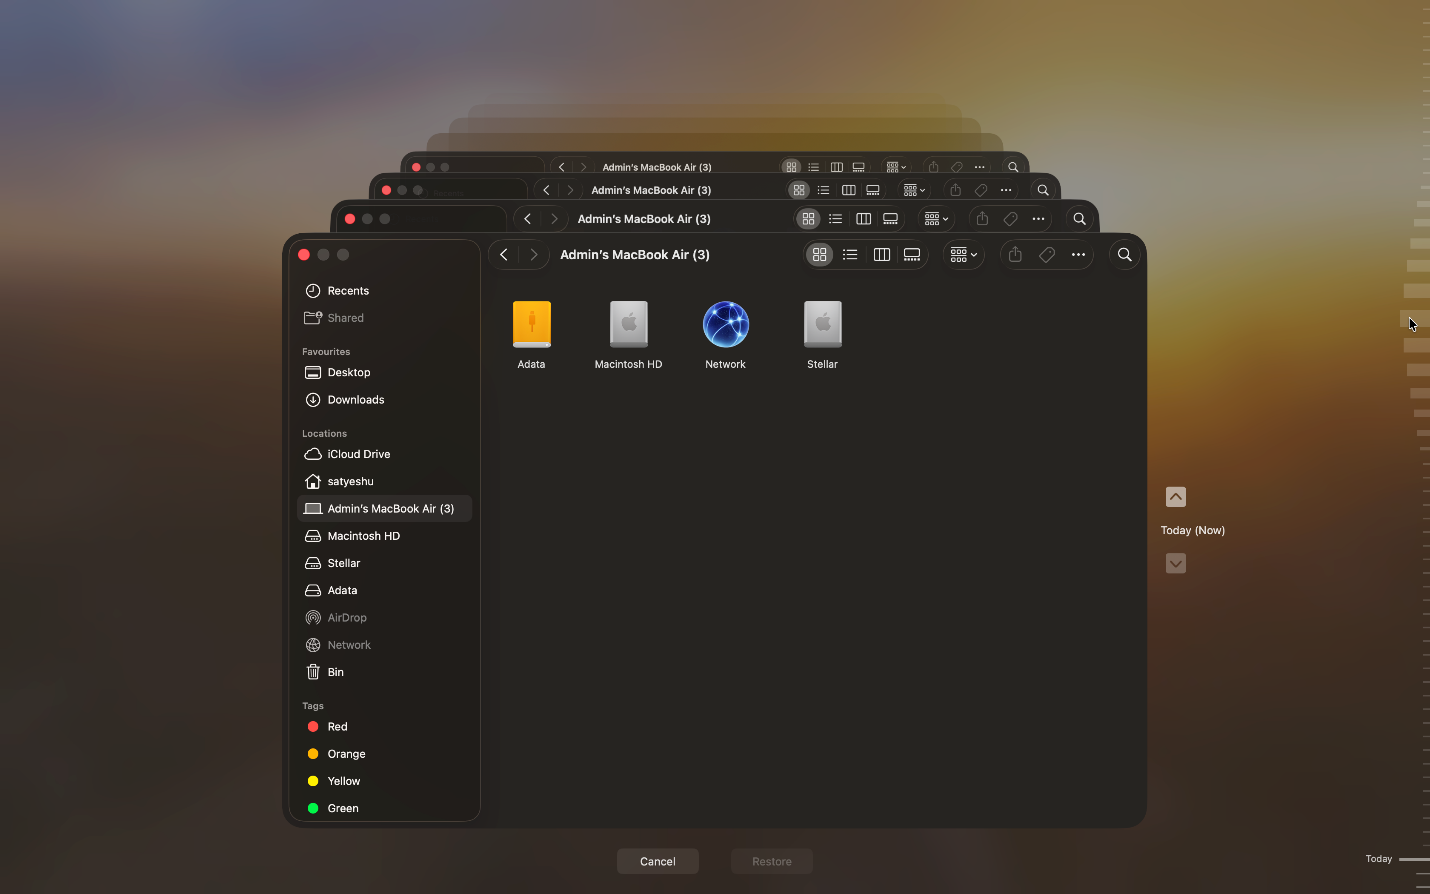
- Select Browse Time Machine Backups
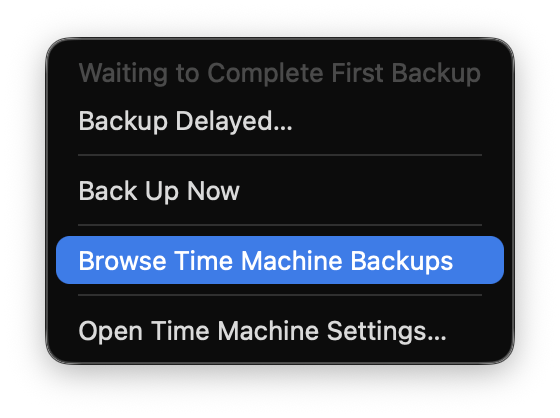
- Select the backup files/folders you want and click Restore
3. Restore from iCloud or Other Cloud Backups
If you use a cloud sync service – iCloud Drive, Dropbox, Google Drive, OneDrive alongside your external drive there's a chance copies of your files exist outside the failed drive. You can often recover files by downloading them again. This isn’t a general-purpose solution for everything, but it works great for documents and media you have synced.
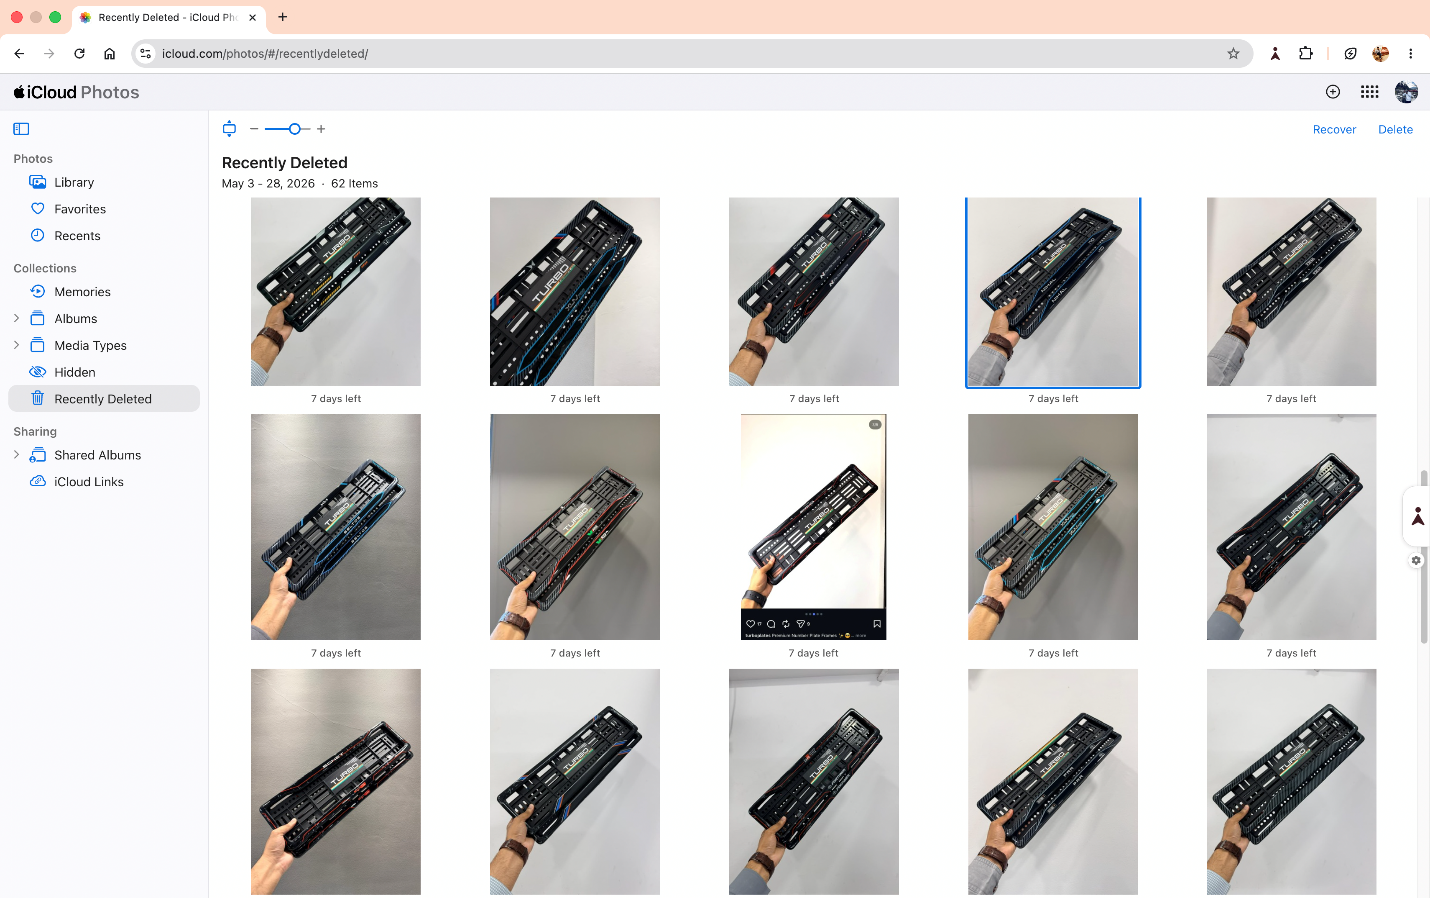
iCloud Drive
Files stored in the iCloud drive can be accessed from any device linked to your Apple ID – iCloud moves the deleted items to the Recently deleted folder and keeps them there for up to 30 days before removing them permanently.
- Go to iCloud.com
- Sign in using your Apple ID
- Click Drive and open the Recently Deleted
- Select the files you want to restore and click Recover
Dropbox, Google Drive, OneDrive
All three keep deleted files and previous versions for a window of time, usually 30 days for free accounts, longer for paid plans.
- Dropbox: Deleted files
- Google Drive: Trash
- OneDrive: Recycle bin
Each service also keeps version history for files that were modified rather than deleted, which is useful if a document on your external drive got corrupted or overwritten and you had a synced copy. Right-click the file in the web interface and look for Version history or Previous versions.
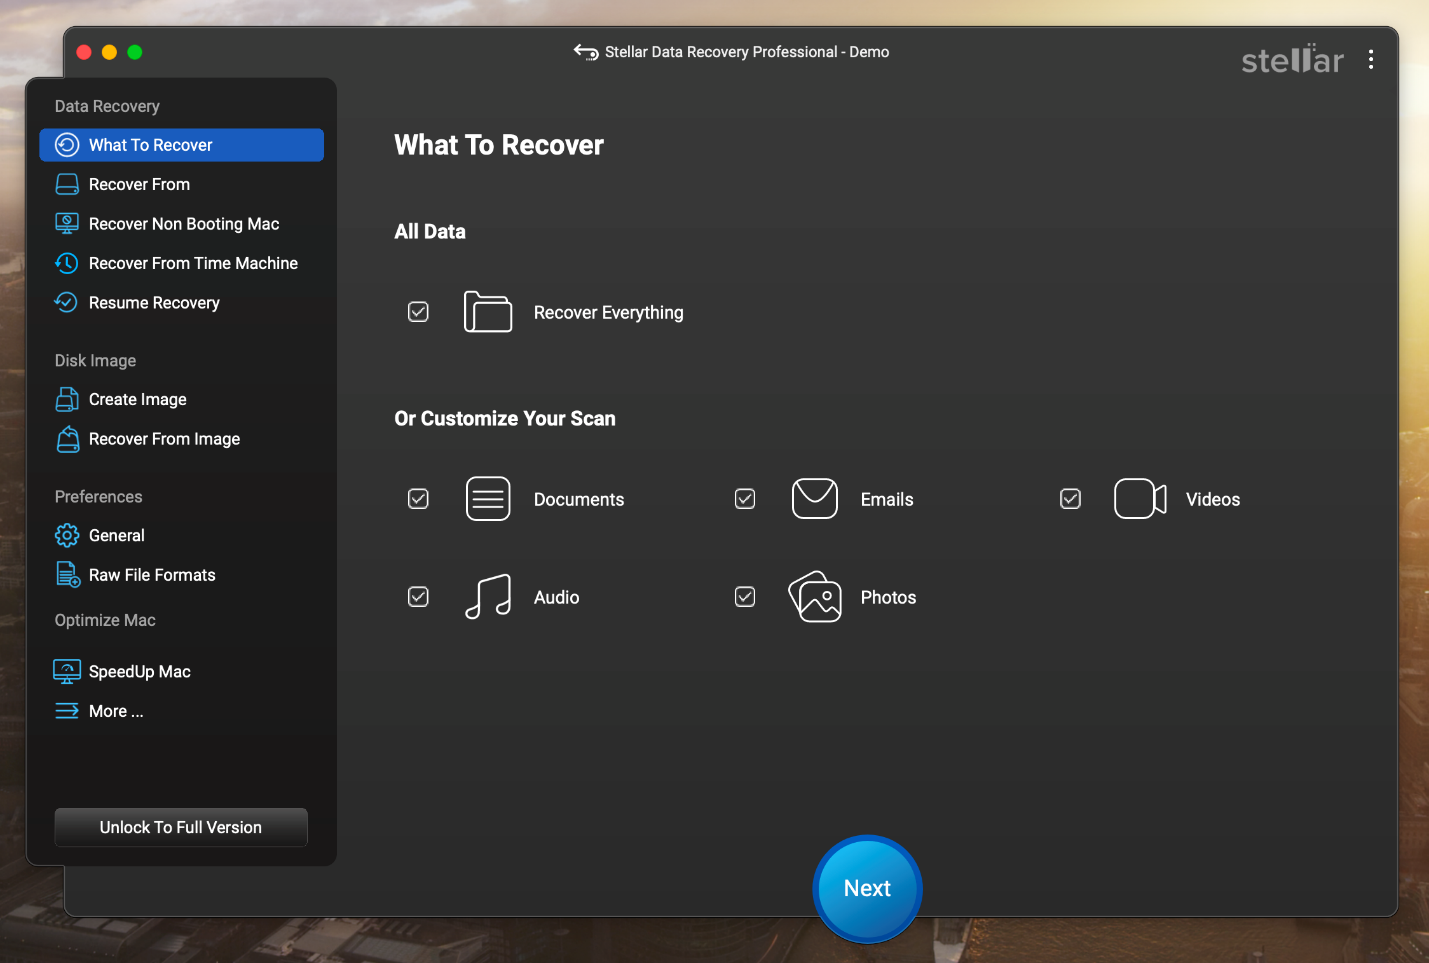
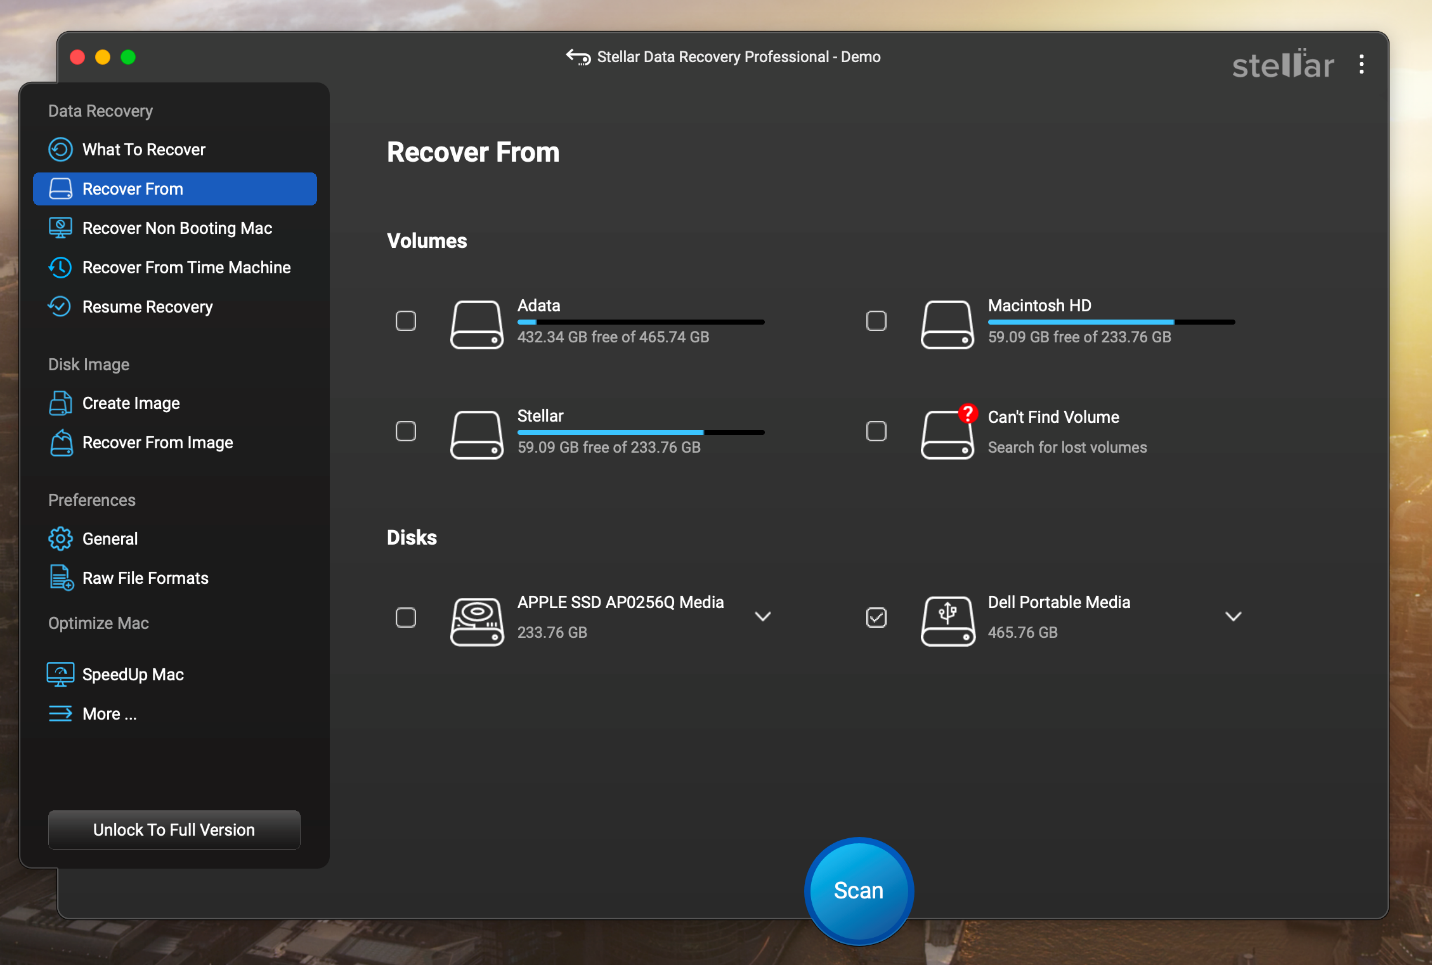
4. Use Mac Data Recovery Software
If the Trash is already empty and you haven’t backed up your external drive via Time Machine – Mac data recovery software is the most practical solution. It scans the drive for deleted or inaccessible files and rebuilds recoverable data even when macOS can no longer access it normally. The files are recoverable as long as the drive is detectable in Disk Utility and the existing data is not overwritten.
- Download, install, and run the software on your Mac
- On the What to Recover screen, choose the file type you wish to recover and click Next
- Then choose your external drive as the storage drive to recover from and click Scan
- The recovered files will be shown for you to Preview
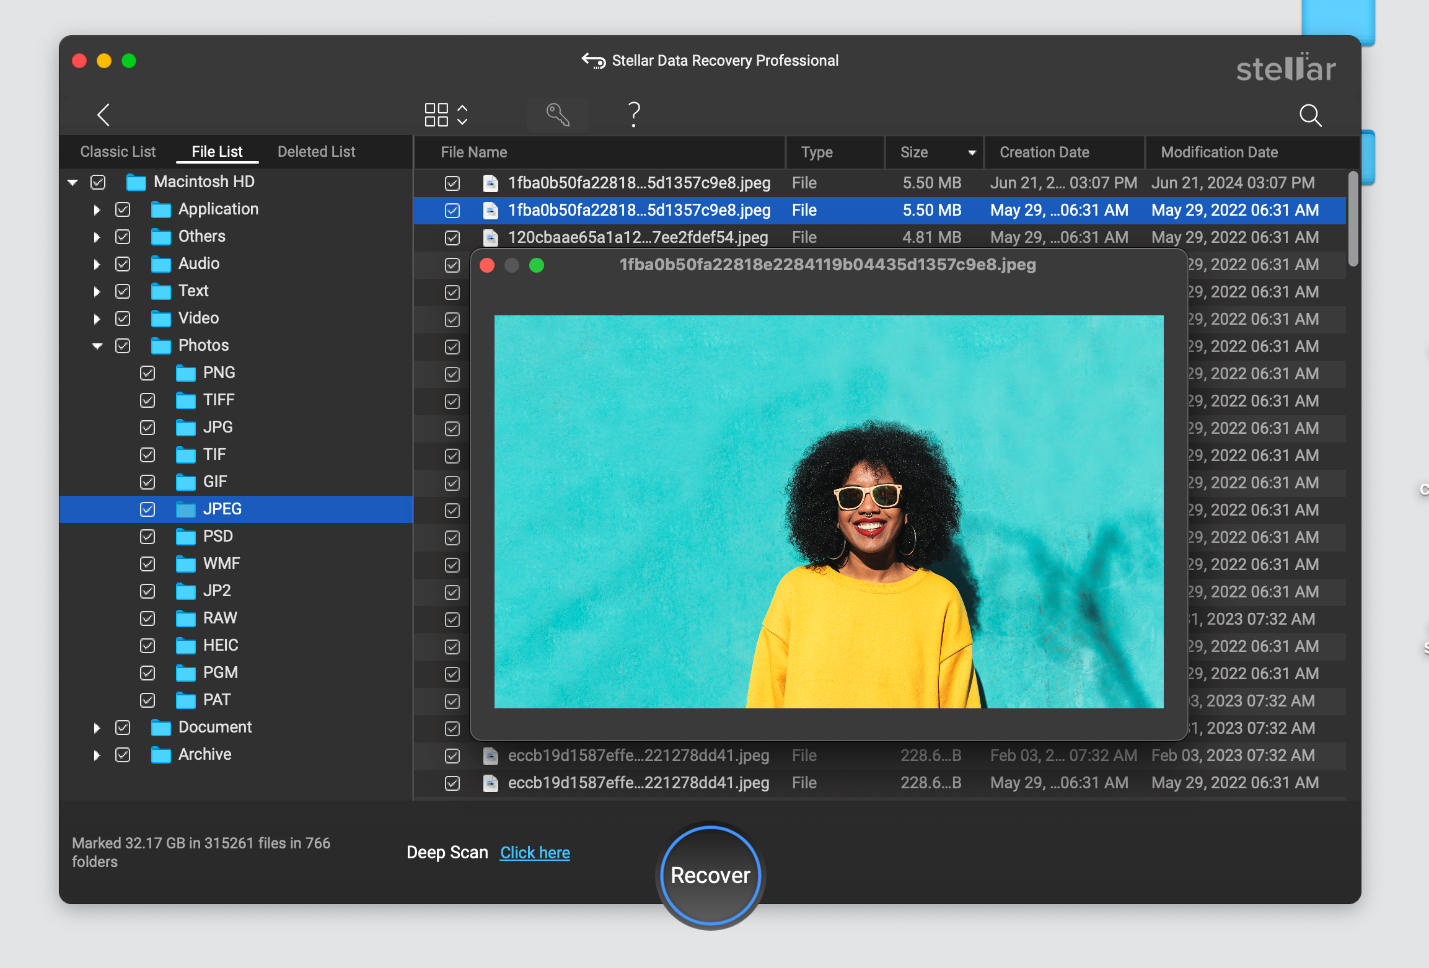
- Choose the files you need and click on Recover to transfer them back to your preferred destination
5. Repair the Drive with Disk Utility
In a scenario where some data in your external disk’s volume has been corrupted or become inaccessible, Disk Utility has a feature called First Aid, which can repair that affected disk of yours and file system errors that caused data to become unreadable.
- Connect the external drive to your Mac
- Open Disk Utility
- Click View > Show All Devices
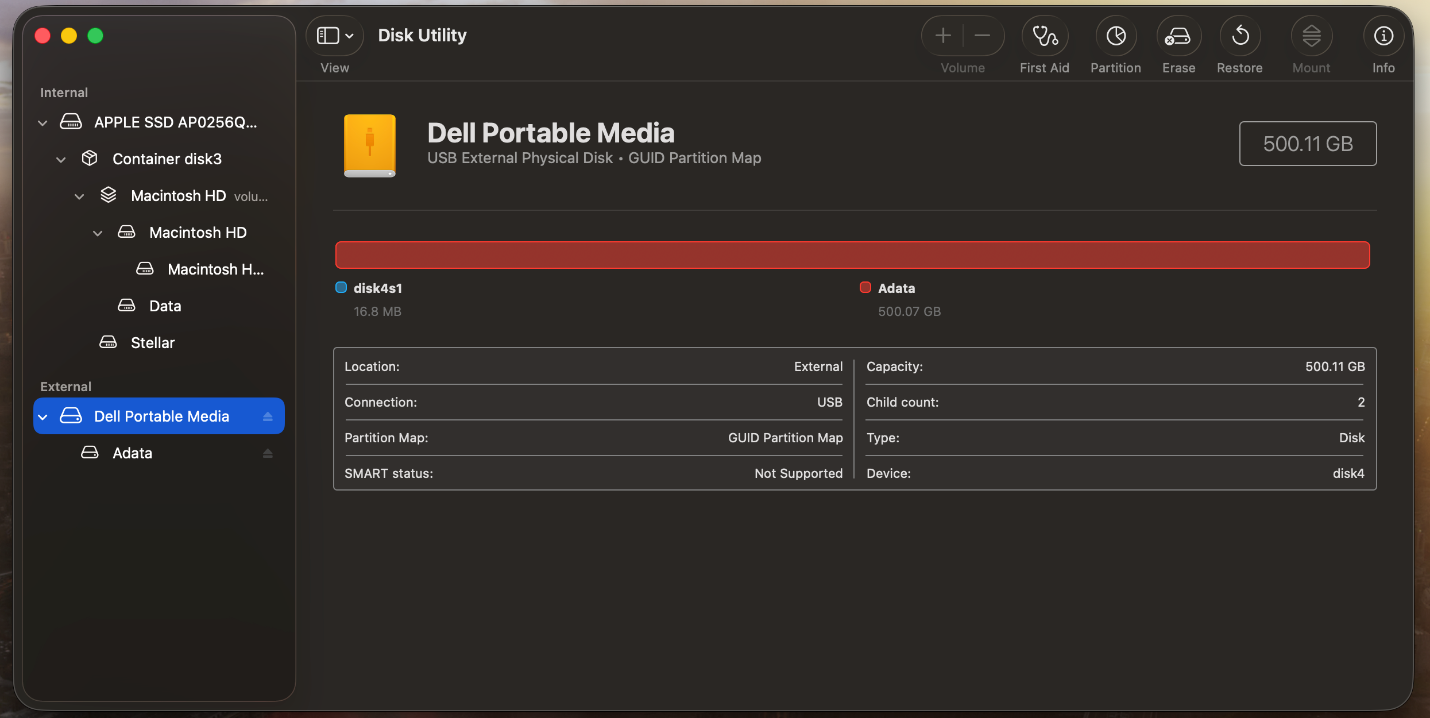
- Select your external drive
- Click First Aid in the toolbar and hit Run
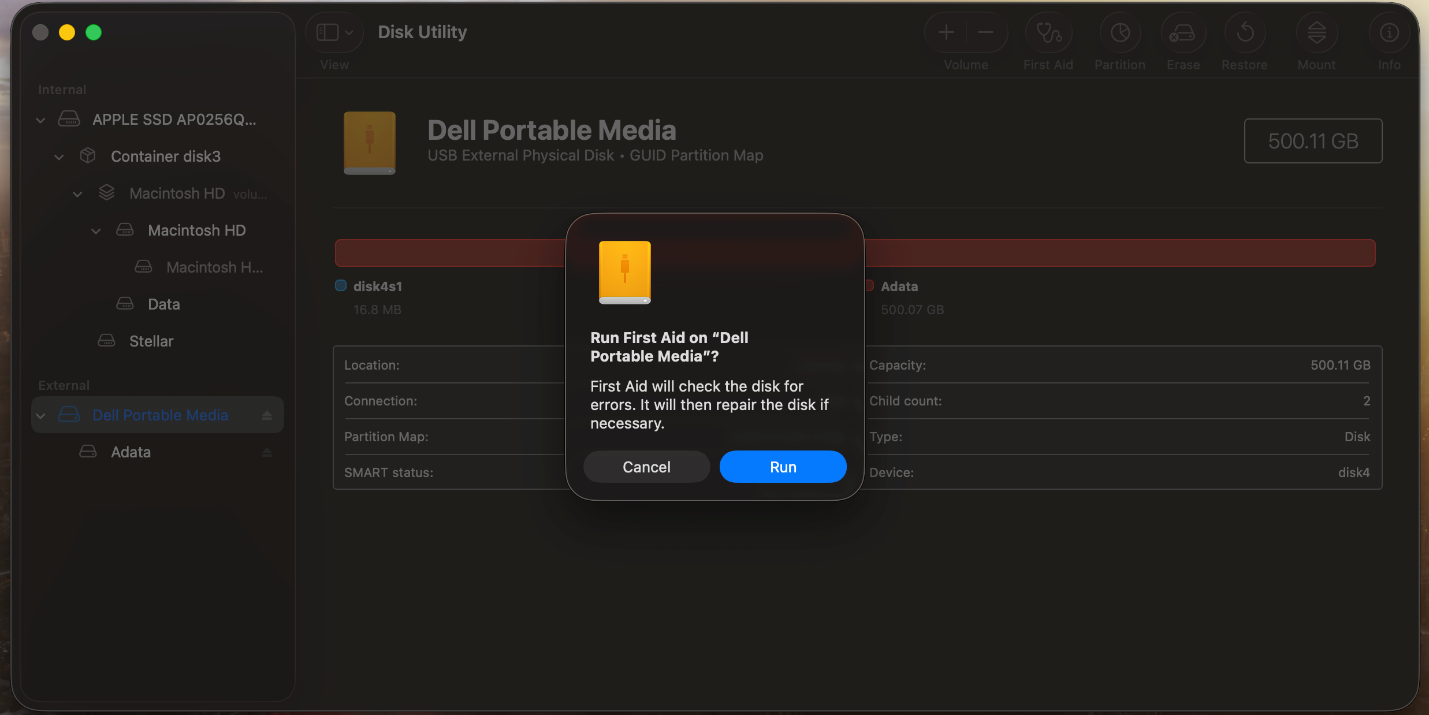
- When the process is complete, click Done
6. Repair the Drive Using Terminal
In case Disk Utility's First Aid is unable to fix the drive – Terminal gives you the same repair tools at command line with more detailed error output and a few options the GUI doesn't expose. This is the last DIY step before professional recovery. You need to be comfortable typing commands exactly as written, including spaces and slashes. Mistyping a disk identifier can target the wrong drive, so read every command before pressing Return.
Step 1: Identify your drive
- Go to Applications > Utilities > Terminal
- Type the following and press Return:
diskutil list
- Find your external drive in the output. Look for the size and name that matches it, for example, /dev/disk4 with a 500.0 GB capacity
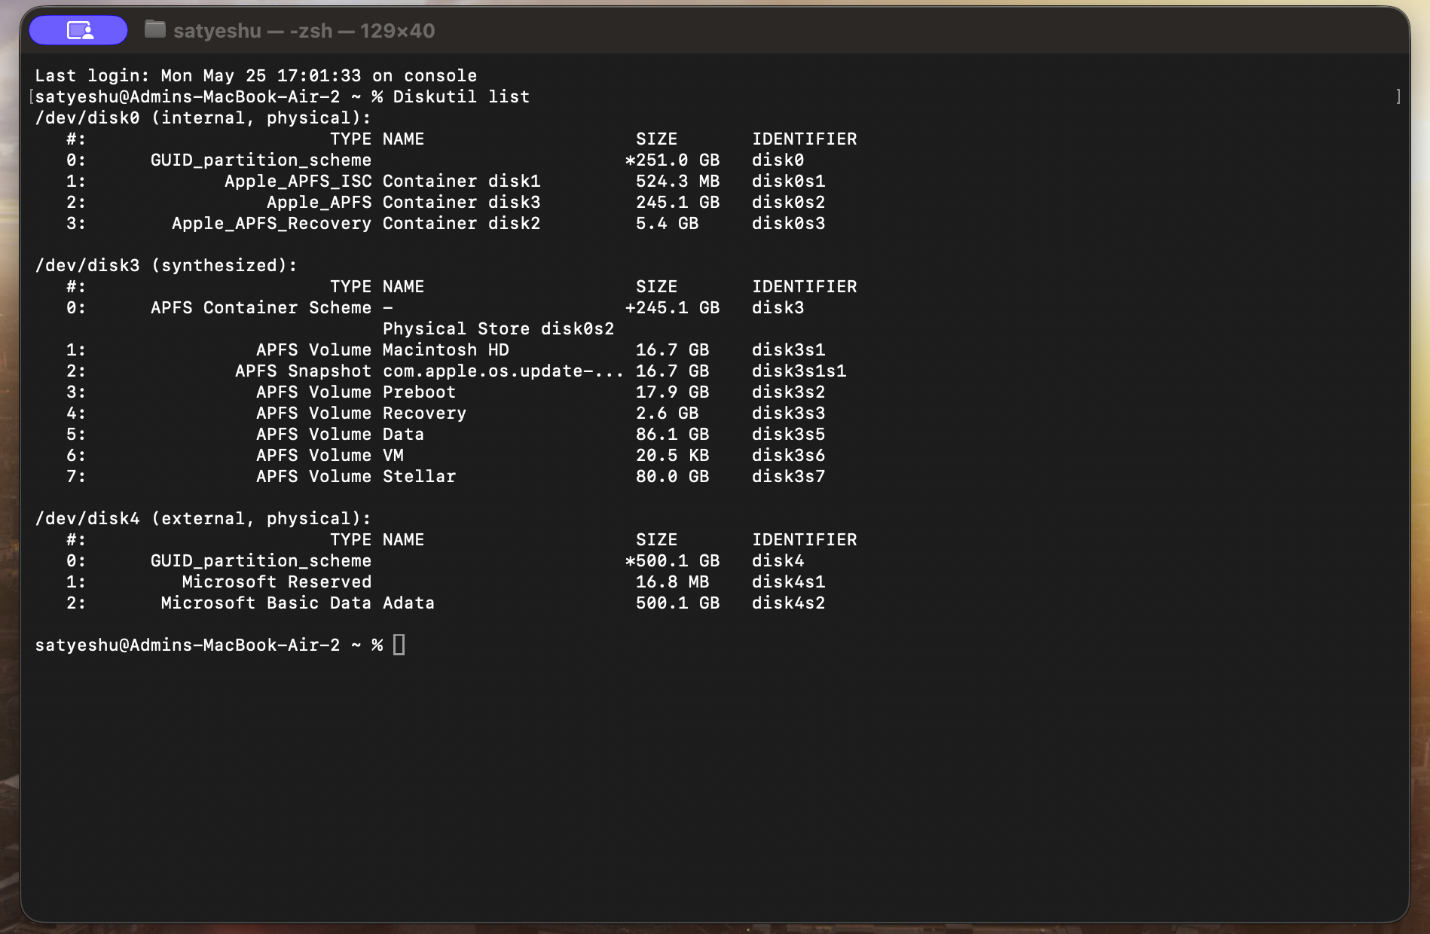
Step 2: Try diskutil repairVolume
It’s the Terminal equivalent of First Aid – gives more detailed output and is often easier to troubleshoot than the graphical version and sometimes succeeds where First Aid fails:
diskutil repairVolume /dev/disk4s1
Replace disk4s1 with your actual partition identifier. Terminal will print progress and report what was repaired. If it succeeds, eject the drive, reconnect it, and copy your files off immediately.
Step 3: If repairVolume fails, try fsck
fsck (File System Consistency Check) is a lower-level repair tool which needs the drive to be unmounted before it can run and administrator privileges too. macOS will prompt for your admin password the first time.
- Unmount the drive (but leave it physically connected):
sudo diskutil unmountDisk /dev/disk4
- Run the right fsck command for your file system. APFS and HFS+ use different binaries:
APFS (modern macOS drives): sudo fsck_apfs -y /dev/disk4s1
HFS+ (older macOS drives): sudo fsck_hfs -fy /dev/disk4s1
exFAT (cross-platform drives): sudo fsck_exfat -y /dev/disk4s1
Step 4: If both fail, image the drive before going further
If the drive still won't repair, the next step isn't another repair attempt – it's preserving what's left. Use Stellar Data Recovery's byte-by-byte imaging feature to create a full clone of the drive to a different storage device. Future recovery attempts, yours or a professional's, can then work on the clone instead of risking further damage to the original.
A few things to know:
- Never run fsck on a mounted drive. It can cause additional corruption. Always unmount with diskutil unmountDisk first
- sudo prompts for your admin password the first time you use it per session
- fsck needs elevated permissions to access the raw device
- If the drive disappears from diskutil list mid-process, stop. The drive is failing.
7. Contact a Professional Recovery Service
When all DIY methods fail or if your drive has severe physical damage – a professional data recovery lab like Stellar Data Recovery Lab-Services is the last resort. They have ISO Class 5 clean rooms and specialized equipment to repair hard drives or salvage data from damaged media. It’s expensive, but can recover data that software cannot.
Steps:
- Do not open the drive yourself or continue attempts, which could worsen damage
- Contact Stellar Data Recovery Lab-Services
- If advised, power off the drive and send it to the lab (or bring it to a local service)
- The lab will diagnose and quote you a cost
- They will operate on the drive under clean conditions, attempt repairs, and then recover data onto another disk
Recovery services can often get data off drives that are severely damaged, for ex. a failed SSD controller or scratched HDD platters. However, success is not guaranteed and costs can be high (often hundreds to thousands of dollars). Use this when your data is extremely critical (like business records or irreplaceeable memories) and all software fixes have failed.
Special Scenarios
The four scenarios below are the most common variants of "external drive data loss on Mac," each shows up frequently in search and has enough quirks to deserve their own quick treatment.
1. External Hard Drive Not Showing Up on Mac — How to Recover Data
An external hard drive that doesn't appear anywhere is usually a connection problem rather than a drive problem. Before assuming the worst, run this checklist:
- Try a different USB or Thunderbolt cable
- Try a different port on your Mac, or a different Mac if you have one
- Finder > Settings > General must have External disks checked for drives to appear on the desktop
- Open Disk Utility and select View > Show All Devices. If the drive appears here but won't mount, it's a logical failure – go to Method 4
- Clicking, grinding, or no spin-up sound means physical failure – go to Method 7
2. Recovering a Formatted External Hard Drive on Mac (APFS, exFAT, NTFS)
Accidental formatting hard drive is one of the most recoverable forms of data loss – if you act quickly. Formatting doesn't erase files – it rewrites the file system table that tracks where files live. The underlying data stays put until something overwrites it.
The recovery approach is the same regardless of which file system was used. Just scan the drive with recovery software and recover your files. Avoid running First Aid or reformatting the drive again before scanning – both can overwrite the data you're trying to find.
3. Recovering from an SSD vs HDD: Why TRIM Matters
SSDs and HDDs lose data the same way – but they hold onto it very differently. Deleted data stays physically present on the hard drive’s platter until new data is written over it which is why recovery often succeeds even weeks after deletion.
On an SSD, a feature called TRIM complicates things. TRIM tells the SSD to permanently erase deleted data blocks in the background to keep write performance high. Once TRIM has cleared a block, no software can recover what was there, the data is genuinely gone.
The important caveat for Mac users – macOS doesn't send TRIM over USB connections, but does for Thunderbolt-connected external SSDs (especially NVMe). That means external SSDs behave more like HDDs when it comes to recovery, your odds are usually much better than you'd expect. Internal SSDs on Apple Silicon Macs are a different story; TRIM is active by default, and deletion is often permanent within seconds.
How to Prevent External Drive Data Loss
The cheapest data recovery is the one you never have to do. A few habits cover most of the failure modes that lead people to articles like this one in the first place.
- Set up Time Machine to include the external drive. This is the single highest-leverage habit
- Follow the 3-2-1 rule for anything irreplaceable. Three copies of the file, on two different types of storage, with one copy stored off-site (cloud backup counts)
- Always eject drives properly. Right-click the drive in Finder and choose Eject. Pulling a drive while it's still writing is one of the most common causes of corruption
- Watch for early warning signs. Drives that are about to fail often show it – slower file transfers, occasional disconnects, files that randomly become unreadable, the drive disappearing and reappearing in Finder
- Don't store drives in extreme conditions
Wrapping Up
External drive data loss on a Mac feels frustrating in the moment, but the outcome is usually decided in the first five minutes, usually by what you stop doing, not by what fancy tool you reach for. Disconnect the drive, rule out a bad cable or port, and then work down the seven methods in order: Trash, Time Machine, cloud sync, recovery software, First Aid, Terminal, and finally a professional lab.
Two ideas matter more than any single method. First, recover before you repair as it can permanently overwrite the data you're trying to save. Second, the best recovery is the one you don't need: keep your external drive in Time Machine, follow the 3-2-1 backup rule for anything irreplaceable, and let a S.M.A.R.T. tool warn you before a drive actually fails.


Rishabh is a senior content specialist at Stellar Information Technology, where he writes about comprehensive data care solutions.
 15 min read