“Every flash photo from my daughter’s birthday has a red eye. I used an iPhone X to click them, tried the built-in iPhone red-eye removal tool on about 10 pictures and it only worked cleanly on three. On the rest, it left a flat gray circle instead of an eye. These are the only photos I have from that day, and I don’t want to ruin them by experimenting with random apps.” (Dorothy Hill, Portland, Maine)
A sudden flash glare can easily ruin your iPhone photos with the most common red-eye effect, especially at night or when shooting kids and pets. Anyone who has tried to rescue a batch of these ruined red eye shots knows how frustrating it can be. This guide walks you through every practical way to fix red eye on an iPhone, starting with the built-in tool and moving to advanced options for fixing the damaged photos with such visual artifacts.
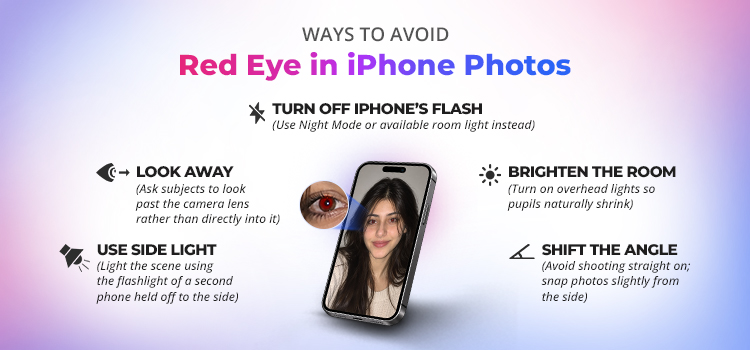
Why Does Red Eye Happen on iPhone Photos?
Red eye shows up when a camera flash shoots close to the lens in low light. The pupil is wide open in the dark, and the flash reflects off the blood vessels at the back of the retina before the pupil has time to close. Because an iPhone packs its flash and lens within a few millimeters of each other, the angle for this reflection is almost unavoidable in dim rooms.
Method 1: Fix Red Eye Using the Built-In iPhone Photos App
Start here for any recent photo taken on an iPhone camera, since it takes under a minute per image. But first create a duplicate of the original photo.
- Open the Photos app and then open the picture with a red eye.
- Now click on three dots and hit Duplicate to create a lossless copy of that image.
- Open the Duplicate image and tap on the sliding adjustment icon to access the Edit options.
- Tap the three dots on the top-left, and now click on the red-eye icon, which looks like an eye with a diagonal line through it.
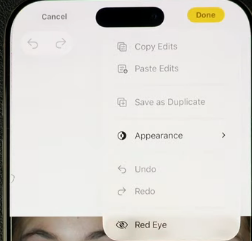
- Tap directly on each eye affected by the red tone. The tool detects the pupil and neutralizes the color automatically.
- Tap Done to save the edit. The original photo is kept, so the change can be reverted later from the same Edit screen.
In most cases, the iPhone fails to detect red eyes in your image, and the menu may not appear for red eye removal. Also, the built-in tool works best when the eyes are clearly open, the photo is reasonably sharp, and there is a visible red or orange tint.
Method 2: Fix Red Eye Manually With Zoom and Markup
The built-in red eye removal tool only appears dynamically when the iOS system actually detects a red-eye artifact in the photo. So, if the automatic tool misses the mark on a smaller or angled eye. Zooming in first gives it a better target.
- Open the photo in Edit mode and pinch to zoom into the eye area before tapping the three dots menu to access the Red-Eye tool.
- Tap precisely on the red portion of the pupil rather than the surrounding iris.
- If the auto-fix still leaves a patch, undo it and try tapping slightly off-center, since the tool reads a small radius around the tap point.
- For a photo that needs a more manual touch, use Markup to select a close-matching dark color and gently retouch, keeping the change subtle so the eye does not look flat.
Group photos with small faces benefit most from this approach, though it takes patience, and pixel-level painting rarely looks fully natural on close-up portraits. If you don’t find the red eye tool on your iPhone, move to any third party tools, such as lightroom, or snapseed.
Method 3: Third-Party Editing Apps
Apps such as Snapseed, Adobe Lightroom , Fotor, Pixazo and others, include their own red-eye or spot-repair brushes. They can work well for photos still on the iPhone.
You can try the below steps to achieve the same with Snapseed on iPhone:
- Open the photo in Snapseed.
- Tap Tools, then choose Selective.
- Tap directly on the red pupil to place a marker.
- Pinch your fingers to shrink the circle so it only covers the red spot.
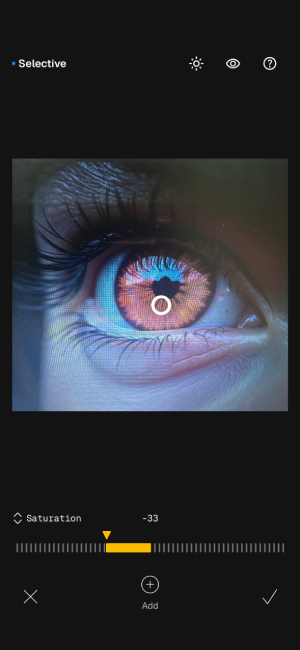
- Swipe up or down to select Saturation, then swipe-left to drop it to -100.
- Tap the checkmark to save your work.
All introduces its own learning curve, and none of them repairs a photo that is already damaged in other ways, such as color shifts, static-like noise, or corruption from being edited.
Method 4: Fix Damaged Photo with Stellar Online Photo Repair
The built-in tool and manual editing tools offering touch-ups cover most everyday photos. However, they fall short on photos where red eye shows up alongside other damage, such as a grainy exposure, an odd color, or blur from a shaky hand. In these cases, correcting the red eye alone still leaves a photo that looks off.
Stellar Online Photo Repair is a browser-based tool built for exactly such scenarios. It corrects red eye along with compression artifacts or damaged, corrupted photos directly on your iPhone’s browser.
- Go to Stellar Online Photo Repair and upload the damaged or corrupted photo.
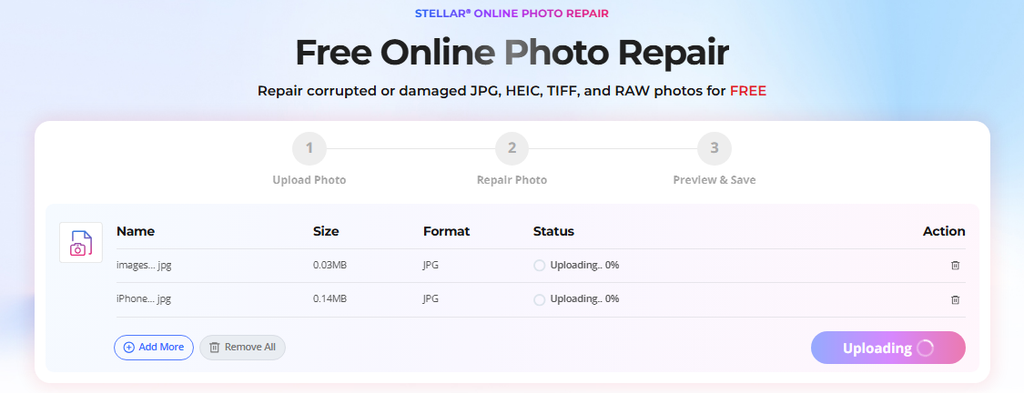
- Let the tool scan and repair color, exposure, and red-eye issues together.
- Preview the corrected photo directly in the browser.
- Download the repaired image in its original quality.
Try Stellar Online Photo Repair to fix red eye and other photo issues in one place, with no installation required.
“A dedicated repair tool looks at the whole image instead of just one flagged region around the eye. That matters when a photo also has color banding, noise, or compression damage from being shared repeatedly over WhatsApp or restored from an old backup.” (Rohit Mayur, Senior Software Developer, Stellar Data Recovery)
That combination makes it a practical option for anyone trying to remove red eye from a photo that is also faded, pixelated, or otherwise not camera-fresh, especially when the picture cannot be retaken.
For Bulk or Offline Repair: Stellar Repair for Photo
Anyone working through an entire event’s worth of flash photos, or repairing images offline in bulk, may prefer a desktop tool instead of handling files one by one in a browser.
Stellar Repair for Photo is built for this kind of batch work. It supports a wider range of photo and RAW formats, handles multiple corrupted or damaged files in a single run, and is a solid option for anyone who prefers working offline on a desktop or laptop rather than uploading photos individually.
Wrapping Up:
The built-in Photos app tool, or external photo editing apps such as Lightroom, Snapseed, etc., is the right first step to fix red eye on iPhone, and it handles recent, well-lit photos without any extra effort. For pictures that resist fixing or have other artifacts or visual errors, be it an old family photo, an image recovered from a backup, or one with color and quality issues on top of the red eye, Stellar Online Photo Repair offers a fast, browser-based fix.
FAQs