One minute you’re deep in a game, on a video call, or maybe just scrolling through your browser and the next, your entire screen goes blue. Not the peaceful kind of blue, but the kind with an ominous stop code that reads: Video_Scheduler_Internal_Error.
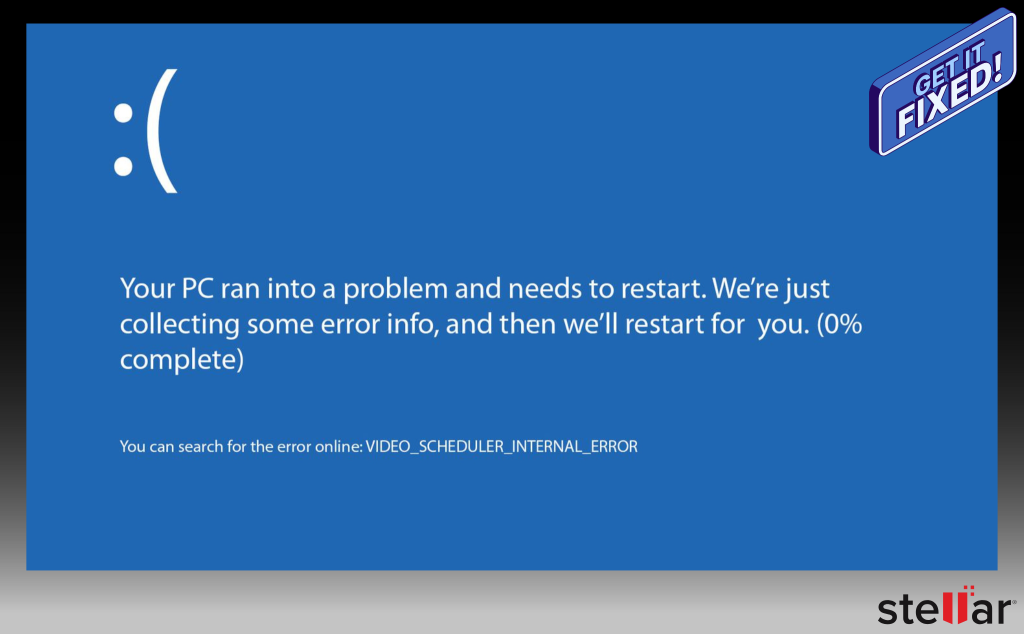
It’s frustrating, it’s sudden, and it usually means your system’s graphics setup has hit a wall. Whether it’s a corrupted driver, a cranky GPU, or something deeper in your system files, this particular Blue Screen of Death (BSOD) doesn’t exactly come with a helpful manual. But don’t worry. You don’t need one. This guide is your manual. In the next sections, we’ll walk you through clear, step-by-step solutions.
What is the Video Scheduler Internal Error?
This BSOD isn’t random. It’s Windows throwing up a stop code (technically: 0x00000119) when it detects a critical problem with the graphics subsystem. That could mean:
- Outdated or broken display drivers
- A faulty or overheating graphics card
- Corrupted system files
- Malware that’s messing with your GPU
- Or recent hardware/software changes that didn’t sit well with Windows
This error can appear while gaming, using a video calling application (Skype), watching a video or even when your PC is just idling. And once it starts, it may trigger random reboots or make your system completely unbootable. Not ideal, we know. But no need to lose heart. It’s fixable.
Quick Fixes Before You Get Technical
Sometimes, the simplest solutions really work most of the time especially with BSODs that show up on your screen unexpectedly. Before going for technical troubleshooting, you can go ahead and try these quick checks. They often resolve the error without needing to crack open command prompts or reset anything.
1. Clean Your PC Internals
When you use your PC or laptop, it can accumulate a lot of dust and lint around the GPU over a period of time. When this happens, the graphics card usually can overheat or start acting up. This can result in blue screen errors. In this case,
- Shut down your PC and unplug the power cord from the socket.
- Open the CPU cabinet carefully if it’s a desktop.
- Take a soft brush and a blower, blow compressed air on the graphics card, fans, and vents and gently clean them with a brush.
- Close the cabinet and then power it back.
- For laptops, clean the fan vents to allow proper ventilation so that the heat gets dissipated properly.
After you’re done, check for the error. Make this part of your monthly maintenance. It helps more than you think.
2. Undo Recent Hardware or Software Changes
If the error appeared soon after installing a new graphics card, upgrading RAM, or launching a freshly installed game or driver, it might not be just a coincidence. They can clash with existing drivers and cause errors. In this scenario:
- Disconnect or remove the new hardware from your system.
- Uninstall the recently added software or updates.
If the system stays stable after restarting, it is likely that you have found the trigger.
3. Disable Third-Party Antivirus (Temporarily)
Some antivirus programs can also be the culprits. They sometimes stop system-level graphics or cause kernel processes to malfunction. If you think that is the case,
- Open your antivirus software. Disable real-time protection temporarily. It is usually in the settings window.
- You should also try and uninstall the antivirus application completely. Well, for the time being at least. You can reinstall it later after resolving the error.
If you resolve the error successfully following a restart, you’ll have to consider switching to a different antivirus, which is more compatible with Windows.
4. Disconnect External Devices
It might be a surprise to you but faulty external hard drives or USB devices can also cause system instability. To ensure that’s not the case,
- Unplug all the non-essential devices connected to your PC, such as external drives, printers, etc.
- Restart the PC.
This helps rule out any external hardware conflict that may be confusing your system.
Methods to Fix the Video Scheduler Internal Error on Windows
If you’ve tried the quick fixes and your system still flashes the dreaded blue, it’s time to go deeper. Let’s get started.
Method 1: Boot into Safe Mode to Diagnose
Your system only runs basic functions and software when started in Safe Mode. So, if there is an app or a driver that is causing the above-mentioned error, Safe Mode lets you decode the situation and zero in on the culprit while keeping the basic functionality of your system available.
- On your system, press Windows + R key to start the Run command prompt.
- In Run, type msconfig and choose OK.
- In the System Configuration window that opens up, open the Boot tab, check Safe boot, and click OK.

- Click Restart when you are prompted and your PC will reboot into Safe Mode
- In Safe Mode, open Settings (Windows + I) > Update & Security > View update history > Uninstall updates, and remove the most recent Windows updates.

- Also in Safe Mode, open Control Panel > Programs > Programs and Features and if you can remember software or drivers you installed lately, uninstall them.

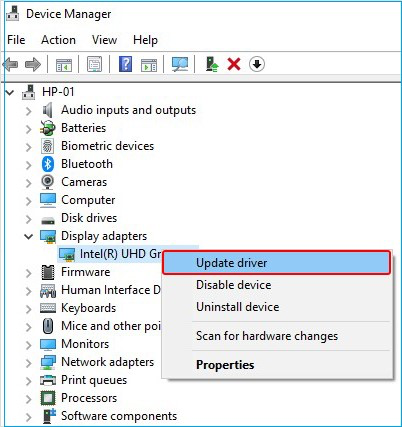
- Open Device Manager (press Windows + X), expand Display Adapters, right-click your graphics driver, and choose Update Driver or Uninstall device as needed. (If uninstalling, restart and then reinstall the latest driver from the manufacturer’s website.)
After doing these in Safe Mode, restart normally (uncheck Safe boot in msconfig if needed). If the error stops, you’ve isolated the cause (such as an update or driver).
Method 2: Use System Restore
System Restore reverts Windows to an earlier point in time (when the PC was working correctly) without affecting your personal files. This can undo bad updates, drivers, or software that caused the BSOD.
- In Windows Search (press the Windows key to launch), type “restore point”. This should open a window, where you have to select “Create a restore point.”
- Click System Restore, then Next.
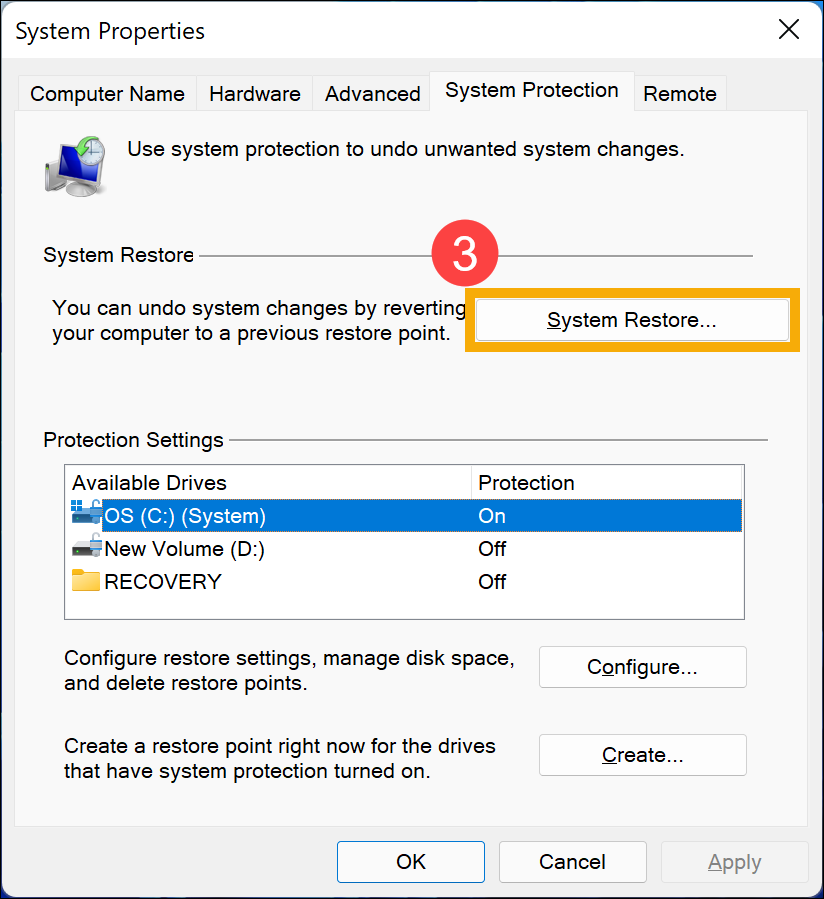
- Choose a restore point dated before the BSOD started happening. If you don’t see enough points, check “Show more restore points.”
- Click Next, then Finish. Confirm to let Windows restart and restore.
Your computer will restart and apply the restore. Once done, check if the Video Scheduler error is gone. (If it doesn’t help, you can undo the restore in the same dialog.)
Method 3: Run Driver Verifier to Spot Bad Drivers
Windows includes a tool called Driver Verifier that can stress-test drivers and reveal ones that may be causing crashes. This is for advanced troubleshooting. If the graphics driver or another driver is corrupt, the Driver Verifier can catch it.
- Find Command Prompt by searching cmd the Start Menu and choose Run as Administrator.
- Type verifier and press Enter.

- In the Driver Verifier window, look for Create custom settings (for code developers), select it and then click Next. (Or select “Standard settings” and continue.)

- On the next screen, select standard checks like IRQL checks and Pool Tracking, then click Next.

- Choose the option Select driver names from a list, and start by uninstalling non-Microsoft drivers. (Be careful: adding all drivers can crash the PC. You can start with just your graphics driver.)
- Finish the wizard and restart your computer.
If a driver is faulty, the Driver Verifier should trigger a BSOD and list the problem driver’s name. (Make note of it.) Then open Device Manager and either update or roll back that driver.
Note: After troubleshooting, disable Driver Verifier (run verifier /reset in Admin CMD and restart) to avoid constant crashes. Driver Verifier will deliberately crash Windows if it finds bad drivers. Use only if you’re comfortable with crash-debugging.
Method 4: Run a Full Malware/Virus Scan
Viruses or malware can corrupt system files and cause BSODs like this. A thorough scan ensures no infection is triggering the error.
- Open Windows Security (Windows + I, then Update & Security > Windows Security), or your preferred antivirus.
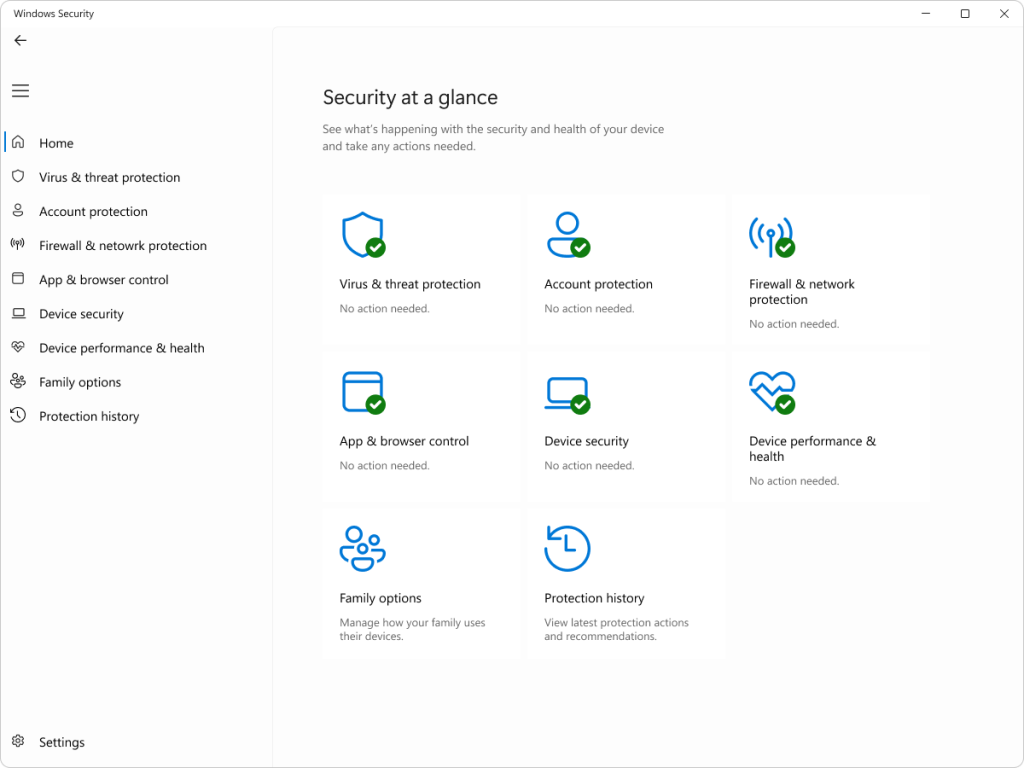
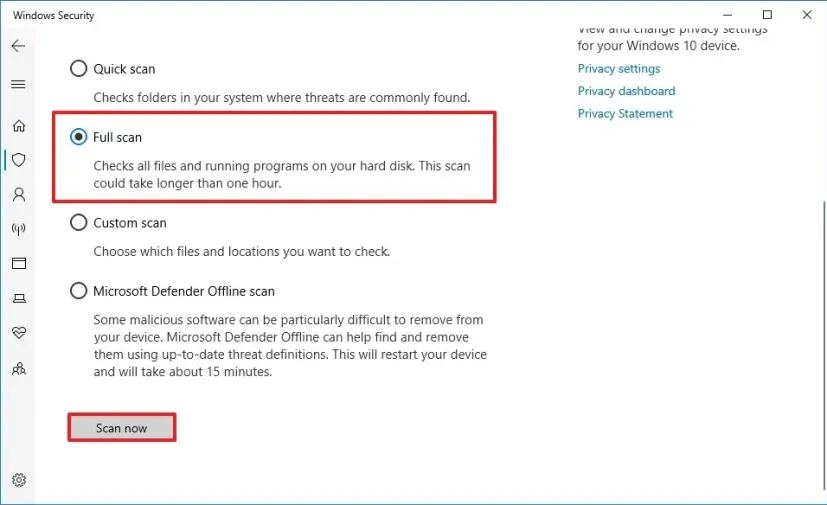
- In this window, go for Virus & threat protection. In that window, choose Scan options.
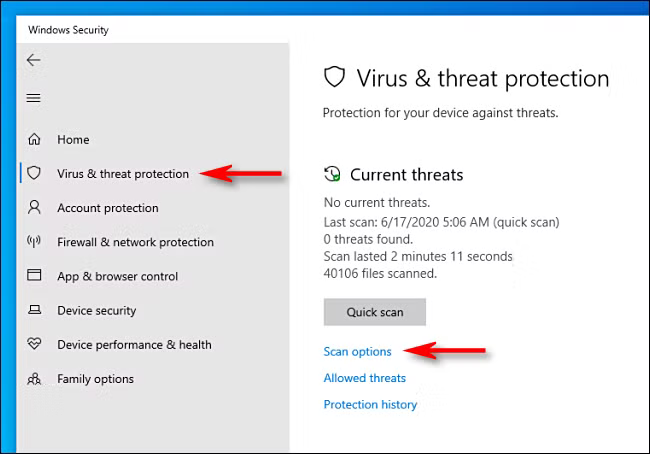
- Select Full scan and click Scan now. Let Windows check all files (this can take a while).
- If any threats are found, remove or quarantine them and reboot.
After scanning, restart normally. If malware was the cause, the BSOD should stop.
Method 5: Update or Reinstall Your Graphics Drivers
The Video Scheduler error is often caused by outdated or corrupted graphics drivers. Reinstalling the latest graphics drivers sometimes fixes the issue. Here are the steps:
- Start your system, either normally or into Safe Mode, and open Device Manager. This can be done by pressing Windows + X, then clicking Device Manager.
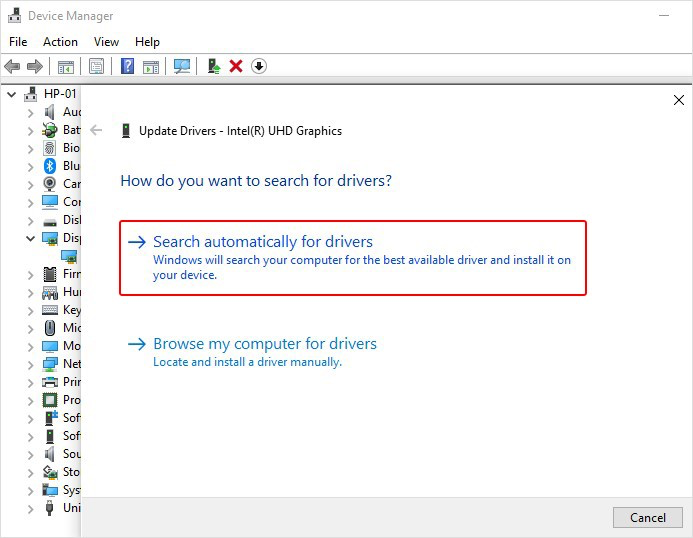
- Expand Display adapters, right-click your video card, and choose Update driver.

- Select Search automatically for updated driver software. Windows will download and install the latest driver.
- If updating doesn’t help, right-click the adapter and choose Uninstall device.
- In this window, choose the option “Delete the driver software for this device” and then go ahead with the uninstall.
- Go to the official website of the manufacturer of your graphics card (NVIDIA, AMD, or Intel), look for the latest driver and install it.
- Restart your computer.
With fresh drivers installed, test whether the blue screen returns.
Method 6: Disable Hardware-Accelerated GPU Scheduling
Windows 10/11 includes a feature called Hardware-accelerated GPU Scheduling to improve performance, but in some cases it can cause instability. Turning it off may stop the BSOD.
- Press Windows + S, type Graphics settings, and open it.
- Under Hardware-accelerated GPU scheduling, toggle it Off.
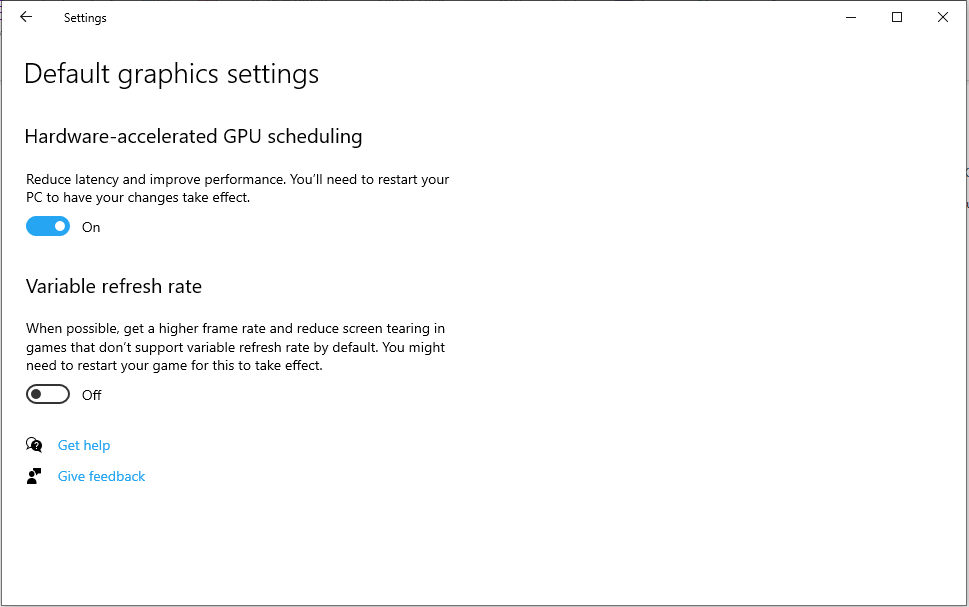
This disables the new GPU scheduling feature. If it was the culprit, the Video Scheduler error should no longer appear.
Method 7: Check Disk and System Files
Corrupted system or disk files can trigger BSODs. Windows has tools to scan and repair these issues. This includes CHKDSK and DISM commands, which you can run to detect the underlying issue. Follow these steps:
For CHKDSK:
- Open Command Prompt as Administrator.
- Type chkdsk C: /f /r and press Enter. If there is a prompt that asks you to schedule a restart, then type Y and go ahead.
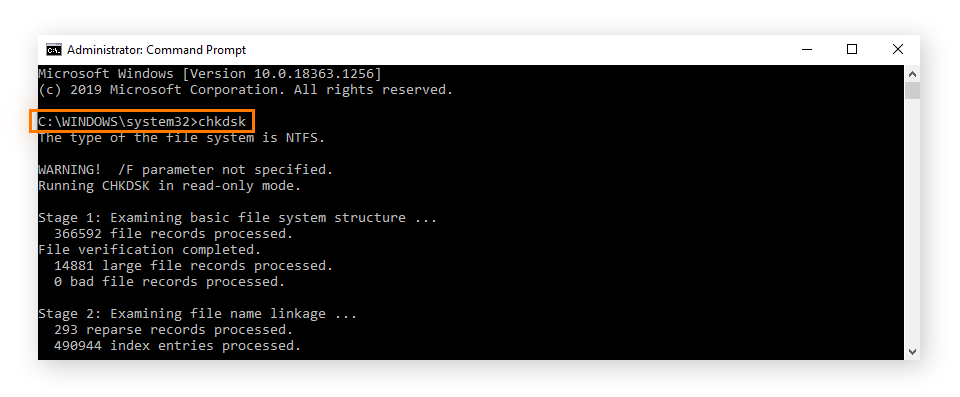
CHKDSK runs a scan and checks if the C: drive has any errors or bad sectors, and repairs whatever it detects. This usually takes some time.
For SFC/DISM:
- In the Admin Command Prompt, run: DISM.exe /Online /Cleanup-image /Restorehealth. Wait for it to complete.

- Then run sfc /scannow. This will scan and repair corrupted system files.
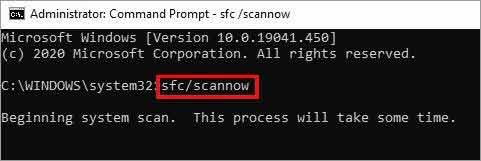
- When finished, restart your PC.
After these scans and repairs, many underlying corruption problems can be fixed, potentially resolving the Video Scheduler error.
Method 8: Install the Latest Windows Updates
Microsoft frequently releases updates that include bug fixes and new driver versions. Missing these updates can leave system bugs unpatched. Follow my instructions to install them:
- For Windows 10, open Settings by pressing Windows + I key and select Update & Security. In Windows 11, you’ll have to select Windows Updates in Settings.
- Now, you should select Check for updates and install if there are any updates available.
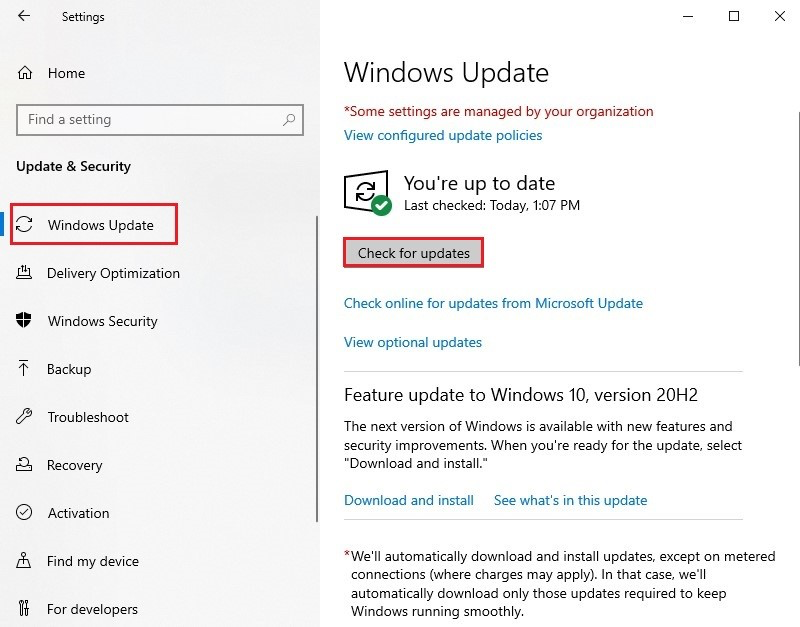
- After installing updates, reboot your PC.
If a recent update caused the BSOD, you might also try uninstalling that update (in View update history > Uninstall updates). Otherwise, bringing Windows fully up-to-date can solve compatibility issues.
Method 9: Reset Windows to Default (Last Resort)
If all else fails, resetting Windows reinstalls the OS and removes problematic changes (drivers, settings, apps). Note: this will remove your installed programs, and you may lose data (see next section). Use this only if you’ve tried everything else.
- Make sure you have backups of your important data first! (See the data recovery section below if you need to retrieve files after a crash.)
- Go to Settings > Update & Security > Recovery. Under Reset this PC, click Get Started.
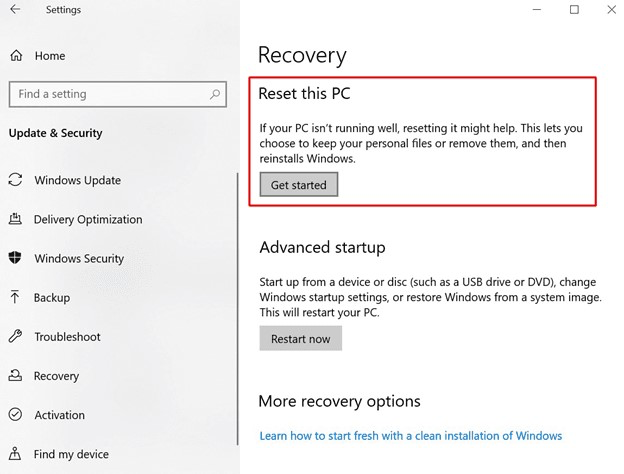
- Choose Remove everything to fully reset Windows, then follow the prompts.

- You can choose “Cloud download” or “Local reinstall”. Cloud may give a fresher OS image.
- Let Windows reset and restart.
After reset, Windows will be like new. You’ll need to reinstall your applications. If the Video Scheduler Internal Error was caused by a deep system issue, this should clear it up.
What if These Methods Lead to Data Loss?
If you end up trading a blue screen for missing files, don’t panic. Your data isn’t gone forever (even if it feels like it). You can use a reliable data recovery software to restore your files, such as Stellar Data Recovery Professional, to pluck your documents, photos, and videos back. Its key tricks include:
- Bootable Recovery: Build a USB rescue stick that lets you recover data from systems too stubborn to boot. Perfect for those “won’t-start” blues.
- Missing/Deleted Partitions: Track down files hiding in lost or formatted partitions on HDDs and SSDs.
- Encrypted Drives Support: Even BitLocker-encrypted volumes can’t keep your data out forever.
- Resumable Scans & Previews: Pause your scan for the day, resume tomorrow, and peek at recoverable files before committing to recovery.
- 4K/High-Capacity Drive Support: No drive is too large whether it’s a high-res SSD or a massive spinning disk, Stellar handles it.
With this toolkit in hand, you can tackle BSODs and disk repairs knowing your data has a good chance of making a comeback, minus any dramatic flair.
Conclusion
A Video Scheduler Internal Error BSOD is no laughing matter, unless you find blue screens oddly picturesque, yet it’s entirely fixable. We’ve navigated everything from dusting off your GPU in mere minutes to delving into Safe Mode sleuthing, and even whipping out the heavy artillery with Driver Verifier, CHKDSK/SFC scans, or a full Windows reset. More often than not, simply updating or reinstalling your graphics drivers, double-checking hardware, or rolling back a recent change (thank you, System Restore) will calm your PC’s dramatic tendencies. Don’t forget to keep Windows updated and to turn off any experimental features like GPU scheduling before they stage another protest.
Remember: tackle these steps one at a time, reboot after each victory, and see if that blue menace disappears. If you ever find yourself forced into a reset or disk repair and you suspect your files have joined the digital abyss, back them up first, or let a professional data recovery software to restore your files and rescue your precious data. Follow this guide, and you’ll have a stable, drama-free PC in no time, no blue screens allowed (for now). Good luck!