tl;dr
Encrypting your Mac hard drive via FileVault is the best way to secure data, but it complicates recovery if your system fails.
- How to Encrypt: Go to System Settings > Privacy & Security > FileVault and click “Turn On”. This encrypts your data in the background without erasing it.
- How to Decrypt: To remove encryption, simply turn FileVault Off in the same menu. Note: Your Mac must be connected to power to complete the decryption process.
- How to Recover: If your encrypted Mac won’t boot, use Target Disk Mode (Intel) or Share Disk (Apple Silicon) to connect it to another Mac. Another easier way is to unlock the drive with your password and use Stellar Data Recovery.
From pictures to confidential work projects to finances to passwords, your Mac’s hard drive keeps secrets that you can’t possibly afford to lose. That is why encryption has become one of the most reliable means to protect confidential information.
Encryption is a mighty shield, though. However, it can also prove to be a double sword. If your password is lost, your hardware fails, or you encounter issues due to corruption, then you may find yourself unable to access your own information. That’s where understanding how to not only encrypt and decrypt, but to recover an encrypted mac hard drive is completely indispensable.
Here in this in-depth guide, we will guide you through the whole process of encryption, decryption, and, when time calls for – the restoration of your Mac hard drive. We will discuss Apple’s built-in solutions, pitfalls to avoid, as well as how software like Stellar Data Recovery for Mac can help when all else is lost.
Why Encrypt Your Mac Hard Drive?
Just as you wouldn’t carry with you a notebook filled with your darkest secrets, you wouldn’t leave your hard drive unsecured. The same applies to your Mac’s hard drive.
Encryption is simply the password on your digital journal. It will keep others from accessing your files even if your laptop gets stolen or your external drive gets swiped. They won’t be able to read one word from your files without your password. To them, your data will appear to be random meaningless characters.
Some significant reasons behind the need for encryption are as follows:
- Privacy Protection: If confidential files likeyour tax documents, ID papers, or medical records are lost or stolen, you may be exposed to identity theft. Encryption renders these kinds of violations virtually impossible.
- Business Security: Business individuals working on client agreements, trade secrets, or lawyer files are in particular required to secure their laptops when in transit. Indeed, in industries like healthcare as well as finance, encryption is not just recommended, it is in most instances mandated by statute.
- Peace of Mind: Whether or not you’re a student user or occasional user, having your drive encrypted means that you won’t have to worry about what happens if your Mac gets lost in transit or in a coffee shop.
How Encryption Works on MacOS
On Macs, encryption is powered by FileVault 2, which was included in macOS Lion, and is still considered the best of the best. FileVault is equipped with XTS(AES)-128 encryption with a 256-bit key. While the specifics of this may sound complicated, the takeaway is that the drive is locked with one of the strongest standards of cryptography there is.
Once activated, FileVault on macOS, will take your readable information, and turn it into an unreadable format. For the user, the unlocking of the drive using the secure password or the recovery key is conveniently tied with macOS which, in the background, is performing encryption and decryption of the data on the fly. To an unwary user with no proper credentials, the drive data appears as a jumbled mess.
Some important things to remember about FileVault and encryption on Macs:
Performance Effect: Encryption may slow down on older Mac computers. But current computers, particularly Apple Silicon (M1, M2, M3 chip)-powered computers, are optimized with native encryption assistance so the process is nearly imperceptible performance-wise.
Full-Disk Encryption: FileVault doesn’t secure just one folder, the whole startup disk is encrypted. All your files, software, plus transient caches are encrypted.
Startup Security: If FileVault is on, the password is requested right away when you startup. If not, the computer will not startup into your operating system.
For external drives, macOS offers to encrypt with APFS (Encrypted) or Mac OS Extended (Journaled, Encrypted). These securely lock removable storage to the level of your laptop’s internal disk.
How to Encrypt a Mac Hard Drive
There are many approaches to encrypting drives on macOS that depend on whether you want something user-friendly, configurable, or something sophisticated.
Encryption using Finder

Finder provides the simplest method to encrypt an external drive that already contains files:
- Connect the drive and then open Finder.
- On the sidebar, right-click on the drive.
- Choose Encrypt “Drive_Name”.
- Type and enter a secure password. You can add a hint if you wish.
- Wait while macOS is setting up the encryption.
The advantage to this process is that it is simple. You will not require any technical knowledge, or you will not have to recreate your drive. The drawback is that it will take longer if your drive is already packed.
Encryption with Disk Utility

The Disk Utility gives you more control but has one huge caveat – it will erase the drive. You will therefore want to back up your entire library first.
- Open Disk Utility from Applications > Utilities.
- Choose the drive that you want to encrypt.
- Click Erase.
- Select APFS (encrypted) or Mac OS Extended (journaled, encrypted.)
- Type in a secure password and voluntary hint.
- Yes, and have macOS build an encrypted volume.
The benefit of Disk Utility is that encryption is done cleanly across the entire drive. It is like a clean start that does not leave any traces of unencrypted data.
Encryption in Terminal
Power users can use Terminal for command-line access:
sudo fdesetup enable
This will enable FileVault for the startup disk. You can also disable it with:
sudo fdesetup disable
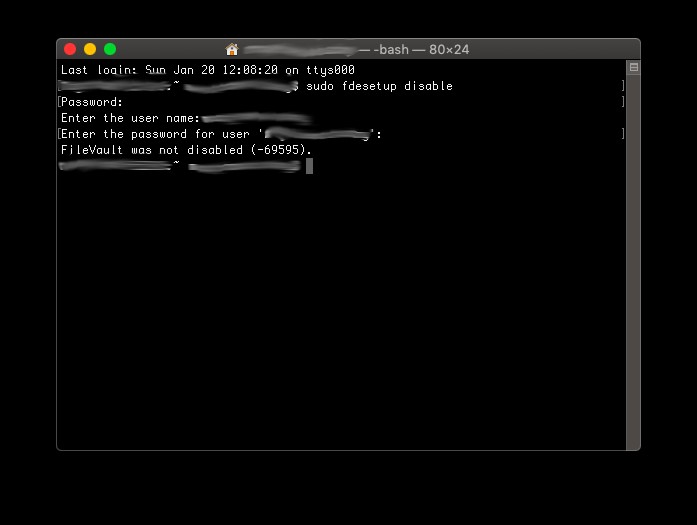
It is most useful when dealing with automation, scripting, or debugging. Don’t use this as a normal user, as your wayward command can have unimaginable side effects.
How to Decrypt a Mac Hard Drive?
The decrypting is the process in reverse. This undoes the encryption and gets the drive back to the normal, readable state.
- Via Finder: Select your encrypted external drive by right-clicking on it. Choose Decrypt. Enter your password, then the operation proceeds.
- Via Disk Utility: If desired, delete and remount drive in non-encrypted format. Warning—this will eliminate all current info.
- For Startup Disks: Choose System Preferences > Security & Privacy > FileVault, then click Turn Off FileVault. Your Mac decrypts automatically in the background.
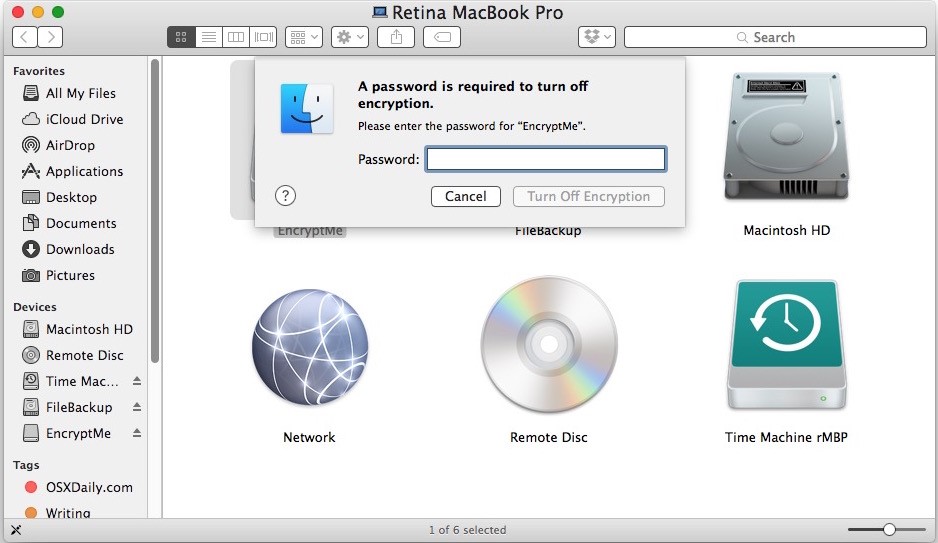
Decryption is slow, usually hours in large drives. Keep your Mac running constantly to prevent interruptions.
Common Problems Encountered during Encryption and Decryption
While Apple has perfected the process, all does not always end well:
Lost Password or Recovery Key: This is the most common and most damaging issue. You can’t open the drive without either.
Interrupted Process: If your Mac suddenly closes in the encryption or decryption process, your drive can partially become corrupted.
Drive Errors: Old or failing drives with bad sectors can throw errors mid-process leaving the drive unreadable.
External Drive Issues: In some circumstances, macOS stops mounting an encrypted external drive, and this is a typical scenario if the drive has been formatted before on another system.
Recovering Lost Encrypted Mac Files from Your Hard Drive
It is trickier to retrieve your data from your encrypted drive than from your non-encrypted drive because your information is scrambled. You can retrieve your password, though, if you know your password.
Built-in Mac Options
- Disk Utility’s First Aid: Ideal for fixing small corruption or directory issues.
- Time Machine Backups: If you already have regular backups in place, this is, by far, the quickest and most foolproof form of recovery.
If these aren’t successful, then you will require stronger software.
Why Stellar Data Recovery for Mac is a Lifesaver
When unexpected data loss strikes, the last thing a Mac user needs is a complicated, unreliable recovery tool. This is where Stellar Data Recovery for Mac proves to be a true lifesaver. Unlike conventional solutions that often struggle with compatibility or fail to recognize encrypted storage, Stellar is designed to natively handle encrypted drives without breaking a sweat.
Here’s why the world trusts it:
Password-Secured Recovery: Stellar will prompt you to provide your encryption password when you connect the drive. That will enable it to recover your files in safety.
Preview File: You can preview your files with Stellar to see what can be restored.
Compatible with External and Internal Drives: If your drive is your startup disk, external hard drive, or even your Time Machine backup, Stellar is ready to assist.
The retrieving process is hassle-free:
- Open Stellar Data Recovery for Mac.
- Connect the encrypted drive.
- Enter the encryption password when prompted.
- Scan the drive.
- Preview and retrieve the files that you want.
This makes it invaluable in cases where encryption or decryption was interrupted, or when Disk Utility simply cannot mount the drive.
Best Practices for Encrypted Drive Management
To keep your information secure as well as recoverable, perform the following:
Backup Before Encrypting: Make a backup copy before applying encryption. Without exception.
Pick strong passwords: Come up with capture phrases that are complex yet easily retrievable, or consider using a reliable password management tool.
Safekeeping Recovery Keys: Keep them as hard copies or within a reliable password safe, not on active workstations.
Safely Remove Drives: Strictly avoiddisconnecting an external encrypted drive while in use.
Regular Maintenance: Schedule First Aid within Disk Utility as often as reasonable to scan for problems.
Update Software: Always ensure both macOS and Stellar are upgraded for proper integration with newer computer systems and updated peripheral file systems.
Conclusion
Encryption is one of the best ways to protect your files. You can secure your internal or external drives thanks to FileVault and tools in macOS. But encryption is not without dangers. If you run into unexpected drive corruption or other errors, you will be locked out from your own files. It’s where software like Stellar Data Recovery for Mac become extremely valuable. If you have the recovery key, the software will help you run an extensive scan on the encrypted drive and recover your critical information.