The Kernel Data Inpage error is a fatal error that may occur in different scenarios, including transferring files from the system to an external drive, playing/exiting a video game at first boot, or after putting the system on sleep mode. The error can make your system stuck in a boot loop or crash or restart frequently, putting your device and data at risk.
Read this post to learn everything about BSoD Kernel Data Inpage Error and learn the right methods to fix it!
What is Kernel?
The Kernel is a core OS (Operating System) component that loads in a protected memory area and remains there until the system’s shutdown. It performs several tasks, such as loading-managing drivers, optimizing and managing CPU, file systems, network transport, managing input/output devices, handling application system calls, and allowing applications to use it. Each system operation performed at the software and hardware level is administrated and managed by Kernel. If the Kernel runs into an error or can’t load correctly, your system will not boot properly.
Important Note: Since the Kernel Data Inpage Error prevents access to the system and its data, you should use professional data recovery software, such as Stellar Data Recovery Professional. With its bootable media recovery feature, this DIY software can quickly recover data from unbootable, crashed, or BSoD-affected systems. What is Kernel Data Inpage Error?
The KERNEL_DATA_INPAGE_ERROR occurs when the requested page of the kernel data from the paging file is not readable in the system’s memory. This error usually contains a bug check value of 0x0000007A. However, it can also show up with different error status codes, including 0xC000009C, C0000185, 0xC000016A, 0xC000009D, etc. All these standard error codes are caused by specific causes.
Why Kernel Inpage Error Occurs?
As discussed above, all status codes associated with the Kernel Data Inpage Error indicate different causes. If you see the stop code 0xC000009C or 0xC000016A, the error is typically caused by bad blocks/sectors on the drive. If the Kernel can’t read data from the disk due to bad sectors, it can throw a Kernel inpage error. Additionally, if the error occurs with C0000185, the paging file is on an older SCSI disk.
Issues Arising Due to Kernel Data Inpage Error?
Many people have been bugged by this error, which has resulted in multiple issues with their system. Some users reported experiencing a black screen that showed up with a “checking media: failed” message while booting their system. Upon restarting the system, it booted with a blue screen and Kernel data inpage error, showing “What failed: wink32kfull.sys.”
Some said they experienced this blue screen of death error with an unexpected store exception code. When they tried rebooting their system, it just got stuck on the error message. Users were unable to shut down or restart the system. A few users stated that they keep receiving the BSOD error now and then, and their PC gets stuck at 0% every time for about half an hour.
How to Fix BSoD Kernel Inpage Data Error?
Below are some proven methods for fixing Kernel Data Inpage Error. Let’s start with some quick fixes!
Quick Fixes:
- Check if all the adapter cards are correctly seated in the computer for PCs with card slots. Additionally, ensure all the adapter card contracts are clean.
- Further, check the SCSI termination for problems and disk cabling if you see status code C0000185 with the Kernel Inpage error.
- Check your hard disk health status by following Control Panel > System and Security > Security and Maintenance > Maintenance > Drive Status. If it shows you Bad/Poor, it will confirm that your hard drive has bad sectors.
- If you can boot the PC in Safe Mode, check if all required Windows updates are installed.
- Try running the Microsoft Hardware Diagnostic Tool. It will help identify issues with software or hardware devices, such as a defective motherboard component.
Advanced Methods:
If you cannot fix this BSoD Kernel Data Inpage Error with the above quick fixes, try the methods discussed below. However, before that, boot your system in Safe Mode. It will help Windows boot only with the minimum required programs and drivers and load quickly.
#1 Scan Disk for Bad Sectors and Errors
One of the major causes behind the error is the hard disk with bad blocks or sectors. If you can reboot your system, Autochk will run automatically and try to map the bad block to prevent Windows from using it. However, if it doesn’t scan the hard disk for errors, you can do it manually through Command Prompt, using CHKDSK or Check Disk Utility in Windows Explorer. Follow the below steps to check the disk for errors:
Run CHKDSK Command
- Open Command Prompt from Windows Search and run it as administrator.
- Type chkdsk /f /r D: in the elevated window and hit Enter. (Replace the D: with your hard disk letter.)

- A scan will start. Once the scan is completed, press Y to continue if it prompts you for further repair process.
- Once finally completed, exit the command prompt and reboot your system to check if the error is fixed.
Run Check Disk Utility in Windows Explorer
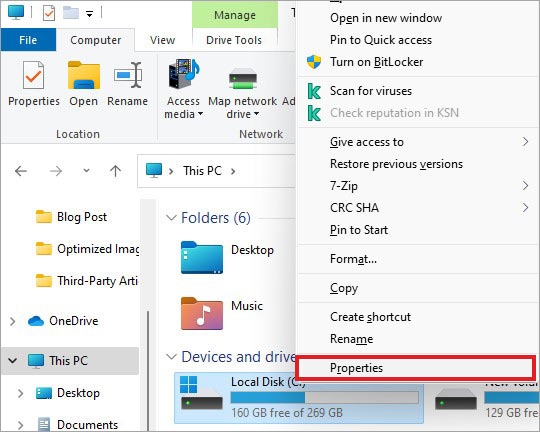
- Open File Explorer (Windows + E), go to This PC, and right-click on the C: drive to open its Properties.
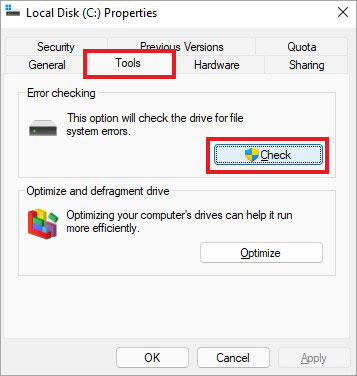
- Next, go to Tools and select Check under Error checking.
- On the following prompt, click Scan drive.
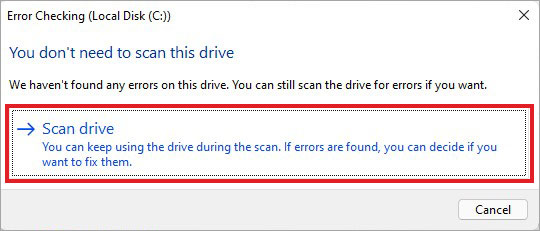
- The utility will scan the disk for errors and bad sectors and repair the drive.
- Once the scanning is done, see if further prompts are needed.
- Finally, restart your system and check if the issue is resolved.
#2 Test Your RAM
A damaged, faulty, or failing RAM can also cause this blue screen of death error on your system. To check and resolve issues with RAM, you can run the hardware diagnostics provided by the manufacturer. Additionally, you can run the Windows Memory Diagnostic tool with the following steps to test your RAM.
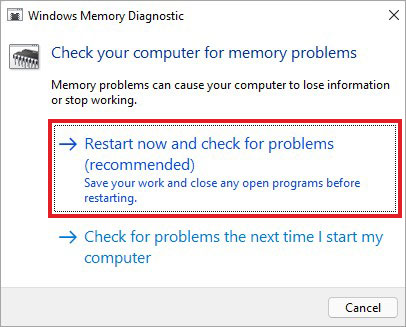
- Open the Windows Memory Diagnostic tool through Windows Search.
- On the following prompt, select Restart now and check for problems (recommended).
- The system will reboot and start running a test to check your RAM.
- Let the process complete and see if any issues are found in the scan results.
#3 Enable Automatically Manage Paging File Size for All Drives
You can also enable the Automatically Manage Paging File Size for all drives to fix the Kernel Data Inpage error. Use the Performance Options in Windows to manage the paging file size settings with the following steps:
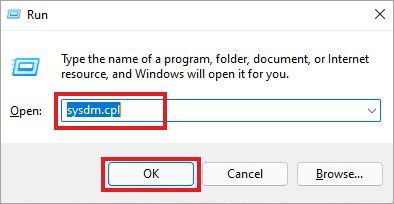
- Open the Run dialog box and type sysdm.cpl. Click OK or press Enter to open System Properties.
- Go to the Advanced tab, and under the Performance tab, click Settings…

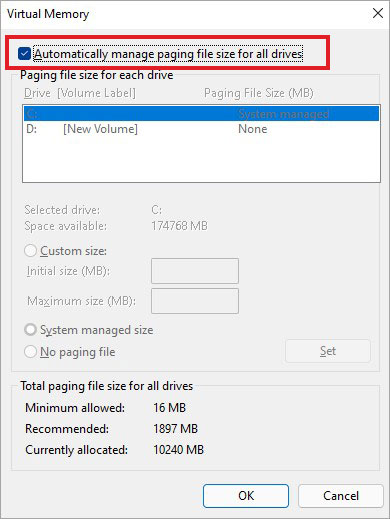
- Next, go to Advanced, and under Virtual memory, click Change…
- Further, select the checkbox for ‘Automatically manage paging file size for all drives’ > OK.
- Now, reboot your system and see if the error is gone.
#4 Run an Antivirus Program to Check Malware Infection
Since the error can also pop up while running any program or application and even after connecting any external drive to transfer files, we recommend scanning your system for malware infection. Follow the given steps to run the Windows Defender antivirus program.
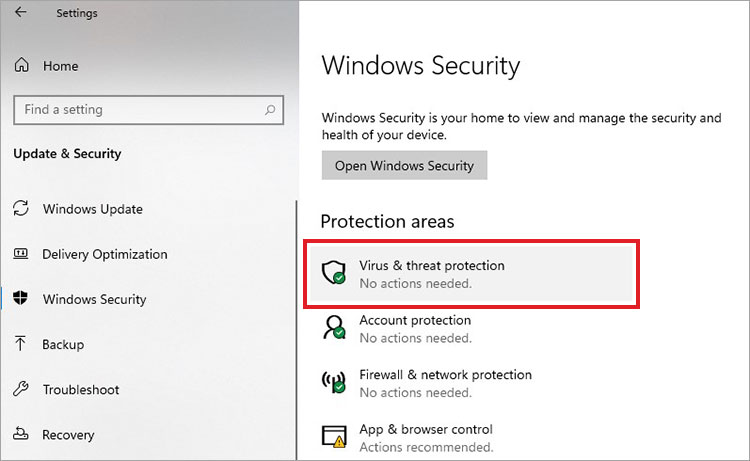
- Open Settings (Windows + I), and go to Update & Security > Windows Security.

- Next, open Virus & threat protection and follow it.
- Run Microsoft Defender Antivirus scan.
- Let the scan complete and see if you see any virus in the scan results.
You can additionally run updated, commercial virus-scanning software to check the MBR of the hard disk, as malware can also infect file systems.
Conclusion:
Kernel Data Inpage Error can occur due to faulty RAM and a bad-sectored hard drive. To identify the real cause of the issue, you can refer to the status codes that appear with the error message. Additionally, you can check the System Event Viewer for error messages indicating which device is causing the error.
If you’re concerned about your data, use Stellar Data Recovery Professional to recover data from unbootable or crashed Windows OS systems.
People Also Ask: