If your Office 365 (Microsoft 365) shared mailbox is not showing in Outlook, you can first check the log files to find out the cause behind the issue and resolve it. In addition, you can disable auto-mapping, add shared mailbox manually, and recreate the Outlook profile to fix the problem. Here, we will explain these solutions with stepwise instructions to fix the shared mailbox not showing issue in Outlook.
What is a Shared Mailbox?
A shared mailbox in Microsoft 365 (formerly known as Office 365) is a common mailbox that multiple users can access in an organization. Users with permission to access the shared mailbox can also send and receive messages using the common mailbox address, such as support@abc.com or info@abc.com. It also offers a common calendar to allow users to create, schedule, and share various work-related calendar tasks. To access a shared mailbox, you must have the Send As, Send On behalf, or Full Access permissions assigned by the administrator.
How to Resolve the Office 365 Shared Mailbox not Showing in Outlook Issue?
Below are some solutions and workarounds you may follow to fix the shared mailboxes not showing in Outlook issue.
Solution 1: Generate and Check the Logs
If you are unable to view and access shared mailbox in Outlook, follow these steps to generate a log and then analyze it to find the issue and resolve it.
- Open Outlook and go to File > Options > Advanced.
- Under Advanced, check the Enable troubleshooting logging (requires restarting Outlook) option and click OK.
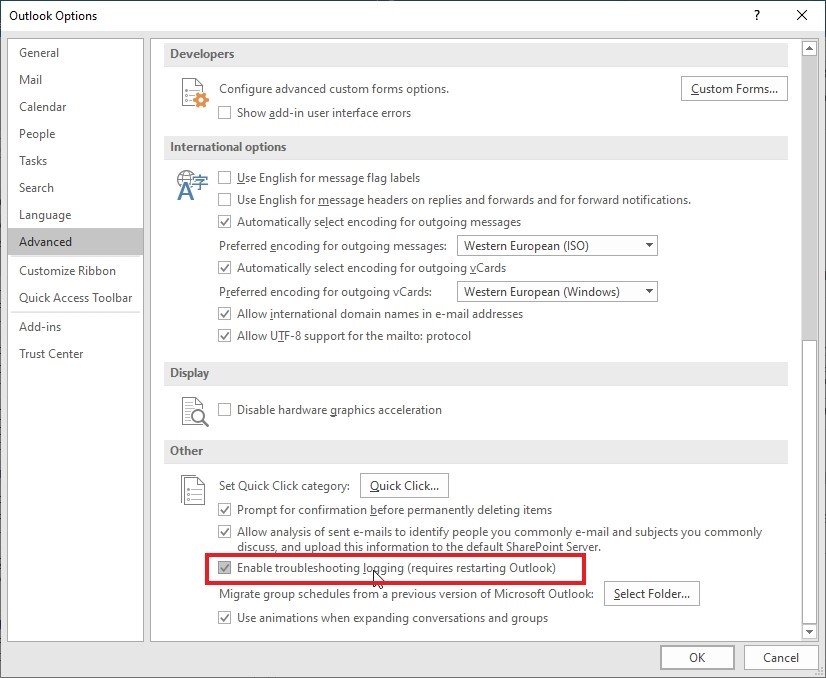
- Restart Outlook.
- The log files are stored in the %localappdata%/Temp folder or C:/Users/UserName/AppData/Temp folder location.
Check the logs and fix the issue to resolve the problem.
Solution 2: Disable Auto-Mapping
Autodiscover services in Microsoft 365 auto-maps the shared mailboxes to users if they have full access or permissions to view the mailboxes. It loads the shared mailbox automatically when the user logins to web app or starts Outlook.
In some cases, this may not work and you may need to disable the auto-mapping feature manually through command-line interface for the user to restore access to the shared mailbox. The steps are as follows:
Note: To perform these steps, you need administrative rights as it requires you to login to Microsoft 365 with Global Administrator account.
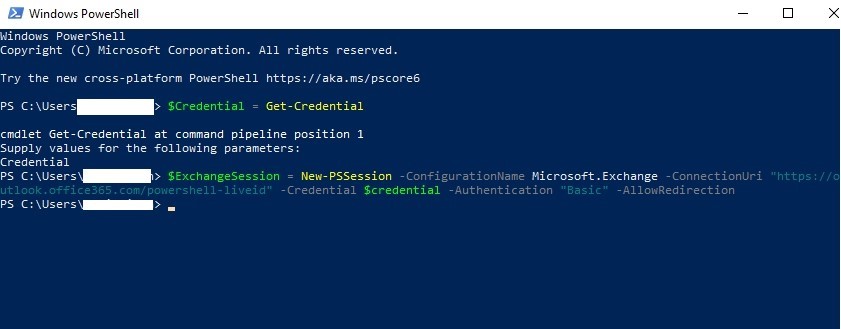
- Open PowerShell and then run the following command to store user credentials.
$Credential = Get-Credential

- Enter your Microsoft 365 credentials and click OK.
- Then, run the following command to establish connection and start a new Microsoft 365 PowerShell session.
$ExchangeSession = New-PSSession -ConfigurationName Microsoft.Exchange -ConnectionUri “https://outlook.office365.com/powershell-liveid” -Credential $credential -Authentication “Basic” –AllowRedirection
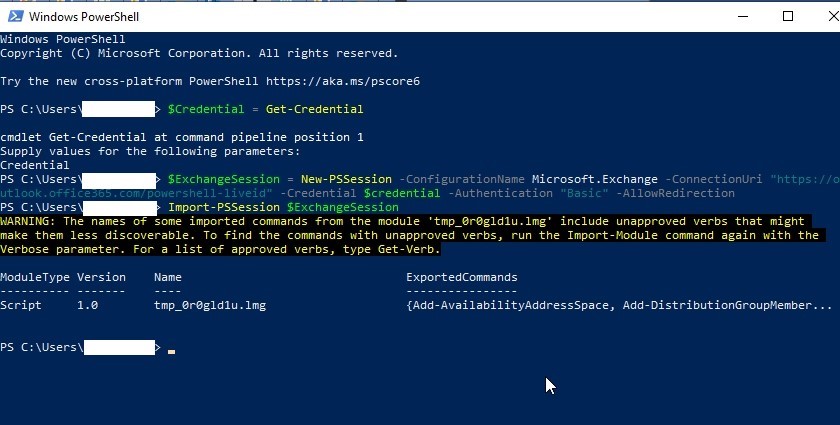
- Then, start the Exchange Online session.
Import-PSSession $ExchangeSession
- Once the connection is established and the session has started, remove the permissions to access the Shared Mailbox. In the following example, we are revoking the permission of support@abc.com from john@microsoft.com user.
Remove-MailboxPermission -Identity support@abc.com -User john@abc.com -AccessRights FullAccess
- Then, assign the full access permission to the shared mailbox again using the following command and disable the auto-mapping.
Add-MailboxPermission -Identity support@abc.com -User john@abc.com -AccessRights FullAccess -AutoMapping:$false
- You may now add the shared mailbox manually in the Outlook account, which will recreate a new OST file. The old one will become orphaned and inaccessible.
- Repeat the above steps for each user to allow access to the shared mailbox.
Solution 3: Add Shared Mailbox Manually
If the shared mailbox is not showing, you can try to manually add it. Follow these steps:
- In Outlook, go to File > Account Settings > Account Settings.
- Under E-mail tab, double-click on your email to open the settings.
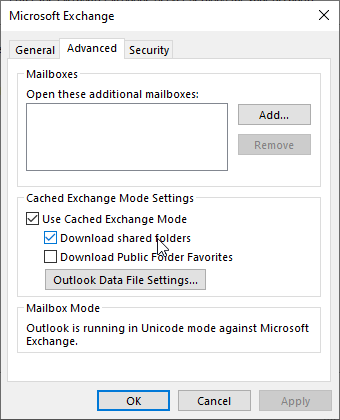
- Click More Settings.
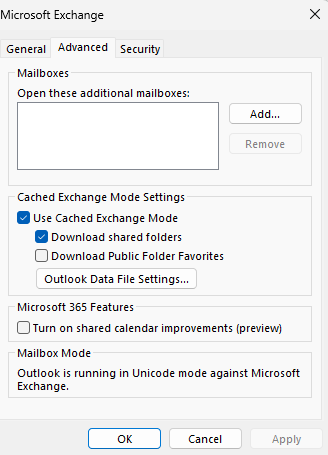
- Under the Advanced tab, click and enable the Download shared folders option.
- Click Add… and type the Shared Mailbox name.
- Click OK > Apply > OK.
Restart Outlook and check if you can access the Shared Mailbox.
Solution 4: Uncheck and Check Cached Exchange Mode
Cached Exchange Mode in Outlook stores a copy of mailbox (OST file) on the local storage and allows offline access to mailbox items. If there are issues with this mode, then the shared mailbox may not appear in Outlook. You can disable and then enable the Cached Exchange mode to see if it helps. Follow the steps mentioned below:
- Launch your Outlook application.
- Go to the File tab.
- Select Account Settings > Account Settings.
- Choose your email account and click the Change button.
- Tap More Settings and click on the Advanced tab.
- Navigate to the Cached Exchange Mode. Disable the option and then enable it.
- Now, restart Outlook and see if the problem is resolved.
Solution 5: Recreate Outlook Profile
It is possible that your email profile is corrupt or damaged, preventing you from accessing the shared mailbox. In such a case, you may try creating a new Outlook profile and setup your email account. The Autodiscover service may map the shared mailbox to your user account. The steps are as follows:
- Close Outlook and open Control Panel.
- Find and click the Mail option.
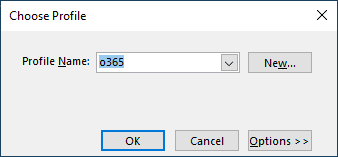
- Click Show Profiles and then click Add.
- Enter the profile name and click OK. A setup wizard will open.
- Enter your Microsoft 365 credentials to create your account with this new profile.
- Once created, close the Control Panel and start Outlook.
- From the Profile Name dropdown, choose your new profile name and click OK.
- This will open Outlook with your newly configured profile.
- Wait for a while until the synchronization is finished.
- Then check all mail folders including shared mailbox. It should be visible by now.
You may contact the administrator if this also fails to add the shared mailbox to your user account in Outlook.
To Wrap Up
Missing shared mailbox from Outlook client or web app can devoid you from reading or sending emails or collaborating with others in your organization. Above, we have discussed some solutions and workarounds you can follow to resolve the shared mailbox not showing in Outlook issue.
However, if you still couldn’t restore the required shared mailbox, try recreating the OST file after taking its backup. Then, check the new OST file for any missing mail items. If you find any, use Stellar Converter for OST to recover them from the backup OST file. This OST to PST converter software can help you find and extract the missing mail folders and items from your backup OST file and save them in PST. Once saved, you may import this PST file into your Outlook account.