Microsoft Office 365 is a cloud-based platform that allows users to experience its features and functionalities from anywhere and from any device (laptop, smartphone, or tablet), when connected to internet. It comes in various subscription plans, depending on the users’ requirements – individual or organizational. You can configure Office 365 account to a desktop-based application, such as Outlook, to access your mail offline. Additionally, you can also configure Thunderbird (a desktop-based free email client) for Office 365. However, for this, you need to configure it with IMAP.
Here, we are going to describe the stepwise process to configure Thunderbird for Office 365 using IMAP.
Process to Configure Thunderbird for Office 365 using IMAP
If you’re already using Thunderbird, then you need to first check that your Thunderbird application version is 77.0.b1 or higher. If you’re using a previous version of the application, you need to upgrade it in order to work with Office 365. If you do not have the Thunderbird application, then download the application on your Windows computer and create a profile.
Here is the step-by-step procedure to configure Thunderbird with Office 365 using IMAP:
- To begin the configuration with Office 365, launch Thunderbird application.
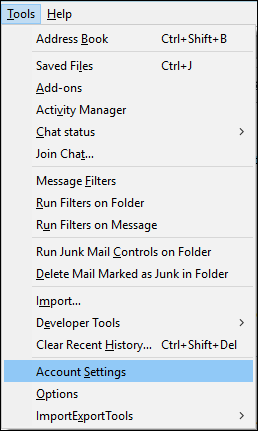
- Go to the Tools option and click on it. You will see a dropdown menu. Select the ‘Account Settings’ option from the menu.
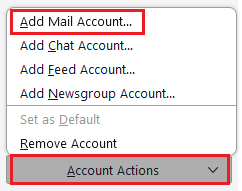
- A pop-up page of ‘Account Settings’ will appear on the Thunderbird interface. Click on ‘Account Actions’ from the dropdown button. Select ‘Add Mail Account’ from the list.
- A page with Account Settings will appear. Enter your credentials - your name, Office 365 ID, and password associated with the account. Click ‘Continue’ to begin adding your Office 365 account to Thunderbird.
- You will get an error if you directly click on ‘Done’. So, click on the Manual Configure option.
- A new Mail Account setup page will appear on the screen. You have to fill the following information in appropriate boxes or fields.
IMAP
Server hostname: outlook.office365.com
Port: 993
SSL: SSL/TLS
Authentication: Oauth2
For Outgoing:
Server hostname: smtp.office365.com
Port: 587
SSL: STARTTLS
Authentication: Oauth2
User Name: (Incoming and Outgoing): user ID
- After entering the information, click ‘Done’.
- You will be prompted to complete the two-factor authentication process. Complete the process.
The procedure to configure Thunderbird for Office 365 using IMAP is now complete.
You may also like How to Move Thunderbird Profile?
Conclusion
Considering the popularity of Office 365 and its many advantages, many Thunderbird users want to access Office 365 from their account. In this article, we have mentioned the step-by-step process to configure Thunderbird for Office 365 using IMAP. However, if you want to leverage all the benefits of Office 365, then you can consider migrating from Thunderbird to Office 365. To do so, you can take the help of a professional MBOX to PST converter tool, like Stellar Converter for MBOX. The tool offers a seamless process to let you import your MBOX files data into Office 365. It uses Microsoft Modern Authentication technique to securely connect to Office 365 and export the data from MBOX files to Office 365 mailboxes, with 100% accuracy. The tool also saves the converted MBOX data in PST, PDF, RTF, and HTML file formats. It supports Microsoft Outlook versions 2021, 2019, 2016, 2013, 2010, and 2007.


-1753.jpg)
 3 min read