RAID arrays are quite robust and reliable
data storage solution to store business data and run critical business tasks or
applications without any problem. However, the mechanical nature of hard drives
makes RAID configuration prone to failure. A RAID may break or become
inaccessible due to one or more disk failure or related errors—leading to significant
data loss and downtime.
Other errors such as human errors, controller
failure, abrupt shutdown, power loss, or power surge, etc. could also break or
corrupt a RAID array and cause partition loss.
Symptoms of RAID Failure
Symptoms of RAID failures are closely related to symptoms of the hard drive failure that are used in the RAID array. The chances of a RAID server failure can be easily analyzed by checking the condition and performance of the associated RAID disks by using an open-source tool like CrystalDiskInfo.
Beside RAID disks, there are a few other symptoms
of RAID failure that you may observe when a RAID is about to fail. These include,
1. RAID Partition Loss
RAID partition loss may
happen due to virus or malware intrusion, which can corrupt the header of a
RAID partition and make it disappear. Other factors, such as power surge,
hardware or software errors, bad sectors, can also cause partition loss.
Sometimes, replacing a
failed RAID drive incorrectly in a RAID array may lead to partition loss.
2. Frequent Read/ Write Errors
If you are experiencing
frequent read/write errors while accessing or transferring data from RAID, it
indicates an underlying problem with your RAID array that may lead to data
loss.
3. Data Corruption
Data corruption may occur
due to bad sectors that appear on the disk with time and usage. A RAID array
with older or ageing drives may fail to reallocate bad sectors, which can lead
to data corruption and RAID failure.
4. RAID Server Crash
A RAID server may crash
due to failing drive, software error, and a problem with the RAID controller.
5. RAID Controller Errors
A hardware RAID controller may show errors due to problems with the hard drive or after RAID rebuild if the new drive is added to the array incorrectly. The system may fail to detect RAID partitions. In such a case, changing to a new RAID controller doesn’t work as RAID metadata is typically tied to the particular RAID controller.
How to Reconstruct a Failed RAID Array without Data Loss
If a RAID (RAID 0, 5, or 6) server fails,
breaks or shows errors, follow the steps mentioned below to reconstruct the
RAID and recover data safely.
Step 1: Precautions
- Never run CHKDSK command on a
RAID array to fix RAID errors or after RAID crash
- Do not change the disk order in
the array
- Do not attempt to rebuild a
RAID 5 or RAID 6 array with more than one disk failure
- Do not attempt any hit &
trial methods, especially if you don’t know what you are doing
Step 2: Backup Data
Before anything else, backup data from the
RAID server, if it’s accessible. Backup is critical. For instance, in a RAID 5
array, if a disk has failed, the RAID enters into degraded mode and loses its
fault-tolerance. In such a case, immediately back up your data from the RAID
before replacing the failed RAID drive to avoid multiple disk failure.
IMPORTANT NOTE: RAIDs are not backup or an alternative to backups. RAIDs do fail and may cause permanent data loss, sometimes beyond recovery.
Step 3: Check the Drive Health Status
Use a tool such as CrystalDiskInfo to check the SMART status of RAID disks. For better and deeper insights about the disk, install the demo version of Stellar Data Recovery Technician and go to More Tools>Drive Monitor.
The Drive Monitor displays overall disk health,
performance, temperature, and SMART status of the disk. If the health is poor
or SMART shows warnings, use ‘Clone Disk’
option to clone your RAID disk.
Step 4: Reconstruct Broken, Corrupt, or Inaccessible RAID Server for Recovery
To reconstruct a failed RAID and recover data safely, you need an advanced RAID drives data recovery software such as Stellar Data Recovery Technician. The software recovers lost, deleted, and formatted data from any Windows-based RAID 0, RAID 5, and RAID 6 server. Install the software on your Windows machine and then follow these steps:
- Connect all RAID drives to a Windows PC by using SATA connector or SATA to USB converter cables.
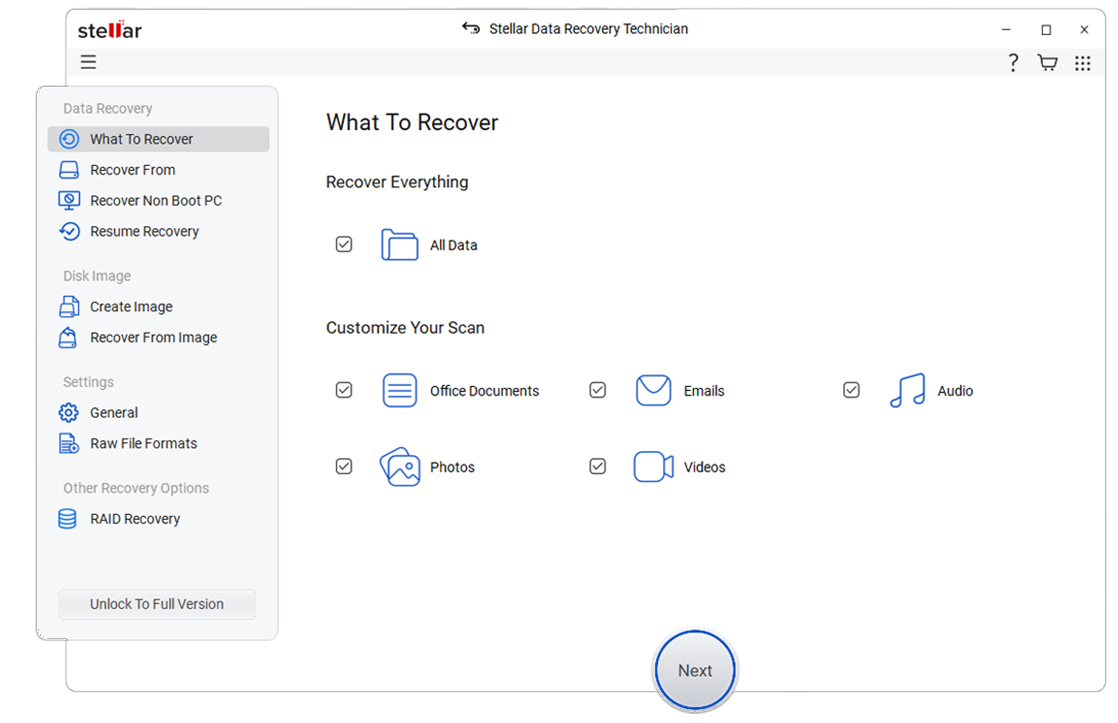
- Launch Stellar Data Recovery Technician software
- Select ‘All Data’ and click ‘Next.’

Tip: Check the list of supported
file types via Settings>File List. To add a new file type or format, click
‘Add Header’ tab and add a few sample files of the particular file format that
you want to recover.
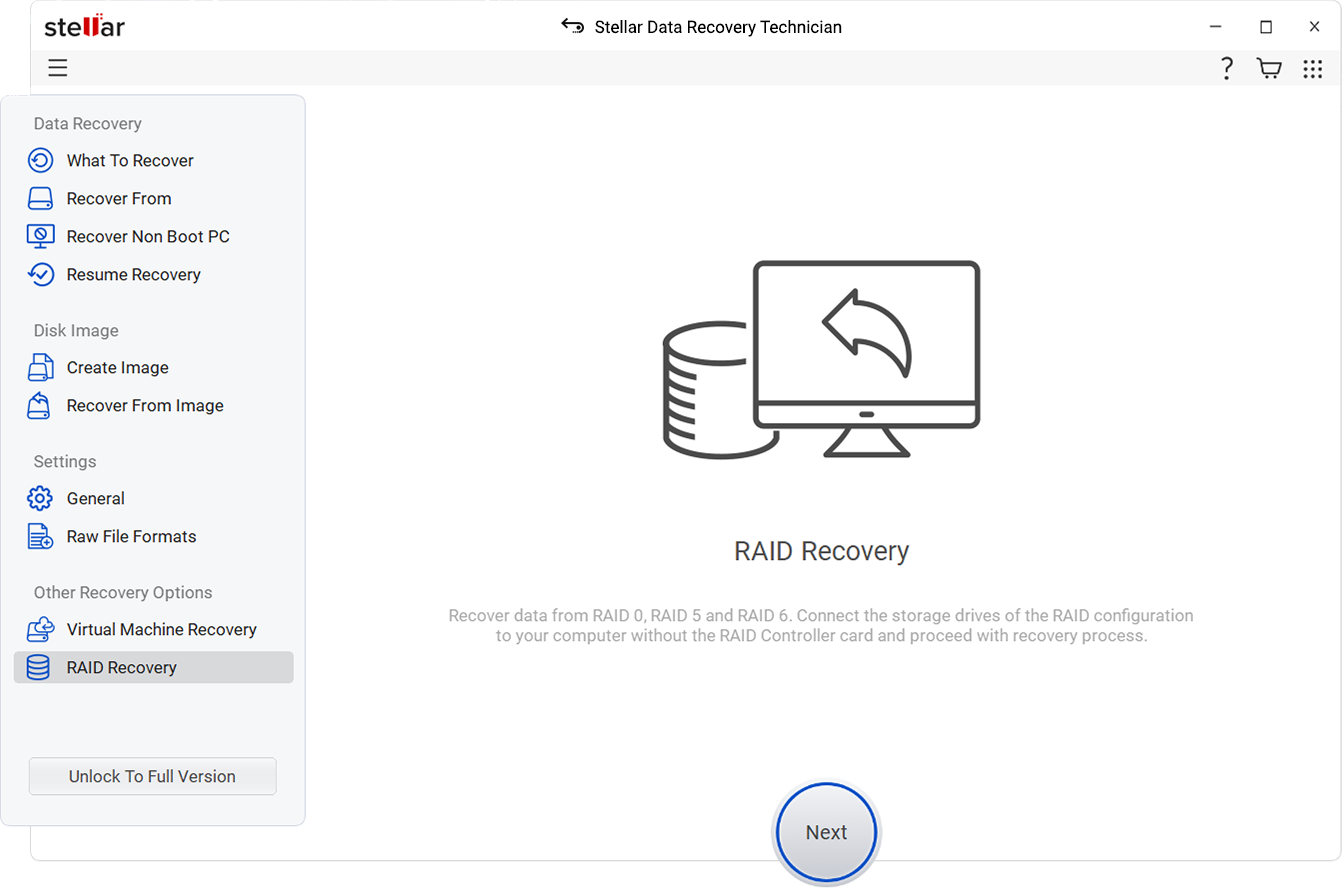
- Select ‘RAID Recovery’ and click ‘Scan.’

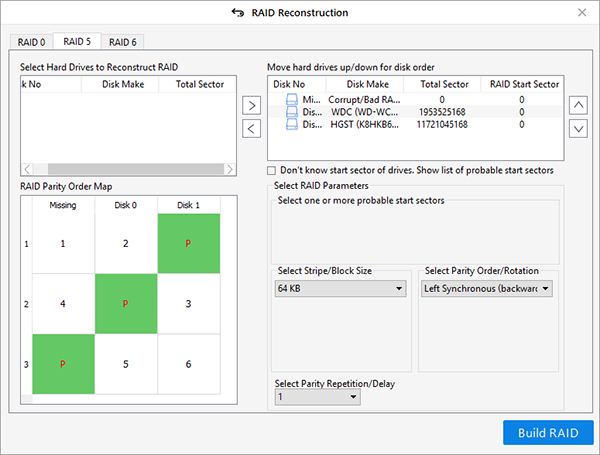
- Select the RAID 0, RAID 5, or RAID 6 tab, whichever RAID you had and want to rebuild for recovery

- Enter and select the required RAID
parameters from the respective options. You need to provide all the parameters.
TIP: In case you forgot the parameter values, choose ‘Don’t know’ options from the drop-down
and select probable values
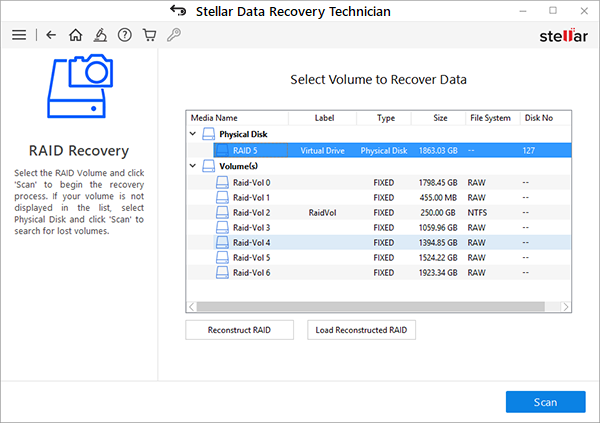
- Click on the ‘Rebuild RAID’ button. Based on provided
and selected RAID parameters, the software intelligently reconstructs a virtual
RAID array and lists the RAID volumes for data recovery scan

If provided RAID parameters are incorrect,
the software automatically detects and reconstructs a few probable virtual RAIDs
for data recovery.
- Choose the reconstructed RAID virtual drive or volume from the list and click ‘Scan.’

- After the scan, click ‘Click Here’ link at the bottom to run a deep scan
- Post deep scan, you may click on a file to see its preview before saving. This helps identify the file you need to recover
- Select the files you wish to save and click ‘Recover.’
- Click ‘Browse’ to select a save location and click ‘Start Saving.’
WARNING: Never select any RAID disk, which is a part of the reconstructed RAID array, to save recovered data. Get a separate external disk(s) to save the recovered files and avoid data overwriting?
RAID Failure Prevention Tip
The most common reasons for RAID failure
are hard disk errors and human errors. However, with regular backup and
adequate measures (discussed below), you can avoid data loss due to RAID
failure.
- Monitor of RAID disk drives’
critical SMART parameters, health status, and temperature can help you minimize
the risk of RAID failures to a great extent.
By monitoring and
analyzing RAID disk health, you can take appropriate & time-bound measures
to backup data from your RAID array and safely replace the failing disk with a
new without breaking the RAID configuration or risk of data loss
- Avoid CHKDSK or Disk Repair utilities to fix RAID errors
- Never install beta update of a RAID firmware, system software, or operating system
- Always update operating system and software to the latest stable version
- Ensure uninterrupted power supply to RAID controller
- Keep at least two new/empty drives available all the time. That will help you replace the failed RAID drive quickly and avoid downtimes and data loss
If you have any queries or suggestions regarding RAID data recovery, leave them in the comment section below. You may also reach us via call, chat, or email for more help.