tl;dr
The Disk Utility First Aid Repair Process Failed error typically indicates serious file system corruption that the standard Disk Utility tool cannot fix while the operating system is active. Here is how to fix it:
- Best Fix: Restart your Mac in Recovery Mode (Command + R on Intel; hold Power Button on Apple Silicon) and run First Aid again. This allows the tool to repair the disk without the OS locking the files.
- Command Line Fix: If Recovery Mode fails, boot into Single User Mode (Command + S) and use the command /sbin/fsck -fy to force a file system consistency check.
- Format Drive: If the directory structure is too damaged, you must Erase and reformat the drive to APFS (for SSDs) or Mac OS Extended (for HDDs).
Disk Utility is macOS’s built-in storage manager and it can format drives, partition disks, and run First Aid to locate and repair disk errors. Actually, Disk Utility is the first tool Mac users and IT pros turn to when a drive starts acting like it shouldn’t. However, sometimes Mac shows that “First Aid process has failed” message and that means something is seriously wrong with the file system or disk.
That can be scary as it might mean corruption, a bad sector, or other issues that need fixing. The good news however is that these errors don’t spell doom. Disk Utility is powerful, and if it can’t fix an issue, other tricks can step in to save your data. The sections below explain the function of Disk Utility, then cover step-by-step fixes for First Aid failures.
What Disk Utility Does on a Mac?
Disk Utility lets you create and delete volumes, erase drives, check for errors, and more. You can use Finder, Launchpad, Spotlight, or go to recovery mode to access Disk Utility on Mac. Here are its key features:
- Format Drives: You can use the Erase button to assign a name, format, and optionally secure overwrite the data.
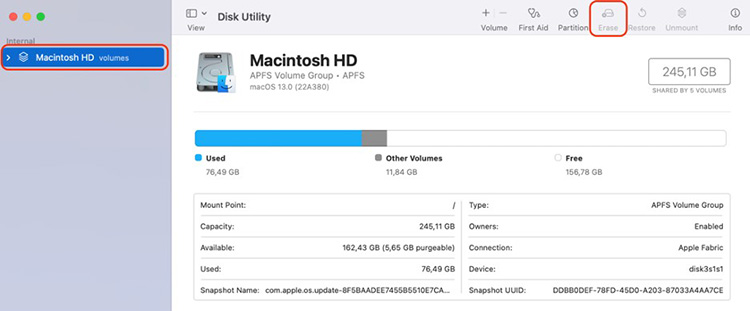
- Disk Error Repair: First Aid, when you run it on volumes, is able to detect and fix file system problems.
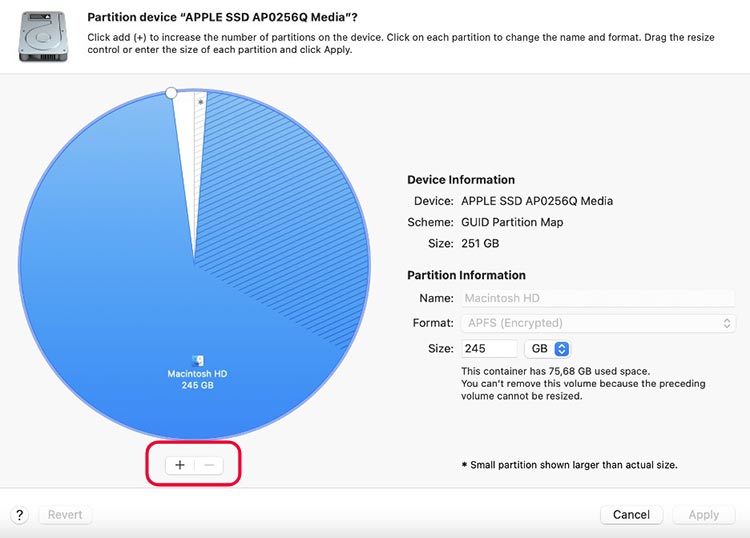
- Partition Drives: Using this, you can create multiple partitions on a physical drive. In Disk Utility, go ahead and select the drive and click Partition, then use the “+” button to add partitions, sizing each as desired. In the end, select a format of your choice for each new volume and apply.
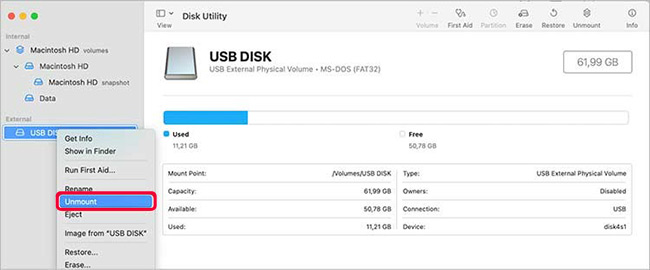
- Mount or Unmount Volumes: It can help you mount or eject drives. Suppose that if an external drive appears grayed out, select it and click Mount to access it, or Unmount to disconnect safely.
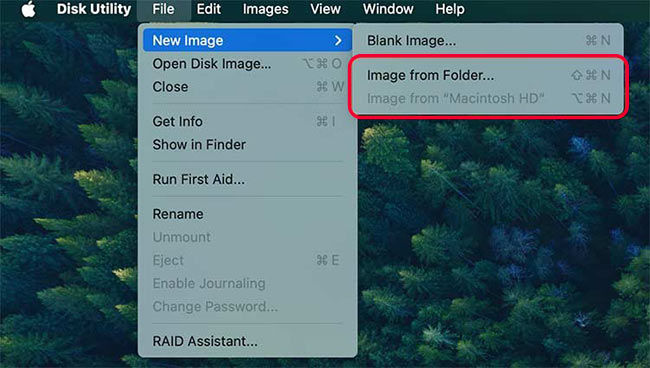
- Create and Restore Disk Images: It can also bundle up the files, folders or even entire volumes into a disk image (.dmg). Simply go to File > New Image > Image from Folder or Image from [device] to capture the data. Specify a name, format, and location, then Save.
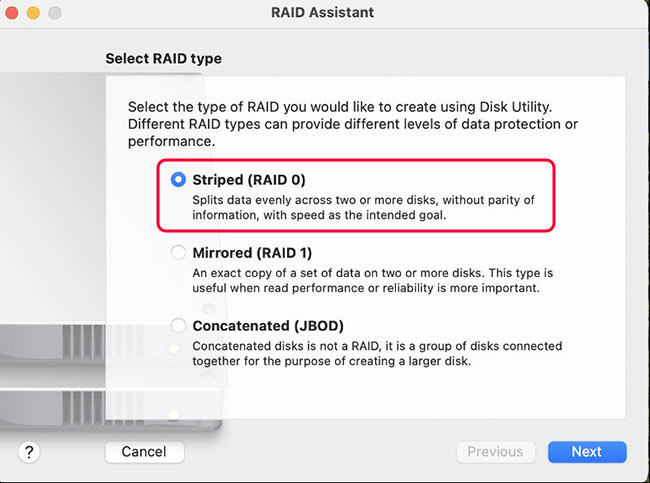
- Create or Rebuild RAID arrays:
- Open Disk Utility.
- Click File > RAID Assistant.
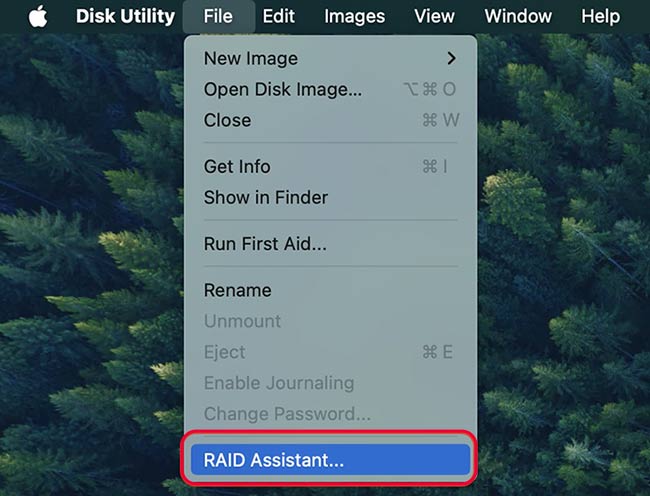
- Follow the assistant to create, delete, or rebuild RAID sets.
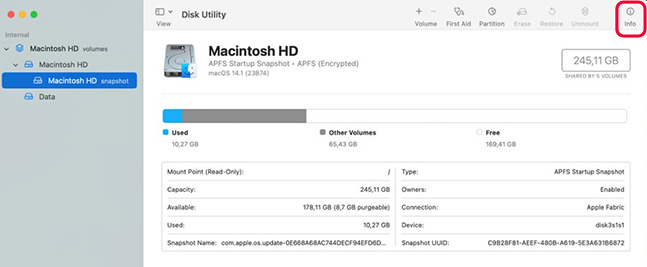
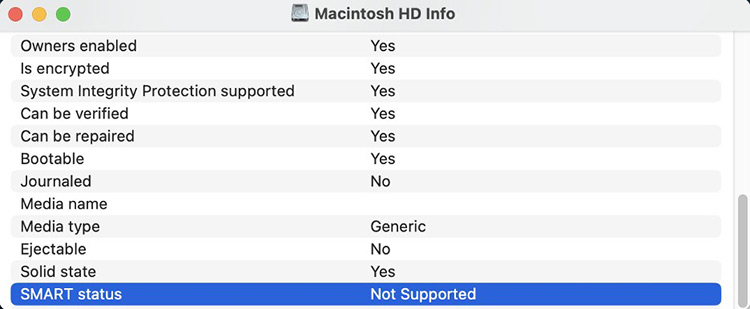
- Check S.M.A.R.T. Status: Click a drive and then the Info button to see S.M.A.R.T. status (errors, if any) and other details.
If First Aid fails, though, it’s time for deeper troubleshooting so let’s start.
Fixes for “Disk Utility First Aid Failed” Error
If First Aid reports “Failed” on a volume or disk, don’t panic. Errors like the following ones can pop up anytime due to certain reasons. Let’s understand them first:
- com.apple.DiskManagement.disenter error 49221: happens when users manually mount the NTFS drive in Disk Utility or certain glitches in a security update.
- com.apple.DiskManagement.disenter error 49153: occurs when there was a glitch during partition or the parto.
- com.apple.DiskManagement.disenter error 49223: occurs when users manually mount the ExFAT drive in Disk Utility.
- com.apple.DiskManagement.disenter error 49244: tells that it is a wrongly reformatted volume.
- com.apple.DiskManagement.disenter error 49180: implies that you have used an incompatible file system when you were making a partition.
If you see any of them on your Mac, go and try these fixes but one-by-one.
Method1: Restart Your Mac
A reboot can clear temporary glitches. Restarting has been historically regarded as the simplest fix for any problem:
- Save your files and choose Restart.
- Now open Disk Utility again and rerun First Aid on the problem disk.
Rebooting will clear caches and reset drivers, and eliminate soft errors. If First Aid still fails after a restart, move on to the next fix.
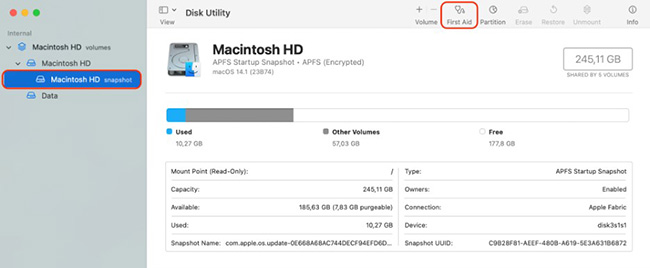
Method 2: Run First Aid in Recovery Mode
First Aid runs with higher privileges in macOS Recovery, where the OS isn’t actively using the disk:
- Boot into Recovery: Restart your Mac system and hold Command (⌘)+R if its an Intel system and the power button if it is an Apple Silicon system until startup options appear. Go ahead and choose Options > Continue.
- In macOS Recovery, find and open Disk Utility from Utilities menu.
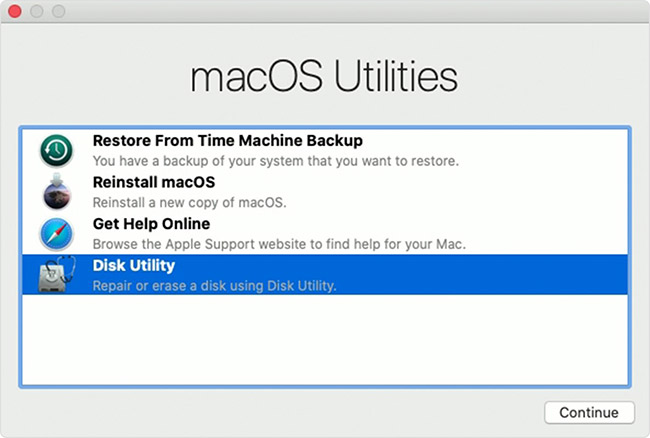
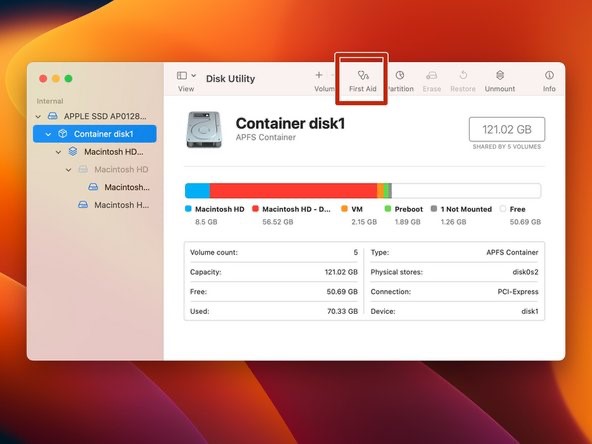
- In the sidebar of Disk Utility, select the parent disk of your drive, which is at the top (e.g. “Apple SSD”) and go to First Aid > Run. When it finishes, also run First Aid on the volume(s) (containers/partitions) listed beneath it.
- If prompted, allow Disk Utility to unmount the drive to repair it. Click Done when finished.
In Recovery mode, the system volume isn’t mounted for regular use, so First Aid can fix issues that aren’t fixable while macOS is running. This method is recommended especially for the startup disk, since the guide notes you must restart into Recovery before repairing the boot volume. If First Aid still reports failure in Recovery, note any error details and proceed below.
Method 3: Check the File System Format
Sometimes, First Aid just can’t work because you are thinking of something else while the reason simply is that the drive’s format isn’t fully supported or it is altogether corrupted:
- In Disk Utility, whether normal or Recovery mode, go ahead and select the drive or volume. In here, look at its Format which is on the right info panel. Commonly known formats of such files are APFS (for modern macOS) or Mac OS Extended (HFS+ for even older Macs).
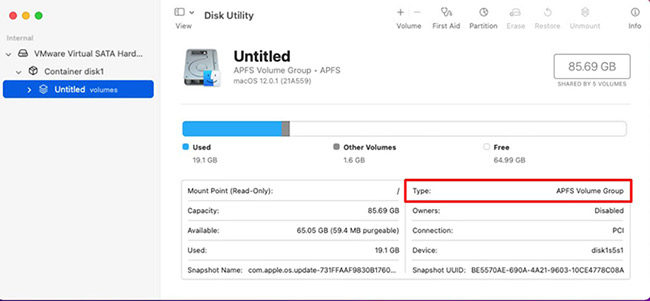
- If it is that exFAT or another format that is not common, it is better to back up your data, formatting the disk (Method 5) and then going ahead and reformatting it to APFS or Mac OS Extended.
- If the format looks correct but errors are still persistent, it implies that the file system is damaged to the core. In this case, you should be making sure that all volumes on the disk are having compatible formats (e.g., an APFS container and its APFS volumes).
In simple words, just remember that it is important to ensure that your disk is formatted in a Mac-friendly way. If the disk was, let us assume, formatted on Windows (exFAT) and the First Aid option fails, go ahead and back up the files before you reformat it as APFS or HFS+. A compatible file system always avoids several First Aid errors. Now if the disk is already Mac-formatted and you are facing issues, it’s time to move to more powerful fixes.
Method 4: Use Terminal or fsck
For advanced troubleshooting, use command-line tools:
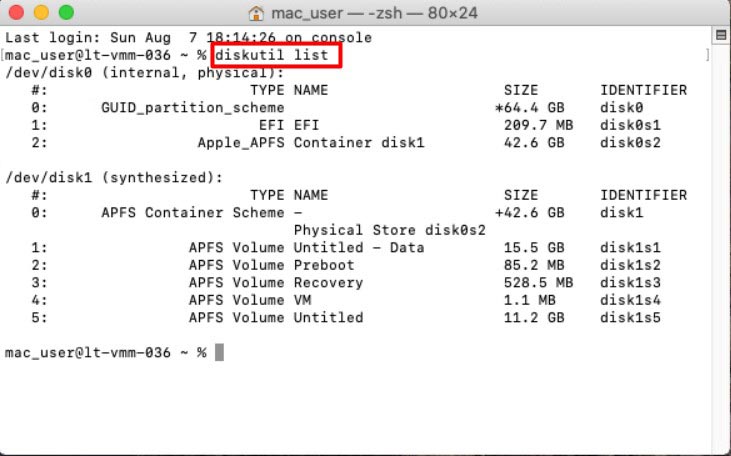
- Diskutil in Terminal: Open Terminal from Applications > Utilities. You can try verifying/repairing with diskutil. For example, identify the disk with diskutil list, then run diskutil verifyDisk diskX and diskutil repairDisk diskX (replace diskXwith your drive identifier). Or use diskutil verifyVolume /dev/diskXsY and diskutil repairVolume /dev/diskXsY for a specific volume.
Single-User Mode & fsck: (Only for older Intel Macs without T2 chips ) Restart and hold Command+S to boot into single-user mode (a black screen with white text). At the prompt, run:
/sbin/fsck -fy
- This runs the file system check (fsck) on the boot volume. If it reports “File system was modified”, run it again until you see “The volume appears to be OK”. Then type reboot to restart normally.
- Repeat First Aid: After Terminal repairs, run Disk Utility First Aid again on the disk or volume.
The fsck command (File System Consistency Check) is a powerful lower-level repair utility. On older Macs it fixes HFS+ volumes; on newer APFS drives, macOS automatically mounts a special tool (fsck_apfs). Using Terminal, can sometimes repair issues that the GUI First Aid misses. Warning: Single-user mode is powerful – follow the prompts carefully. If Terminal methods don’t fix the disk, proceed to the next fix.
Method 5: Erase and Reformat the Disk
If First Aid still fails, the disk’s file system may be beyond repair. Backup any important files (see below on recovery) and then erase the drive:
- In Disk Utility, select the affected disk (not just a volume). Click Erase.
- Choose a format now. Go and select APFS for SSDs and modern macOS 10.13 or later or Mac OS Extended (Journaled) for if there is a spinning drive. Name the new disk you are creating and click Erase.
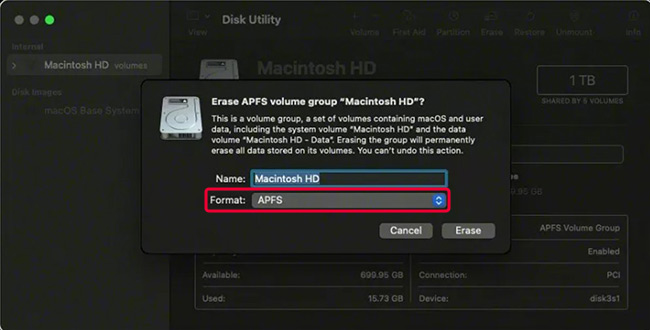
- After erasing, the disk will be blank. You can then create new volumes or leave it as one partition.
- Once erased, run First Aid on the new volume to verify it’s OK (it should complete with no errors).
Erasing fixes corruption by rebuilding the file system from scratch. All data on the disk is wiped, so make sure you have a backup or use recovery tools first. If First Aid succeeds on the blank disk, you’ve eliminated the file system error – you’ll just need to reinstall any software or restore files onto it. If First Aid still fails on a newly erased disk, the drive hardware itself may be faulty. In that case, skip to Reinstall macOS (next) or consider replacing the disk.
Method 6: Reinstall macOS
If errors are happening on your startup disk, it means that the system files might be damaged. The only option is to reinstall macOS and fix system-level corruption:
- Boot to Recovery: As you did before, go ahead and restart your system and start the same macOS Recovery (Command+R).
- Select the Reinstall macOS option to be found in the utilities window and then click Continue.
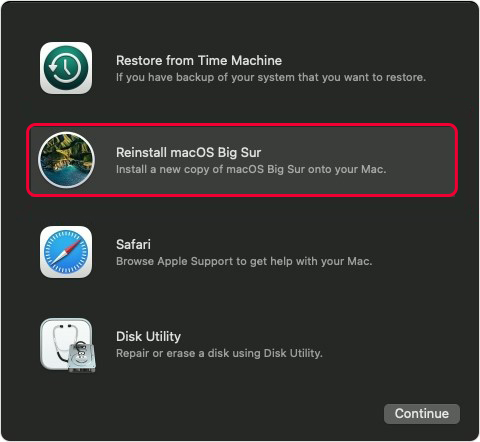
- Now you’ll have to follow the onscreen instructions in order to reinstall macOS. Although you can install it over the existing system, remember… data should be preserved. You will be in a safe space if you have a backup.
- Once done, restart and try Disk Utility First Aid again.
Method 7: Reset NVRAM and SMC (for Intel Macs Only)
On Intel Macs, resetting low-level settings can sometimes help with quirky disk or hardware issues:
- Reset NVRAM (PRAM): Shut down your Mac. Turn it on and immediately press and hold Option+Command+P+R. Keep holding for about 20 seconds (your Mac may restart twice). Release the keys and let the Mac finish booting.
- Reset SMC: The steps vary by model. For example, on a MacBook Pro (T2 chip): shut down, then press and hold Control+Option+Shift on the left side for 7 seconds, also press the Power button for another 7 seconds, release all keys, then power on. (For other Mac models, see Apple’s guide.)
After resetting NVRAM/SMC, open Disk Utility and try First Aid again. These resets clear low-level caches and power settings that might interfere with disk operations. It’s worth trying if hardware anomalies are suspected. If First Aid still fails after all of the above, the drive may be dying.
What if you lose your data on the way?
Since these steps, mentioned above, are related to the Disk, data loss can always happen while performing these fixes. If you are in such a position, Stellar Data Recovery Professional for Mac can recover files. This reliable software is designed to work with all Mac file systems and Apple hardware. It even supports the latest Apple Silicon (M1/M2/M4) and macOS Sequoia, so no need to worry as it works on any modern Mac.
This software is easy to use and very fast. It offers a free trial to scan and preview recoverable items, so you can see if your files are intact before buying. It works on any Mac (MacBook, iMac, Mac mini, etc.) and any attached storage.
Conclusion
Disk Utility is one of those Mac tools you’ll rely on constantly as it handles everything from formatting to partitioning and repairing disks. When First Aid fails, it’s concerning, we know that, but don’t let your heartbeat go fast just yet. You are not out of options yet and have got several options to try. These options are giving your Mac a restart, booting into its Recovery mode and doing the steps above, trying out even those Terminal commands like fsck or diskutil. But if everything goes in vain and you feel helpless again, it is better that you know that it is the time when you need to erase and rebuild the disk or do a fresh macOS install. Just make sure to back up your data first if you can. Even if the whole rebuilding exercise erases your data, Stellar Data Recovery Professional for Mac has got your back. The bottom line of this whole blog is that if First Aid fails, it doesn’t mean that your data is gone. You just have to hang in there and work through your options.