Pixelation can be a real buzzkill… it’s what happens when an image is stretched beyond its actual resolution and you start seeing individual square pixels on it.
But fear not! With some clever tricks and right tools we are going to discuss here, you will put back life into those low-res photos and make them look crisp as a cracker. Let’s first understand how images get pixelated and explore practical methods to fix them.
Why Do Photos Get Pixelated?
Several common issues can cause pixelation. In plain words, pixelation takes place in a picture when there aren’t enough pixels to show the image to the viewer clearly. Some typical causes are here:
- Low Resolution: If a photo has very few pixels like its that small or low-DPI image, it will look blurry or pixelated naturally when someone enlarges it.
- Excessive Compression: If one saves a photo in a highly compressed format, it can just throw away the detail.
- Over-Enlargement: When you stretch an image of yours way beyond its original size, it exposes those pixels.
- Editing Artifacts or Conversion Errors: Over-editing like putting heavy filters, poor noise reduction or even switching those file formats incorrectly can make your otherwise clear picture just distorted.
- Corrupted or Damaged Files: Many times though, any glitch in the camera’s own memory card or file corruption in your system shall scramble pixel data.
Keeping your photos at high resolution (always) is the best preventive measure. But when you do end up with a pixelated photo, there are fixes for that too!
Methods to Fix Pixelated Images
Now that we know why your pictures get pixelated, let’s move on from that and look at how you yourself can fix them. Below are several popular methods. Don’t worry if you’re not a techie here… we are here for the help!
Method 1: Use AI-Powered Image Upscalers
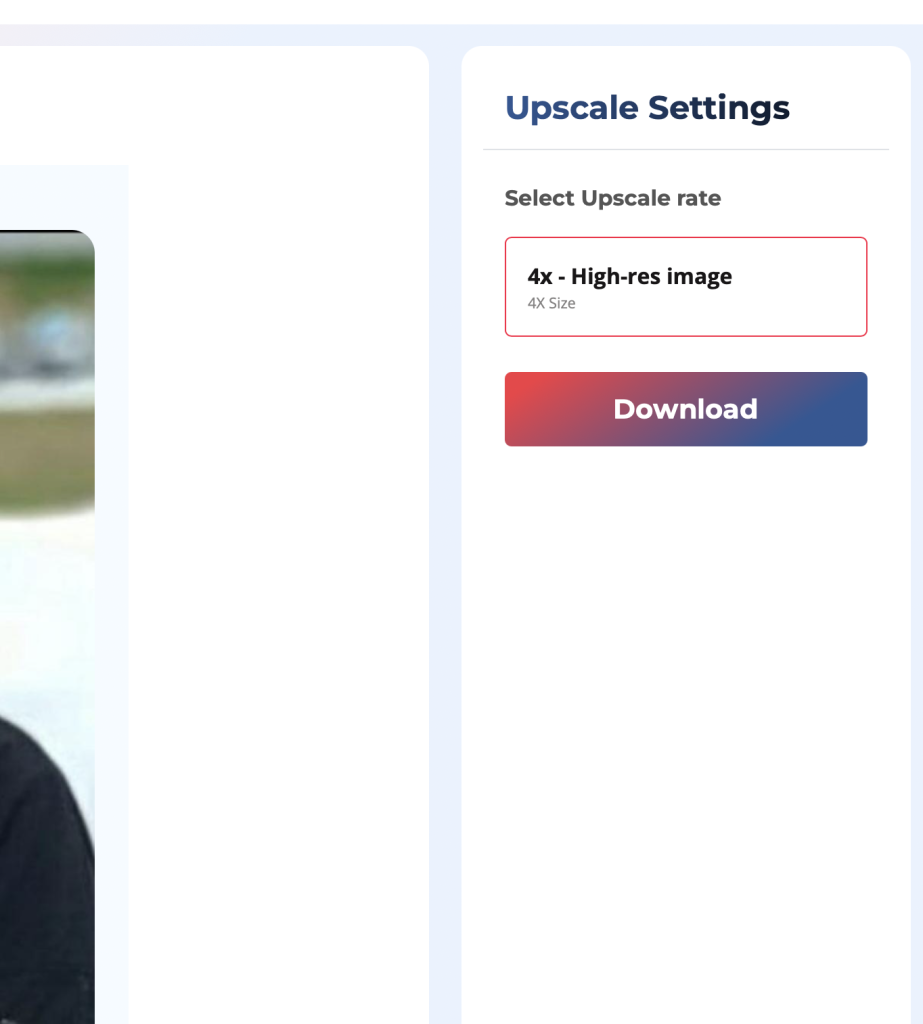
Artificial Intelligence has made big strides in recent times to improve those low-res photos. AI upscaling tools can analyze an image and generate detail to enlarge it without obvious pixel blocks. These tools “add pixels based on learned patterns,” often creating a much cleaner result. Try a tool like Stellar AI Image Upscaler, Let’s Enhance, Waifu2x, or Bigjpg. (Even some smartphone apps like Remini use AI for this.) Our best pick is the Stellar’s tool. Let’s see how we can go about it:
- Open the Web-based Tool: Open Stellar AI Image Upscaler through the official website.
- Upload your image: On the website or app, import your pixelated photo (here, we are taking Stellar’s example).
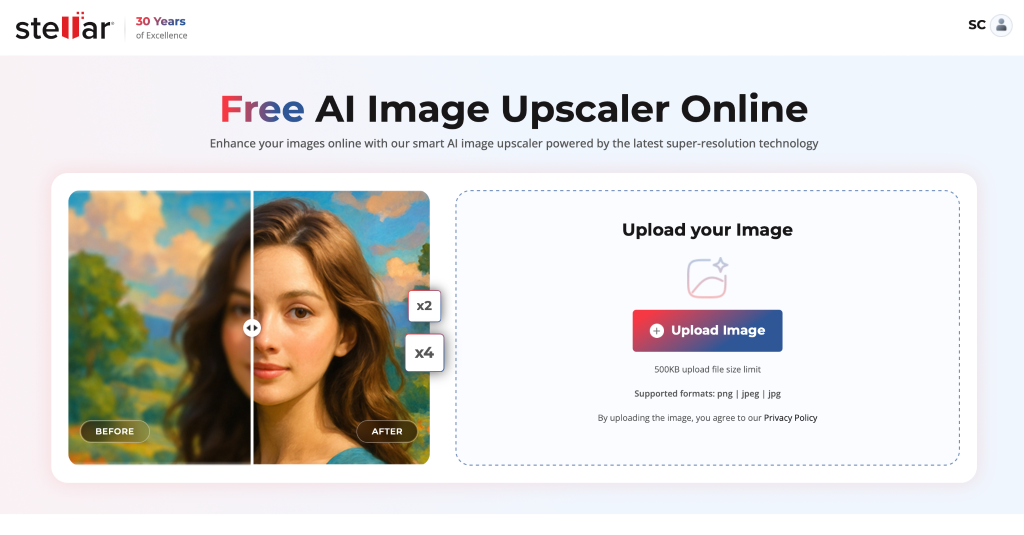
- Select upscaling factor: Pick an enlargement level (commonly 2× or 4×). The tool will process your image with its AI model.
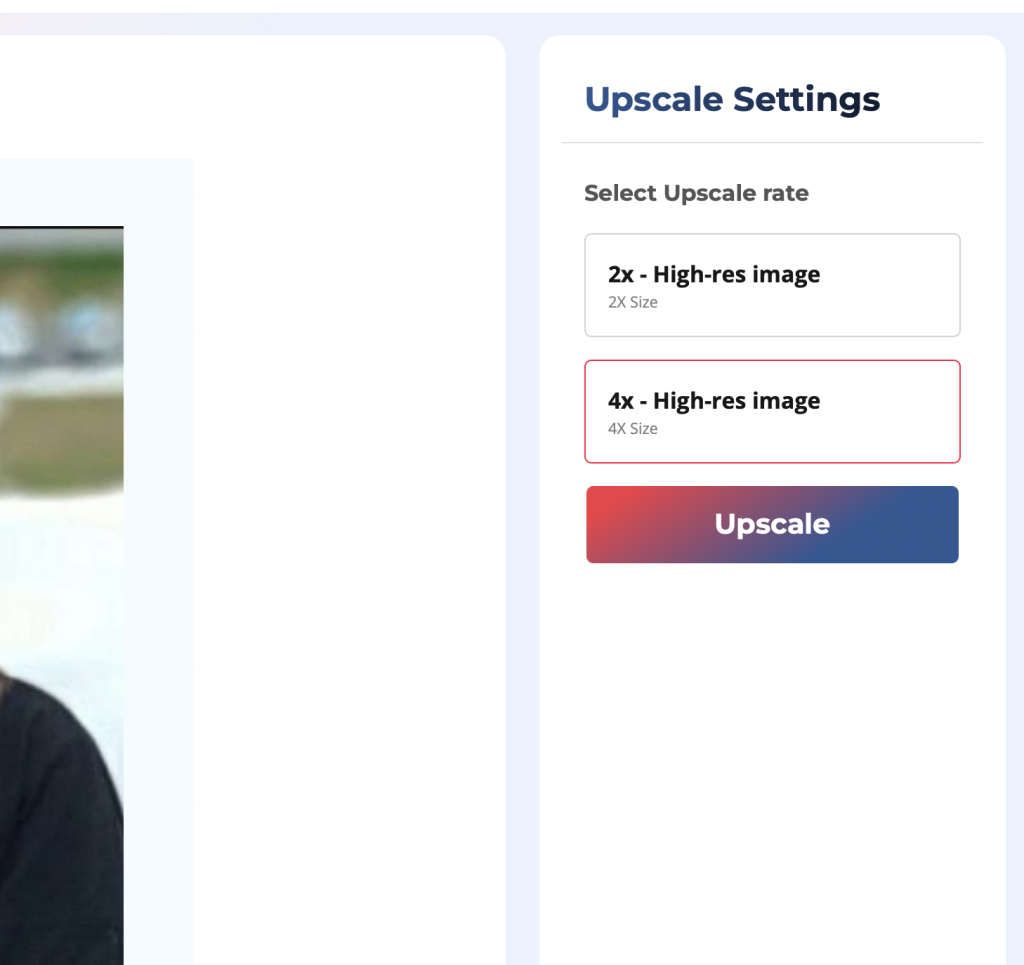
- Download the result: After it’s done, save the upscaled photo.
These AI tools do much of the work for you. Fity, and eliminate imperfections” in pixelated images. In practice, you’ll often see a dramatic difference: the image looks more detailed and far less blocky.
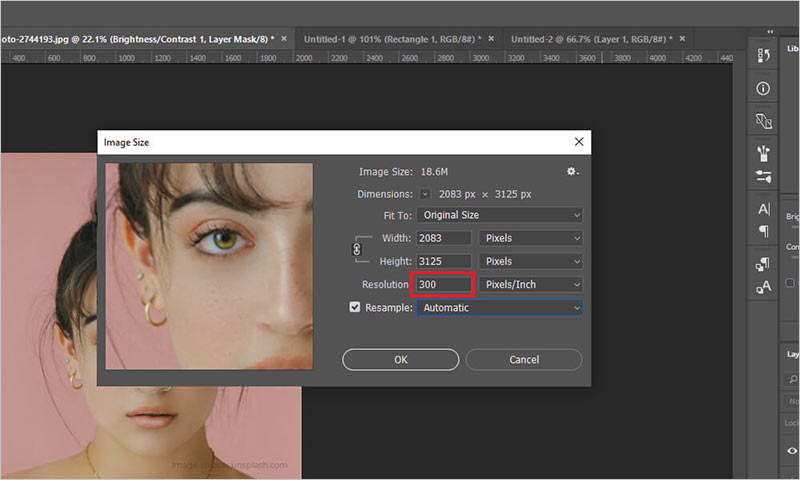
Method 2: Use Photoshop’s Image Size & Camera Raw Filter
This approach works by increasing the image resolution and then smoothing and sharpening details. Modern Photoshop versions even use AI algorithms to help fill in missing pixels when you upscale. In this method, we shall raise the DPI and then use Camera Raw’s sharpening and noise reduction to make that image tidy.
- Open the image in Photoshop.
- Go to Image > Image Size. In the dialog box, set the Resolution to around 300 DPI (or higher, if needed) and make sure Resample is on. Click OK.
- Go to Filter > Camera Raw Filter. In the Camera Raw window, switch to the Detail tab (often looks like two triangles).

- In the Detail section, increase the Sharpening amount until edges look clearer, and bump up Noise Reduction to smooth out grain and blockiness. Don’t overdo it… Just go with enough to see less pixelation.
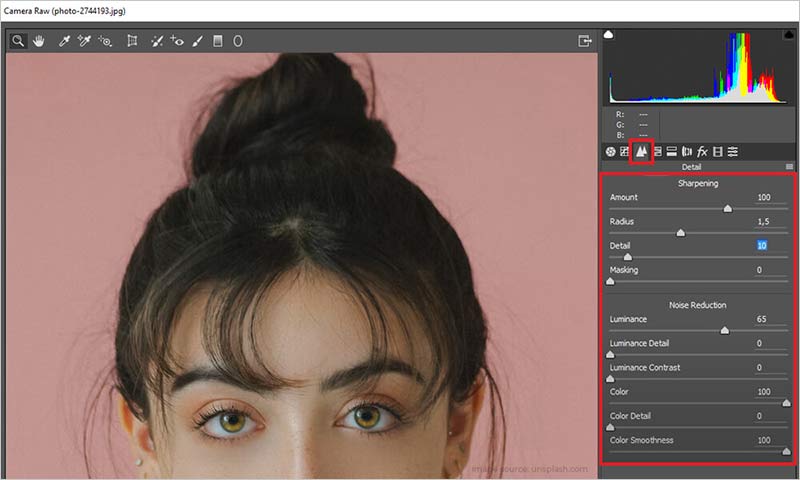
- Click OK to apply.
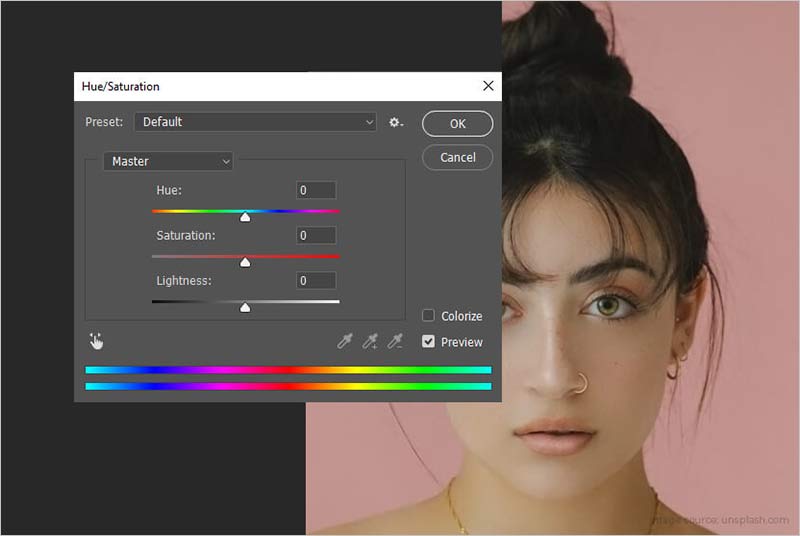
- Optionally, you can go to Image > Adjustments > Hue/Saturation.
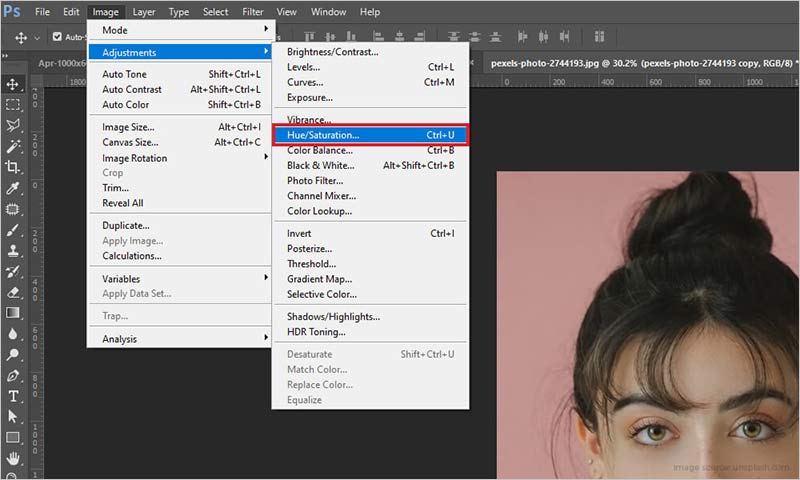
- Here, tweak any color shifts in the image.
- Click on File and select Save from the drop-down.
By increasing the resolution first, Photoshop has more pixels to work with. Then the sharpening and denoising help hide the gridy look. Photoshop has built-in tools like “Smart Sharpen” and “Preserve Details” that are specifically made for reducing pixelation and in recent versions, the Image Size dialog even uses AI to guess new pixel data in an intelligent way. The result shall be a smoother and crisper image with very few visible blocks.
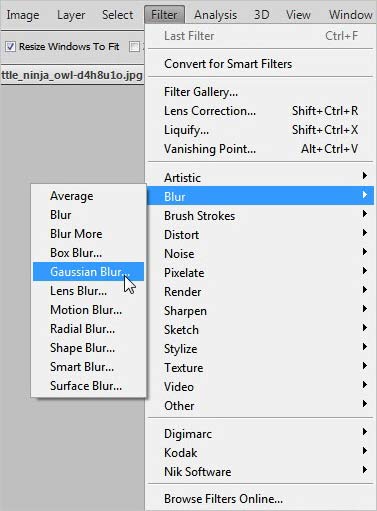
Method 3: Blur then Sharpen in Photoshop (Gaussian Blur + Unsharp Mask)
Sometimes, instead of those complex measures, a simple combo of blur-and-sharpen can be ‘the’ trick. The idea here is to just blur the image but only enough that you hide those chunky pixels that are showing and then sharpen those edges back up for detail. Photoshop has Gaussian Blur that softens the image you upload and the Unsharp Mask options get that clarity back.
- Open the pixelated photo in Photoshop.
- Go ahead and navigate to Filter > Blur > Gaussian Blur. Move the slider a little (mostly a small radius like 1-3 pixels is just enough) so that blocky patches start to smooth out. Click OK.
- Next, go to Filter > Sharpen > Unsharp Mask. Adjust the Amount and Radius until edges look crisp again (start with moderate values, e.g. Amount ~100%, Radius ~1 px). Click OK when satisfied.
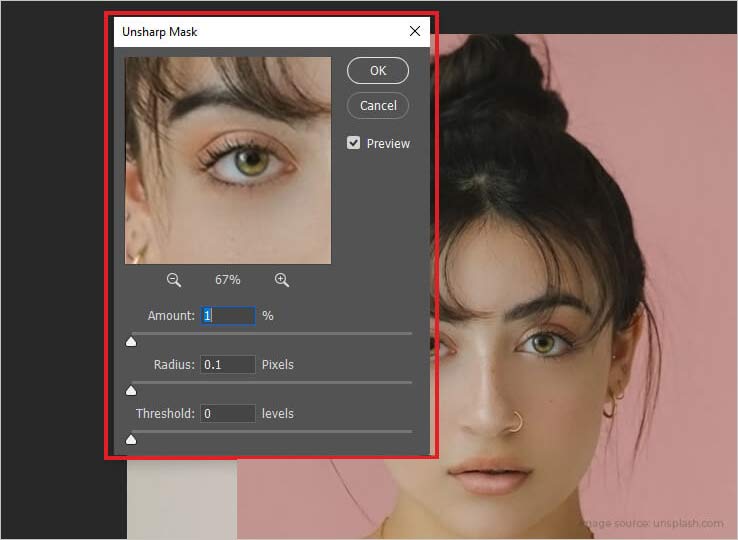
This method works because that gentle blur that we give in here spreads out the harsh edges of each of those pixel block that make it look pixelated and then the sharpening as a final touch up restores definition. Just give it a try and tweak those sliders that you see up there in the software until you have a good balance.
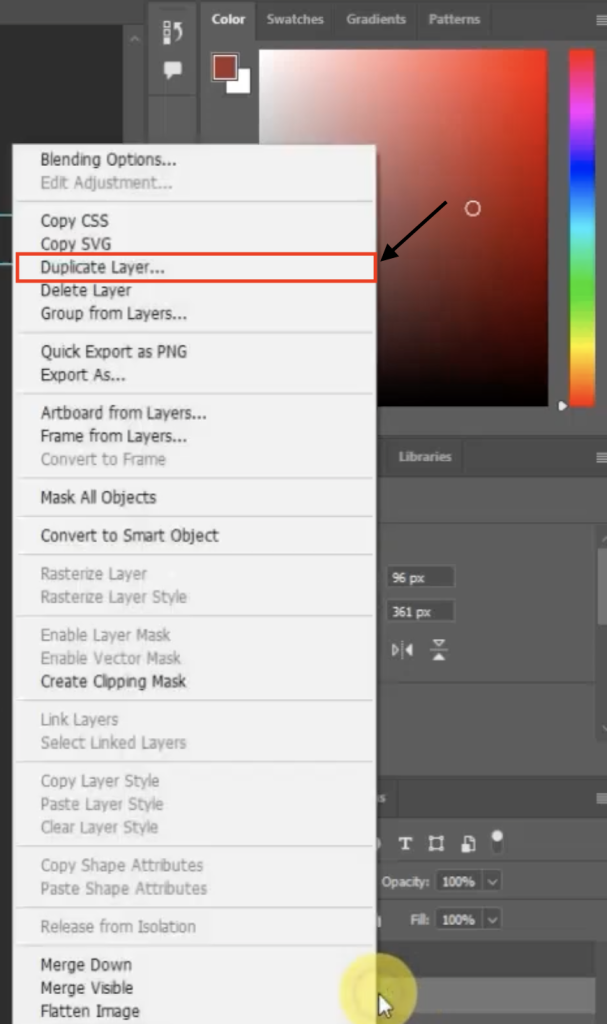
Method 4: Photoshop Soft Light Layer & Despeckle
Another Photoshop trick that should be in your book is to duplicate the image on a brand new layer. Just set that layer to Soft Light and then use noise filters to see the magic unfold. Here’s how:
- Duplicate the layer: In the Layers panel on the right side, right-click on that Background layer and hit the option that reads Duplicate Layer.
- Set that blend mode to Soft Light: Now change that Blend Mode in the very same Layers panel from Normal to Soft Light, if it’s not like that already. .
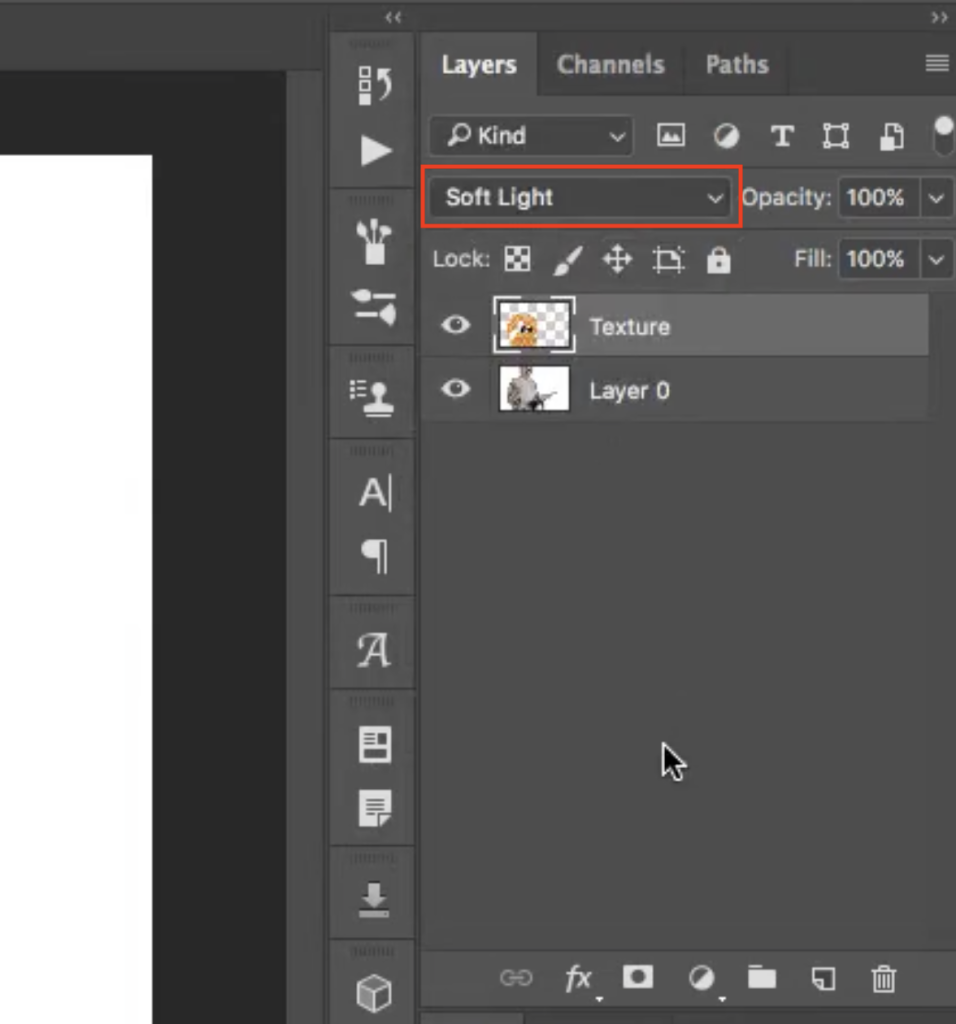
- Despeckle: Go to Filter > Noise > Despeckle. It shall actually be good if you apply Despeckle more than once if you don’t get a good effect on your first try.
Method 5: Use Paint.NET (Free Windows Editor)
If you don’t have Photoshop for this crucial rescue, Paint.NET can be a saviour too. It is a free to use Windows image editor that can help reduce pixelation with similar filters as you saw above. Let’s now see how to work it up.
- Open your photo in Paint.NET.
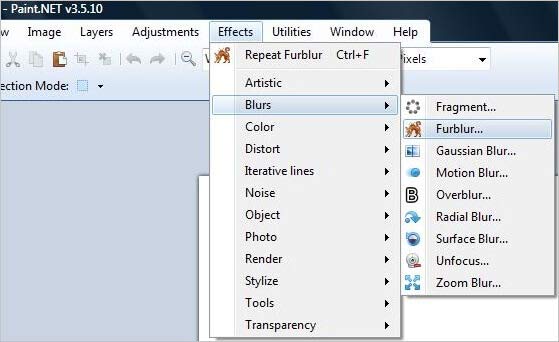
- Go to Effects > Blur > Gaussian Blur. Slide to blur slightly (enough to smooth out pixels). Click OK.

- Next go to Effects > Photo > Sharpen. Adjust the sharpening amount until details pop back in (stop when the image isn’t too grainy). Click OK.
Paint.NET’s tools aren’t as advanced as Photoshop, but for many simple cases, this blur-then-sharpen trick noticeably improves a pixelated image. It’s free and very user-friendly for Windows users.
Method 6: Use Other Software or Online Editors
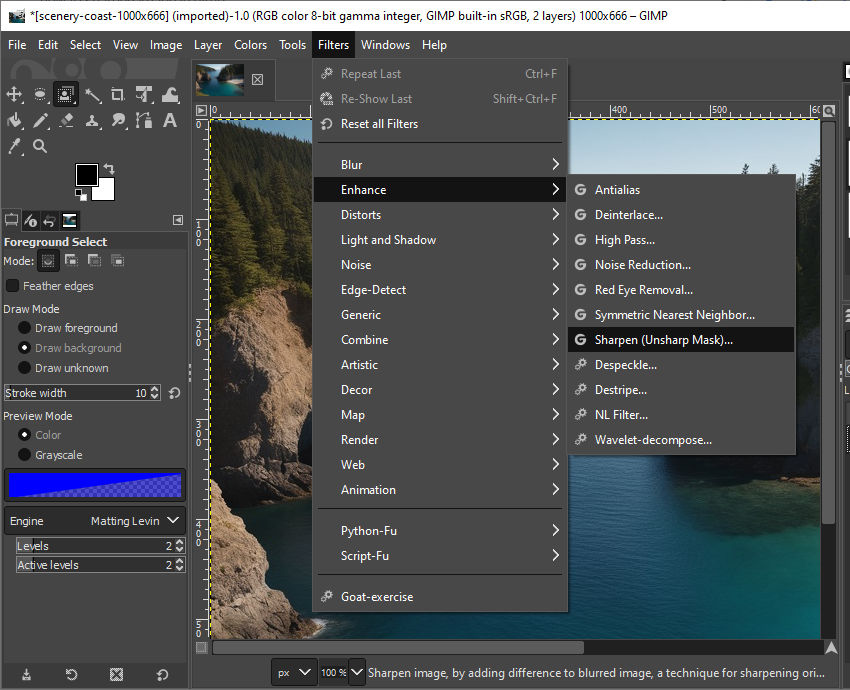
There are many other ways that can help you fix that pixelation. The key here is to find the tools that allow you to increase that blurry picture’s resolution. Let’s do it via GIMP to give you an idea.
- Open the image in GIMP.
- Go to Image > Scale Image and increase the Resolution (e.g. set a higher DPI or pixel size). Click Scale. Then use Filters > Enhance > Sharpen (Unsharp Mask) and adjust the settings to improve clarity. Save when done.
- Websites like Pixlr, Fotor, or Lunapic lets you upload a photo and apply filters. These are great if you don’t want to install software.
Regardless of the program that you use, you just focus on increasing resolution or smoothing and then sharpening those edges. But it is important to always work from a copy of your photo so that you don’t overwrite the original photo and lose everything if the method fails. You can also use Snapseed to do this.
What if your Pictures are Corrupted or Become Inaccessible?
Especially for those unpredictable tricky cases like if those images are corrupted by a bad memory card, a dedicated repair tool can be your only remaining option. Stellar Photo Repair, one of the best photo repair tools to fix corrupt photos, is designed to recover and fix those badly damaged images. It can handle various file formats and restores them to viewable quality most of the times. Stellar offers a free online photo repair for small files and a desktop version for larger jobs. Here’s how to use it:
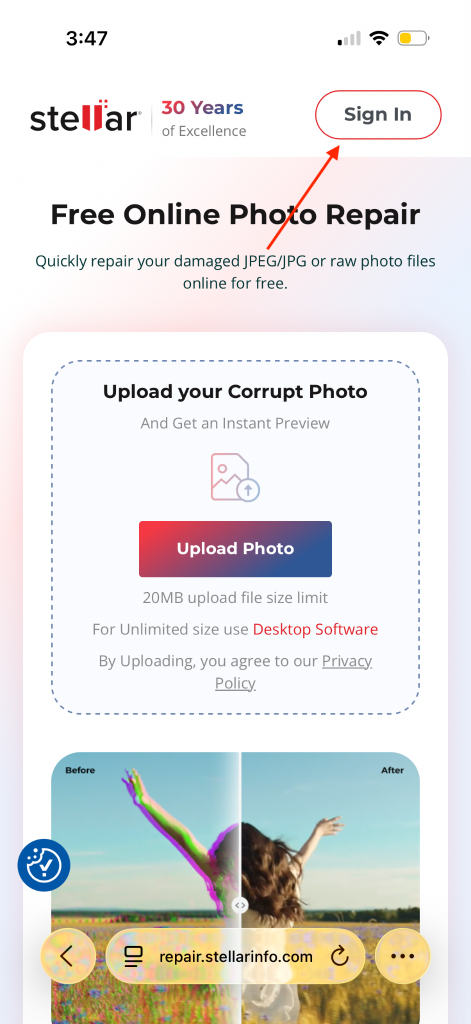
For files below 20MB:
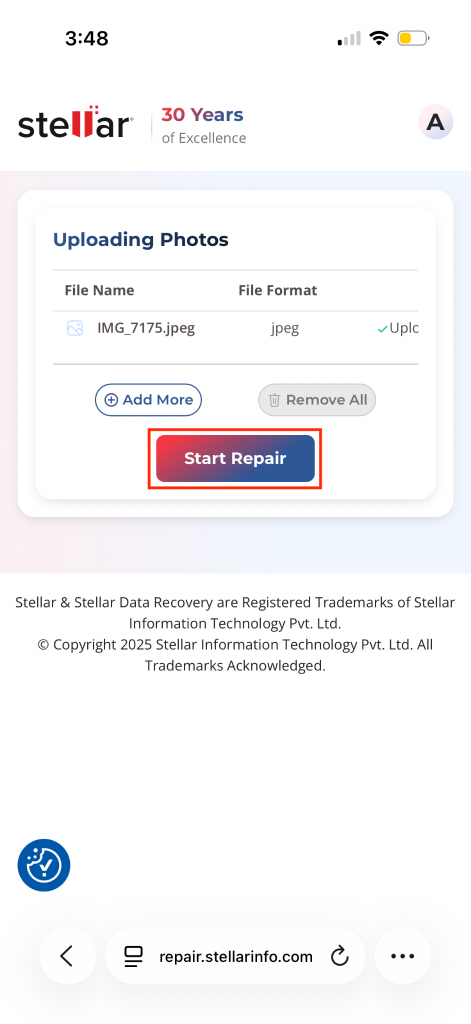
- Step 1: Go to Stellar’s Free Online Photo Repair page and sign in using your email ID. You get to repair 3 photos for free.
- Step 2: Go ahead and upload that glitched picture that you want to repair.
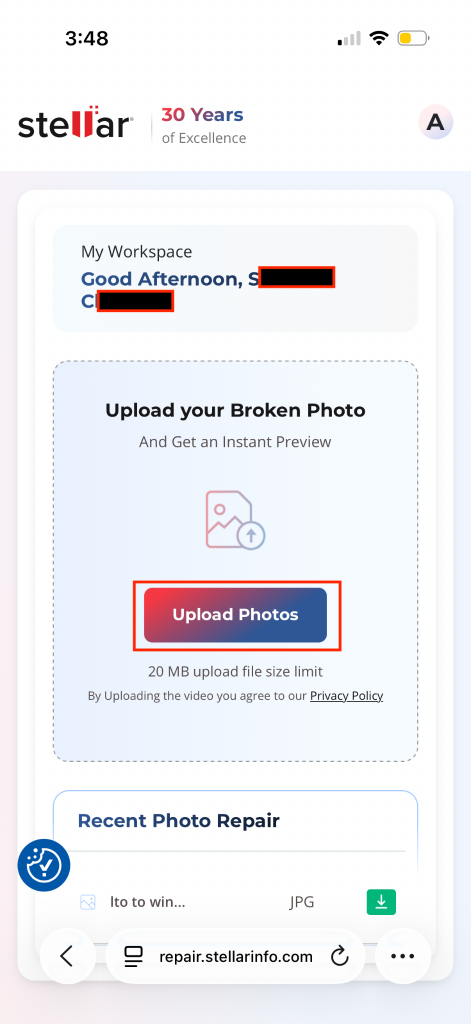
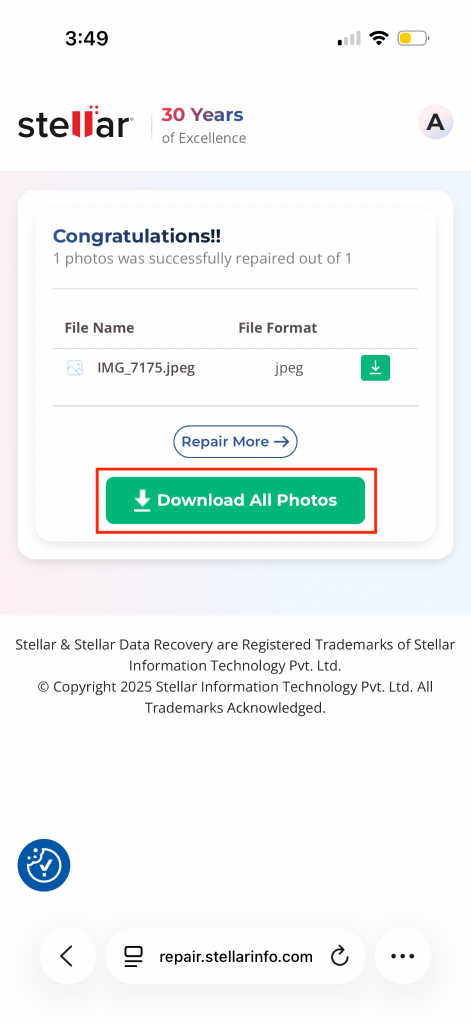
- Step 3: Once your picture is uploaded successfully, go ahead and hit the Start Repair button.
- Step 4: The tool will analyse the picture and repair it. Once this process is done, click the Download All Photos button to download the repaired photos.
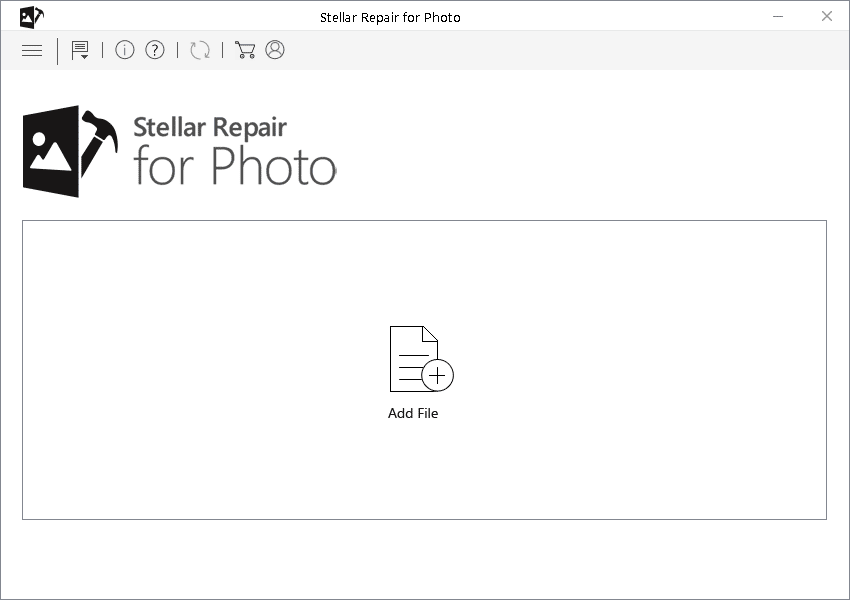
If your file is above 20 MB and you don’t need any kind of size limit for photo repair, download Stellar Repair for Photo and follow these steps:
- Step 1: Launch the tool by double-clicking on its icon.
- Step 2: Click Add File icon that appears on the centre of the user interface of the application.
- Step 3: Once the application is done with the uploading, click Repair. This starts the repair process.
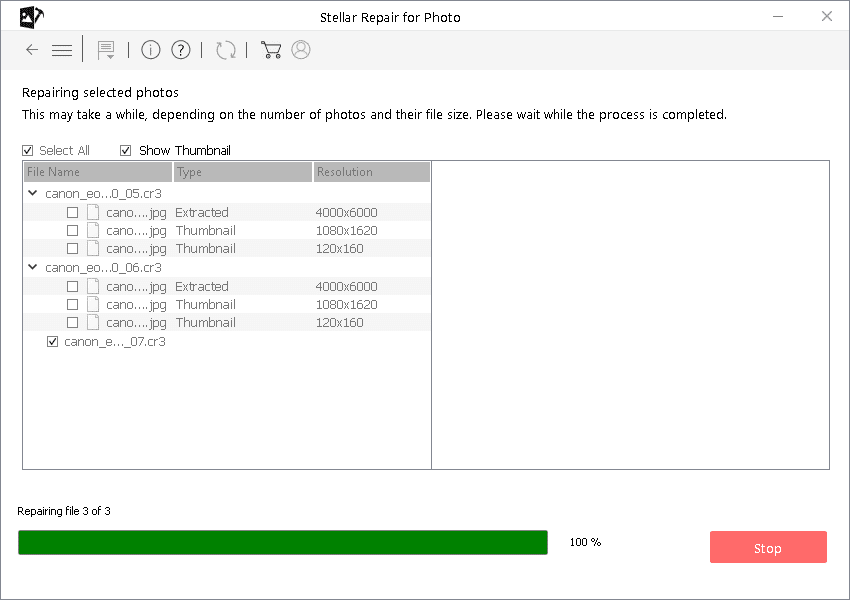
- Step 4: When the repair process is done, click Save Repaired Files to save those repaired files of yours.
Pro tip: Always preview the repair if possible before paying or downloading.
How to Prevent Photos from Getting Pixelated
Pixelated images can be avoided if you take a little care while saving, editing, and sharing photos.
- Always click or save your photos in high resolution mode on your device.
- Do not just zoom too much while clicking or on a small image because that digital zoom shall make the picture look broken or blurry.
- Avoid doing too much compression when you save those images in JPEG format.
- Keep a copy of your original photo before you go ahead and edit it.
- Use reliable editing tools with good online reviews so your image quality does not go down.
- Try that you export your images in the right size for web, print or social media.
If you follow these simple steps that we highlighted, your images will just be staying clear and sharp for a long long time.
Conclusion
Pixelation can be frustrating but it’s normally quite fixable if you go about that with the right approach. In general, the best and the most easiest way to avoid this pixelation problem is to straight away shoot high-resolution photos in the first place (shooting those at 300 DPI for printing and saving them all in quality formats).
But if you find yourself with a blocky image, just keep the tricks we told you above in your head. Resizing and sharpening filters in Photoshop or GIMP, blur+sharpen combos, AI upscaling or even smartphone apps… all of those can help you around for sure.
Just try each method to see what works best for the photo that you have. And if the issue is due to corruption, those methods would most probably disappoint you. But don’t you worry at all… Tools like Stellar Online Photo Repair or Stellar Repair for Photos application are ready for your rescue. Trust us! With these methods and tools behind your back, you’ll definitely be turning those fuzzy, Lego-looking pics back into share-worthy memories and that too in no time!