“Cloned my old 500GB NVME SSD to my new 2TB one, everything transferred just fine, but my storage still caps at 500GB and I just have almost 1500GB of storage that is labelled unallocated, and I don’t know how to use it.”
Are you unable to access your files because one of your drives is no longer showing up? If you check Disk Management, you will find that the space where your files were stored is now labeled as unallocated. This usually occurs when Windows loses track of a partition due to partition table corruption, an interrupted disk operation, or improper disconnection.
Seeing your partition disappear like that can make it seem like your files are gone, but that is rarely the case. Before you format the space or create a new partition, recover your data first. In this guide, we’ll show you how to recover data from an unallocated SSD and fix the affected partition.
What “Unallocated” Means and Is Your Data at Risk?
When Windows shows part of your SSD as unallocated space, it means that particular area of the drive is not currently assigned to a partition Windows can use. If a previously existing partition has disappeared, this can happen because its partition information was deleted or corrupted.
A drive becomes unallocated when the partition information is deleted or corrupted. But unallocated doesn’t automatically mean your files are gone, and if that space is not overwritten the underlying files may still be recoverable. That’s why you shouldn’t format your unallocated SSD right away, create a new partition, or copy new files to it until you’ve recovered everything important.
There is one important SSD-specific catch though. SSDs use the TRIM function which tells the drive which blocks are no longer needed so they can be cleared for future use. Windows automatically triggers the TRIM command during its weekly scheduled optimization. If TRIM has already cleared the blocks associated with the lost partitions, recovering those files may no longer be possible. So if a partition on your SSD has suddenly disappeared and is now showing as unallocated, stop using the drive and focus on data recovery first. Before deciding how to fix the unallocated SSD, however, you need to determine exactly what situation you’re dealing with.
Choose the Right Fix for Your Unallocated SSD
| If this is your situation | Do this |
| It’s a brand-new SSD and there’s no data on it yet | Initialize and set up a new SSD |
| I cloned my old SSD to a bigger one, and now there’s unallocated space left over | Extend the partition into Unallocated space after cloning |
| A partition with my files just disappeared, I didn’t do anything to cause it | Recover your data first |
| I unplugged the drive improperly, or the power went out mid-operation, and now it’s unallocated | Recover your data first it |
| I reinstalled Windows, and now a different drive shows as unallocated | Recover your data before doing anything else. Don’t format or create a new partition first. |
| The SSD shows up in Device Manager but Disk Management won’t recognize it properly | Update or reinstall disk drivers |
| I’ve already recovered my files (or there was nothing to recover) and just need the space usable again | Create a new volume |
| I’ve tried the fixes above and the SSD is still showing unallocated | Clean and rebuild the SSD with DiskPart |
| The SSD isn’t showing up in Disk Management at all | SSD Not Showing Up? Here’s how to fix |
| The SSD keeps disconnecting, won’t show in BIOS, or seems to be failing | Stop DIY fixes and seek professional help |
Why an SSD Becomes Unallocated?
A handful of things cause this, and most aren’t as scary as they look:
- Deleted or lost partitions: You accidentally deleted it or a partition tool could have altered it.
- Partition table corruption: A system crash, sudden power loss, or improper shutdown can damage the partition table.
- Interrupted cloning or resizing: When a clone or partition resize is stopped mid process, a part of the drive may show up as unallocated.
- Malware: Some types of malware can target the partition table and cause damage.
- New or uninitialized SSD: If the SSD has never been initialized or partitioned then the entire drive will show as unallocated.
- Drive failures: Unallocated space can also be a sign of an underlying hardware issue.
Recover Your Data Before Fixing the Drive
Before you try to fix the unallocated SSD make sure that your files are safely rescued. Fixes like initializing the drive, creating a new partition, or using DiskPart can write to the drive. This can make the otherwise recoverable data much harder to retrieve. Recovery may be possible if the partition was accidentally deleted, corrupted, or lost during an interrupted operation. But it becomes rather difficult if you have formatted the SSD, created a new partition, written new data to it, or securely erased it.
For now, Windows won’t let you access the files via File Explorer because the partition is no longer recognized. If the SSD contains important data, you can use a Windows data recovery software to scan the unallocated space and recover files before attempting to repair the drive.
These recovery tools can scan unallocated space, including when the original file system information is no longer available. Stellar Data Recovery Professional is one such tool that can work with all common Windows file systems like NTFS, FAT 16/32, exFAT, and others, even when a drive appears as unallocated. If the original file system information is unavailable, it can also identify recoverable files using their file signatures.
Here’s the rundown:
- Download the install Stellar Data Recovery Professional.
- Launch the software and select Create Image from the left sidebar. This will create a byte-by-byte disk image (copy) of the affected drive. You can later use this image to perform recovery rather than stressing the affected SSD itself.
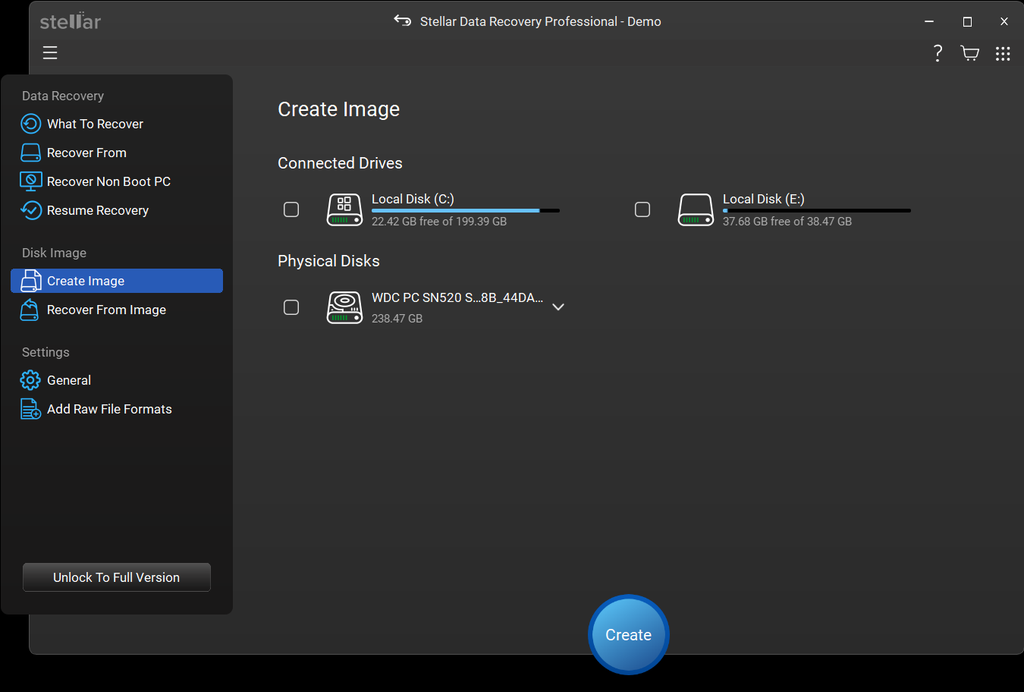
- Select the unallocated SSD drive and click Create.
- Choose a destination for the backup file and follow the on-screen instructions to complete the process.
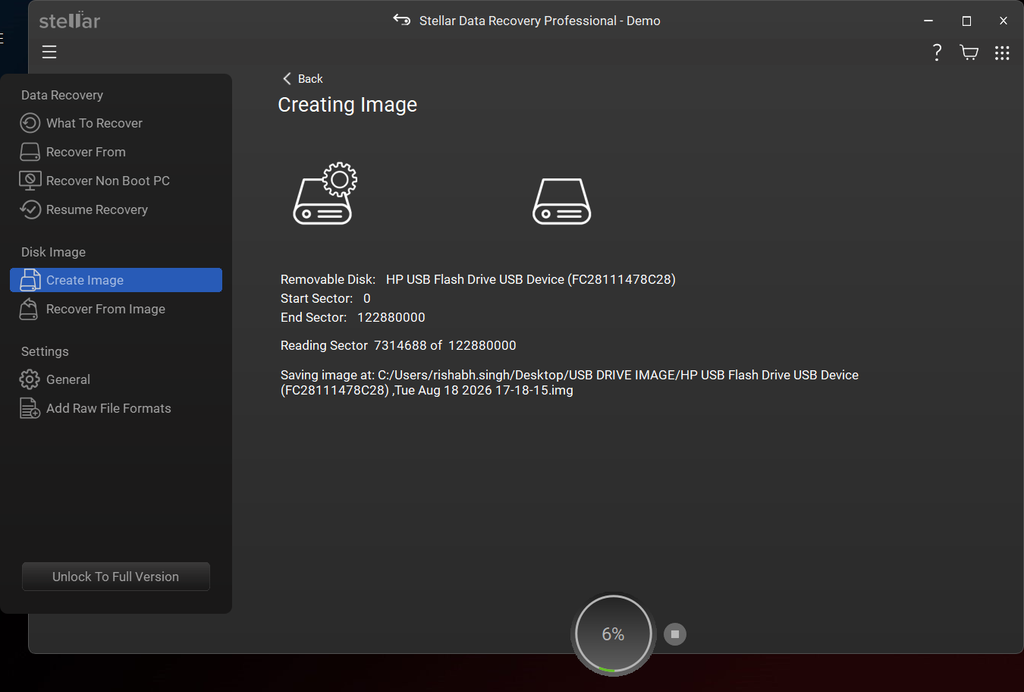
- Once the image has been created, click Recover from Image on the left sidebar.
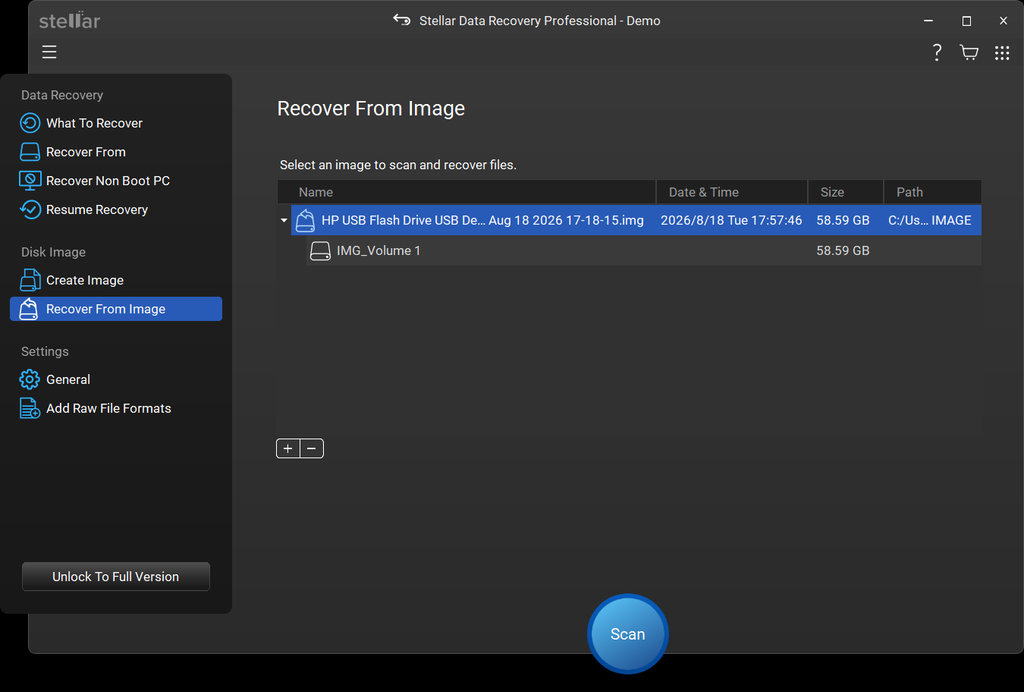
- Select the backup SSD Image file and click Scan.
- A screen displaying the scan results will appear.
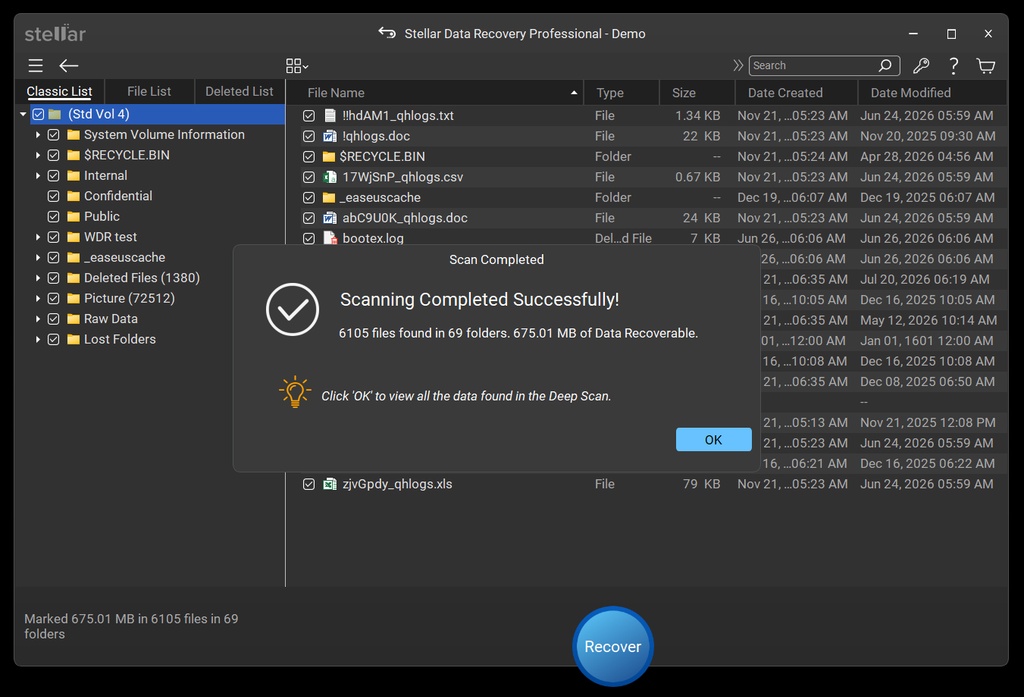
- Recovered files will be displayed for you to Preview.
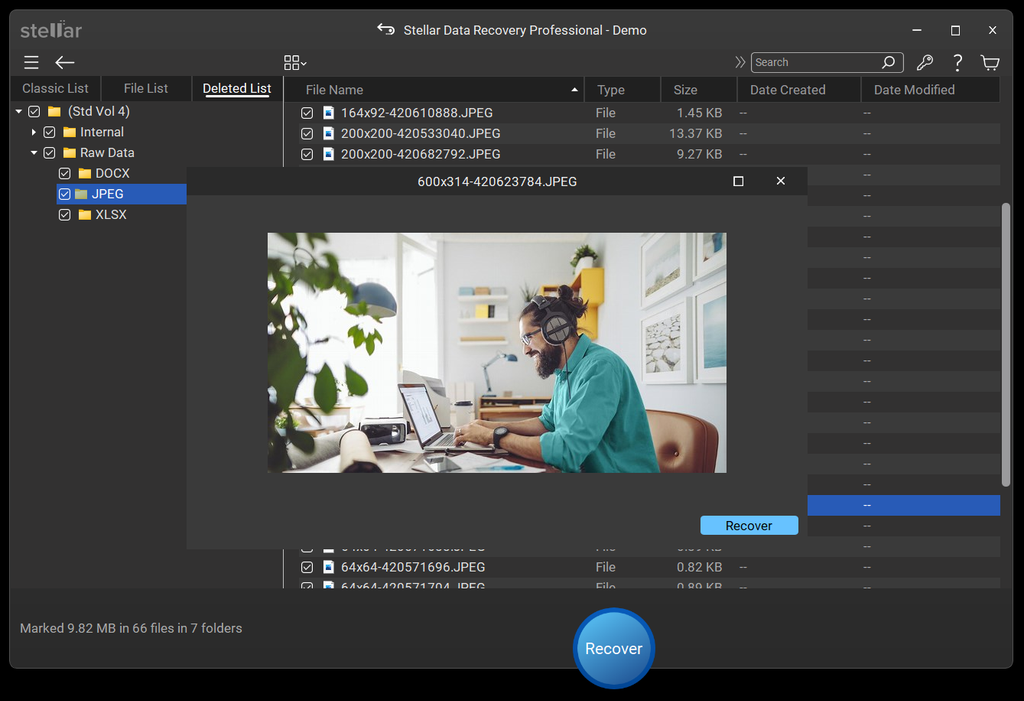
- Select the files you want to retrieve and click Recover to save them to a secure location.
How to Fix an Unallocated SSD?
Once your important files are safely recovered, you can move on to fixing the unallocated SSD. The right method depends on why the space became unallocated and whether the SSD is new, was recently cloned, or previously contained your data.
For example, a new SSD that has never been initialized simply needs to be set up before Windows can use it. If unallocated space was left behind after cloning, you can usually extend the existing partition into it. On the other hand, if a partition containing your files suddenly disappeared, you should recover the data first and then rebuild the partition.
1. Initialize and Set Up a New SSD
In case the SSD is brand-new and you don’t have any data on it that needs to be recovered, the unallocated status is normal. A new drive needs to be initialized and partitioned before Windows can use it for storing files.
“Only use this method for a new SSD that doesn’t contain any of your important data. If the SSD previously contained files and is now showing as unallocated, stop here and recover your data first. Initializing and formatting the drive can overwrite information needed for recovery.”
– Santosh Kumar (Senior Software Architect)
A new SSD can be set up using Disk Management:
- Press Win + X and open Disk Management.
- Locate the new SSD in Disk Management. If it’s showing as Unknown and Not Initialized, right-click on it and select Initialize Disk.
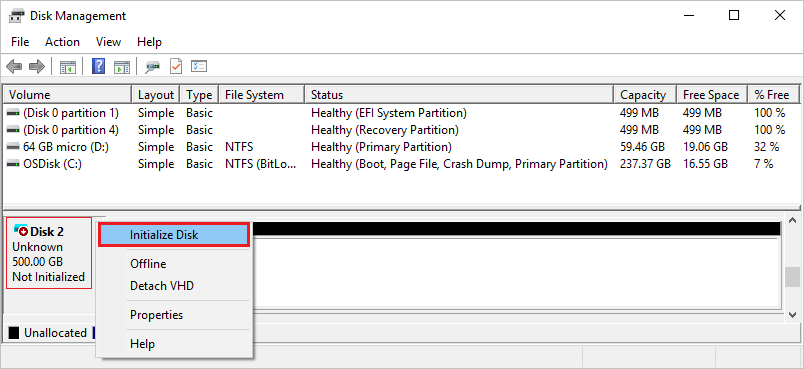
- In the Initialize disk windows, make sure that you have selected the correct disk.
- Choose the partition style, GPT is generally the appropriate choice for modern Windows systems, while MBR is useful only if you need compatibility with an older system that uses legacy BIOS/partitioning requirements.
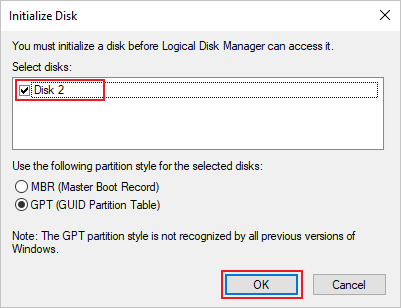
- Once initialized, right-click the Unallocated space and select New Simple Volume.
- Specify the volume size, assign a drive letter and choose NTFS as the file system. Complete the formatting options in the wizard and click Next.
- Select Finish to prepare the new disk.
2. Extend the Partition into Unallocated Space After Cloning
Did the unallocated space appear after you cloned your old SSD to a larger one? If so, you may not have partition problem at all. The cloning process may have copied your existing partition without automatically expanding it to use the SSD’s full capacity. If the unallocated space shows up directly next to the partition, you can add it to that partition using Disk Management.
- Press Win + X and select Disk Management.
- Locate the partition that you want to expand and check that the unallocated space is directly beside it.
- Right-click the partition and select Extend Volume.
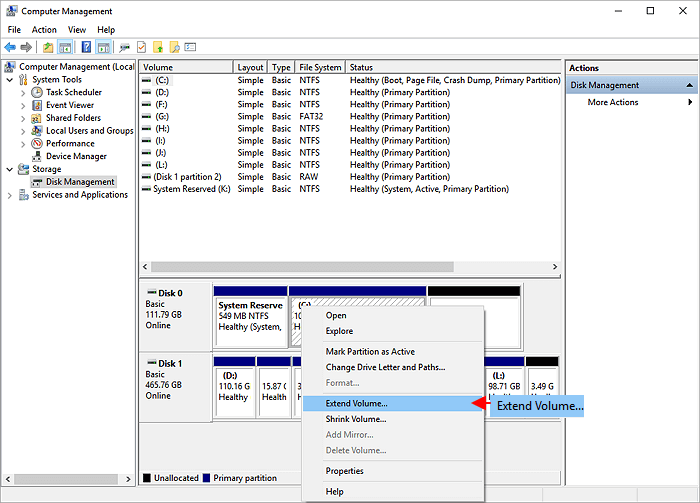
- In the Extend Volume Wizard. Specify how much of the available unallocated space you want to add to the partition.
- Click Next, then Finish to complete the process.
The partition will now show the additional capacity and the unallocated space should be gone.
Note: Disk Management can extend a partition only when the unallocated space is directly adjacent to it on the appropriate side. If another partition exists between them, Extend Volume may be unavailable.
3. Update or Reinstall Disk Drivers
Sometimes, Windows may detect the SSD but fail to communicate with it because of a driver-related issue. If the drive is appearing in Device Manager but still showing incorrectly in Disk Management, updating your disk driver is something you should definitely look into. First check for a driver update. If no update is available, you can uninstall the driver and restart windows which will allow the OS to reinstall the latest driver.
- Press Win + X and open Device Manager.
- Go to Disk Drives and expand the entry.
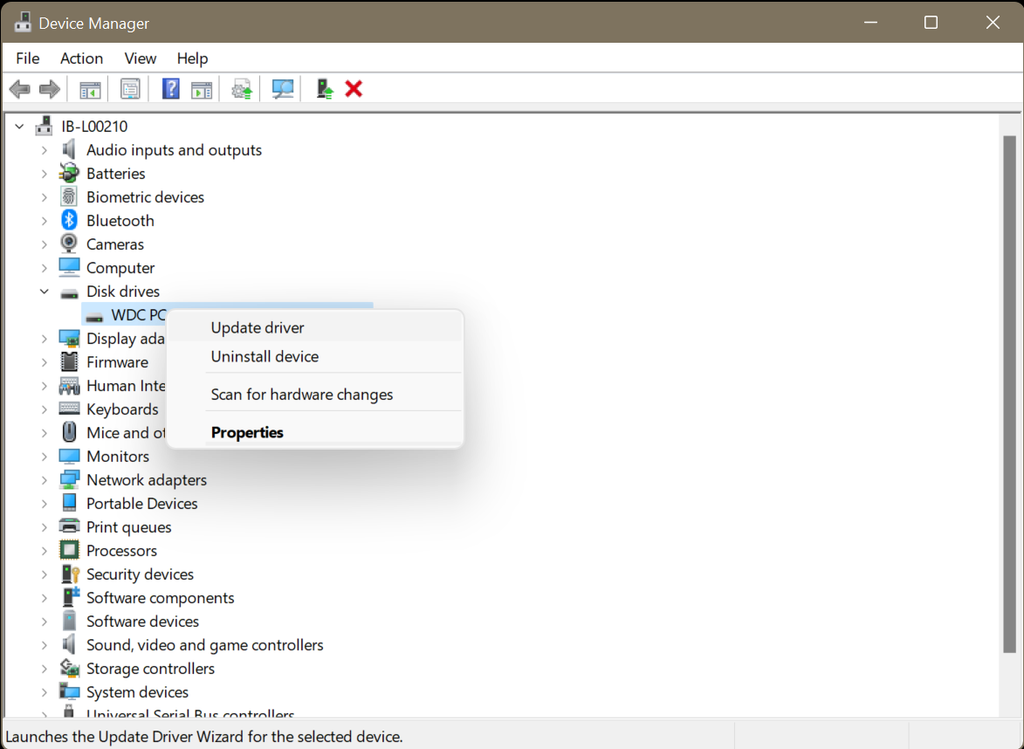
- Right-click your SSD and select Update Driver.
- Select Search automatically for drivers and install any available update.
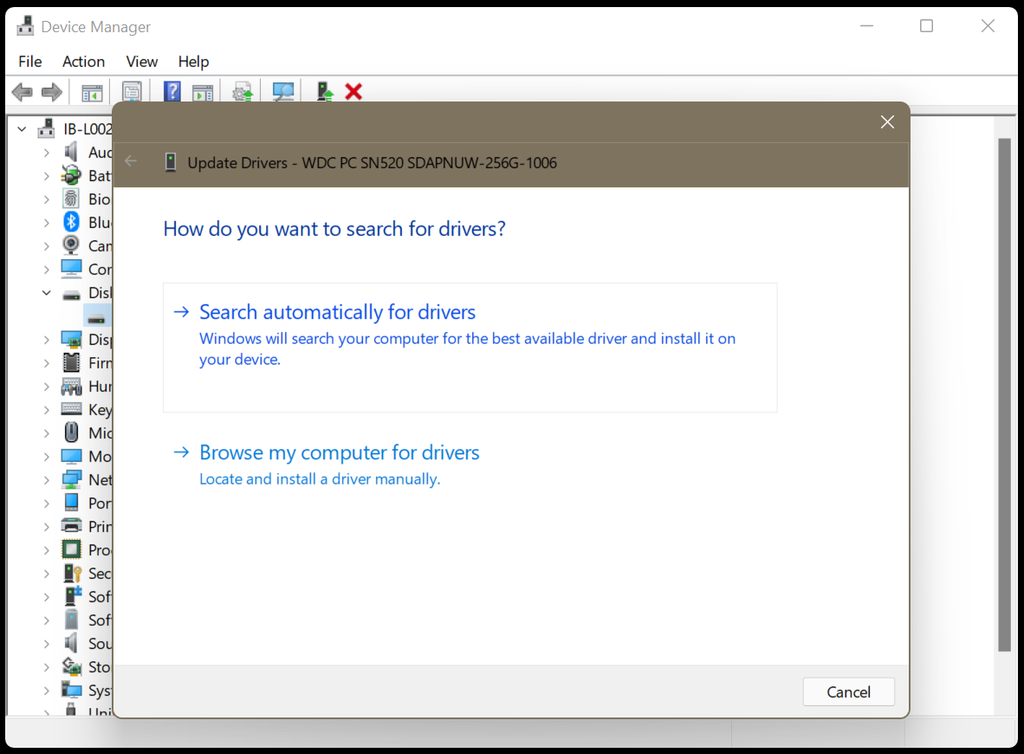
- If no update is available, right-click the SSD again, select Uninstall device, and restart your PC. Upon restart, Windows will automatically install the device driver.
4. Create a New Volume After Recovering Your Data
If you’ve already recovered the important files from the SSD, you can make the unallocated space usable again by creating a new volume. Doing so will give Windows a partition and file system it can recognize. Note that you have to use this method only after recovering your data from the affected SSD.
- Press Win + X and select Disk Management.
- Right-click the unallocated space and select New Simple Volume.
- Follow the on-screen instructions to specify the volume size and assign a drive letter.
- Select NTFS as the file system and complete the formatting options.
- Click Finish to create and format the new volume.
Once done, the volume will appear in File Explorer and be ready to use.
5. Clean and Rebuild the SSD with DiskPart
In case the SSD is still showing unallocated after trying the above methods, as a last resort, use DiskPart to clean the disk and rebuild its partition structure.
- Press Win + X and open Command Prompt as administrator.
- Type in
diskpart and press Enter.
- Type
list disk to display the connected drives.
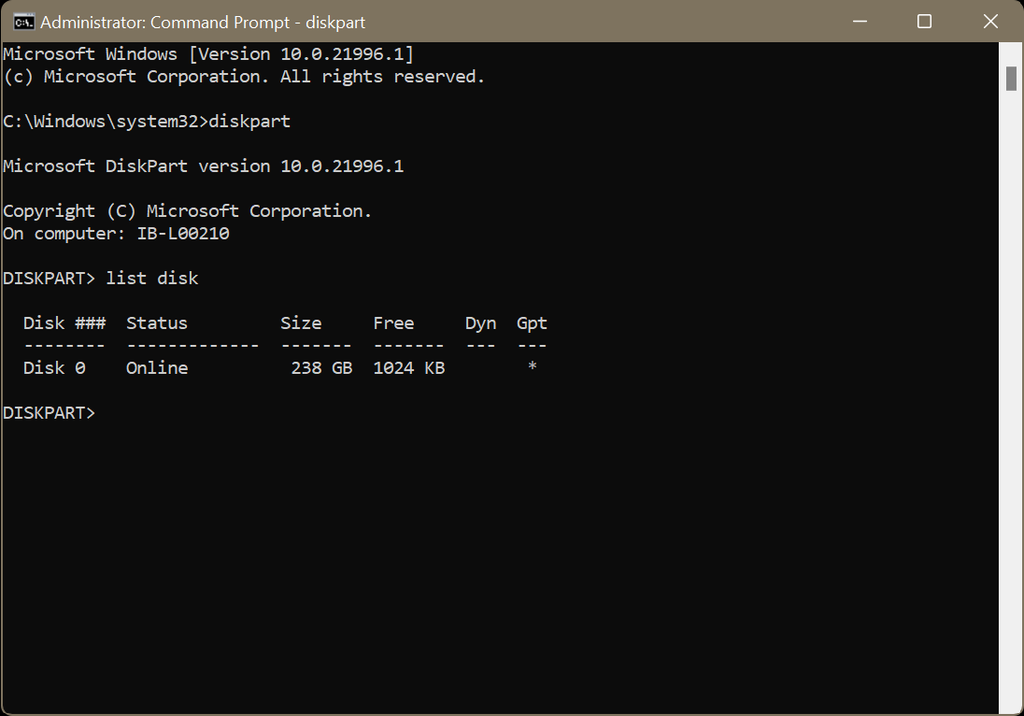
- Type
select disk z (replace z with the disk number of the disk that has unallocated space) and press Enter.
- Enter
create partition primary size=y (replace y with the number listed under the Free column) and press Enter. This is the size of the new partition that will be created.
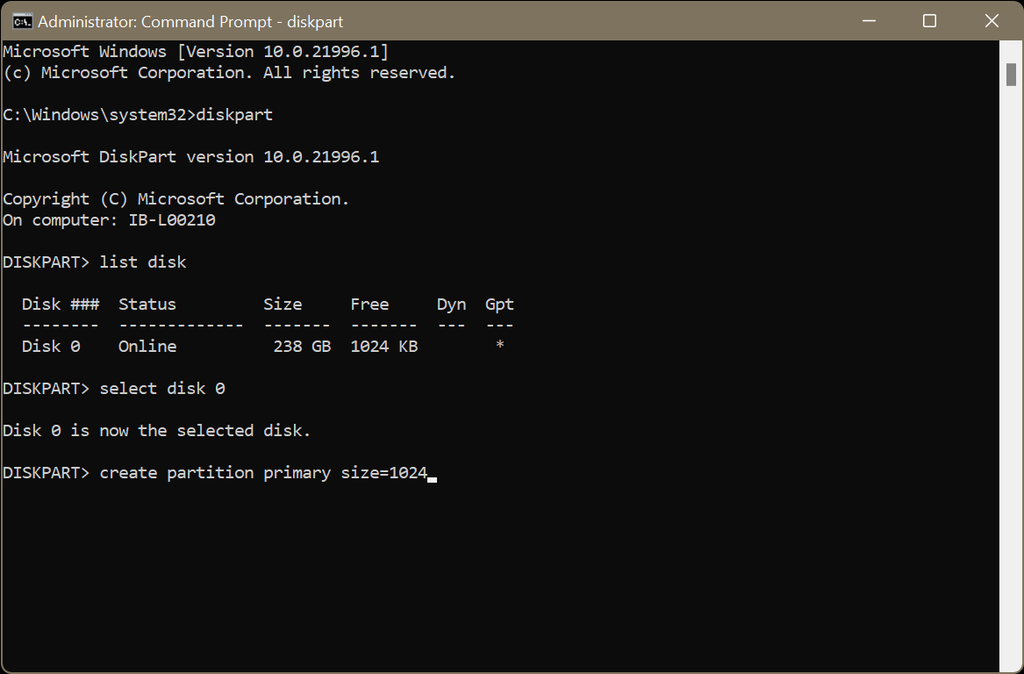
- Type
list partition and press the Enter key.
- Type
select partition z (replace z with the number of the newly created partition) and press Enter.
- Type
format fs=ntfs quick and press Enter. This will format the drive.
- To assign a drive letter, type in
assign and press Enter.
- Exit once done.
When to Stop DIY and Seek Professional Help?
If your SSD drive isn’t detected in BIOS/UEFI, keeps disconnecting, becomes unusually slow, or shows other signs of hardware or firmware failure, it’s time to stop with DIY solutions. At this point, software-based partition fixes may not help, and continuing to work with the drive could make data recovery more difficult. If the SSD contains important files that you haven’t been able to recover, use professional data recovery services instead of repeatedly formatting, initializing, or running repair commands on the drive.
How to Prevent Your SSD from Becoming Unallocated in the Future?
You can’t prevent every partition or drive failure, but a few habits can reduce the chances of your SSD suddenly becoming unallocated or make recovery easier if something goes wrong.
- Keep regular backups: Maintain at least one backup of important files on another drive or a trusted cloud service. A backup gives you a safer recovery option if the SSD fails.
- Avoid interrupting disk operations: Don’t shut down or restart your computer while cloning, partitioning, resizing, or formatting a drive.
- Use reliable cloning and partition tools: Before making changes to partitions, verify the source and destination drives carefully and follow the software’s instructions.
- Protect against sudden power loss: Use a UPS for desktops where possible, especially when performing lengthy disk operations.
- Monitor unusual SSD behavior: Frequent disconnects, unexpected slowdowns, read/write errors, or other abnormal behavior can indicate a developing drive problem. Back up your data before the issue gets worse.
- Leave enough free space: Avoid keeping an SSD almost completely full. Maintaining some free capacity can help the drive manage its storage more efficiently.
- Handle external SSDs safely: If you use an external SSD, eject it through Windows before disconnecting it, particularly when files are being transferred.
Summing Up
An unallocated SSD doesn’t necessarily mean your data is gone. If a previously used SSD suddenly shows unallocated space, recover your important files before attempting any repair, formatting, or partition changes. For a new SSD or unused space left after cloning, you can safely set up or extend the partition as appropriate. If the SSD shows signs of hardware failure or remains undetected, stop DIY troubleshooting and consider professional data recovery.
FAQs