Search
  • For Individuals
      « Back
    • Windows Data Recovery

      Recovers lost or deleted Office documents, emails, presentations & multimedia files.

      Free Standard Professional Premium

    • Mac Data Recovery

      Recovers deleted files, photos, videos etc. on Mac.

      Free Standard Professional Premium

    • Photo Recovery

      Recover photos, videos, & audio files from all cameras and storage on Windows or Mac.

      Free Standard Professional Premium

    • Video Repair
    • Photo Repair
    • iPhone Data Recovery
  • For Business
      « Back
    • Email Repair & Converter

      Repair for Exchange Converter for EDB Converter for OST Converter for NSF Converter for OST MBOX Repair for Outlook

    • Database & File Repair

      Repair for MS SQL Repair for Access Repair for QuickBooks Software Repair for Excel Extractor for Windows Backup Repair for MySQL

    • Data Recovery & Erasure

      Data Recovery Professional Data Recovery Technician Mac Recovery for Technician Virtual Machine Recovery File Erasure Software Mobile Erasure Drive Erasure File Eraser Software File Eraser Software for Mac

    • Toolkit

      Exchange Toolkit Outlook Toolkit File Repair Toolkit MS SQL Toolkit Data Recovery Toolkit

    • Forensic

      Email Forensic Exchange Auditor Log Analyzer for MySQL Log Analyzer for MS SQL

  • Store
  • Partners
  • Services
  • Offers
  • Support


  • For Individuals
    DIY software for anyone who works with data.

    Windows Data Recovery Recovers lost or deleted Office documents, emails, presentations & multimedia files

    Free Standard Professional Premium

    Mac Data Recovery Especially for Mac users to recover deleted documents and multimedia files from macOS

    Free Standard Professional Premium

    Video Repair Windows Mac Repair multiple corrupt videos in one go. Supports MP4, MOV & other formats.

    StandardPremium

    Photo Recovery Windows Mac Recover photos, videos, & audio files from all cameras and storage on Windows or Mac.

    Standard Professional Premium

    iPhone Data Recovery Windows Mac Recover deleted photos, videos, contacts, messages etc. directly from iPhone & iPad

    Recover Erase Toolkit

    Photo Repair Windows Mac Repair multiple corrupt photos in one go. Supports JPEG & other formats.

    Standard Professional Premium


  • For Business
    • Email Repair
    • Email Converter
    • File Repair
    • Data Recovery & Erasure
    • Toolkit
    • Forensic

    Exchange Repair Repair corrupt EDB file & export mailboxes to Live Exchange or Office 365

    Outlook PST Repair Repair corrupt PST & recover all mailbox items including deleted emails & contacts

    OLM Repair Repair Outlook for Mac (OLM) 2011 & 2016 backup files & recover all mailbox items

    Exchange Toolkit Repair EDB & Exchange backup file to restore mailboxes, convert OST to PST, & convert EDB to PST

    Active Directory Repair Repair corrupt Active Directory database (Ntds.dit file) & extract all objects in original form

    EDB to PST Convert online & offline EDB file & extract all mailbox items including Public Folders in PST

    OST to PST Convert inaccessible OST file & extract all mailbox items including deleted emails in PST

    NSF to PST Convert IBM Notes NSF file & export all mailbox items including emails & attachments to PST

    MBOX to PST Convert MBOX file of Thunderbird, Entourage & other clients, & export mailbox data to PST

    OLM to PST Convert Outlook for Mac Data File (OLM) & export all mailbox data to PST in original form

    GroupWise to PST Convert GroupWise mail & export all mailbox items - emails, attachments, etc. - to PST

    EML to PST Convert Windows Live Mail (EML) file & export mailbox data - emails, attachments, etc. - to PST

    Office 365 to PST Connect to Office 365 account & export mailbox data to PST and various other formats

    DBX to PST Convert Outlook Express (DBX) file & export all mailbox data - emails, attachments, etc. - to PST

    SQL Repair Repair corrupt .mdf & .ndf files and recover all database components in original form

    Access Repair Repair corrupt .ACCDB and .MDB files & recover all records & objects in a new database

    QuickBooks Repair Repair corrupt QuickBooks® data file & recover all file components in original form

    MySQL Repair Repair MyISAM & InnoDB tables and recover all objects - keys, views, tables, triggers, etc.

    Excel Repair Repair corrupt Excel (.XLS & .XLSX) files and recover tables, charts, chart sheet, etc.

    BKF Repair Repair corrupt backup (BKF, ZIP, VHDX and .FD) files and restore complete data

    Database Converter Interconvert MS SQL, MySQL, SQLite, and SQL Anywhere database files

    PowerPoint Repair Repair corrupt PPT files and restore tables, header, footer, & charts, etc. like new

    File Repair Toolkit Repair corrupt Excel, PowerPoint, Word & PDF files & restore data to original form

    Data Recovery Windows Mac Recover lost or deleted data from HDD, SSD, external USB drive, RAID & more.

    Technician Toolkit

    Tape Data Recovery Retrives data from all types and capacities of tape drives including LTO 1, LTO 2, LTO 3, & others.

    Virtual Machine Recovery Recover documents, multimedia files, and database files from any virtual machine

    File Erasure Permanently wipe files and folders, and erase traces of apps and Internet activity.

    Standard Corporate

    Mobile Erasure Certified and permanent data erasure software for iPhones, iPads, & Android devices

    Drive Erasure Certified and permanent data erasure software for HDD, SSD, & other storage media Windows Mac

    Exchange Toolkit 5-in-1 software toolkit to recover Exchange database, convert EDB to PST, convert OST to PST, restore Exchange backup, and reset Windows Server password.

    Outlook Toolkit Comprehensive software suite to repair PST files, merge PST files, eliminate duplicate emails, compact PST files, and recover lost or forgotten Outlook passwords.

    File Repair Toolkit Powerful file repair utility to fix corrupt Word, PowerPoint, and Excel documents created in Microsoft Office. It also repairs corrupt PDF files and recovers all objects.

    MS SQL Toolkit 5-in-1 software toolkit to repair corrupt SQL database, restore database from corrupt backup, reset database password, analyze SQL logs, & interconvert databases.

    Data Recovery Toolkit Software helps to recovers deleted data from Windows, Mac and Linux storage devices. Also supports recovery from RAIDs & Virtual Drives.

    Email Forensic Advanced email forensic solution for cyber experts to audit, analyze, or investigate emails & gather evidences.

    Exchange Auditor Exchange Server monitoring solution to automate audits, scans and generate reports ìn real-time.

    Log Analyzer for MySQL Analyze forensic details of MySQL server database log files such as Redo, General Query, and Binary Log.

    Log Analyzer for MS SQL Track & analyze MS SQL Server database transactions log files.

    Email Forensic
    STELLAR EMAIL FORENSIC

    Advanced email forensic tool to analyze and collect the mailbox data of email clients

    Learn More arrow


    All Products arrow

    All Products arrow

    All Products arrow

    All Products arrow

  • Our Partners
  • Lab Services
  • microphone-icon-android

    Trending Searches

    Data Recovery

    Photo Recovery

    Video Repair

    iPhone Data Recovery

    File Erasure Software

    Exchange Repair

    OST to PST

    PST Repair

    Raid Recovery

    MS SQL Repair

  • English Deutsch Français Nederlands Italiano Español 日本語 简体中文
  • Support
Raid Data Recovery 6 minute read

How to Fix RAID Failure After Upgrading BIOS?

Updated on February 12th, 2021
Eric Simson
Written By
Eric Simson
Rohit Arora
Approved By
Rohit Arora

Summary: In this post, we are going to know what are the possible manual as well as alternative methods to fix raid failure after upgrading BIOS, and how Stellar Data Recovery Technician software can help get your lost data back.

free download

RAID is a redundant array of independent disks that provide failover protection in data storage. However, a RAID can fail at any time due to various factors such as power failure, disk failure, hard drive corruption, sudden power surge, etc. But the most common reasons to why RAID fails are related to hardware & software failure.

In a software controlled RAID array, the array information is saved on the compatible system’s BIOS. When the BIOS is upgraded or reset to defaults settings, RAID configuration also changes that leads to RAID failure after upgrading BIOS.

Moreover, removing the CMOS battery (Complementary metal-oxide-semiconductor, a small amount of computer memory on RAID controller or motherboard that stores BIOS settings) from the motherboard/RAID controller board resets the BIOS to defaults thus resulting in RAID failure.

Although RAID failure after upgrading BIOS or reset can be fixed by altering BIOS settings and recreating the RAID array. In case that doesn’t work, we have also mentioned an advanced option that can help you reconstruct RAID array for RAID data recovery, recover data from it, and then recreate a new RAID array through BIOS utility.

Solution 1: Check SATA Cable, Power Cable, and CMOS

Check whether the CMOS is connected to the motherboard or not. Also, check for any loose SATA or power connection to your hard drives. Sometimes, we fail to verify the basic connectivity. If all connections are intact, then the problem lies with Settings.

The next solution details resetting BIOS.

Solution 2: Re-Enable RAID from BIOS

A BIOS reset due to CMOS removal or restoring defaults can lead to RAID failure. Resetting BIOS switches the controller back to AHCI mode from the RAID. This can be solved by switching controller to RAID from AHCI mode. Follow the steps to switch controller to RAID from AHCI mode:

  1. Turn on the System and immediately start pressing press F2 key to ‘Enter’ the BIOS settings.
  2. Go to Advanced>IDE Configuration>Configure SATA as using arrow keys on the keyboard and then press ‘Enter’ key
  3. In the Configure SATA as options, select RAID
  4. Press F10 to save changes & exit the BIOS utility

This should most probably fix the RAID issue. If not, try Solution 3 of recreating the RAID.

Solution 3: Recreate the RAID

In case re-enabling RAID from AHCI doesn’t help, a recreation of RAID array is required to fix the RAID failure due to BIOS upgrade. Follow these steps to recreate RAID in your system:

  • After enabling RAID, shutdown and then start the system. Immediately press ‘CTRL+I’ to enter Configuration Utility & create RAID volume. Don’t format drives as you will lose all data from the drive.
  • In case there is no other way other than formatting to re-create RAID array, go to solution 4 and perform RAID array recovery from the failed Later, recreate RAID using the ‘Configuration Utility’ or Intel Matrix Storage Manager

However, this process is complex and requires time. Also, successful RAID recreation is not guaranteed. Most importantly, this doesn’t work for the RAID that is used as the primary volume in the system.

If you are not able to re-create RAID, then opt for the best solution.

Solution 4: Reconstruct the RAID Volume and Recover Data

RAID failure recovery software such as Stellar Data Recovery Technician can help reconstruct a RAID array in case it fails on your system. All you need is a working Windows PC with Stellar Data Recovery Technician installed and SATA connectors to connect RAID drives to the system. You can also use SATA to USB converter cable or HDD enclosures to connect your failed RAID drive to the working Windows PC via USB port.

Once connected, follow these steps to reconstruct the RAID volume and proceed to RAID array recovery. Later you can format drives and create a new array on your system.

1. Launch Stellar Data Recovery Technician software.

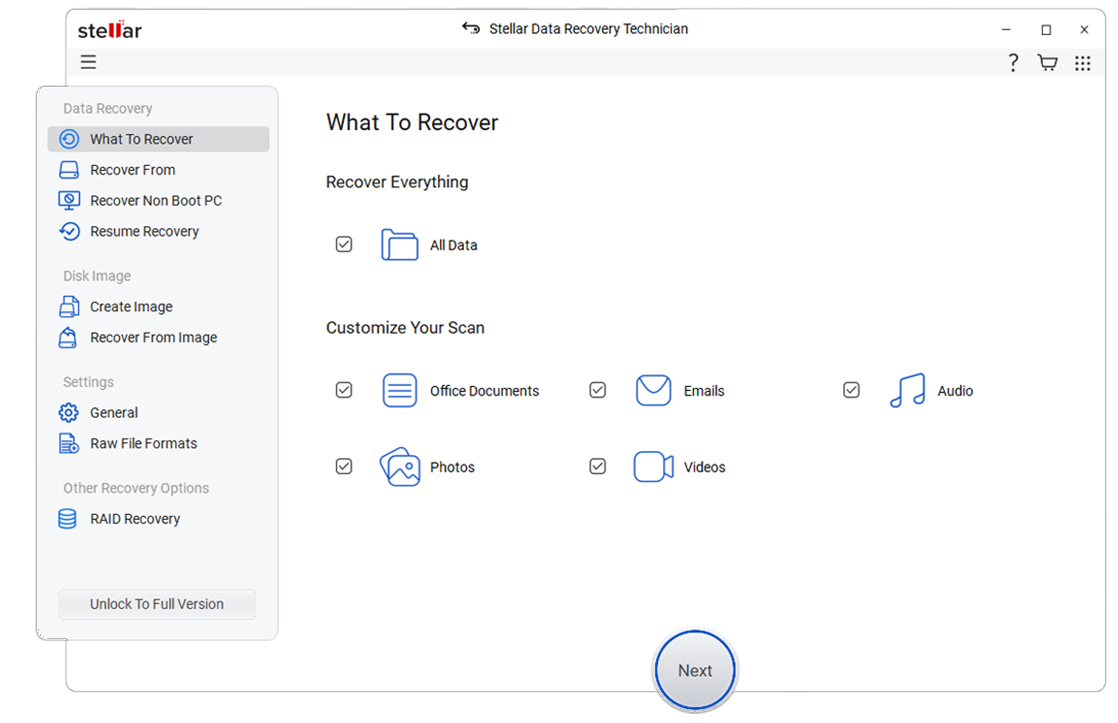
2. Choose What to Recover. Click ‘All Data’ to recover all file types and then click Next.
Stellar

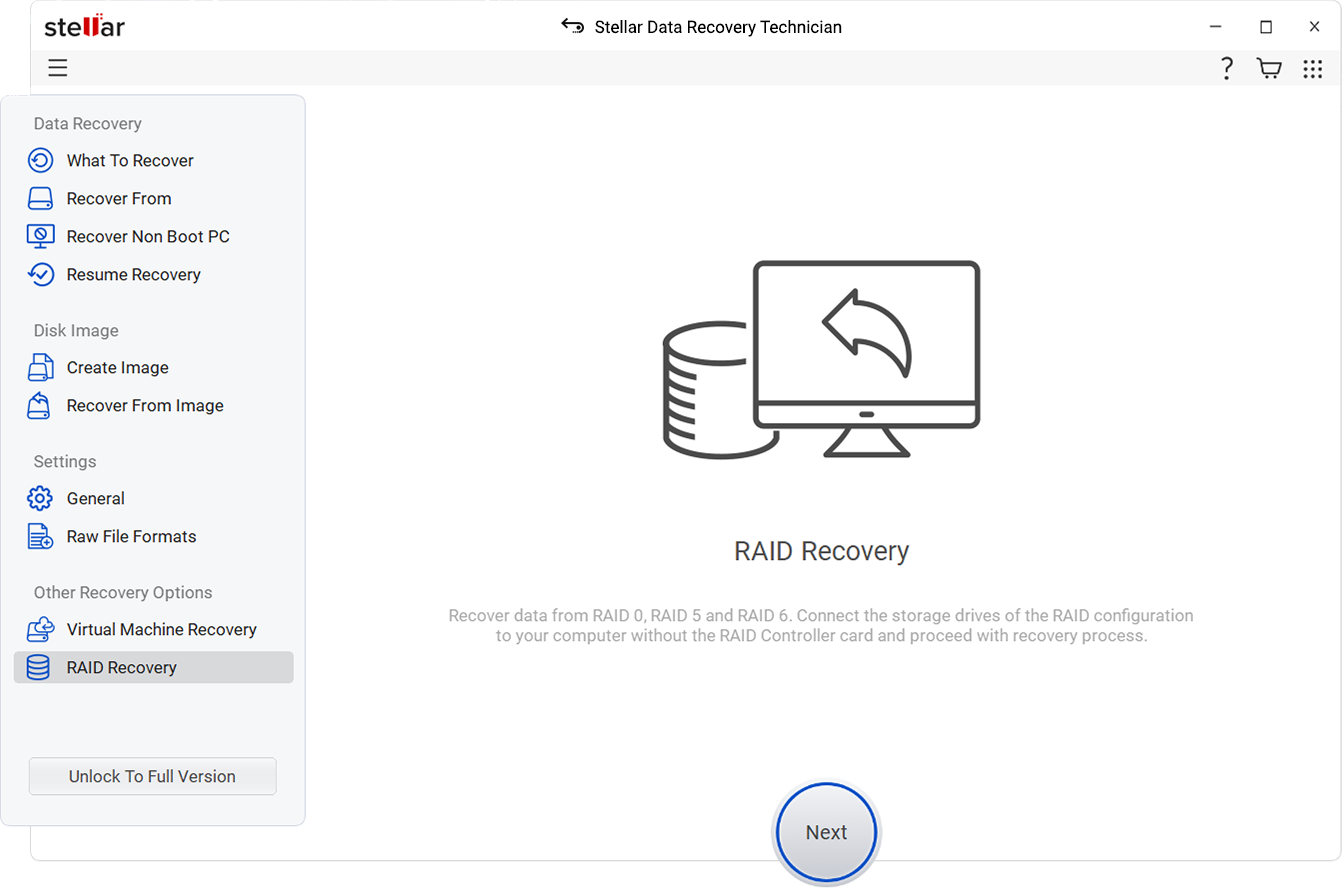
3. Click on RAID Recovery option. A new RAID Reconstruction window appears.
Stellar

4. Click the ‘Scan’ button. A new ‘RAID Construction’ Window appears.

Stellar

5. Click either RAID 0, RAID 5 or RAID 6 tab as per the RAID configuration you had. All the drives connected to the system are visible under ‘Select Hard drives to reconstruct RAID’ list box

6. Click on RAID HDDs, one at a time, and use the arrow button to add or remove drives from the ‘Select Hard drives to Reconstruct RAID’ list box to ‘Move hard drives up/down for disk order’ list box

7. Use the up or down arrow buttons adjacent to the list view box and arrange disks in the same sequence as they were in the RAID array

8. Click the ‘Don’t know start sector of drives. Show list of probable start sectors’ checkbox if you don’t know the required parameters and start sector of the drive. A new checklist box appears in the ‘Select RAID Parameter’ section

9. Choose one or more probable start sectors or add desired start sector in text box & click on ‘Add Sector’ button (max 32 sectors can be added) when it’s not listed in the checklist Skip this step if you know the RAID parameters.

Stellar

10. Choose RAID parameters from the ‘Select Stripe/Block Size’; ‘Select Parity Order/Rotation’ drop-down, and from ‘Select Parity Repetition/Delay’ dropdown. It is presumed that these values are known to the RAID admin or user who built it.

11. After adding and selecting the RAID parameters in the software, click ‘Build RAID’.

12. Constructed RAID volume details are displayed in the ‘Select Constructed RAID’ window.

13. Click the ‘Show Volume List’ button.

Stellar

14. In ‘Select Volume to Recover Data’ windows, choose the volume from the listed volumes of the reconstructed RAID – from where data is to be recovered.

15. After selecting the RAID volume, click the ‘Scan’ button. Wait until the scan is finished.

Stellar

16. Click on blue colored ‘Click Here’ link beside Deep Scan text at the bottom of the software to start ‘Deep Scan’ process if the desired files are not found in the scan results during Raid 0 data recovery

17. In the left tree-view pane, all recovered folders and files are listed. Click on the ‘File Type’ tab or search box to easily browse and recover required data

Stellar

18. Check the checkboxes of the files and folders that you want to recover, and then click the ‘Recover’ button. A pop up appears

19.Click the ‘Browse’ button to select the location where you want to save the recovered data. At this point, RAID 0 data recovery is successfully completed.

Stellar

Note: Make sure not to select the drive which is in the reconstructed RAID array. Use an external disk or internal disk with enough space to save recovered data.

20. Click the ‘Start Saving’ button and wait until data is saved successfully.

Stellar

Conclusion:

In this blog, we discussed why RAID fails when you reset the BIOS to defaults and how to re-create or reconstruct the failed RAID using the BIOS utility and advanced options available in the market such as Stellar Data Recovery Technician that also helps in successful RAID failure recovery.

Never remove CMOS from your RAID controller or PC’s motherboard as it resets the customized changes to BIOS and can significantly affect your system. Always disconnect RAID before restoring defaults (reset) in BIOS. After reset, re-enable RAID settings before connecting the RAID drives to the system to avoid RAID failure.

About The Author

Eric Simson

Eric Simson is an Email Platform Consultant and is associated with Stellar Data Recovery from last 6 years. He writes about the latest technology tips and provides custom solutions related to MS Outlook, MS Exchange Server, Office 365, and many other Email Clients & Servers.

Best Selling Products

Stellar Data Recovery Professional for Windows

Stellar Data Recovery Professional for Windows

Stellar Data Recovery has the right Windows Recovery tool for all your data recovery

Read More
Stellar Data Recovery Professional for Mac

Stellar Data Recovery Professional for Mac

Stellar Data Recovery for Mac program performs safe..


Read More
Stellar Photo Recovery

Stellar Photo Recovery

A comprehensive photo recovery software to restore photos, music & video files


Read More
Stellar Repair for Video

Stellar Repair for Video

Powerful video repair tool for repairing corrupt or damaged MOV and other video files


Read More

9 comments

  1. Lukas says:
    July 12, 2019 at 6:43 pm

    Hi Eric,
    I have quiet the same problem as @Ethan from July 2018. Had to upgrade my Bios due to graphiccard issues. I changed the settings back to RAID instead of AHCI and only 2 drives of my 4x1TB Raid5 Setup were Raid-member-drives (only HDDs #3 & #4 of the original #2 #3 #4 #5 Setup). #0 ist my primary non-raid drive on another mainboard controller with Windows on it (working). I reseted both HDs to non-member using Intel BIOS utility. Created a new array with identical settings as the broken array.

    Now is there an option to reset the new aray to the initial settings with Stellar as if nothing had happen, or is Stellar “just” (no offense) a tool to rescue my date onto a additional drive (NAS whatever) so that I can start a fresh Raid5 and re-copy thos rescued date.
    Thanks in advance
    Lukas

    Board: GA-z77x-ud5h (1.0), BIOS: Rev.14, HDDs: 4x 1TB WD-WCATRC, OS: Win8.1Pro on Samsung SSD

    Reply
  2. Kandy B. Xavier says:
    January 28, 2019 at 10:13 am

    I have lost access to Raid-0 array after setting BIOS to default. I want to prevent RAID array from being deleted. Please provide solutions.

    Reply
    1. Eric Simson says:
      January 28, 2019 at 10:41 am

      This problem can be solved by Re-enable RAID from BIOS. Try switching controller to RAID from AHCI mode.

      Reply
  3. Chauncey A. Edwards says:
    January 23, 2019 at 10:12 am

    We are trying to reset the BIOS suddenly RAID failure. We’re trying to figure out the problem but can’t solve it.

    Reply
    1. Eric Simson says:
      January 23, 2019 at 10:43 am

      Sometimes RAID fails due to reset the BIOS to default. You can fix this issue by altering BIOS settings and recreating the RAID array.

      Reply
  4. Isaac B. Fava says:
    January 16, 2019 at 10:11 am

    I got stuck when Raid 0 Failed after flash bios upgrade. Now, how to get ride from this problem.

    Reply
    1. Eric Simson says:
      January 16, 2019 at 10:46 am

      You can recreate the RAID array to fix RAID failure issue. In case Recreate RAID doesn’t help then try Re-enabling RAID from AHCI.

      Reply
  5. Ethan says:
    July 25, 2018 at 6:45 am

    I use the integrated Intel RAID controller to create a 2 disk RAID-0 6TB (2x3TB), but every time I update the BIOS, there is a RAID failure. It does not matter if I use Live Update or the Update BIOS+ME option of the BIOS menu. All settings are lost, and after the boot, the RAID controller is deactivated due to that. I go to BIOS right after the auto-reboot and re-enter my settings (RAID instead of AHCI), but the Intel controller only sees 1 disk as a RAID member.

    Recovery option is not active when I enter the controller options (control+I). I always need to delete and recreate the RAID, which of course loses all data.

    Very frustrating! Now how to Fix RAID Failure after Upgrading BIOS?

    Reply
    1. Eric Simson says:
      July 26, 2018 at 6:24 am

      During upgrading BIOS, RAID gets failed because of many issues like cable, CMOS. So, to fix RAID you have to perform a manual action. Manual action is long and you will get frustrated.

      So, to get rid of this issue you can use Stellar Windows Data Recovery – Technician that helps in successfully RAID failure recovery.

      Reply

Leave a comment Cancel reply

Your email address will not be published. Required fields are marked *

8  +  1  =  

Table of Contents    

Categories

offer banner

Related Posts

related post
Raid Data Recovery

How to Recover Data Lost from RAID after Netgear ReadyNAS Firmware Update

Stellar Author Mansi Verma September 17, 2020 Read More
related post
Raid Data Recovery

How to Recover Data from Formatted RAID Array?

Stellar Author Ravi Singh June 8, 2020 Read More
related post
Raid Data Recovery

How to Recover Data from an Inaccessible RAID Volume?

Stellar Author Ravi Singh June 4, 2020 Read More

Stellar Official Website

Stellar Data Recovery Inc.
48 Bridge Street Metuchen,
New Jersey 08840,
United States

ALSO AVAILABLE AT

Partner Logo

About

  • About us
  • Career
  • ISMS Policy
  • Privacy Policy
  • Terms of Use
  • License Policy
  • Refund Policy
  • End User License Agreement

RESOURCES

  • Blog
  • Articles
  • Product Videos
  • Knowledge Base
  • Case Studies
  • Whitepapers
  • Software Catalog

NEWS & EVENTS

  • News
  • Events

PARTNERS

  • Affiliates
  • Resellers
  • Distributors

Useful Links

  • Contact Us
  • Support
  • Special Offers
  • Student Discounts
  • Awards & Reviews
  • Downloads
  • Store
  • Sitemap
Follow Us

tw in yt

Stellar & Stellar Data Recovery are Registered Trademarks of Stellar Information Technology Pvt. Ltd. © Copyright 2022 Stellar Information Technology Pvt. Ltd. All Trademarks Acknowledged.

Hippa Logo tuv footer partner logo DMCA.com Protection Status
We use cookies on this website. By using this site, you agree that we may store and access cookies on your device Read More Got it!