If your drive won’t mount, appears greyed out in Disk Utility, or shows a “can’t repair this disk” error, that’s usually a sign of logical corruption. In most cases, the file system is damaged, but your files are still there. You can recover data from a corrupted Mac hard drive using recovery software that reads past the damaged file system to retrieve them.
Physical damage is a different issue entirely. If your drive is clicking, grinding, or not being detected at all, the hardware is likely failing. Stop using it immediately and get help from a professional data recovery service, DIY tools won’t help here.
The type of drive also affects how recoverable your data is. Hard disk drives (HDDs) store data magnetically, so corruption doesn’t erase it outright. That’s why recovery software can usually retrieve HDD data successfully. Solid-state drives (SSDs) work differently. They use a background feature called TRIM that clears deleted data blocks to improve performance. But TRIM only acts on files you’ve deleted, not on data affected by file system corruption. That’s why a corrupted SSD is often just as recoverable as a corrupted HDD.
Signs Your Mac Hard Drive is Corrupted
Corruption shows up differently depending on what’s actually broken and what kind of drive you have. Use the table below to match your symptom to its likely cause, and note whether it’s an HDD-only issue, an SSD-only issue, or one that affects both.
| Drive Type | Symptom | Likely Cause |
| HDD & SSD | Drive doesn’t mount / greyed out in Disk Utility | Corrupt file system, directory damage, connection issue |
| HDD & SSD | “Disk Utility can’t repair this disk” error | Severe directory/catalog corruption beyond First Aid’s scope |
| HDD only | Clicking, grinding, or beeping noises | Mechanical failure: head crash, spindle/motor issue |
| SSD only | Sudden total failure, no warning, no unusual sound | Controller or NAND chip failure |
| HDD & SSD | Mac won’t boot past Apple logo / progress bar | Startup disk corruption or firmware issue |
| HDD & SSD | Files visible but won’t open / “file is damaged” | Partial corruption of individual files, not the drive |
| HDD only | Rapidly increasing bad sector count / slow reads | Aging drive. See growing bad sector counts on Mac hard drives |
HDD vs. SSD on a Mac: Why Recovery is Different
Hard Disk Drive (HDDs) and Solid-state Drives (SSDs) store data on different physical media and erase it through completely different mechanisms.
HDDs store data magnetically on spinning platters and don’t actually erase files when you delete them. They only remove the pointer that tells the location of the file system. You can still recover this data with the help of a data recovery software.
SSDs work differently. They use NAND flash memory which can’t overwrite a memory cell in place. They need to erase an entire block before new data can be stored there. The moment you delete a file, macOS sends a TRIM command to the SSD controller that wipes the deleted data.
Two more things matter if your Mac is from 2016 or later:
- You can’t just remove the drive. Most Macs since 2016 have the SSD soldered directly to the logic board. If the Mac itself dies, you can’t take out the drive and read it on another computer the way you could with older Macs.
- Newer Macs encrypt everything by default. Macs with T2 chip or Apple Silicon (M1 and later) lock your data to that specific machine. If the logic board fails, even professional labs usually can’t lift the storage chips and read them elsewhere.
Once you’ve ruled out the caveats above, the next step is figuring out exactly what kind of failure you’re dealing with.
Is the Failure Logical or Physical?
A logical failure means that the drive’s hardware is fine, but the file system (APFS on modern Macs, HFS+ on older ones) is corrupted. The disk may not mount, but the data is usually still sitting intact. Quickly recover your data first then worry about repairing the file system.
A physical failure means the drive itself is dying, there are worn-out components on an HDD, failing memory cells on an SSD. Continuing to use it risks losing data for good.
If your Mac doesn’t boot up but you can sense the drive spinning up normally, the data can still be recovered. But if the drive is clicking, grinding, or making a repetitive buzzing sound, that’s a sign of physical failure.
Do This Before You Do Anything Else
- Stop saving anything new to the affected drive.
- Don’t install recovery software on the drive you’re trying to recover.
- If it’s an external drive, eject it properly.
- Don’t run Disk Utility’s First Aid on it yet as it can rewrite the underlying structure.
- If there are signs of physical damage, just power off your Mac.
Recover Your Data with Mac Data Recovery Software
Once you’ve ruled out physical failure, recover data from the corrupted Mac hard drive using recovery software. Stellar Data Recovery Professional for Mac recovers lost or deleted data from corrupted or non-booting drives.
- Download and install. Get the downloadable exe from Stellar’s site and drag the app into Applications. Install it on a different drive than the one you’re recovering, never the affected drive itself.
- Launch and grant Full Disk Access. On first launch, macOS prompts for Full Disk Access under System Settings > Privacy & Security. Approve it once, you’ll only need to re-enter your admin password on future launches.
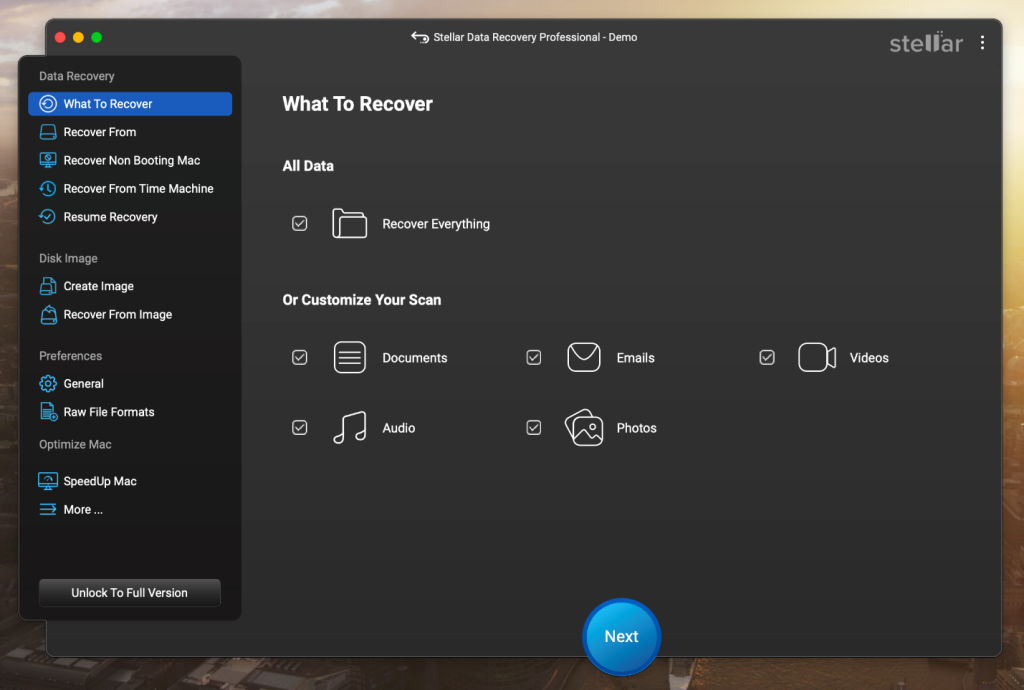
- Select what to recover. Choose the type of file you want to recover: docs, emails, videos, audio, photos. You can also opt to recover everything.
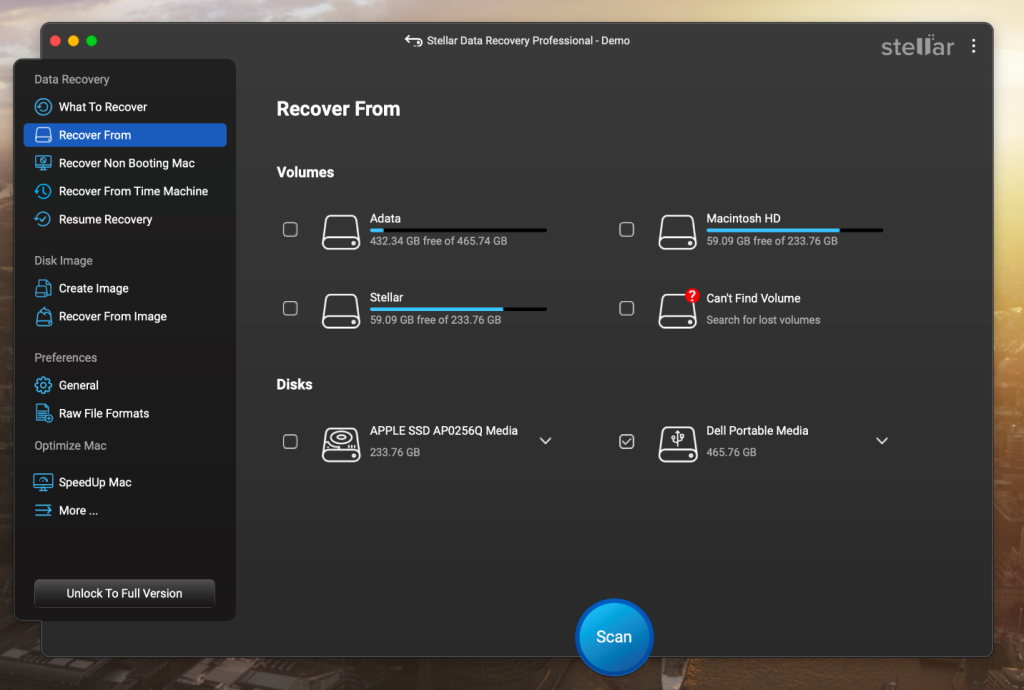
- Select the source. Choose the volume that lost data. If the drive itself shows up but the volume is missing, it’s the “Can’t Find Volume” scenario. Switch to the Advanced Source View and select the physical disk instead. The software can still scan it at the raw level.
- Run the Scan. A quick scan covers mostly deletions. For formatted or unmounted drives, run a deep scan, it takes longer but performs a more thorough search.
- Preview and recover. Filter results by file type, preview what’s recoverable, then save the recovered files to a separate drive. Never recover back onto the source drive.
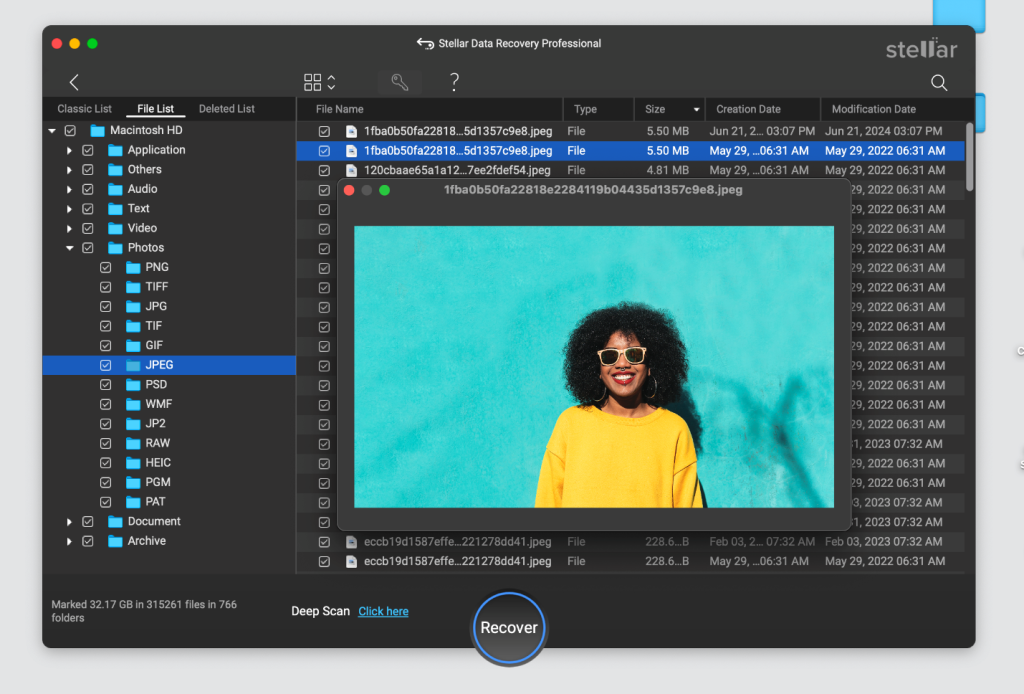
On an HDD, this workflow usually recovers close to everything. On an SSD, results depend on how much TRIM has already run through.
How to Repair the Drive after Recovery?
Once your files are safely recovered, you can repair the corrupted drive itself. This step comes after recovery for a reason. Because repair utilities change the drive’s file system structure, if something goes wrong during the repair, then recovering data becomes much harder.
1. Repair the Drive with Disk Utility First Aid
macOS offers a built-in Disk Utility tool called First Aid which checks the drive for file-system errors. It repairs common issues like damaged directory structures, invalid volume headers, and minor metadata corruption on both APFS and HFS+ volumes.
- Open Disk Utility.
- Click View > Show All Devices.
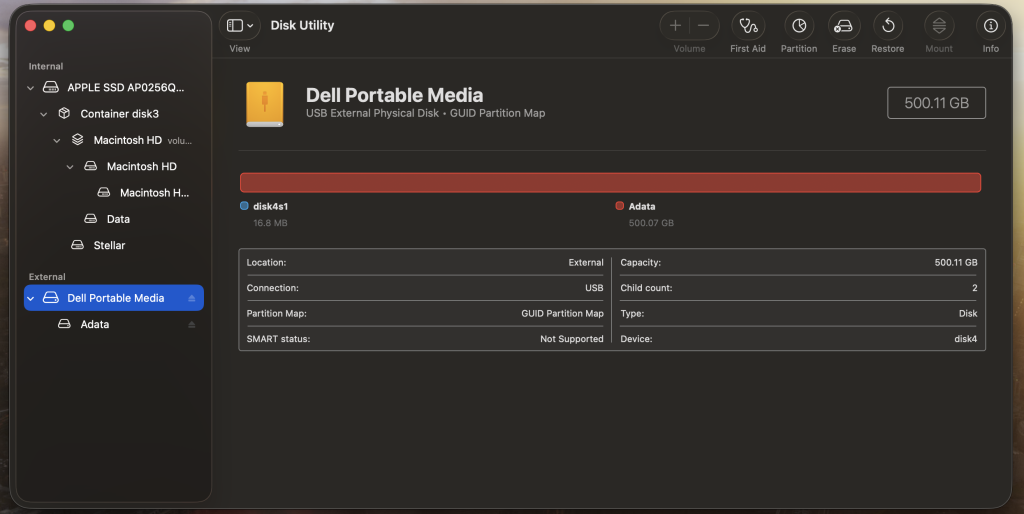
- Select the affected drive or volume.
- Click First Aid in the toolbar and hit Run.
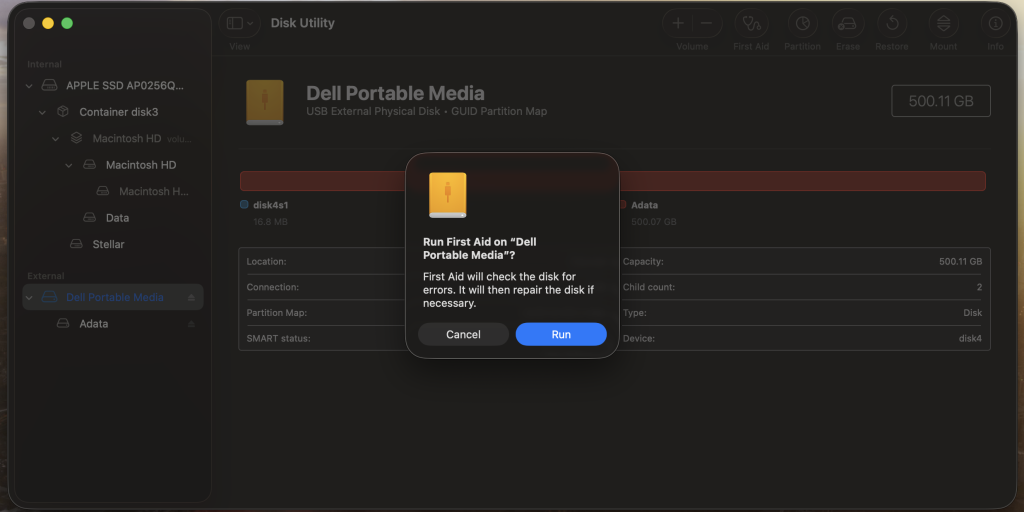
- When the process is complete, click Done.
When First Aid reports that the disk has been repaired successfully, then remount the drive and verify that your files are accessible.
You may also see error messages like:
- “File system verify or repair failed”
- “Disk Utility can’t repair this disk”
- “The volume could not be repaired”
It usually means that the file system is severely corrupt and First Aid was unable to fix it. In that case, do not run the utility again as multiple attempts can further corrupt the file system. Let’s see the next method.
2. Repair the File System Using Terminal
macOS includes a lower-level utility called File System Consistency Check (fsck), which can thoroughly examine the file system and can sometimes fix issues that disk Utility itself can’t. But fsck is only intended for users who are comfortable with running Terminal commands. Running it on a mounted startup volume can cause problems so it’s recommended to run it from macOS recovery.
- Shut down your Mac.
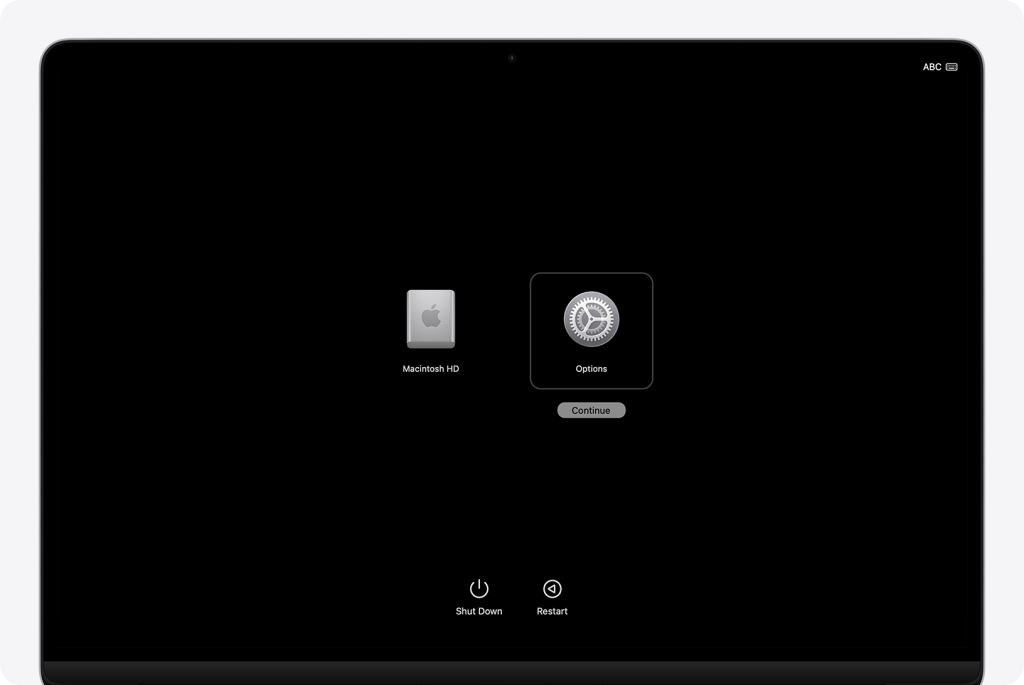
- Boot into macOS Recovery.
Apple Silicon Macs: Press and hold the power button until Options appears. Click Options > Continue.
Intel Macs: Restart while holding Command + R until the Apple logo appears.
- Go to Utilities > Terminal.
- To identify the affected volume, run the following command:
diskutil list
- For APFS volume, run the following command:
fsck_apfs -y /dev/diskMsN
- For HFS+ volume, run the following command:
fsck_hfs -fy /dev/diskMsN
* M and N are placeholders, read the real disk identifier (e.g., disk2s1) from the diskutil list output above.
- Restart the Mac once the scan is finished and check whether the drive mounts normally.
If fsck reports that the file system cannot be repaired or continues to find new errors after multiple runs, the corruption may be too severe or the drive may have underlying hardware issues.
How to Recover Data Using Time Machine?
Time Machine, Apple’s built-in backup system, is an excellent tool for recovering lost or deleted files. If you regularly back up your Mac with time Machine, you may not need any other method to recover your files. Time Machine stores snapshots of your data, allowing you to restore individual files, folders, or even your entire Mac to an earlier point in time.
- Connect the Time Machine backup drive to your system.
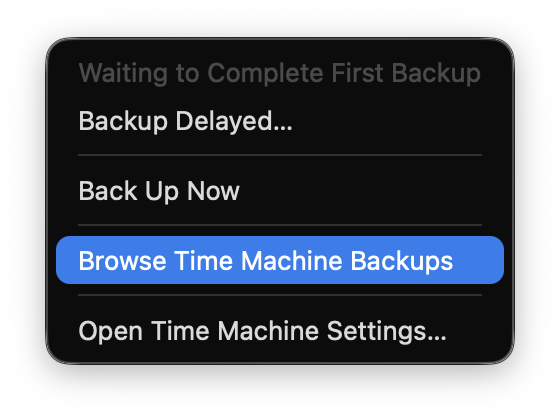
- Click the Time Machine icon in the menu bar.
- Select Browse Time Machine Backups.
- Use the timeline to navigate back to a date before the file was deleted.
- Select the backup files/folders you want and click Restore.
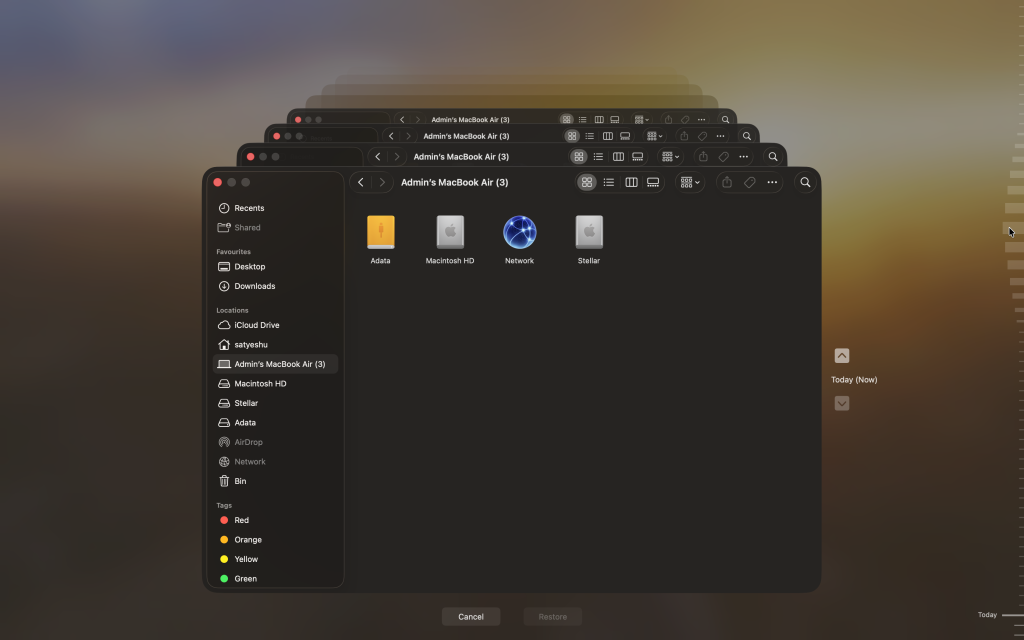
- The file will return to its original location.
Just keep in mind that time Machine can restore only those files that were backed up before the drive became corrupted. If the files were created or modified after the last backup, you’ll need to recover them directly from the affected drive using a data recovery software.
How to Recover Data from an Internal Drive That Won’t Boot?
If your Mac fails to boot up that doesn’t mean that your files are gone. In most cases, the issue lies with the macOS itself rather than the internal storage drive. When the storage drive is still healthy, you can recover the data without removing the drive. One way to do this is via macOS recovery. Once you enter Recovery Mode:
- Open Disk Utility to check if the startup drive is detected. If the startup disk appears in Disk Utility, the issue is likely logical corruption and the chances of getting back your data are high.
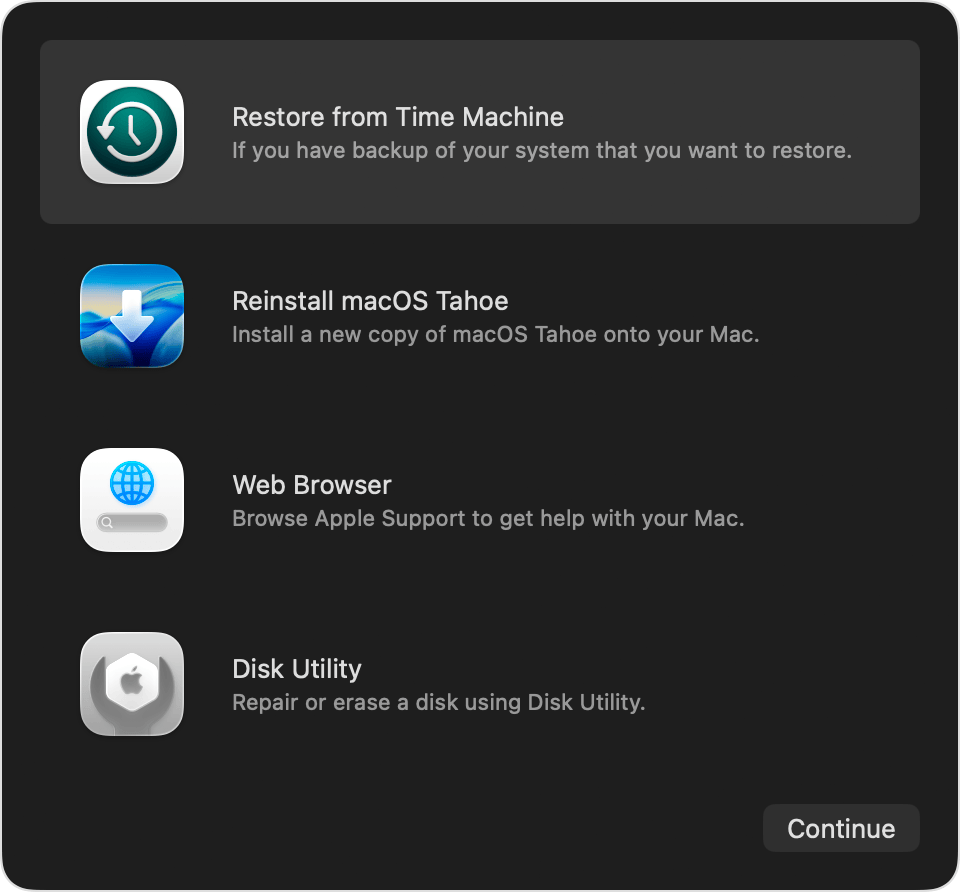
- Restore files using the Time Machine backup.
- Launch Terminal if you need to run fsck (covered in the previous section).
- Install and run data recovery software if the drive is accessible.
Another way is to recover your Mac storage drive data via Target Disk Mode. This method assumes that while your Mac won’t boot, the internal HDD or SSD is still working. It allows your Mac to present its internal storage as an external drive, allowing a different Mac to access it and copy the important files or scan it using a data recovery software. Target Disk Mode only works on Intel Macs. On Apple Silicon Macs (M1 and later), use Share Disk instead, accessible from macOS Recovery, since these Macs don’t support Target Disk Mode.
How to Recover Data from an External Drive That’s Greyed Out?
When your external drive appears greyed out in Disk Utility, it usually means that the macOS can still detect the drive, but it is not able to mount its file system. This is usually due to logical corruption, an unsupported or damaged file system, directory errors, or an interrupted write operation. The good news is that the drive is still recoverable as the hardware is still communicating with your Mac.
Before attempting any repairs:
- Do not format the drive even if macOS prompts you to initialize it.
- Do not run Disk Utility repeatedly.
- If the drive contains your important data, recover it first.
After you have successfully recovered the data, safely troubleshoot the underlying issue by checking the file system, mounting the drive manually, or repairing it with Disk Utility. For detailed troubleshooting, follow our guide: WD My Passport external hard drive is greyed out in Mac.
How to Recover Data from an External Drive That’s Not Showing Up on Your Mac?
An external drive should automatically get detected and show up in the Finder sidebar once you connect it to your Mac. But sometimes, this isn’t the case and can happen due to several different reasons:
- The drive is corrupted.
- A Finder setting is hiding the drive.
- Connection or power-related issues.
- The macOS is not able to read the file system of the drive.
Begin with the basics first and check the thunderbolt cable, try another port, or test the drive on a different Mac. But if the drive isn’t detected anywhere, follow our detailed guide to fix the issue: External storage not showing on Mac.
When to Stop DIY Recovery and Call a Professional Recovery Service
While data recovery software and macOS repair tools are capable of dealing with a large portion of cases involving logical corruption, they also have limits. In case a drive has been subjected to physical damages or has developed any hardware issues, further DIY data recovery can worsen the situation. It is recommended to stop using the drive altogether if any of the following applies:
- Your hard drive produces clicking, grinding, or beeping sounds. These are classic signs of mechanical failure.
- The drive is not recognized by the computer. In case it is not detected in Disk Utility, System Information, or data recovery software despite using different cables and ports, there is a high probability of failure of controller/storage hardware.
- The drive keeps disconnecting when in use. This could be the indication of hardware failure as well, instead of mere file system corruption.
- The drive has been physically damaged. It includes drops, water spills, fire, electricity shock, or physical damages and cannot be recovered with DIY solutions.
- The drive shows S.M.A.R.T. errors and develops new bad sectors quickly. Such symptoms indicate that the hardware is failing.
When expert help is required, Stellar Data Recovery Lab Services can recover data from storage devices affected by file system corruption and other types of physical failure. Stellar engineers utilize specialized tools and work in cleanrooms to retrieve data from Hard Disk Drives (HDDs), Solid State Drives (SSDs), RAID arrays, NAS devices, USB flash drives, memory cards, and other types of storage devices.
How to Prevent Mac Hard Drive Corruption?
Despite the fact that no storage medium works forever, the majority of logical corruptions can be easily avoided if you develop healthy habits, such as backing up regularly, handling storage devices properly, and monitoring their condition. Following the recommendations below will help prevent many problems related to drive corruption:
- Backup your Mac regularly. Turn on Time Machine or use other means of backing up your system. It would be best if you kept an extra copy of all essential files on another storage medium, preferably on another drive.
- Always unmount external drives properly. Disconnecting an HDD or SSD before files are written on it may corrupt the file system and damage data stored on the drive.
- Have enough free space. Free disk space is necessary for macOS to function as well as for performing virtual memory operations. Low free disk space can lead to increased chances of errors and system instability.
- Protect your Mac against power interruptions. Unexpected shutdowns can stop ongoing write operations and corrupt the file system.
- Monitor your drive’s health. Check your drive’s S.M.A.R.T status from time to time and if you notice any anomaly – back up your data immediately and replace the drive before it fails.
- Keep macOS updated. System updates often ship fixes for storage, file system, and drive-related bugs.
Summing Up
Not everything is lost when there is corruption on your Mac hard drive. Just act quick and take appropriate measures. First, understand whether it is a case of logical or physical corruption, stop using the compromised drive, retrieve all data that you need, and only after that proceed with repairing the drive. However, if it is clear that the drive is experiencing hardware issues, it would be better to find professional help in order to avoid data loss.