Nowadays, more and more enterprises are either bidding or are planning to bid goodbye to their current On-premises Messaging Environment and looking forward to switching to the Exchange Online. The reason for this migration is simply to eliminate capital cost of running the server edition, improve management overhead, and last but not the least, easy manageability.
The execution of this migration process depends on several aspects such as number of users, organization-messaging environment, on-premises environment size, etc.
There are certain approaches using which this migration process can be executed. One such efficient manual approach is Staged Migration. In addition, you can also use a third-party Exchange migration tool, such as Stellar Migrator for Exchange for migrating Exchange mailboxes to Office 365 or Microsoft 365.
Office 365 Staged Migration: An Overview
Staged Migration is the migration approach where the mailboxes and user data are migrated to Office 365 in two or more stages. When it comes to Office 365 or Microsoft 365 staged migration, it is often achieved in two stages:
- In the first stage, you migrate the user mailboxes and content of mailbox over a period. Post migration, the MX records are updated on the target server or domain is transferred. Also, in the first stage, newest or older data is transferred so that users can start working in new Office 365 environment while remaining data is being migrated.
- In second stage, the remaining data is migrated to the target server.
You can use Office 365 Staged Migration to move from on-premises Exchange 2003 or 2007 Deployment to Office 365. For Exchange 2010, Staged Migration to Office 365 or Microsoft 365 is not available. You can use Hybrid Deployment for Exchange 2010, 2013, 2016, or 2019 environment.
The prime targets of the type of migration are the users who wish to create a permanent mail coexistence, along with on-premises environments as well as Exchange Online. To deploy Exchange Online, the users must deploy directory synchronization. The patrons with only Enterprise Exchange licenses can use it.
Who is the Primary Target of Staged Migration?
The medium-sized enterprises, who wants to migrate Exchange 2003 or 2007 mailboxes to Office 365 (Exchange Online) over a period, are the primary target of the Staged Migration.
When is Office 365 Staged Migration Recommended?
The Staged Migration is recommended under the following circumstances:
- When there are more than 2,000 mailboxes
- When the source email system is either Microsoft Exchange Server 2003 or Microsoft Exchange Server 2007
Things to Consider Prior to Staged Migration
There are a few pointers which an Exchange or IT admin should consider before executing the Staged Migration process.
- To ensure smooth Staged Migration process, a customer should synchronize accounts by using Azure Active Directory sync. These accounts are synchronized between Office 365 or Microsoft 365 and on-premises Active Directory domain.
- The primary domain for the on-premises Exchange organization should be in harmony with Office 365 organization.
- Only user and resource mailboxes can be migrated. To enable migration of other recipient types, directory synchronization process is needed.
- If there is any Out of Office message, it will not be migrated.
- Connections to the Source Email System should not be limited.
Staged Migration of Emails from Exchange 2003 or 2007 to Office 365
The following 11 steps are required to be followed to ensure seamless migration of Exchange mailboxes to Office 365 or Microsoft 365.
Step 1. Staged Migration Preparation
It involves the following:
- Outlook Anywhere Configuration on on-premises Exchange server
- Checking whether you can connect to Exchange organization
- Permission setting
- Unified Messaging disabling
Step 2. Verification that On-Premises Domain is same as Office 365 Organization Domain
Verify that on-premises domain is same as the one that Office 365 organization owns, by using the domain wizard.
Step 3. Office 365 Users Creation by using Directory Synchronization
It involves synchronization as well as creation of on-premises users in Office 365. To execute this action, you can choose either Microsoft Azure Active Directory Sync Services or Microsoft Azure Active Directory Synchronization Tool. Upon successful migration, the user accounts are being managed.
Step 4. Mailbox List Creation for Migration
It involves identification of the users whose on-premises Exchange mailboxes are to be migrated to Office 365. To create a migration batch, Comma Separated Value (CSV) is being used. To run the flawless migration process, each CSV row file includes information about an on-premises mailbox.
Step 5. Office 365 Connection Establishment to the Email System
In this step, the customer is required to generate an Outlook Anywhere migration endpoint. This migration endpoint will be used by all the migration batches. It includes the credentials as well as setting that is required to connect host on-premises server.
Step 6. Mailboxes Migration
In this step, the customer needs to create an individual Staged Migration batch for each created CSV file.
Step 7. Staged Migration Batch Start
In this step, you need to ensure that the Staged Migration batch is in the process. In the Migration Dashboard, its process can easily be analyzed. In case you find any issue, then you can review its log file.
Step 8. On-Premises Mailboxes Conversion to Mail-Enabled Users
This conversion step is required to enable that the migrated users can easily get to their emails.
Step 9. Direct Email Routing to Office 365
Email system uses MX record to search the delivery location of email. Initially, it is set to the on-premises email system. But the moment the migration process is completed, it is to be directed to Office 365. Usually, MX record requires 72 hours to get adapt to the change.
Step 10. Staged Migration Batch Deletion
During this step, the customer needs to ensure that all the emails being routed are perfected to Office 365 mailboxes. Upon successful verification, Staged Migration batches can be deleted quickly by following certain simple steps.
Step 11. Post Migration Tasks Completion
Post migration, certain tasks need to be accomplished. These tasks are: Office 365 user migrated accounts activation via licenses assignment, Autodiscover DNS record creation to get to mailboxes effortlessly, and decommissioning the on-premises Exchange server.
Steps to Migrate Exchange Mailboxes to Office 365
1. Go to Exchange Admin Center
2. Navigate to Recipients and select Migration
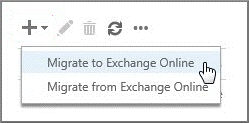
3. Click on New+ icon and select Migrate to Exchange Online option
4. The Select a Migration Type screen will pop up. Here, select Staged Migration option
5. Click on Next
6. Now, on the Select the users screen, just browse and choose the desired CSV File that you want for the migration batch
7. Now, Office 365 Verification process will take place for CSV validation. It ensures the following—it is not empty, it is back by comma-separated format, it does not include more than 2,000 rows, it uses the required Email Address column, and all rows have same column number as the header row.
8. A screen with a number of CSV File listed users will be displayed.
9. Click on Next.
10. On the Confirm the Migration Endpoint screen, authenticate the migration endpoint information
11. Click on Next
12. When the Move Configuration screen pops up, type the name of the migration batch and click on Next.
13. On the Start the Batch screen, select the desired option — Auto Start or Manual Start
14. Now, click on New to create the migration batch
15. Now, go to Exchange Admin Center, select Recipients, and further select Migration
16. From the Migration dashboard, choose the desired batch and click on Start option
17. If the Migration Batch has started successfully, you will see a Syncing status on the dashboard.
Now, the Staged Migration process is complete.
An Easier Way to Migrate Mailboxes from Exchange to Office 365
Undoubtedly, the traditional migration approach is effective. However, it tends to be lengthy and requires manual intervention. This means that users with technical expertise may find it manageable to perform mailbox migrations from Exchange to Office 365 using the Staged Migration method. However, users without sufficient technical skills may face challenges, including the risk of data loss or disruption.
To avoid such issues, a reliable third-party migration tool like Stellar Migrator for Exchange can be used to streamline the process.
Stellar Migrator for Exchange is not only fast and efficient but also eliminates the need for complex manual steps, reducing the risk of errors during migration.
Steps to Migrate Exchange Mailboxes to Office 365 Using Stellar Migrator for Exchange:
- Launch Stellar Migrator for Exchange.
- Select the source Exchange environment.
- Choose the mailboxes or Public Folders you want to migrate.
- Authenticate and connect to the target Office 365 tenant.
- Map source mailboxes to destination mailboxes.
- Start the migration process.
- Once completed, verify the migrated data in Office 365.
Stellar Migrator for Exchange: An Overview
A trusted solution for Exchange administrators, IT professionals, and organizations, Stellar Migrator for Exchange supports seamless migration of mailboxes and Public Folders from all major versions of Exchange Server—including 2010, 2013, 2016, and 2019—to Office 365 or Microsoft 365.
This intuitive tool is designed to ensure smooth, error-free migration with minimal effort. It retains all mailbox items—including emails, contacts, calendars, attachments, journals, and more—and offers full or selective migration as per your requirements.
The software is compatible with Office 365, Microsoft 365, and all modern Exchange Server environments. Its simplified interface makes it easy to plan and execute complex migration projects without downtime or data loss.
The Way Forward
Staged Migration is commonly used for transitioning from older versions of Exchange, such as Exchange 2003 and 2007, to Office 365 or Microsoft 365. However, this method can be complex, time-consuming, and prone to issues like service interruptions and email delays.
To overcome these challenges, organizations can rely on Stellar Migrator for Exchange, which offers a simpler, more efficient path to migrate mailboxes and Public Folders—ensuring business continuity and a smooth transition to the cloud.