Many organizations, using older Exchange Server versions such as the Exchange 2007, are moving to cloud-based email solutions, such as Microsoft 365 as it offers flexibility and better data security. However, Exchange 2007 to Microsoft 365 migration is not an easy task as it requires extensive planning and preparation processes.
To ease the Exchange 2007 to Microsoft 365 migration process, in this article, we will be highlighting one of the simplest ways to migrate all existing and deleted Exchange mailboxes from Exchange 2007 to Microsoft 365. However, before we go to that, let us have a quick look at different ways to migrate Exchange to Microsoft 365.
Methods to Migrate Mailboxes from Exchange 2007 to Office 365
Here are some methods you can use to migrate mailboxes from on-premises Exchange Server 2007 to Office 365.
1. Cutover Migration
When you migrate the contents of user mailboxes from Exchange 2007 to Office 365 as a part of Office 365 deployment at one time, it is referred to as Cutover Migration. It is one of the most advisable methods for Exchange 2007 to Office 365 migration. However, you should use this method if the number of mailboxes is less than 2000.
2. Staged Migration
When you migrate user mailboxes from Exchange to Office 365 as a part of Office 365 deployment over time, it is referred to as Staged Migration. This type of migration is used to move mailboxes in batch and you can use it if the total number of mailboxes to be moved from Exchange 2007 to Office 365 is more than 2000.
3. IMAP-based Migration
If your Exchange Server supports Internet Message Access Protocol (IMAP), you can use this technique to complete the migration too. However, with this method, you will only be able to move the items in the user's email folders. Contacts, calendar items, and tasks cannot be migrated with IMAP. This method also does not create mailboxes in Office 365. You will have to create the mailbox for each user before migrating their emails.
You can view the detailed steps of the IMAP-based migration in this article: Migrate IMAP mailboxes to Microsoft 365 or Office 365.
Now that you're clear on the options available for Exchange 2007 to Office 365 migration, let's see which of them suits your purpose best and how.
Useful Tip: Plan your migration with Exchange Server Deployment Assistant Tool.
The Simplest Way to Perform Exchange 2007 to Office 365 Migration
Particularly, you need a migration technique that's capable of working with Exchange 2007. Since the Hybrid Migration technique is not available for Exchange 2007 and IMAP method has several limitations, you are left with the Cutover and Staged Migration techniques to migrate Exchange 2007 to Office 365.
Based on the number of user mailboxes in Exchange 2007, you can choose whether you want to follow the Cutover Migration or Staged Migration.
Steps to Migrate Exchange 2007 to Office 365 by using Cutover Migration
Below, we've discussed the steps to perform Cutover Migration from Exchange 2007 to Office 365.
Before Migration
- Always plan and test the migration technique on test servers before the actual implementation
- Backup Exchange mailboxes and database files
Step 1: Plan Migration
Before moving Exchange 2007 to Office 365, you need careful planning. Consider the following points before you begin the migration:
- Communicate changes to users
- Enable Outlook Anywhere (OA) on your on-premises Exchange 2007 (if not already)
- Get a certificate issued by trusted Certification Authority (CA) with OA and Autodiscover services
- Check if you can connect to Exchange by using OA (outside the network). You may also use Microsoft Exchange Remote Connectivity Analyzer
- Assign Full Permission access for all mailboxes on Exchange 2007 to the user (Administrator) account that you are going to use for Exchange 2007 to Office 365 migration
- Disable Unified Messaging before migration
- Create security groups if you want security groups in Office 365
Step 2: Testing the Existing Setup
For this process to work, the Exchange 2007 infrastructure should support Outlook Anywhere (RPC over HTTP) and Autodiscover. Verify it by using the guide from Exchange Deployment Assistant. Then, use the MS Remote Connectivity Analyzer (RCA) to verify Outlook Anywhere (RPC over HTTP). Assign all required permissions to the mailboxes that are to be migrated by following these steps:
- Open the RCA website.
- Select the Outlook Anywhere (RPC over HTTP) test.
- Click Next.
- Enter all the required information.
- Enter the Verification code and then click on Perform Test.
If the process fails or gives warnings, refer the guide and correct any mistakes before attempting again. If the test is successful, continue to the next step.
Step 3: Configure and Start Cutover Migration
For this, follow the given steps:
- Login to Office 365 Admin Center and then open the Exchange Admin Center (EAC).
- In EAC, click Migration and then click on the + button.
- From dropdown options, choose Migrate to Exchange Online.
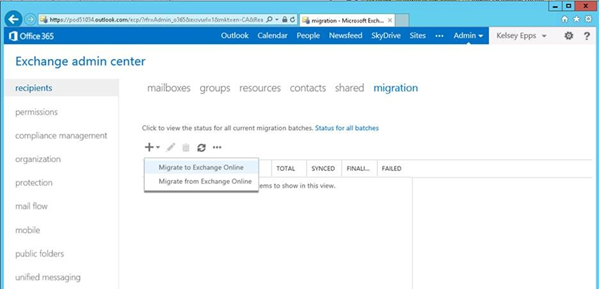
- Then, select Cutover Migration… and then click Next.
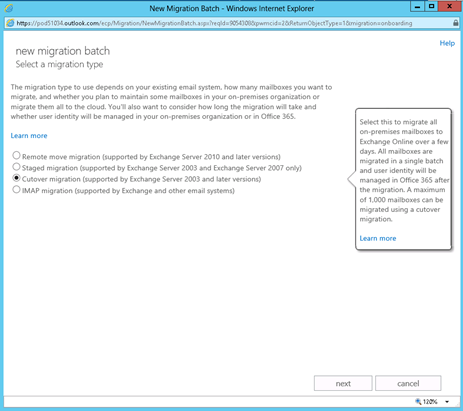
- Enter the on-premises account details and click Next.
- Provide a name for the New Migration Batch and click Next.
- Select a recipient for the migration report at the end of the process. You may select multiple accounts here.
- Choose to 'Automatically start the batch' or 'Manually start the batch later' depending upon your readiness.
- Click New to create a new migration batch. Its status should be syncing.
This will take a while to complete based on the number of accounts and the amount of data. You can view migration details by clicking View Details under the Mailbox Status.
Step 4: Completion of the Migration
After the sync is complete from Exchange 2007 to Office 365, a report is emailed to complete the migration process. Once done, perform the following tasks:
- Migrate Public Folders to Office 365
- Assign Office 365 licenses to the users
- Verify and update all the DNS records and point towards Office 365 services
- Configure the systems to use Office 365 services
- Once done, stop the batch migration job
At this point, you can decommission the Exchange 2007 Server.
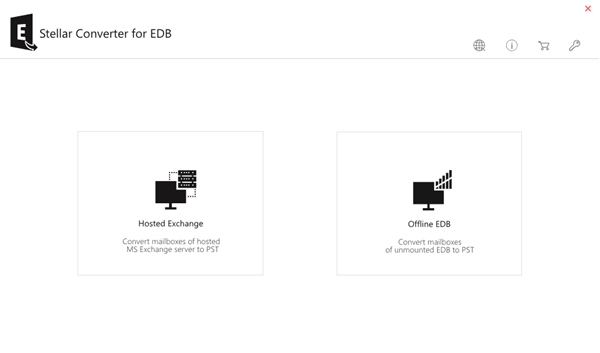
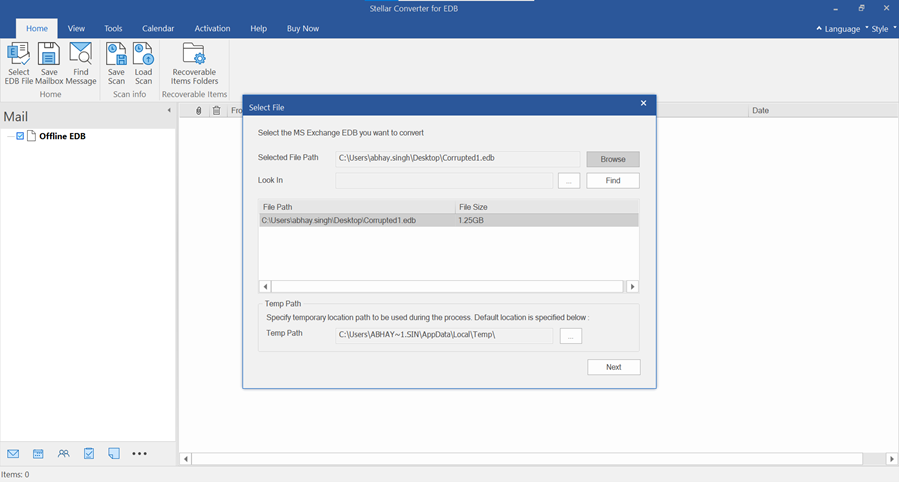
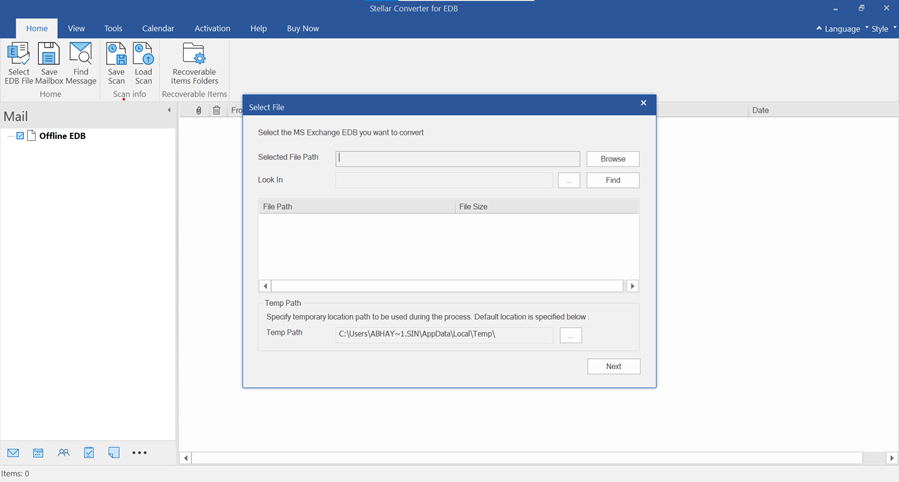
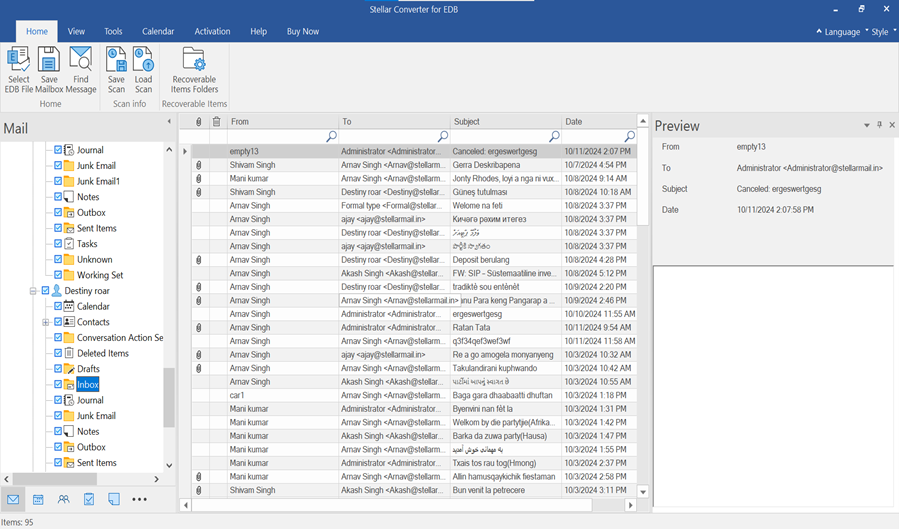
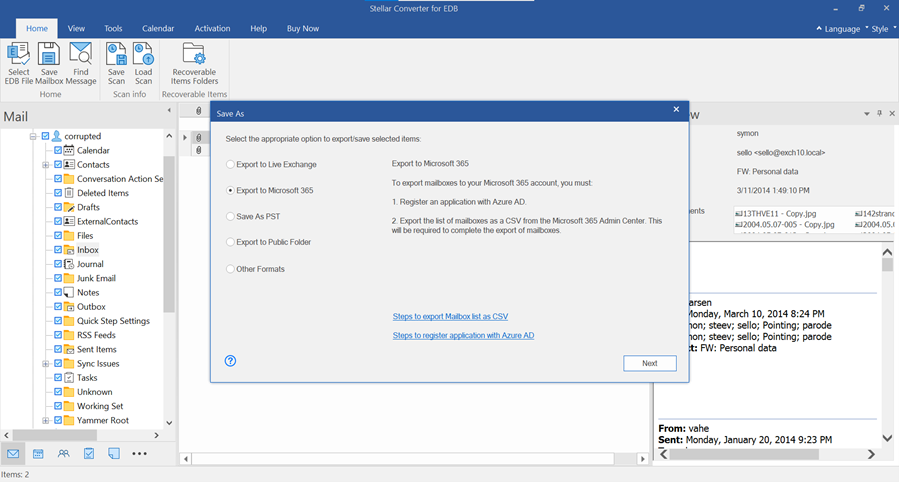
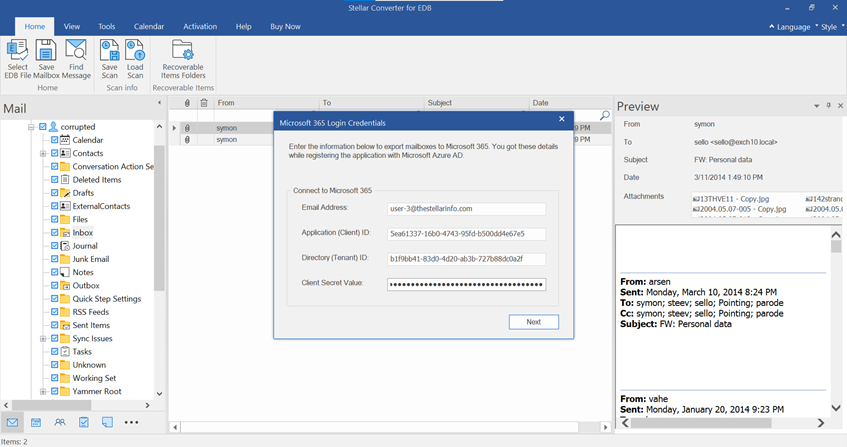
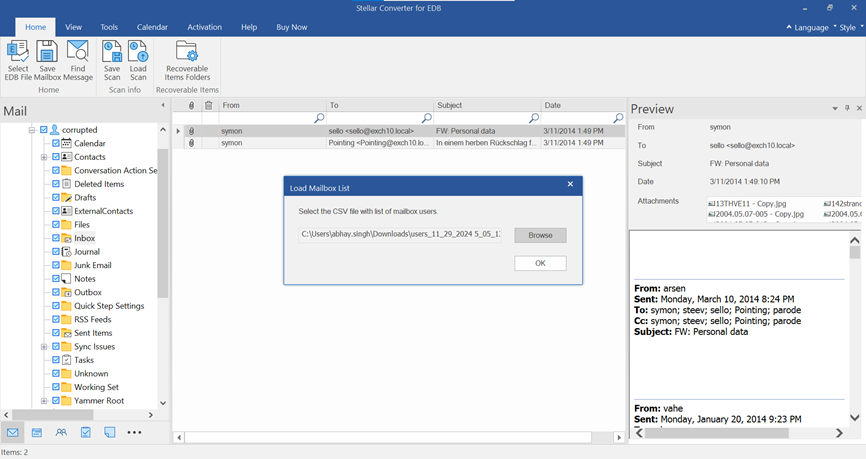
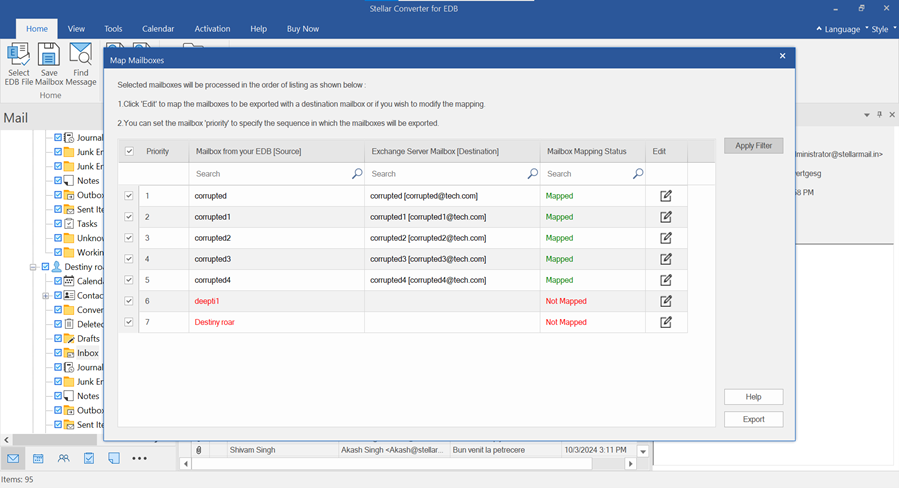
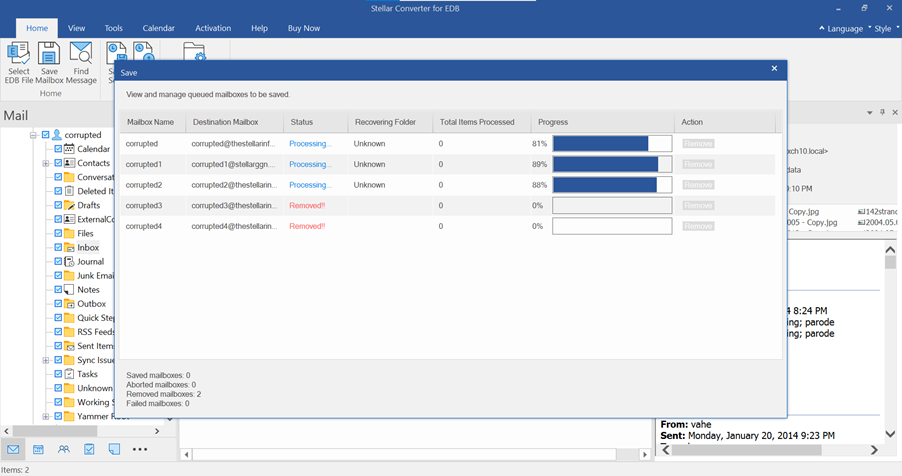
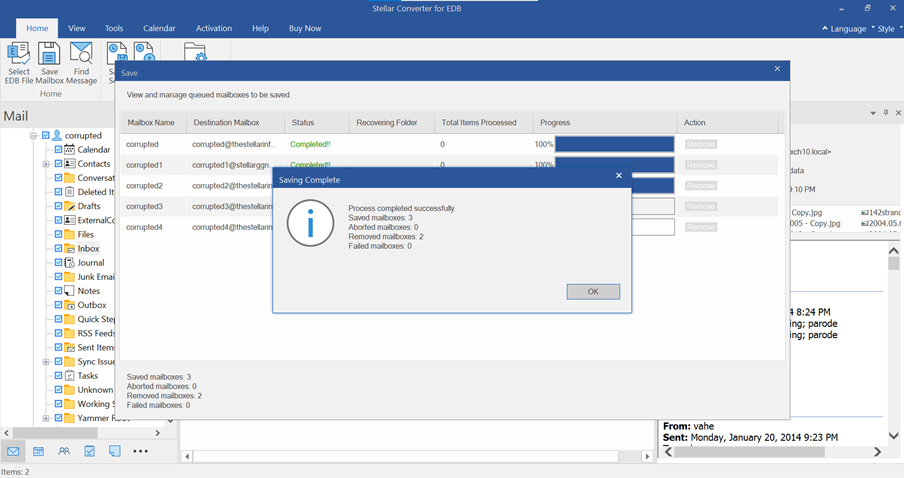
Migrate Mailboxes from Exchange 2007 to Office 365 using Stellar Converter for EDB
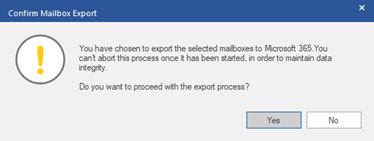
Though the above-mentioned methods seem simple, it might be a tedious job for beginners. You may also receive errors. In addition, there may be a risk of losing some data during the manual Cutover Migration process. To avoid all the hassles and make the Exchange 2007 to Office 365 migration process easier, export the mailboxes from Exchange 2007 database file (EDB) to Office 365 directly with the help of Stellar Converter for EDB.
Here are the steps to migrate mailboxes from Exchange 2007 to Office 365 using Stellar Converter for EDB:
Conclusion
Above, we have explained different methods to migrate Exchange 2007 to Microsoft 365. Based on the number of mailboxes, you can choose between Cutover, Staged Migration, and IMAP-based migration methods. For a simpler and more efficient migration, you can opt for Stellar Converter for EDB. This powerful EDB converter software allows you to directly export mailboxes from Exchange 2007 EDB files to Microsoft 365. This software can auto-map the mailboxes and process 8 mailboxes at a time. This helps speed up the migration process, thus reducing downtime.


 6 min read