There are numerous features in Windows that Mac lovers desire. This is one of the reasons why many Mac users are looking for ways to combine the benefits of both operating systems. You can accomplish this in various methods, which this article will cover further below.
However, you might encounter problems while attempting to install Windows on a Mac using Boot Camp Assistant. The most typical issue one may face when downloading Windows operating systems on a Mac system is the “Your Bootable USB Cannot be Created” issue on Mac. If you are one of the users experiencing this problem, don’t worry! There are several options for resolving this issue described below.
What is a Boot Camp Assistant?
Boot Camp technology allows you to install Windows on a Mac computer as an additional system on a separate hard disk partition. When you turn on or restart your computer, you will be able to choose which OS to run— Mac or Windows. It’s not as convenient as using remote desktop apps as you have to restart your Mac each time you want to convert from Windows to Mac or vice versa, but each OS will have higher performance.
Reasons for Getting “Your Bootable USB Cannot be Created” Issue on Mac
As Boot Camp is a helpful tool that can boot computer systems from a USB drive rather than a computer. However, it will occasionally crash. Here are some reasons why it may happen:
- The USB format is incompatible with macOS.
- The bootable USB is not recognized as a boot device.
- The bootable USB is not seen or acknowledged in the BIOS.
- The process is stuck on the boot menu screen and can’t move on.
- It can’t boot from USB, even after selecting the correct boot option.
Steps Before Fixing “Your Bootable USB Cannot be Created” Issue on Mac
Before you repair the problem, back up your vital data to ensure that you can restore your information if any of the processes fail.
If you create a backup of macOS, you can recover all of your data if you lose it.
Here is how to make a backup of your Mac with the help of Time Machine:
1. Plug in an external HD to your Mac.
2. Open Time Machine. In the top left corner of the screen, select Apple Menu > System Preferences > Time Machine.
 System Preferences > Time Machine
 3. Then choose the Select Backup Disk option.
 Time Machine > Select Backup Disk
 4. Select the needed disk to upload a backup and click the Use Disk button.
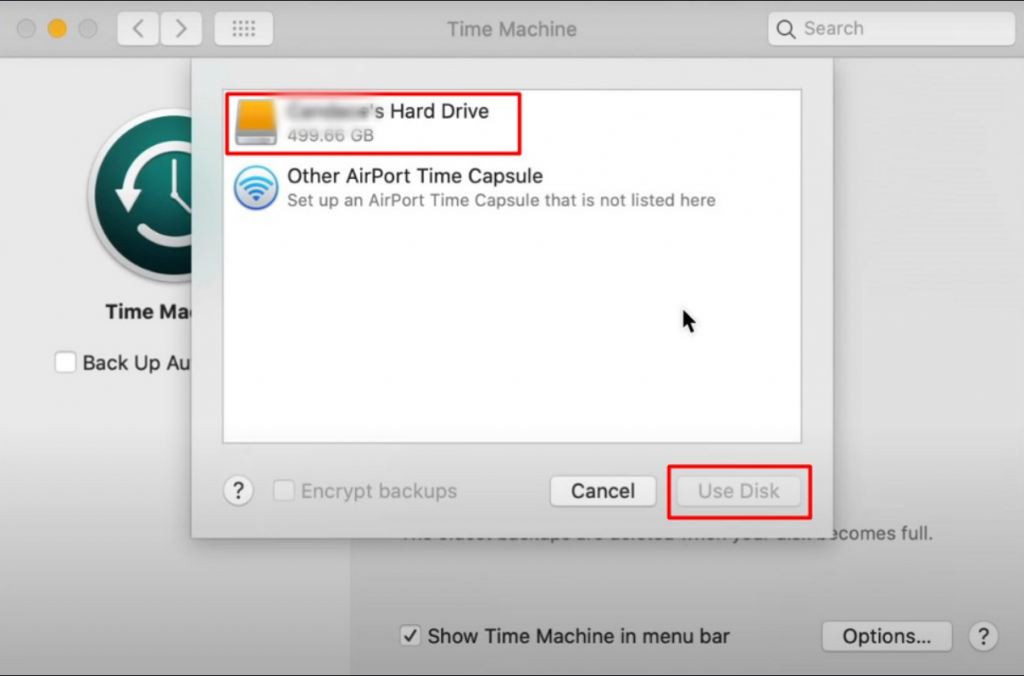 Time Machine > Select Backup Disk > Use Disk
 When the procedure is completed, you will have a backup of your Mac on the external device.
How to Fix “Your Bootable USB Cannot Be Created” Issue on Mac?
In this part, we will go through how to fix your bootable USB drive that isn’t working.
First, try the bootable USB device on a different computer if possible. If the bootable USB flash drive starts on the other computer, the issue is with the device, not the bootable USB flash drive.
If not, proceed with the solutions below.
1. Check the Mac Storage and RAM
One of the first things you should verify before installing Windows is whether your Mac system has enough space.
To run Boot Camp and install Windows, your Mac system must have at least 2 GB of RAM and a hard drive capacity of approximately 30 GB. If your Mac is running out of space, clear it out by eliminating unnecessary files before reinstalling Windows.
2. Update macOS
The outdated macOS version is another reason you may receive the “Your Bootable USB Cannot Be Created” issue while installing Windows on your Mac. You can update macOS to the most recent version by following the steps below:
1. Go to the Apple menu.
2. Choose About This Mac > Software Update.
 About This Mac > Software Update
 3. In the opened window, search for new macOS updates. If it finds any, click Upgrade Now to get the latest update.
 About This Mac > Software Update > Upgrade Now
 3. Unmount ISO Image File
Boot Camp could not generate a bootable USB drive is a common issue when installing Windows on a Mac system. You can unmount the ISO file to resolve this and other issues connected with the USB.
To eject the ISO file is very easy:
- Right-click on the needed ISO image file.
- Select Eject
- Start Boot Camp Assitant again to create the bootable USB.
4. Create Another ISO File with Windows
If you’ve tried everything and still can’t get Windows 10 to install on your Mac, you can try creating a Windows 10 Boot Camp USB installer. Follow the procedures outlined below to create the new image file with Windows.
1. Erase the USB you will use as the bootable image.
- Open Disk Utility.
- Select the needed disk.
- Click Erase as an MBR/FAT32 file.
2. Download and save the Boot Camp Assitant drivers from Apple to the flash drive.
3. Copy all files from the Windows 10 ISO to the flash drive.
4. Using the Disk Utility, create a FAT32 partition.
5. Start the computer from the USB drive and choose the FAT32 partition as the destination.
How to Recover the Files if They were Deleted During the Fix?
If your files were lost or just disappeared from your Mac while fixing the “Your bootable USB cannot be created” issue, you will need to recover your Mac from the backup. To do that:
1. Open the Utility window. The instructions differ depending on the Mac type.
- Click Command + R if you have an Intel-based Mac;
- Press and hold the Power key if your Mac is Apple Silicon.
2. Choose Restore from Time Machine backup > Continue.
3. Select the disk you want to restore your files from.
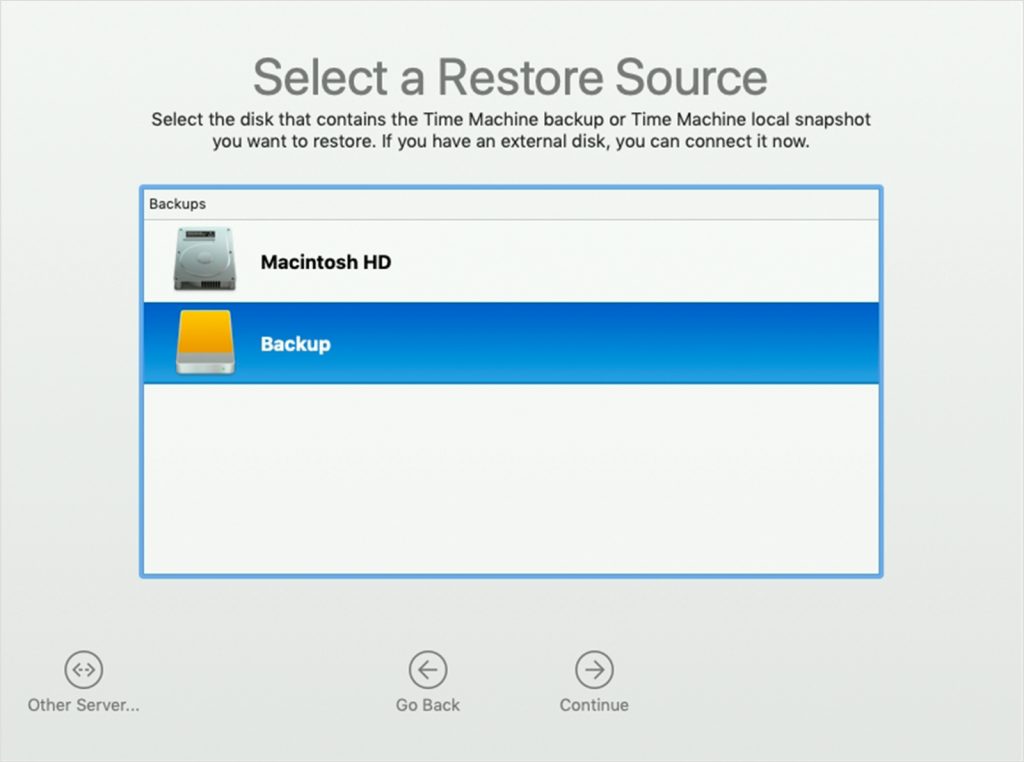 Select Restore Source
 4. Choose a needed backup date and the destination on your Mac > click Restore.
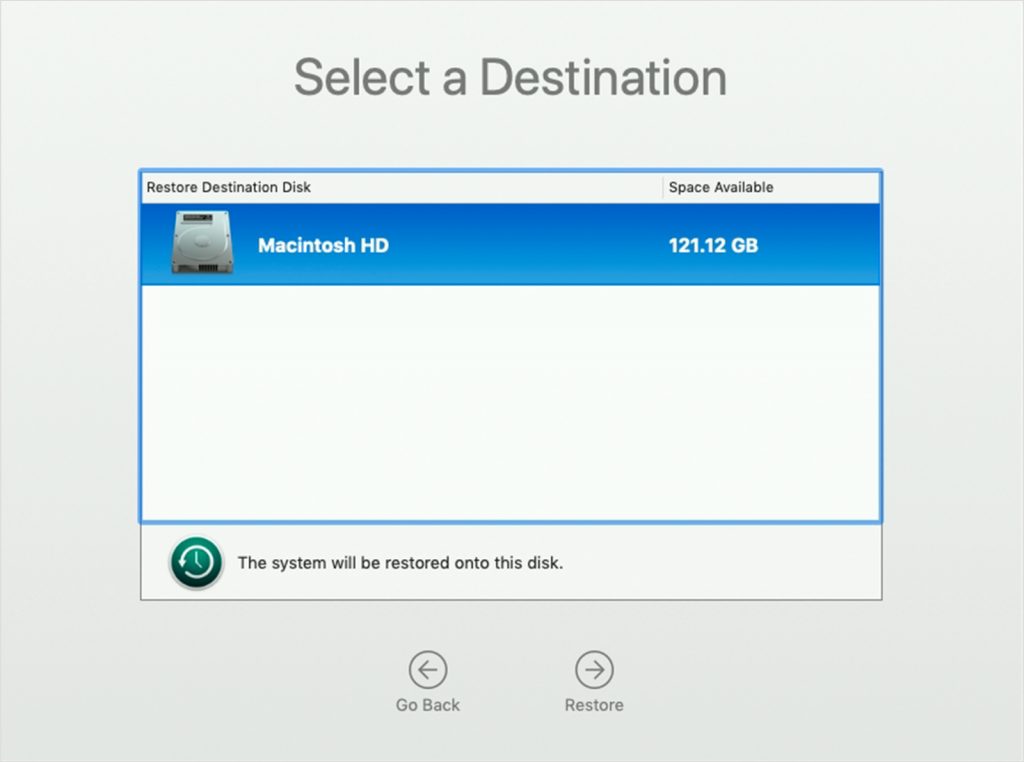 Select a destination to backup
 5. Finally, restart your Mac.
You can also recover your Mac with a restoring application like Stellar Data Recovery Professional for Mac to recover disks and information stored there.
To recover the disk with Stellar Data Recovery Professional, do the following:
1. Download and install Stellar Data Recovery Professional for Mac software.
2. After you run the application, you need to pick the file types you want to recover. You can recover specific files or recover everything and click Next.
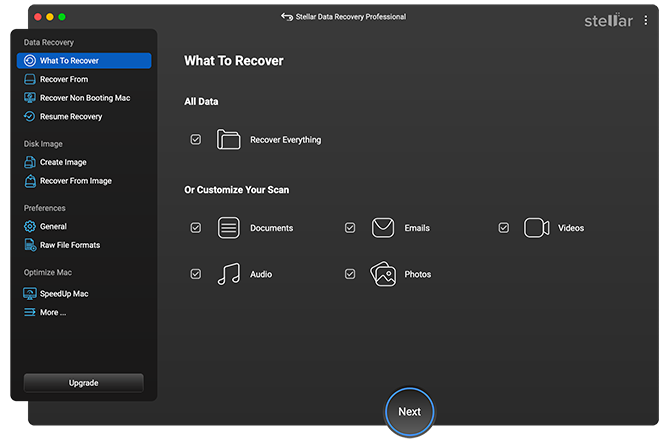 Stellar Data Recovery Professional > Select What To Recover
 3. Select the drive from where you need to recover data and click Scan.
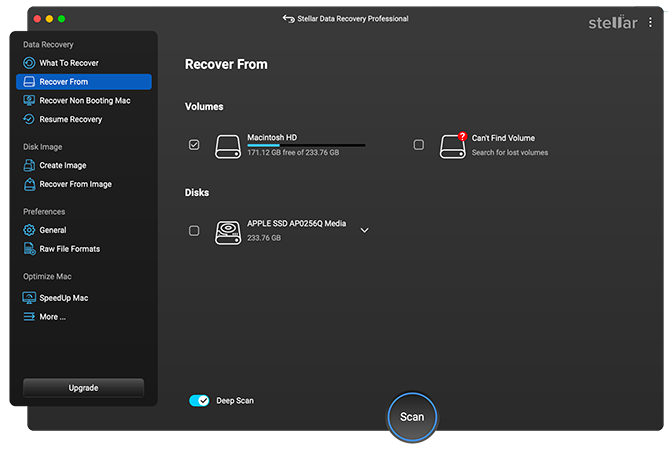 Stellar Data Recovery Professional > Recover From
 4. When the scan is completed, go through the files and select the ones you want to restore.
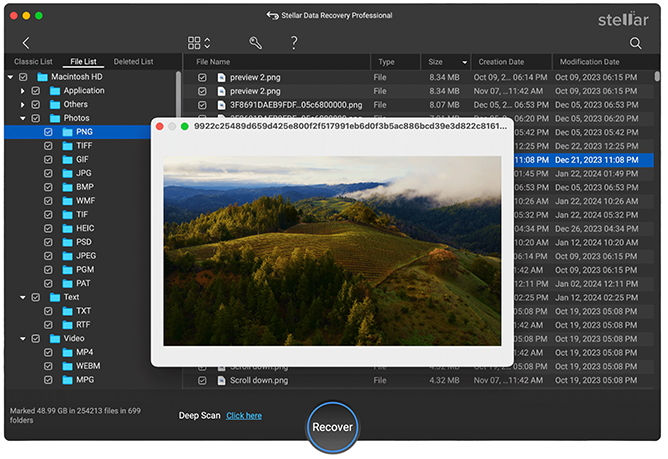 Stellar Data Recovery Professional > Preview
 5. Click on Recover to finish.
Wrapping Up
The above solutions should resolve the error message “Your bootable USB cannot be created.” Installing Windows on a Mac may be difficult for beginners who are only vaguely familiar with Boot Camp Assistant. Mac users can easily perform fixes or run installations on Windows-based systems with the help of a bootable Windows USB.
Read more: