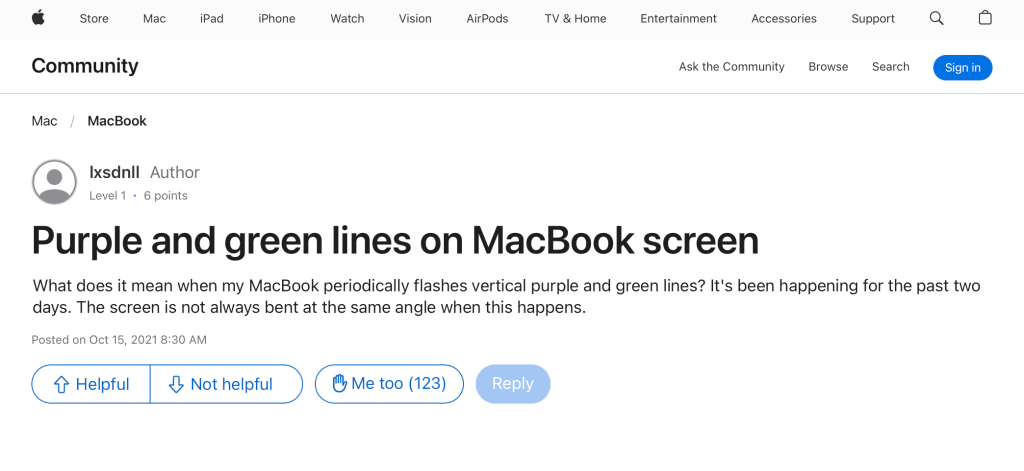
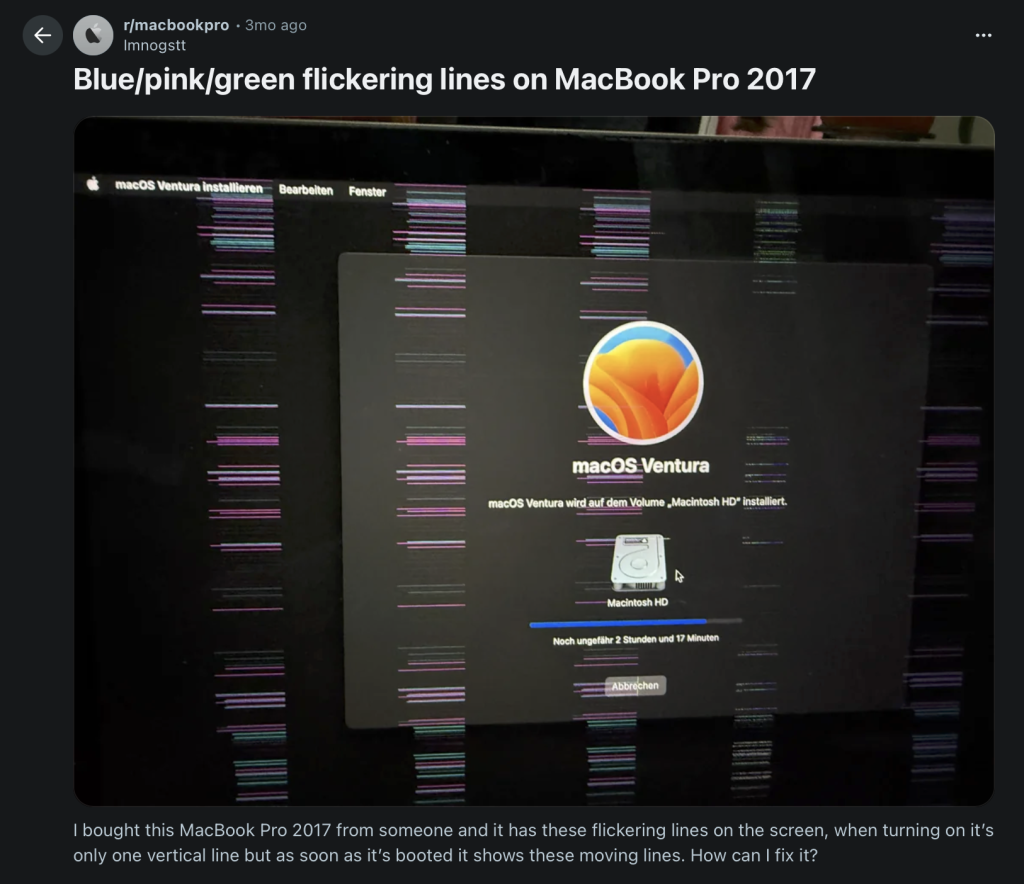
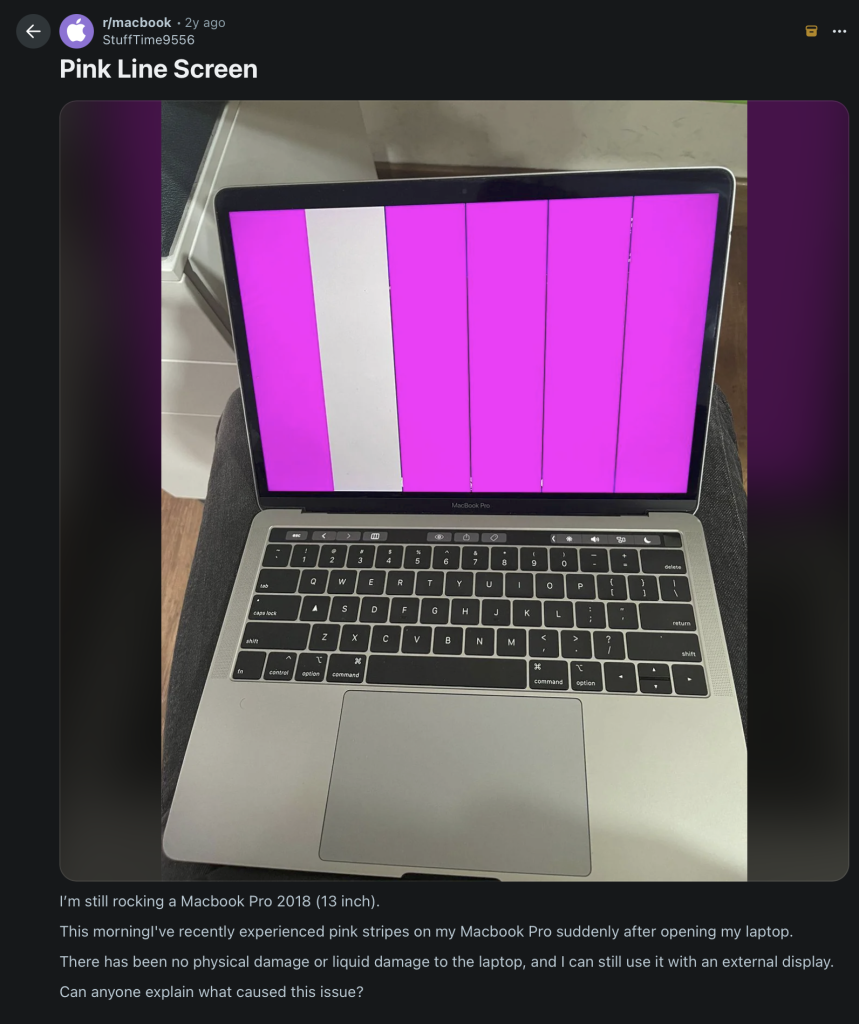
Have you ever booted up your Mac only to see weird colored lines… Those pink, blue, green or purple streaking across the screen? It can be startling but you are not the first to see that. Mac users often report seeing colored vertical or horizontal lines on MacBooks, iMacs, Mac minis, or even those Mac Pros.
These lines can be caused by a faulty display panel or a loose cable (hardware-related), or it can be a graphics-related issue. The key here is to identify the root cause of the issue and then proceed. Luckily for you, the good news here is that we’ve compiled the recommended methods for both the cases that you can try. In this guide, we’ll explore all the known ways to fix or diagnose colored lines on your Mac’s display.
What are the Best Methods to Fix Colored Lines on Mac?
Now let’s go through all the methods you can try. We start from the simplest and move to more technical ones. After each one of them, we’ll note what to check or do next.
Quick Navigation
- Restart Your Mac
- Take a Screenshot to Identify the Issue
- Try an External Display or Port
- Calibrate the Display
- Reset NVRAM and SMC
- Boot Mac in Safe Mode
- Update macOS
- Run Apple Diagnostics
- Reseat Internal Display Cable
- Reinstall macOS
Method 1: Restart Your Mac
First just try the simplest fix: restart your Mac. Believe it or not… a plain reboot can clear many minor glitches as it clears your system’s temporary GPU memory and resets its display driver state. Let’s do it:
- Click the Apple menu and choose Restart. Confirm and let your Mac reboot in peace.
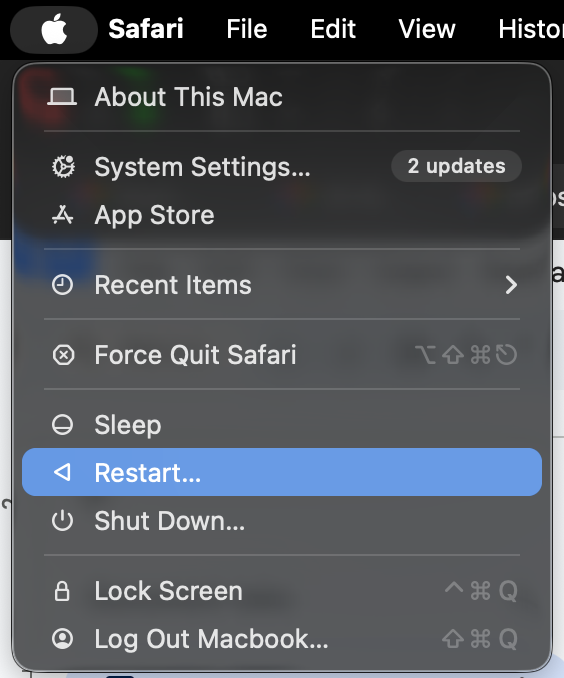
- After restarting, check those lines if they are there or not.
If the lines just disappear after a restart, it was likely a temporary software hiccup that came in the way. If they come back, go on with the methods below.
Method 2: Take a Screenshot to Diagnose
This clever trick just tells you if the lines are actually on the display or it is in the graphics output:
- While the lines are visible, press Shift+Command+4 or Shift+Command+3 to take a screenshot.
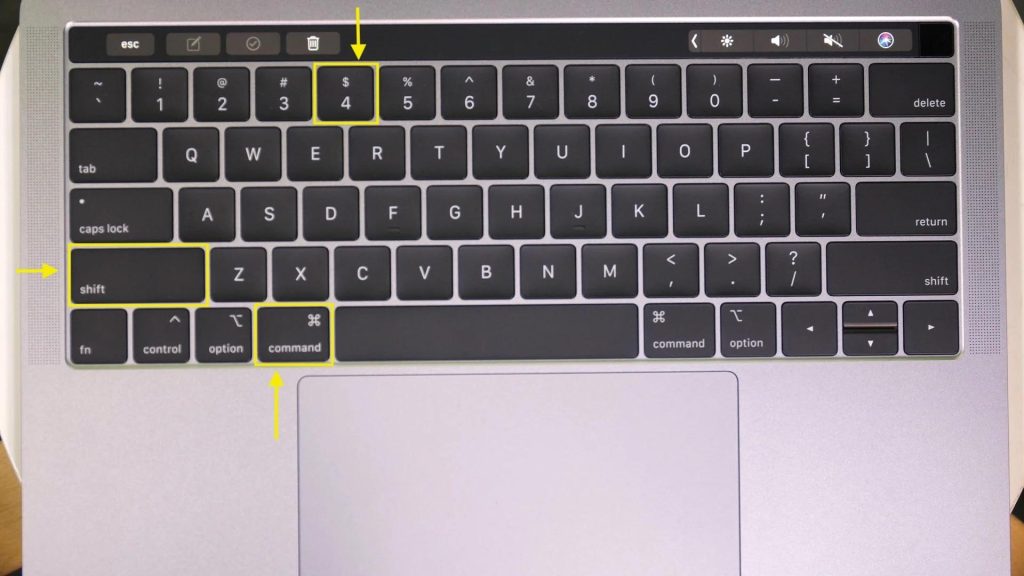
- Open the screenshot image in Preview. Check if the colored lines appear in the screenshot.
- If the lines appear in the image, the GPU is rendering them so it’s a graphics system issue (GPU or Driver) most probably.
- If the screenshot is clean, then the problem is with the cable or the display panel itself and you just need to go out there and change it through Genius Bar or an Apple Authorised Service Provider.
This method we believe is a quick way to pinpoint the culprit. It requires no tools and can save time in diagnosing that hardware vs. software dilemma.
Method 3: Try a Different Display or Port
Testing with another display can help you isolate the issue:
- If you have got a spare monitor, connect your Mac to it using HDMI, DisplayPort, or Thunderbolt.
- If your external monitor works with no lines and those lines appear only on your Mac’s screen, then there’s a problem with your built-in panel or the connecting cable. But if both the external and the Mad display show lines, the problem lies in the Mac’s GPU or logic board.
- Also, switch cable types like DisplayPort instead of HDMI. Faulty ports or adapters can cause issues.
Using an alternate display or port is a good diagnostic step: it tells you if the Mac or the monitor is problematic.
Method 4: Calibrate the Display (Workaround)
You can use this method as a workaround if your display colours are distorted or there are white lines on the display. Calibrating all those colors using the steps down here can keep you going as it might hide those white lines and distorted colours:
Note: This method is not a permanent fix and works only when there are white lines or the colours are slightly distorted.
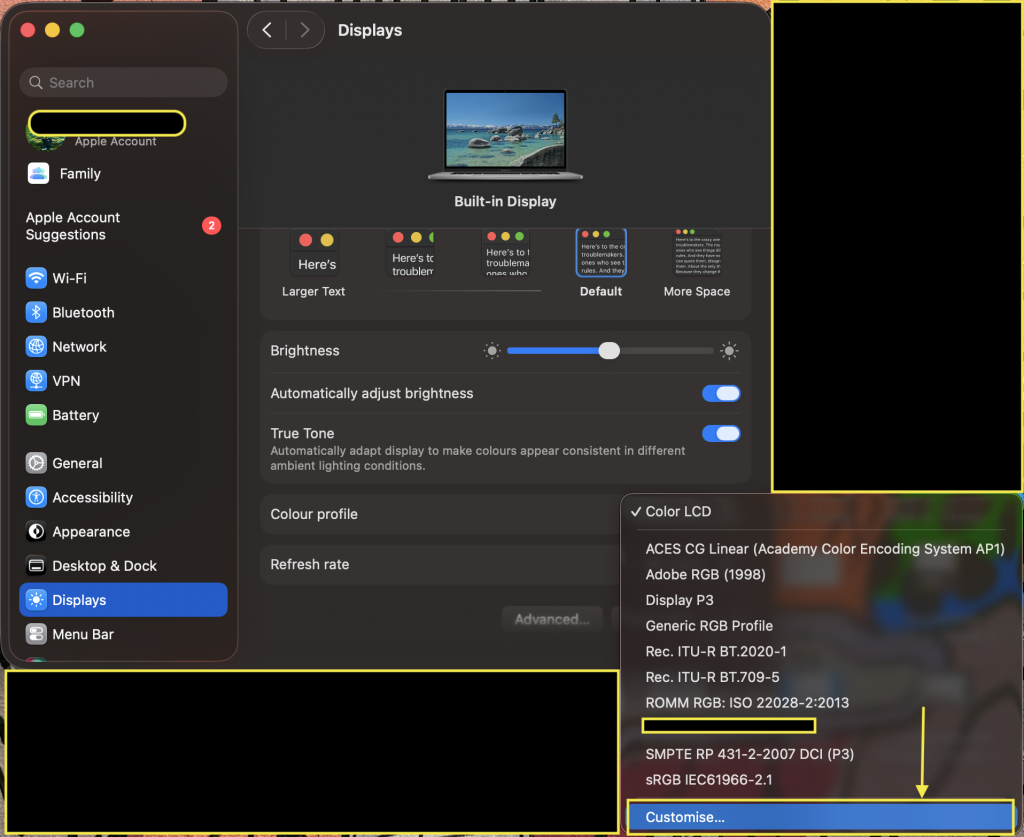
- In System Settings, just navigate to Displays > Color profile.
- From that Colour profile drop-down menu, select Customise.
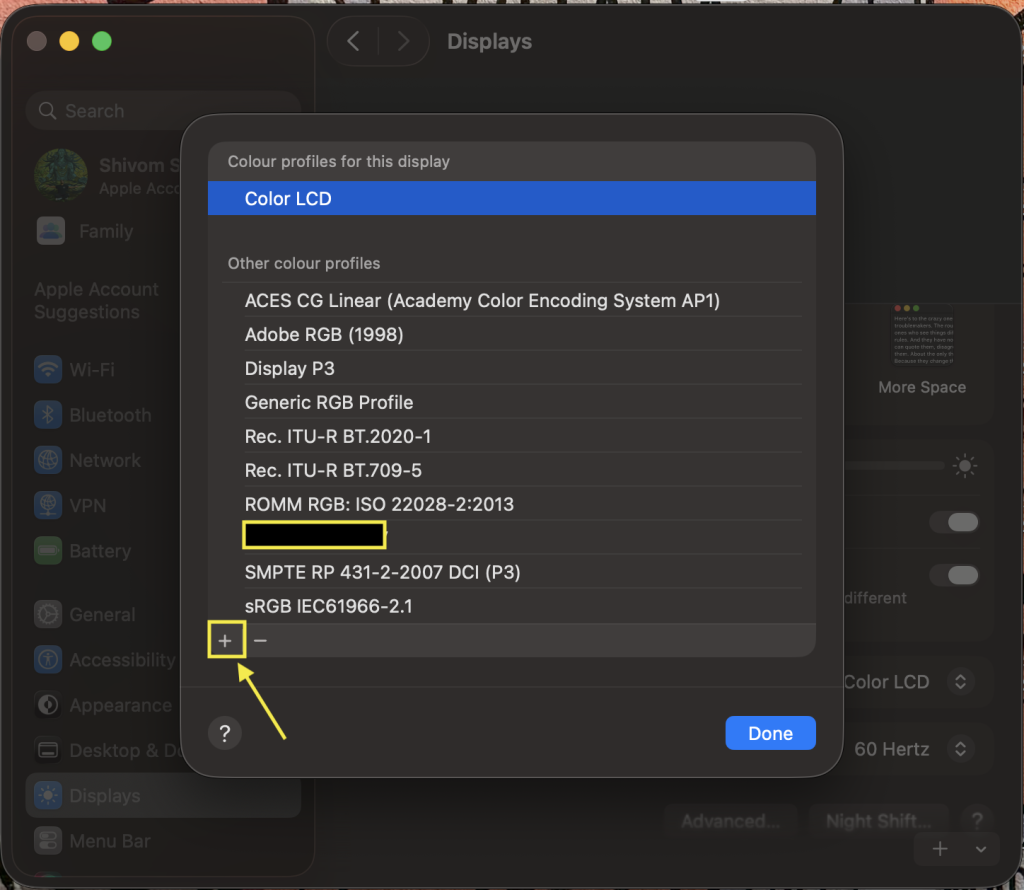
- From the list, click + and it opens the Display Calibrator Assistant.
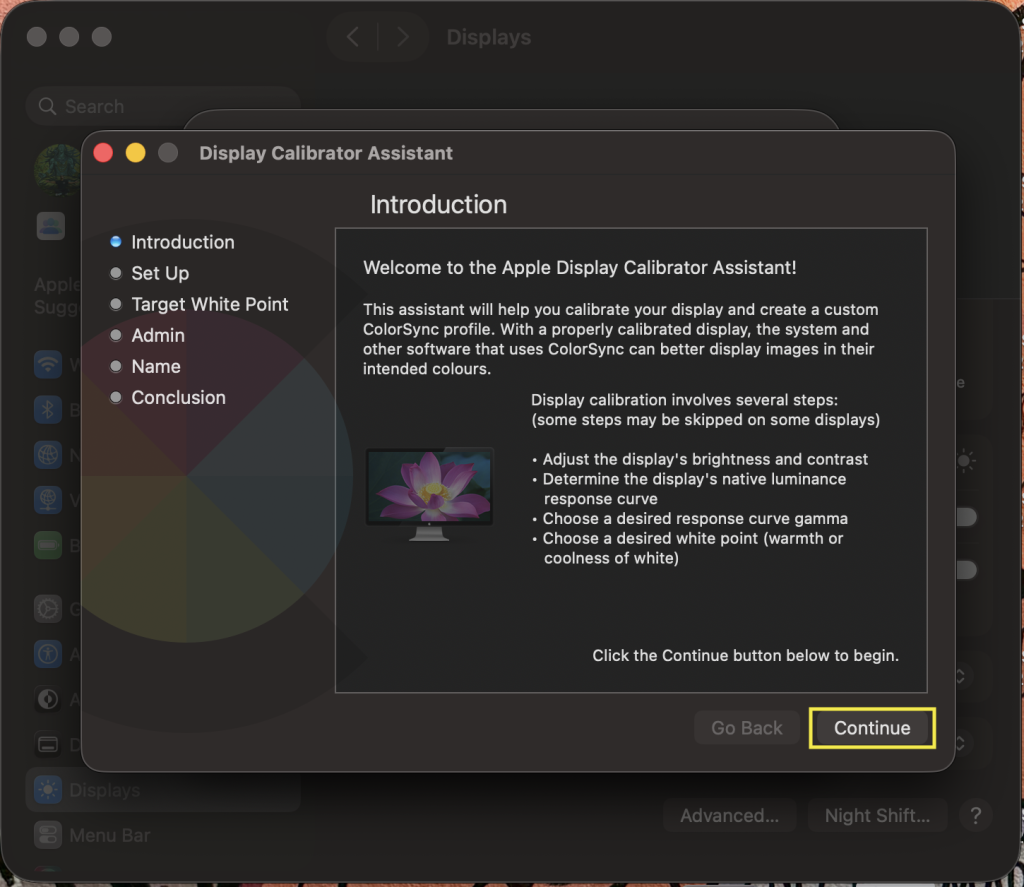
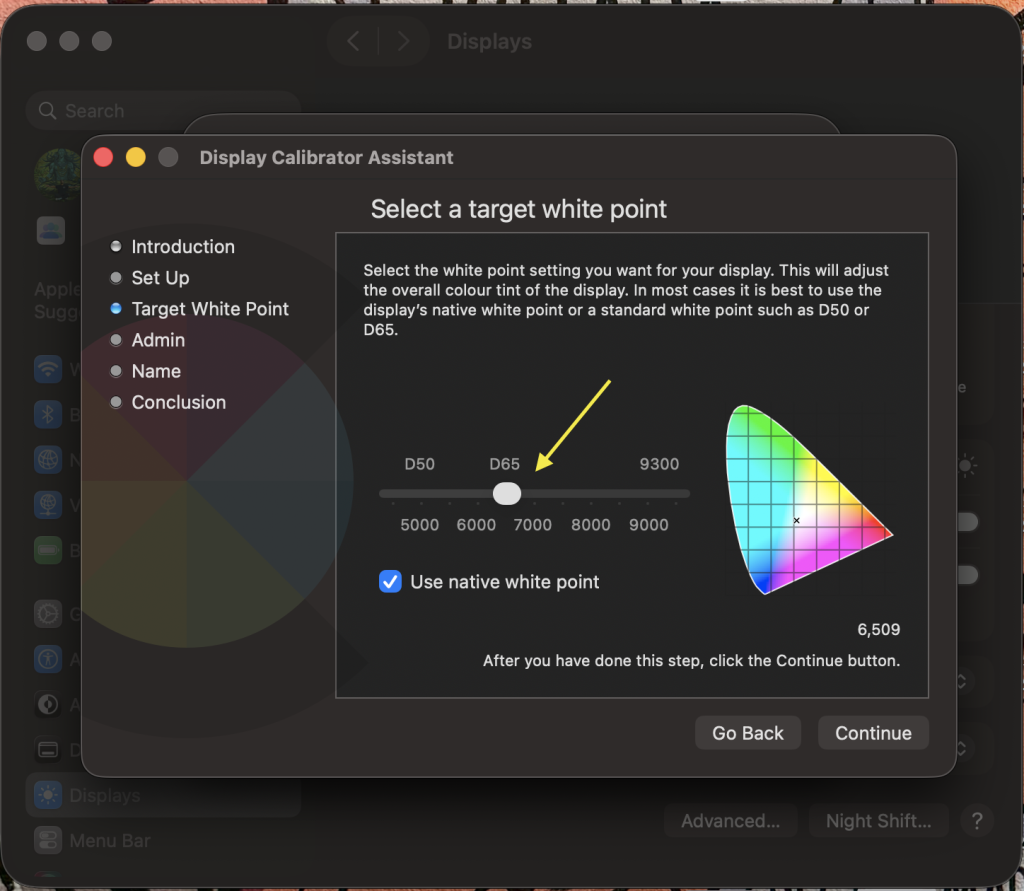
- In the Display Calibrator Assistant, follow the prompts until you see a slider to calibrate colours. Move the white point slider around.
Name and save the profile and see if those unattractive lines starting at your face lessen and if it’s still the same, move on to the next method.
Method 5: Reset the NVRAM and SMC
On many Macs, display and power settings are controlled by those small firmware chips. Note that on Apple Silicon Macs, both SMC functions (integrated into SoC) and NVRAM get reset automatically on restarting. Resetting them can clear annoying issues like those colored lines. For Intel Macs, let’s know how do it:
Note: Since those steps to reset SMCand NVRAM/PRAMvary for different Mac models.
- Reset the SMC. Shut down your Mac, unplug that power cable of yours and wait 15 seconds right there. Now plug it in back there, wait another 5 seconds and then just turn on the Mac. This actually resets the System Management Controller and basically just fixes issues related to device recognition.
- Reset the NVRAM/PRAM. On those good old Intel Macs, restart your Mac and just press and hold Option + Command + P + R for around 20 seconds. Release the keys right there and allow the Mac to just boot normally.
These processes clear those low-level settings and help resolve device conflicts that might have caused those ugly coloured lines.
Method 6: Boot in Safe Mode
Safe Mode starts your Mac with only those essential drivers which can bypass software problems:
- Shut down your Mac right away.
- For Intel Macs: Press the power button and then immediately hold the Shift key until you see the login screen.
- For Apple Silicon Macs: Hold that power button until those startup options appear. Now select your volume, hold the Shift key and just hit that Continue in Safe Mode button.
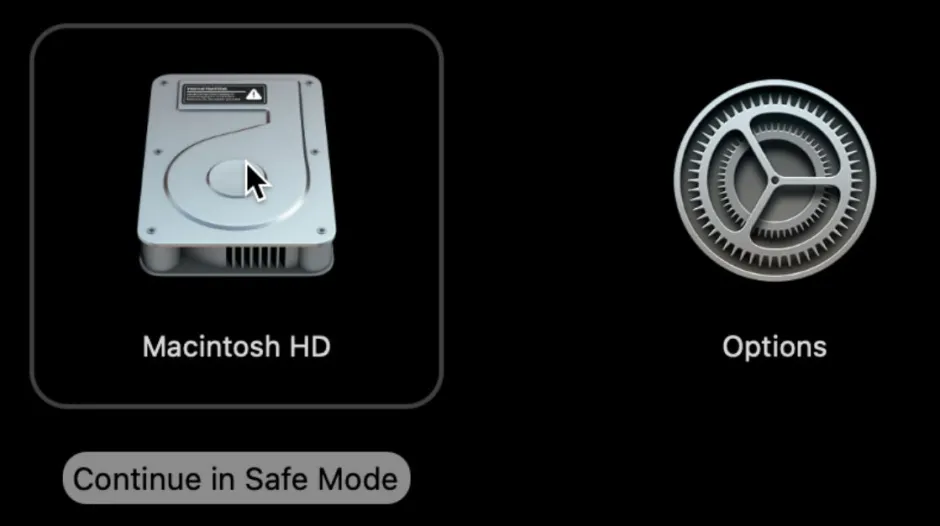
- Log in and see if the lines still appear.
If the colored lines disappear in Safe Mode but are there in a normal boot that suggests a software or driver issue. Go ahead and uninstall recently added apps or updates.
Method 7: Update macOS and Graphics Drivers
Since Mac drivers are updated with macOS, it is a wise move to ensure that your system is fully updated:
- Go straightaway to System Settings > General > Software Update and then hit the Check for Updates button.
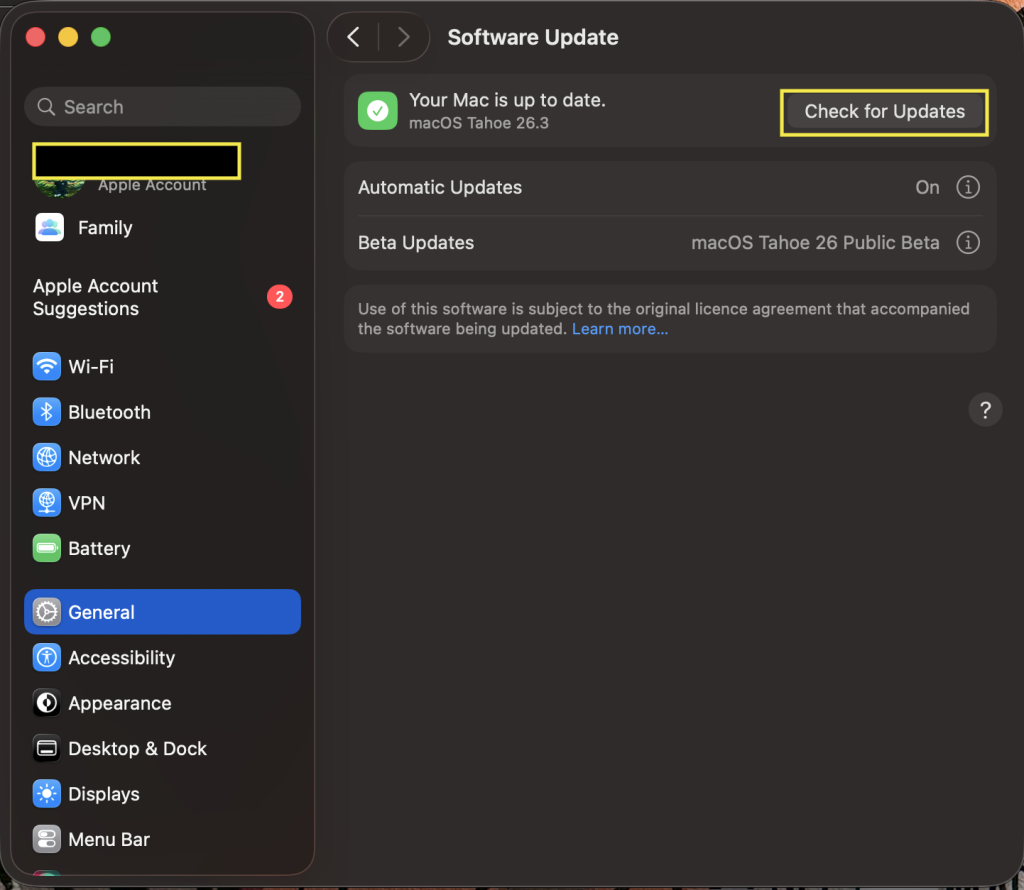
- If an update is available, just go ahead and install it.
Updating basically ensures that you have those latest graphics driver fixes. After you are done with that updating process, just check if the lines are gone.
Method 8: Run Apple Diagnostics
Apple Diagnostics can particularly check for hardware faults and let you know if anything is wrong. Here’s how to go about it:
- Disconnect all your external devices except power, keyboard, and mouse.
- Shut down your Mac.
- Turn on your Mac and immediately press and hold the D key in Intel systems or hold power button > Options > Continue and then instantly press Command-D in Apple Silicon systems.
- Release when you see a diagnostics screen. It will test your Mac and show any error codes.
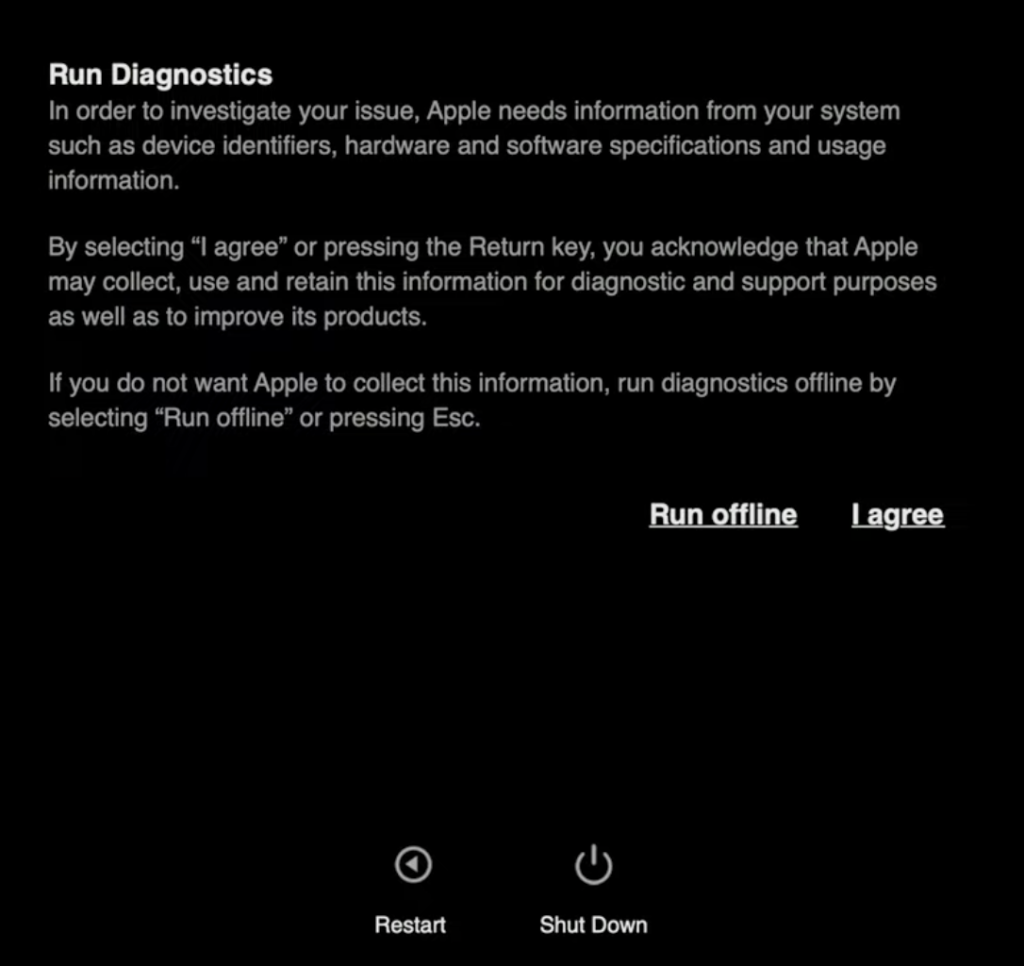
If Diagnostics finds an issue, just take a note of them. This test is a good way to confirm a hardware problem.
Method 9: Reseat Display Cable
Note: Only do this if you have the skills and tools or a Mac expert by your side otherwise just stick to software fixes.
- For older MacBooks, you can get the bottom cover opened with the proper screwdrivers.
- Locate the display cable, often a wide connector near the top of the logic board. Carefully unlock its latch and disconnect it.

- Inspect for any dirt or damage. Re-seat it firmly and lock the latch back.
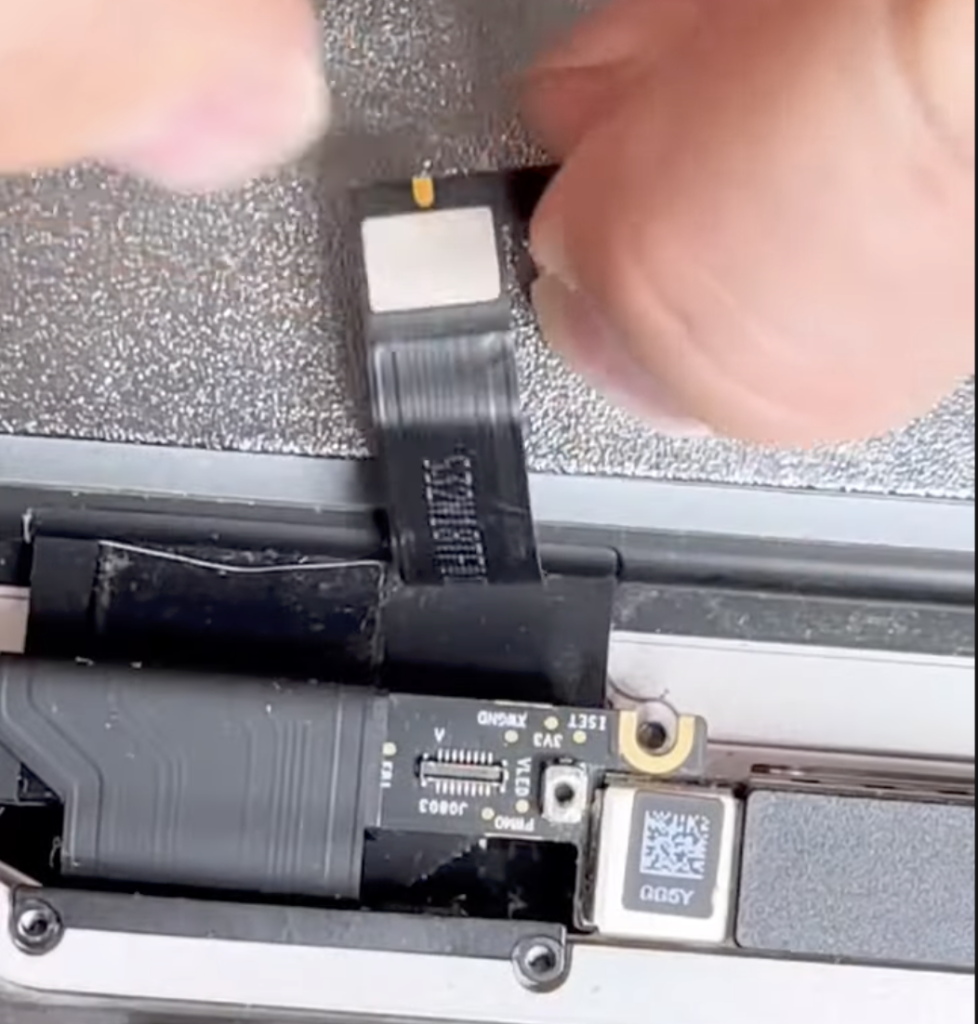
This can fix lines caused by a slightly loose cable or dirty port.
Method 10: Reinstall macOS
If you suspect a deep software issue or nothing else has fixed the lines, try reinstalling macOS:
- Backup your data first (Time Machine or other backup).
- Boot Mac into Recovery Mode and choose Reinstall macOS. After that, you will just have to follow the prompts.
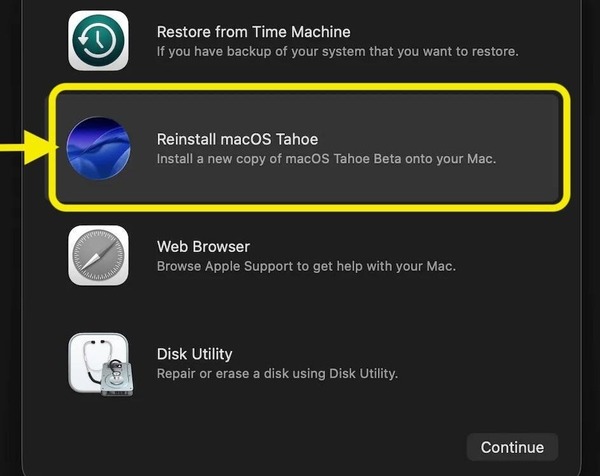
This replaces the operating system without erasing your files. If the lines were due to a rare software/driver bug, a fresh macOS install might clear it.
In rare situations, an interrupted macOS reinstallation, incorrect disk formatting, or improper handling during hardware repairs can result in disk errors or inaccessible data. In such cases, a professional Mac data recovery software can help. It is designed to retrieve your lost files even after those disk issues. Such software can help restore any missing photos, documents or other kinds of data if you find anything lost during the repair process.
Note: After reinstalling, check your display before restoring your entire backup. If the lines are gone, great. If you still see them, the issue is certainly hardware. At this point, contacting Apple Support would be wise.
What are the Common Causes of Colored Lines on Mac Screens?
When Mac users encounter pink, blue, green or purple lines on the screen, online forums and support sites typically mention both hardware and software culprits.
Here are the most commonly reported causes:
- Overheating
- Outdated Graphics Drivers or Software Glitches
- Loose or damaged display cable
- Physical screen damage
- Hardware faults
- External display or cable problems
- Known display defects: Certain MacBook models (e.g. 2016 13″ MBP) had display issues like “flexgate” with stage-light effect or lines. Apple sometimes offers free repair programs for those specific faults.
How Can You Prevent Colored Lines on a Mac Screen?
You can reduce your chances of seeing colored lines on your Mac screen by taking care of both your device’s hardware and software.
- Keep your Mac system updated with the latest macOS version.
- Avoid overheating by using your Mac on a flat surface.
- Handle your MacBook carefully to prevent screen or internal cable damage.
- Use high-quality cables and adapters for your external displays.
- Use high-quality display cables and ignore forceful plugging as it will lead to port wear.
- Do not apply pressure on the screen and don’t close that MacBook lid with any objects on the keyboard.
- Keep your Mac clean and those vents and ports are to be kept dust free.
These simple precautions can actually minimize the risk of display issues and help you to keep your Mac screen working smoothly for the long run.
Conclusion
Colored lines on your Mac screen can be absolutely unnerving but there is always hope. Stop panicking and start with those easy fixes like restarting your Mac, resetting NVRAM/SMC, and maybe checking for updates. Then go ahead and test it right there with Safe Mode, screenshots, and external displays… just to identify whether it’s a software or hardware issue. Make sure all those cables are clean and solid too. We’ve covered most of the effective troubleshooting methods to fix those multi-colored glitch lines on Mac displays so that whenever you see them on the screen, you know what to do.