DBCC CHECKDB is a built-in command in Microsoft SQL server used to check and repair the logical and physical integrity of SQL database. As per Microsoft document, it is one of the Database Console Commands (DBCC) in SQL Server to manage, maintain and provide options to repair MDF file corruption. It scans tables, indexes, allocation structures, logical issues and broken links around pages.
This command is a critical tool in SQL DBA’s toolkit, database Administrators (DBAs) use it as the diagnostic tool when their database enters suspect mode, fails to come online or they encounter integrity errors on database. It not only helps to check database’s integrity but also recommend the minimum repair level required to resolve the corruption problem.
Source: https://learn.microsoft.com/en-us/sql/t-sql/database-console-commands/dbcc-checkdb-transact-sql
Here is the most basic form of the command. Replace 3.Bonus2 with your actual database name:
DBCC CHECKDB ('3.Bonus2 ');
When DBCC CHECKDB finds no problems:
CHECKDB found 0 allocation errors and 0 consistency errors in database 'ADVENTUREWORKS'.DBCC execution completed. If DBCC printed error messages, contact your system administrator.
When DBCC CHECKDB detects corruption:
Msg 824, Level 24, State 2, Line 5
SQL Server detected a logical consistency-based I/O error: incorrect checksum (expected: 0x4a3c2f1e; actual: 0x8b1d9f2a).
It occurred during a read of page (1:47623) in database ID 7 at offset 0x000000175c6000 in file 'D:\Data\3.Bonus2 .mdf'.
This SQL server command performs the consistency checks on database pages, allocation pages, index relationships, etc. The key checks that this command runs internally include:
Disk space allocation consistency
Runs DBCC CHECKALLOC to ensure that pages and extents are properly allocated across the database.
Table and view integrity
Executes DBCC CHECKTABLE on every table and view to verify structural consistency.
Database-wide consistency
Performs checks across the entire database to detect corruption or logical inconsistencies.
Indexed views validation
Confirms that the contents of every indexed view are correct and consistent.
FILESTREAM data validation
Validates link-level consistency between table metadata and the file system when storing varbinary(max) data using FILESTREAM in database.
Service Broker data validation
Ensures that Service Broker objects and data are intact and consistent.
What Causes SQL Server Database Corruption?
Corruption in MDF/NDF files can occur due to various reasons. Most common reasons are below:
| Logical Corruption Causes | Physical Corruption Causes |
| Abrupt System/Application shutdown during a write | Hard disk failures (bad sectors, read errors, controller faults) |
| SQL Server instance crash mid-operation — can leave page splits or index splits partially written | Faulty RAM |
| Operating system or file-system error — NTFS can mask I/O errors, allowing a partially-written page to appear committed when it is not. | Ransomware attack — encrypts or overwrites MDF/NDF file bytes directly, producing checksum mismatches across thousands of pages simultaneously. |
| Improperly detaching a database and editing or moving the .mdf file outside of SQL Server can corrupt headers or log sequence numbers (LSNs). | Disk controller driver bug |
Source: Microsoft SQL Server documentation — Understanding How Errors Propagate in SQL Server (learn.microsoft.com/sql/relational-databases/errors-events/). Check the Windows System Event Log for disk driver errors before attempting any repair.
How the DBCC CHECKDB Command Works?
The command thoroughly scans the database and performs integrity checks and other structural checks. If any of these checks fail, it displays consistency errors indicating issues in the database and also recommend appropriate repair option. Let’s take a look at the syntax of DBCC CHECKDB command.
DBCC CHECKDB
    [ ( db_name | db_id | 0
        [ , NOINDEX
        | , { REPAIR_ALLOW_DATA_LOSS | REPAIR_FAST | REPAIR_REBUILD } ]
    ) ]
    [ WITH
        {
            [ ALL_ERRORMSGS ]
            [ , EXTENDED_LOGICAL_CHECKS ]
            [ , NO_INFOMSGS ]
            [ , TABLOCK ]
            [ , ESTIMATEONLY ]
            [ , { PHYSICAL_ONLY | DATA_PURITY } ]
            [ , MAXDOP  = number_of_processors ]
        }
    ]
]
In the syntax above, replace db_name with your actual database name. In all examples throughout this guide, we use [3.Bonus2 ] — replace this with your database name.
Now, let’s understand the various options used in the above DBCC CHECKDB command.
- database_name | database_id | 0: Specifies the name or ID of the database against which you need to run integrity checks. If the ‘database_name’ or ‘id’ is not specified and ‘0’ is specified, the current database will be used by default.
- NOINDEX: Performs only logical checks to reduce the total execution time. It does not include non-clustered indexes in the checks.
- REPAIR_FAST: REPAIR_FAST was deprecated in SQL Server 2012 and removed in SQL Server 2016. Do NOT use on SQL Server 2016 or later — it will return an error. It accepted the syntax on older versions but performed no repair actions, it will return an error. It accepted the syntax on older versions but performed no repair actions, according to Microsoft
- REPAIR_REBUILD: Helps repair database without any data loss. It can be used to repair missing rows in non-clustered indexes and for rebuilding an index.
- REPAIR_ALLOW_DATA_LOSS: This option tries to fix all the reported issues and errors. Use this option as a last resort as it can lead to data loss.
- ALL_ERRORMSGS: This argument displays all the error messages for each object.
- EXTENDED_LOGICAL_CHECKS: Use this option to perform additional checks.
- NO_INFOMSGS: DBCC output displays informational messages that are not related to the consistency errors. This option turns off the informational messages.
- TABLOCK: Uses locks rather than internal database snapshot to perform consistency checks on the database.
- ESTIMATEONLY: Specifies the estimated space required by the ‘tempdb’ database for executing the CHECKDB command.
- PHYSICAL_ONLY: Limits consistency checks on the physical structure of the database page, reducing runtime for DBCC CHECKDB on large databases.
- DATA_PURITY: Helps check database for invalid or out-of-range column values.
Prerequisites for using DBCC CHECKDB command
To run DBCC CHECKDB command first check the following things:
- Make sure the database on which you’re trying to run this command is not detached, or in recovery pending state.
- Check the permissions and roles on the database. Make sure you have sysadmin fixed server role or db_owner role.
- DBCC CHECKDB uses TempDB heavily for internal checks, so your system should have sufficient space.
- To use its repair option on the database, your database should run in a single-user mode.
How to run DBCC CHECKDB command to check corruption?
If you’re able to attach database (MDF/NDF) file then you can use the DBCC CHECKDB command. You can use it to check database file for corruption. If you fail to access the database, then change its status to Emergency mode to provide read-only access to the administrator.
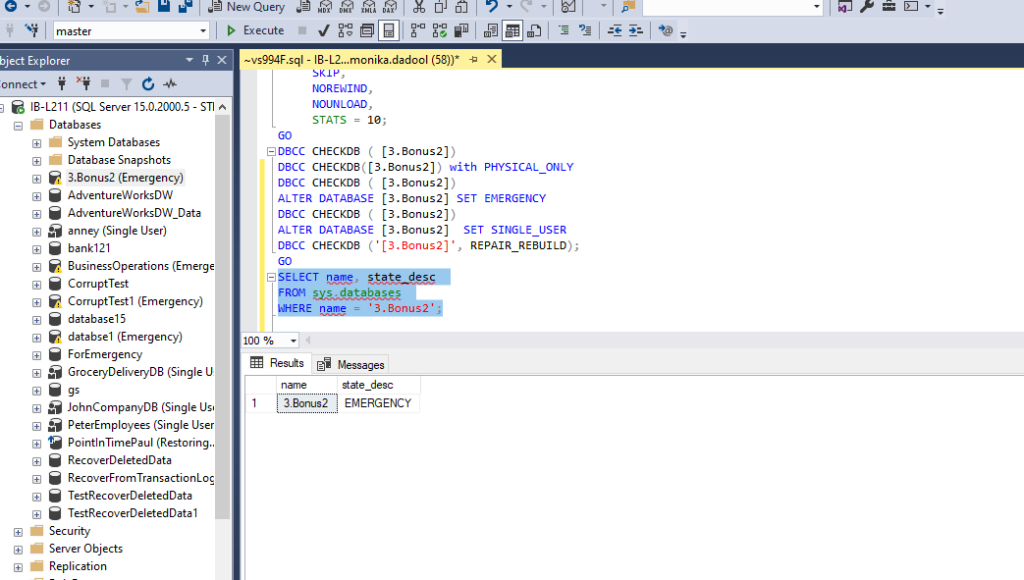
To set the database in EMERGENCY mode, run the below command:
ALTER DATABASE [3.Bonus2] SET EMERGENCY
Once you can access the database then, here’s how to use this command to check the corruption in SQL data files.
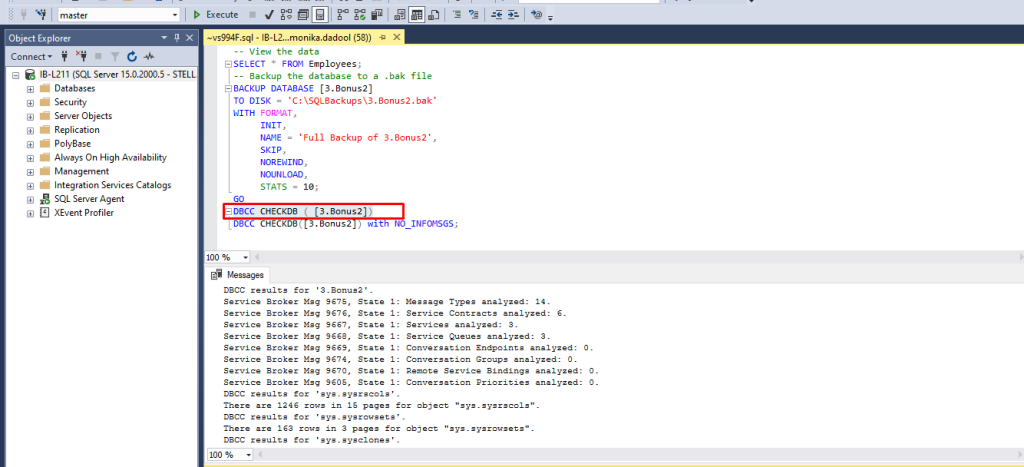
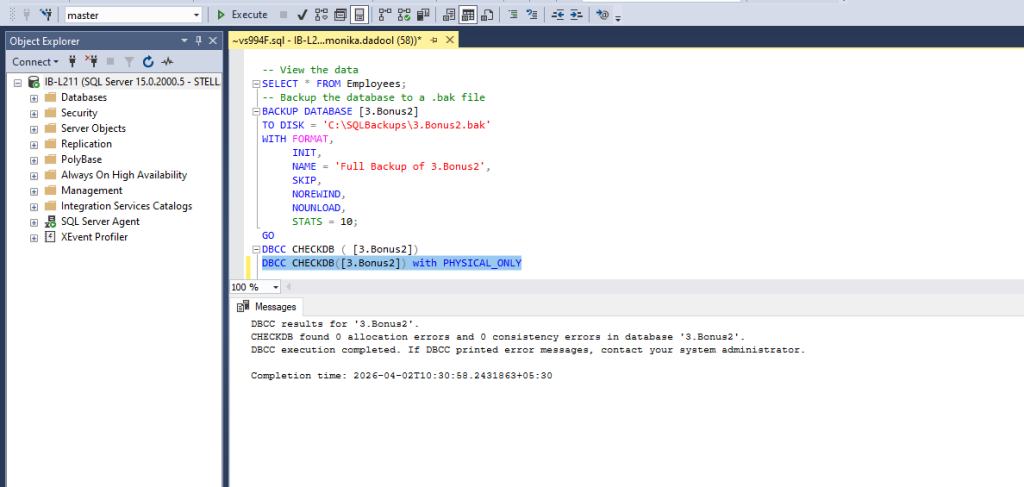
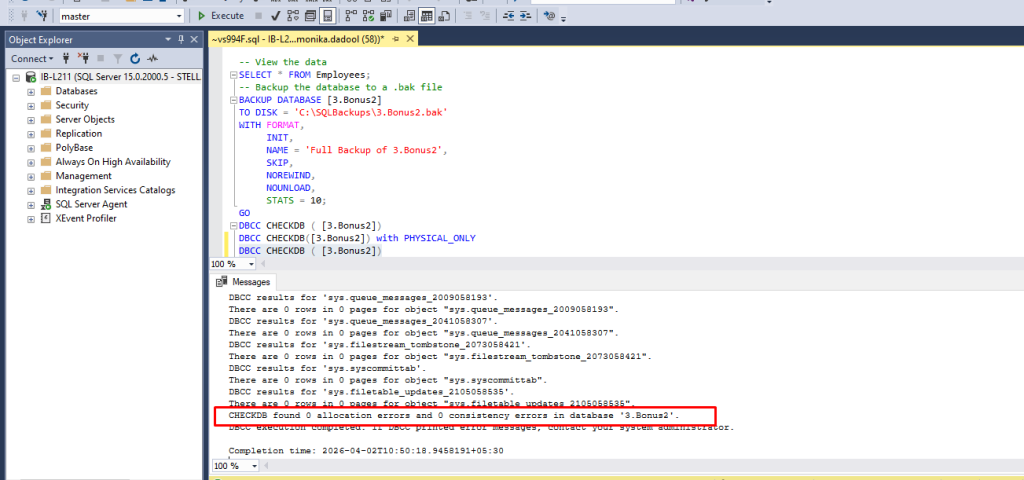
DBCC CHECKDB ( [3.Bonus2])
The CHECKDB command can have performance implications. However, you can use the right parameters in it to minimize performance impact on SQL server. Some few ones are below:
Use DBCC CHECKDB with NO_INFOMSGS
You can run the NO_INFOMSGS option with CHECKDB to display only the consistency errors instead of thousands of informational lines. It helps to cut down the processing time considerably when integrity checks are performed on small databases in SQL Server Management Studio (SSMS). Here’s the command:
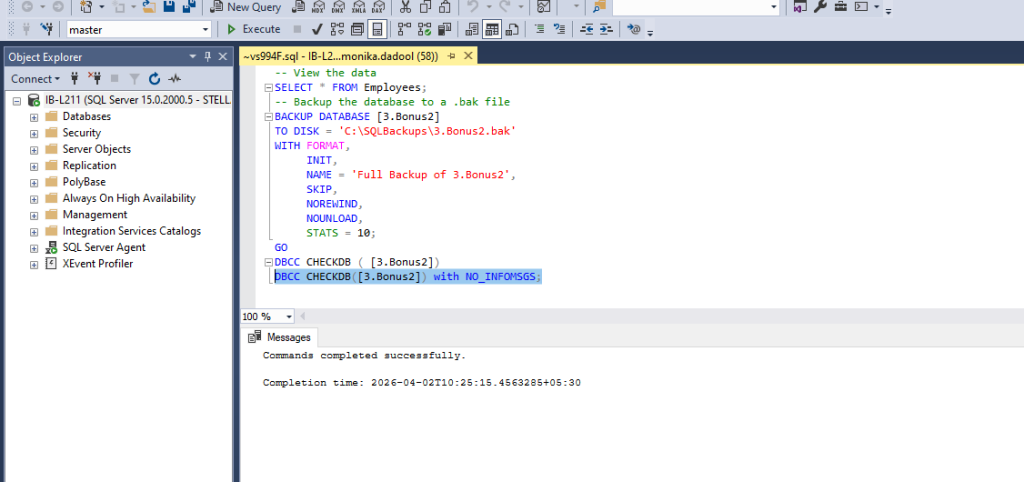
DBCC CHECKDB([3.Bonus2]) with NO_INFOMSGS;
Note: Using NO_INFOMSGS does not minimize a performance issue but it can prevent you from running the integrity checks again by showing you only the errors. Also, use this option for small databases<=1TB.
DATA_PURITY
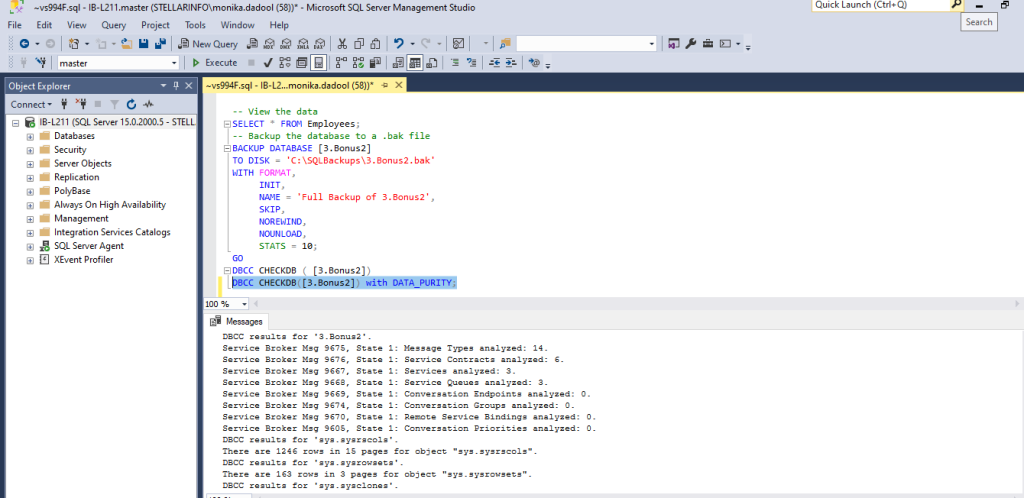
The DBCC CHECKDB performs column-value integrity checks by default. However, in case you have upgraded databases from previous versions then can use the DATA_PURITY option. Here is the command:
DBCC CHECKDB([3.Bonus2]) with DATA_PURITY;
EXTENDED_LOGICAL_CHECKS
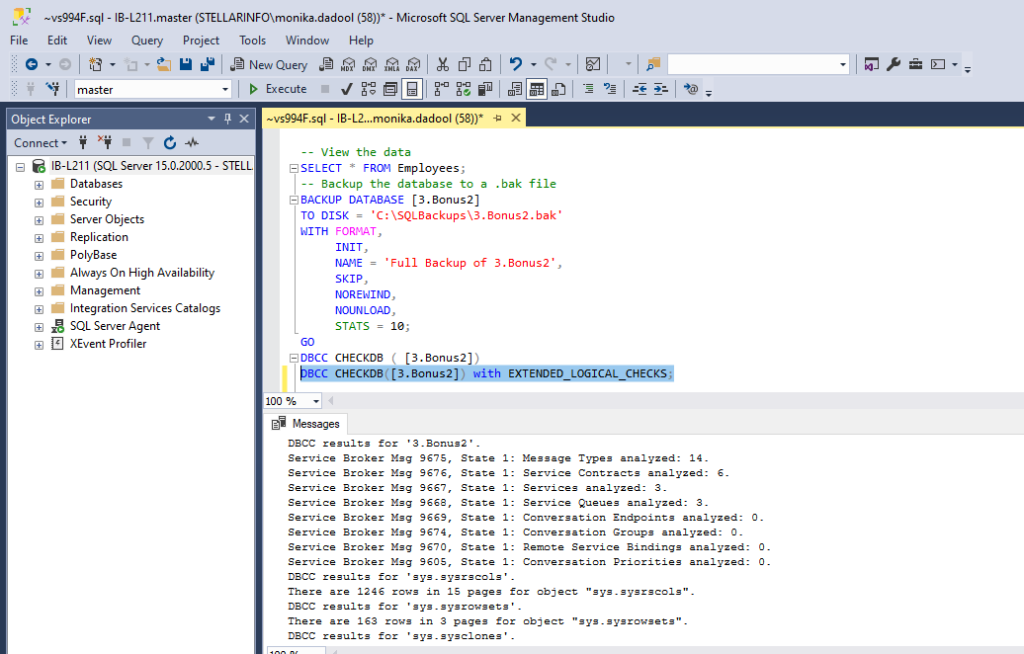
If you suspect your database is corrupted then you can perform logical checks on its indexed view, special indexes or XML indexes. To do so, run the following command:
DBCC CHECKDB([3.Bonus2]) with EXTENDED_LOGICAL_CHECKS;
In SQL Server 2016, running the DBCC CHECKDB command with the EXTENDED_LOGICAL_CHECKS option may fail on a table that has a “filtered non-clustered index (NCI) over a clustered columnstore index (CCI)”. Also, it will result in SQL error 5297.
PHYSICAL_ONLY
You can reduce the overhead of DBCC CHECKDB and make it faster for larger databases using it with “PHYSICAL_ONLY” option. DBCC CHECKDB skips all the logical checks and limits the checking to physical structure of a page. It also helps validate page checksums for failure, torn pages, and common hardware failures that can lead to data corruption. To use DBCC CHECKDB with PHYSICAL_ONLY, use this syntax:
DBCC CHECKDB([3.Bonus2]) with PHYSICAL_ONLY
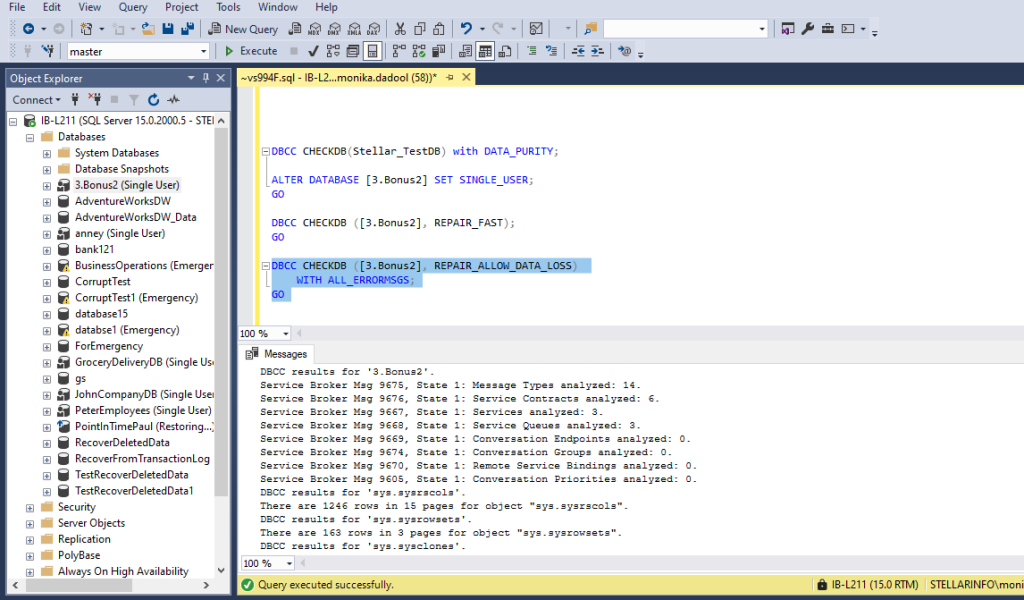
DBCC CHECKDB Output Explained
If DBCC CHECKDB shows “0” allocation errors as shown below means your database is healthy.
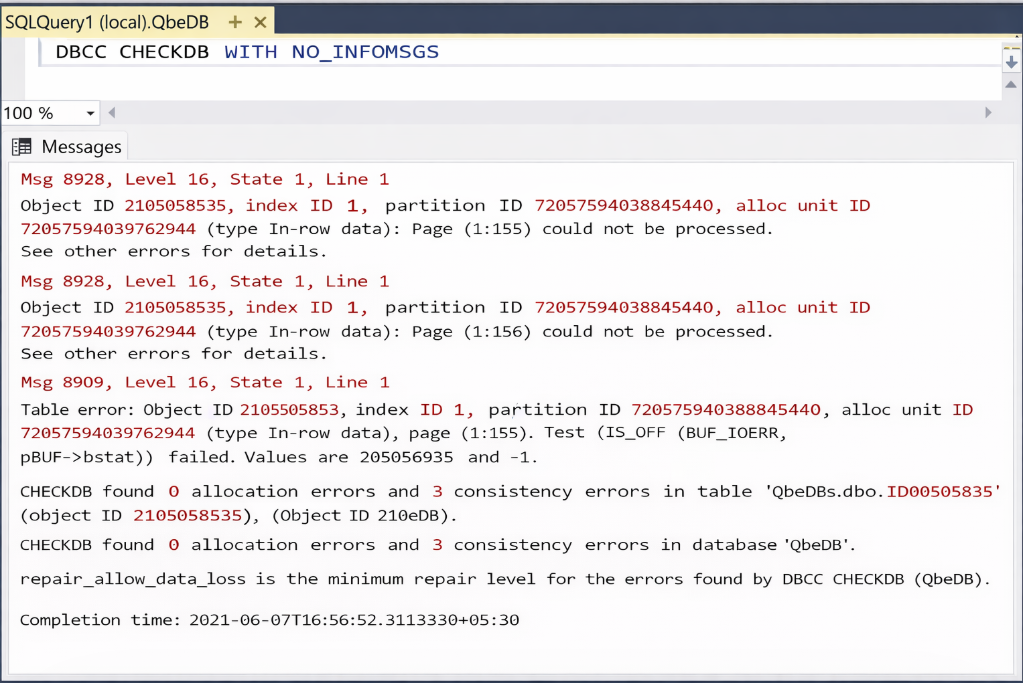
If consistency errors found by the command, means data corruption is detected. It also recommend the repair option to resolve the detected error as shown in fig:
Causes behind SQL Server Database Consistency Errors
DBCC CHECKDB check fails or report consistency errors due to various reasons, such as issues in the hardware system or SQL Server Engine, file system corruption, or corrupted pages in memory.
Before attempting to resolve the db inconsistency problem, it is important first to understand why database consistency errors have occurred.
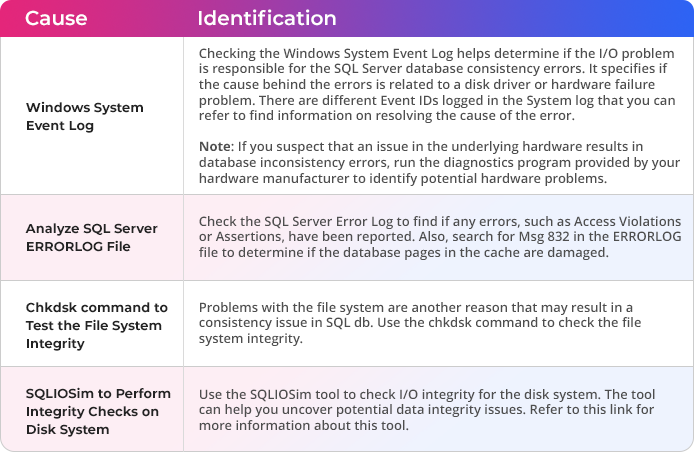
How to Determine the Causes behind Consistency Errors in SQL Server Database?
To find out what has caused database consistency errors, consider using:
Open the SQL Server Management Studio (SSMS) and follow these steps:
Test Environment (all steps verified on this configuration) Operating System: Microsoft Windows 11 Pro (x64) SQL Server: 2022 (version 16.0.1000.6, Developer Edition) SQL Server Management Studio (SSMS): 20.2.1 RAM: 32 GB | Processor: 13th Gen Intel Core i5-1335U | Storage: 500 GB SSD Note: All commands in this guide apply equally to SQL Server 2016, 2017, 2019, 2022, and 2025.
Step 1: Set Database to Emergency Mode
If the database is inaccessible or it is in suspect mode, first change its status to EMERGENCY mode. This will provide read-only access to the administrator. To put the database in EMERGENCY mode, run the following query in SSMS:
ALTER DATABASE [3.Bonus2] SET EMERGENCY
Step 2: Check Database for Corruption Errors
After setting the database to EMERGENCY mode, execute the following command to check the database for corruption errors:
DBCC CHECKDB ( [3.Bonus2])

If the DBCC CHECKDB command detects any errors or corruption in the database, it will recommend an appropriate repair option.
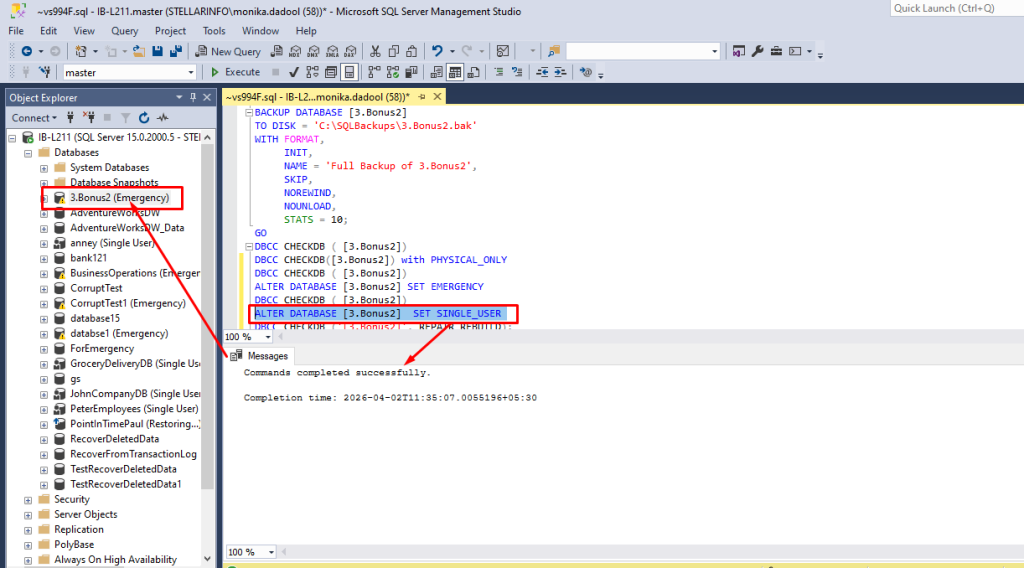
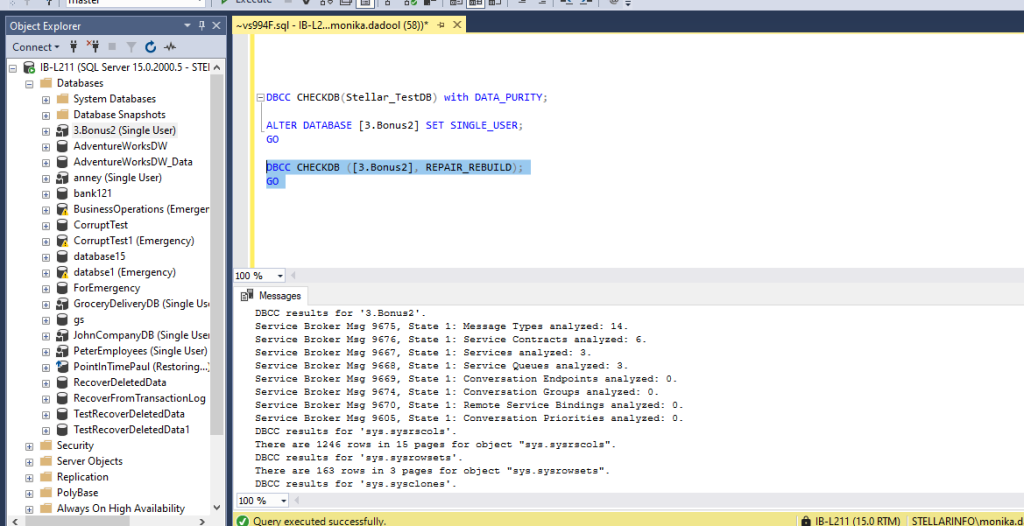
Step 3: Set Database to SINGLE_USER Mode
Before using the repair option, you need to put the database in SINGLE_USER mode to prevent other users from modifying the data during the repair process. Also, Make sure you have the ALTER permission on the database.
To set the database to SINGLE_USER mode, run the following T-SQL query in SSMS:
ALTER DATABASE [3.Bonus2] SET SINGLE_USER
Sometimes, you may encounter a situation where you’re not able to recover SQL Database from Emergency Mode to Normal Mode. In such a case, first check the state of your database by following command
SELECT name, state_desc
FROM sys.databases
WHERE name = '3.Bonus2';

If it shows EMERGENCY then you can try the following command:
ALTER DATABASE [3.Bonus2] SET ONLINE
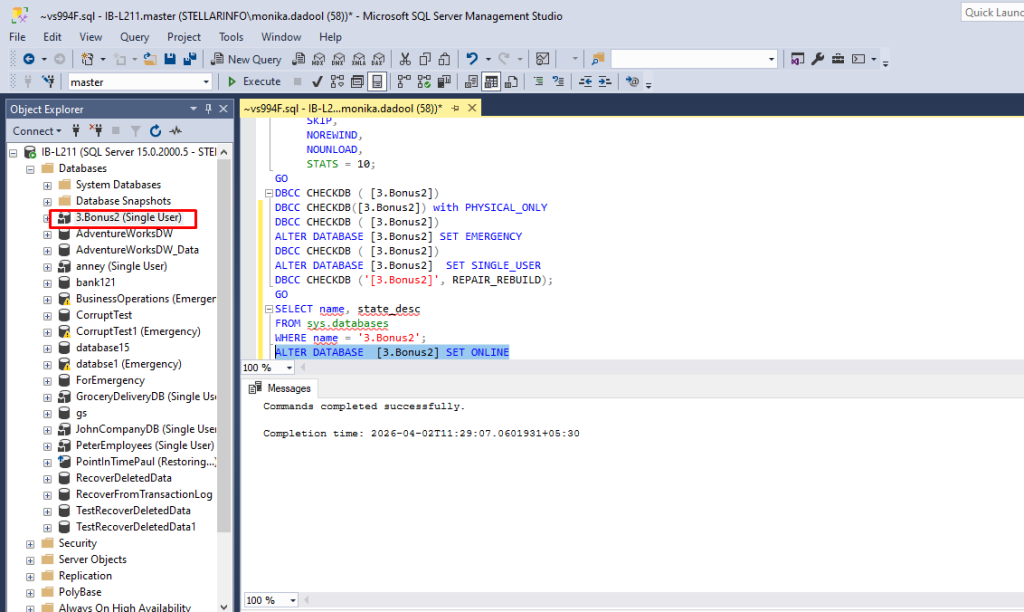
Now again try to change the database state to SINGLE_USER
Step 4: Rebuild SQL Database with REPAIR
After setting the database to SINGLE_USER mode, run the command with the REPAIR option recommended by DBCC CHECKDB command. If it shows an error message recommending to run the REPAIR_REBUILD as the minimum repair level, then run the DBCC CHECKDB command with REPAIR_REBUILD option as given below:
Note: Before running any repair option, take a full database backup with BACKUP DATABASE. If the repair goes wrong — or introduces a logical inconsistency that only shows up later — you will want that backup. (Source: Microsoft SQL Server Documentation — Back Up and Restore of SQL Server Databases)[JP1]
DBCC CHECKDB ([3.Bonus2], REPAIR_REBUILD);
GO
This command will rebuild the database without any data loss. It can repair missing rows in non-clustered indexes and help in fixing minor corruption errors. However, it is a time-consuming option.
Alternatively, you can use the REPAIR_FAST with the command as given below:
DBCC CHECKDB ([3.Bonus2], REPAIR_FAST);
GO

This repair option only maintains backward compatibility syntax and does not perform any repair actions.
If the above repair options fail or the DBCC CHECKDB command recommended using the REPAIR_ALLOW_DATA_LOSS repair option, then run it as given below:
Before running any repair option, take a full database backup with BACKUP DATABASE. If the repair goes wrong — or introduces a logical inconsistency that only shows up later — you will want that backup. (Source: Microsoft SQL Server Documentation — Back Up and Restore of SQL Server Databases)
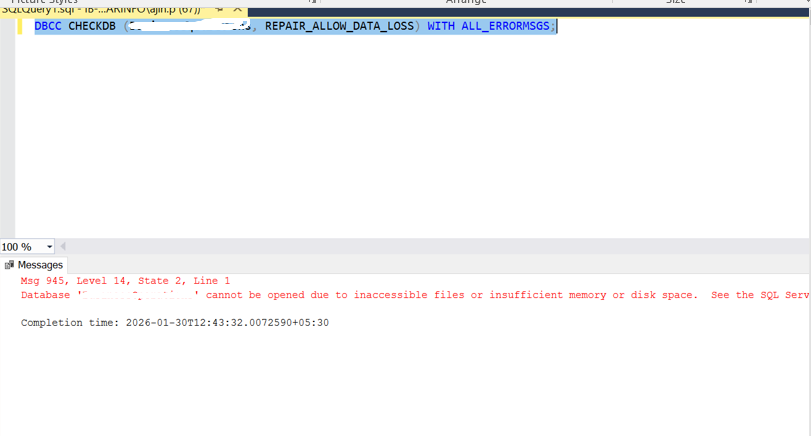
DBCC CHECKDB ([3.Bonus2], REPAIR_ALLOW_DATA_LOSS)
WITH ALL_ERRORMSGS, NO_INFOMSGS;
GO
The REPAIR_ALLOW_DATA_LOSS option helps in repairing all reported errors in the SQL server database but as per official of Microsoft, it causes data loss. In fact, Microsoft recommends using the REPAIR_ALLOW_DATA_LOSS option as a last resort.
Source: learn.microsoft.com/sql/t-sql/database-console-commands/dbcc-checkdb-transact-sql.
Sometimes, while executing this command to repair corrupt SQL database, you may encounter errors. One such error is SQL error 945.
Step 5: Set Database to MULTI_USER Mode
After successfully repairing the database, set the database to MULTI_USER mode by executing the following command:
ALTER DATABASE [3.Bonus2] SET MULTI_USER;
GO
Running DBCC CHECKDB in Always On Availability Groups:
If database is a part of Availability Group, you can run DBCC CHECKDB on readable secondary replicas instead of primary one. This is one of the most practical benefits of AGs for database integrity checks. Here are some points you need to know:
- Run CHECKDB on the secondary:
Running DBCC CHECKDB command on a large database can cause load on the primary server. You can run this command on a database in Always on Availability Groups on a readable secondary replicas instead of primary one. This helps you to check the results on the secondary server without slowing down the primary server.
- Manage corruption on the primary:
If you find any corruption issues then you need to failover and run the repair on primary server to resolve them.
- Schedule during off-peak hours:
For less performance impact, it is recommended to schedule DBCC CHECKDB on secondary during off-peak hours.
- Understand its repair limitations on AGs
The DBCC CHECKDB command does not support repairing severely corrupted pages and meta data. If running its repair option, can cause data loss and synchronization issues. So it’s highly recommended to take a backup before using it.
Source: Microsoft Always On Availability Groups — Run DBCC CHECKDB on a Secondary Replica (learn.microsoft.com/sql/database-engine/availability-groups/)
Limitations and Downsides of DBCC CHECKDB Command
Though DBCC CHECKDB can fix consistency issues, using the REPAIR_ALLOW_DATA_LOSS option comes with serious downsides. Every experienced DBA has run into these limitations at some point.
| Limitation | Mitigation |
| It may deallocate rows or pages when repairing the database. Deallocated data can sometimes become unrecoverable. | Always take a BACKUP DATABASE before running any repair. |
| It may leave your database in a logically inconsistent state. | After any repair, run DBCC CHECKCATALOG to check system catalog consistency. Next, run the DBCC CHECKCONSTRAINTS to check foreign key relationships manually. |
| You may require to use this command multiple times to fix all errors associated with SQL database. It is a time-consuming process. | Run DBCC CHECKDB Use PHYSICAL_ONLY first to identify scope before full repair. |
| It does not guarantee complete SQL Server database recovery. | In this case, put the database in EMERGENCY mode, use page-level restore or use Stellar Repair for MS SQL to repair database with complete integrity |
An Alternative to DBCC CHECKDB Command: Stellar Repair for MS SQL
There are failure scenarios that DBCC CHECKDB simply cannot handle — particularly when corruption has hit the allocation pages, the system tables themselves, or the database header. In those situations, even putting the database into EMERGENCY mode fails.
This is where a specialized third-party software comes into picture. You can use Stellar Repair for MS SQL, developed by Stellar Information Technology to repair [JP3] the corrupt SQL database with complete integrity. It is trusted and recommended by MVPs. It repairs severely corrupt MS SQL database and restores all its components. The SQL database repair software[JP4] helps reinstate access to the database with minimal manual efforts and time.
Key Features of Stellar Repair for MS SQL:
- Repairs both MDF and NDF database files
- Recovers all database components, including tables, keys, indexes, stored procedures in MS SQL, etc.
- Allows recovery of deleted records
- Recovers SQL tables with PAGE and ROW compression
- Generates preview of recoverable database objects before saving
- Saves the repaired database to a new or live database and formats like CSV, HTML, and XLS
- Supports SQL Server database 2025, 2022, 2019, 2017, 2016, 2014, 2012, and lower versions
- Compatible with both Windows 11, 10, 8.1, 8 & Windows server 2022, 2019, 2016, 2012 and Linux operating systems
How to Use Stellar Repair for MS SQL when DBCC CHECKDB fails?
Step 1. Download, install and launch Stellar Repair for MSSQL
<Download Now>
Step 2. Click Browse to select the corrupt MDF database file. Click Repair.
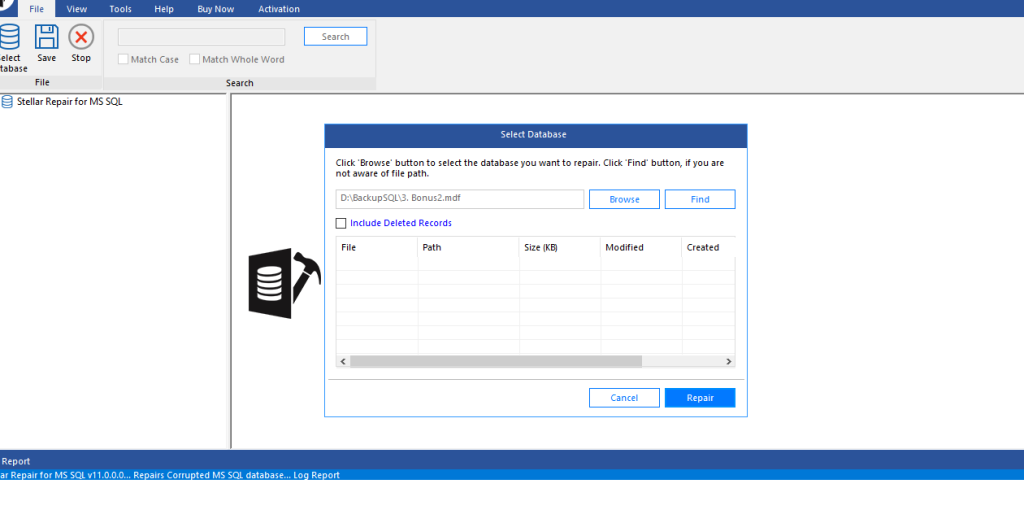
Step 3. Select Standard Scan. Click OK.

Step 4. The tool will start repairing the selected database file (3.Bonus2.mdf)

Step 5. Once repair process completes, you will “Selected MS SQL database repaired successfully” message. Click OK.
Walkthrough of Stellar Repair for MS SQL Start 01:55
Video Embed à https://www.youtube.com/watch?v=czXGeS3EZG8
Tested and Approved by Microsoft Most Valuable Professional
Stellar Repair for MS SQL delivers proven recovery in critical production failures. As Anton Martyniuk shared, this tool helped him repair a corrupt SQL database when DBCC CHECKDB, backups, and emergency mode all failed. In another case study, it enabled SAPIENCE SIS INDIA PVT LTD to recover a corrupt database after an unexpected hard disk failure.
THE DBCC CHECKDB command uses a lot of CPU, I/O, and TempDB to execute smoothly. So it is required to optimize its performance, to minimize downtime. To do so, you should use appropriate options, such as MAXDOP settings and WITH PHYSICAL_ONLY for large databases. And schedule running it during off-peak hours, and keep tracking the command execution times from SQL server error logs.
Best Practices to optimize DBCC CHECKDB usage
1. Use Trace Flags 2562 and 2549
Microsoft recommends using the 2562 and 2549 trace flags to improve disk I/O resource usage while executing the DBCC CHECKDB command with the PHYSICAL_ONLY option.
Trace flag 2562: It optimizes DBCC CHCKDB performance by running the command as a single batch. Further, it helps determine the pages to be read from a database. However, one problem associated with this trace flag is that it may increase the utilization of tempdb (i.e., 5 percent of the database size).
Trace flag 2549: Using this trace flag helps improve performance of the DBCC CHECKDB command. It does so by assuming that each database file resides on a unique underlying disk. Do not use this trace flag for the database that has multiple data files.
2. Optimize TempDB
DBCC CHECKDB can make heavy usage of temporary database (TempDB). To properly utilize it, put TempDB on a fast I/O subsystem. Essentially, put the TempDB database on its own set of fast disks or spindles.
3. Cut Down on CPU Usage
If you can run DBCC CHECKDB for a longer duration to limit CPU usage, try reducing parallelism by following these practices:
Turn off parallelism for DBCC CHECKDB (and its commands CHECKFILEGROUP and CHECKTABLE) by using trace flag 2528.
Use the SQL Server maximum degree of parallelism option to limit the number of processors to be used for parallel queries.
4. Run weekly
You can run DBCC CHECKDB command weekly to catch corruption early before it causes further data loss or spreads. You can try to schedule it during weekends or off-hours to reduce performance impacts.
5. Run the command after Backup restore
Always prefer running DBCC CHECKDB command after restore. This helps you confirm that your restored database is consistent.
DBCC CHECKDB vs Other DBCC Commands
| Command | Scope | When to use instead of CHECKDB |
| DBCC CHECKDB | Entire database | Full integrity validation — run this weekly or whenever you suspect corruption. |
| DBCC CHECKTABLE | Single table | When CHECKDB is impractical on a very large database and you need to focus on a specific table that is generating errors. Checks indexes and row structure for that table only. |
| DBCC CHECKALLOC | Allocation pages only (GAM, SGAM, PFS, IAM) | When you specifically suspect allocation-level corruption — double-allocated extents, unlinked pages, or suspect_pages table entries pointing to IAM pages. |
| DBCC CHECKCATALOG | System catalog consistency | After a DBCC CHECKDB repair, run DBCC CHECKCATALOG to verify the system catalog is consistent — CHECKDB does not check inter-catalog relationships. |
Conclusion
If your SQL database is corrupted, you can use the DBCC CHECKDB command to check and repair it. Above, we have explained how to use the DBCC CHECKDB command to repair SQL database. However, using the DBCC CHECKDB command with REPAIR_ALLOW_DATA_LOSS involves risk of data loss. To repair the corrupt database without data loss, you can use Stellar Repair for MS SQL. The software helps retrieve all the SQL database components, including tables, deleted table records, indexes, views, etc. You can free download the software to evaluate its functionality and efficiency.