SSD storage uses flash memory and wear leveling, so normal deletion or formatting won’t remove all data. In fact, a quick format only removes file tables (not the data bits). To truly wipe an SSD you must use methods that issue a secure erase command to the drive’s controller or otherwise overwrite every cell.
Below are five reliable methods (for Windows and even Mac), each safe for SSD health.
Comparison of Methods for Secure SSD Erasure
| Method | How It Works | Pros | Cons |
| File Eraser Software | Overwrites files/free space with data | Easy; no boot needed; flexible | For encrypted drives, you need the encryption key. |
| Windows Reset (“Clean” PC) | Overwrites OS drive via Windows reset | Built-in; simple for Windows users | Only handles Windows drive; not true ATA secure erase |
| Manufacturer Utility | Sends ATA Secure Erase to SSD controller | Fast; SSD-approved; hits all cells | Brand-specific; requires matching tool |
| BIOS/UEFI Secure Erase | Hardware-level secure erase via firmware | OS-independent; very thorough | Not on all PCs; manual BIOS navigation |
| PSID Revert (for SEDs) | Deletes encryption key (instant factory reset) | Extremely quick; erases hidden data | Only for encrypted drives; tool-dependent |
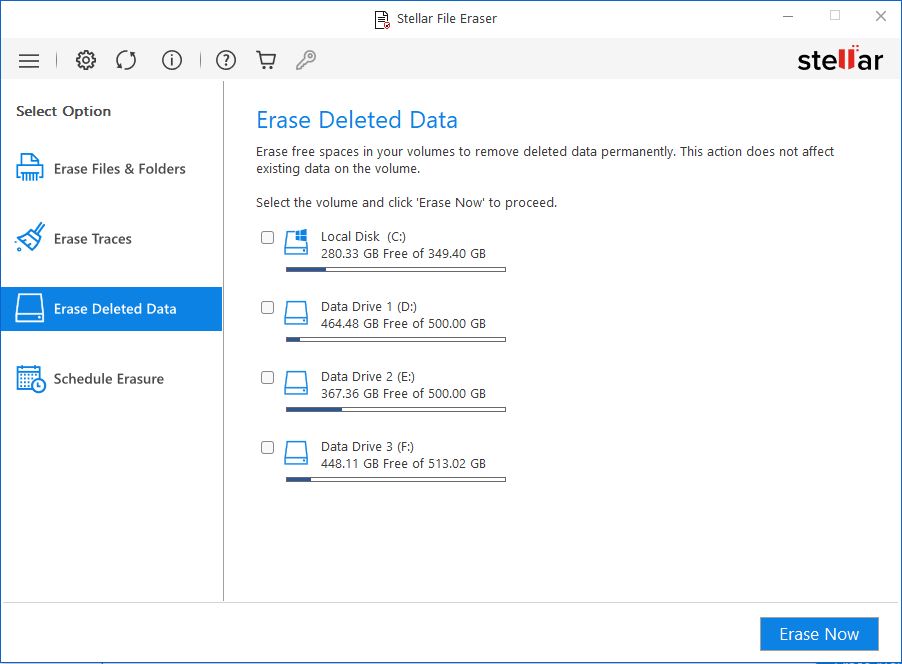
For individual files or an entire disk, a file shredder/eraser can overwrite data. There are free tools like Stellar File Eraser that let you “scrub” files or free space by overwriting with random data without spending a penny. These programs typically offer multiple overwrite passes to make recovery very unlikely.
Here are the steps:
- Back up any needed data.
- Download/install Stellar File Eraser program.
- Select the SSD (or specific files/folders by either dragging-dropping or simply adding them) and choose Erase Now.
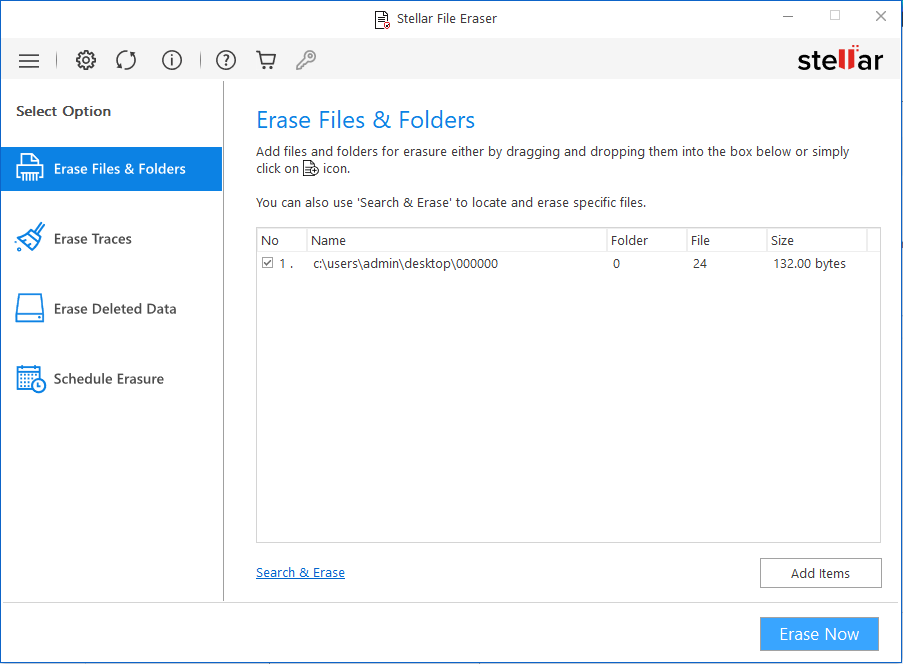
- Now click Erase Traces to erase any fragments of the files from the SSD created elsewhere on the system.

- As a last check, go ahead and wipe the already free space on your drive so that the deleted data is never recoverable.
Note that constant overwriting can slightly wear an SSD, so use it sparingly.
Method 2: Windows Reset (Clean Install)
Windows 10/11 includes a built-in “Reset this PC” feature that can wipe your system drive and reinstall Windows. Choosing “Remove everything” and the “Fully clean the drive” option runs an internal overwrite of all sectors. This isn’t the same as a full ATA Secure Erase, but it’s much more thorough than a normal delete.
Steps (Windows 10/11):
- Press WIN + I to open Windows Settings and click on Update & Security.
- Click on Recovery in the left pane. In the Recovery section, click on Reset PC under the Reset this PC option.
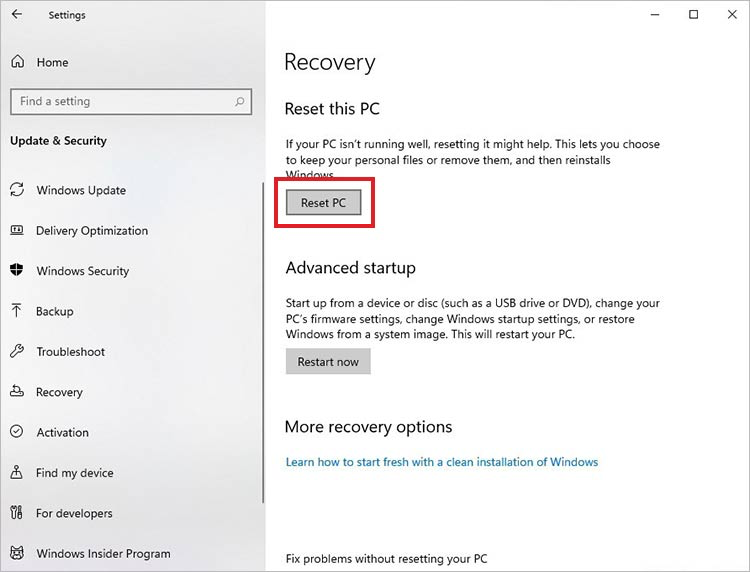
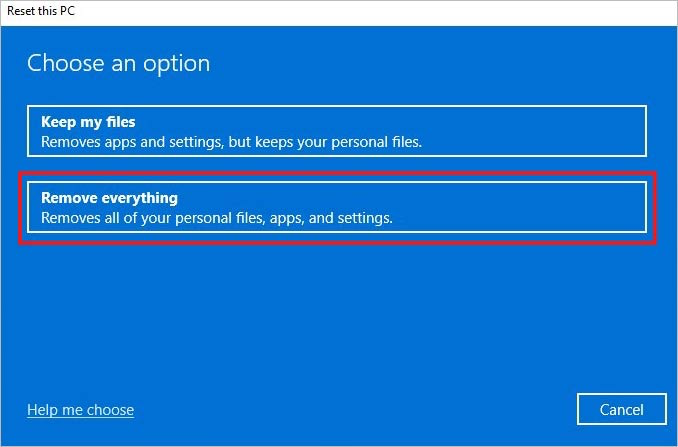
- Click on the Remove everything option in the following dialog box.
- In the next dialog box, select between Cloud download or Local reinstall to reset Windows 11/10.
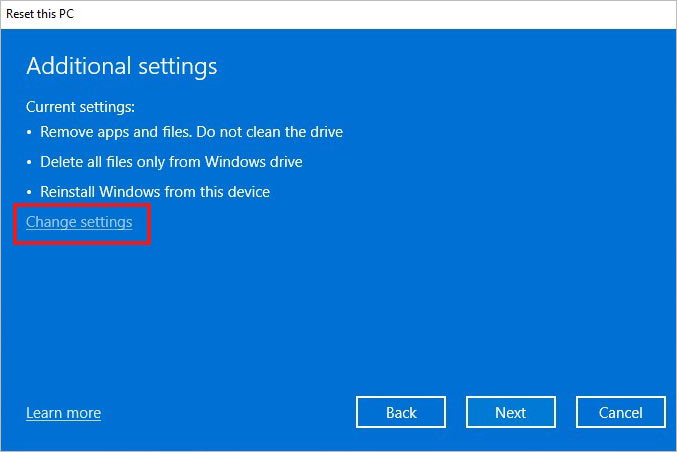
- In the Additional settings dialog box, click on Change settings.
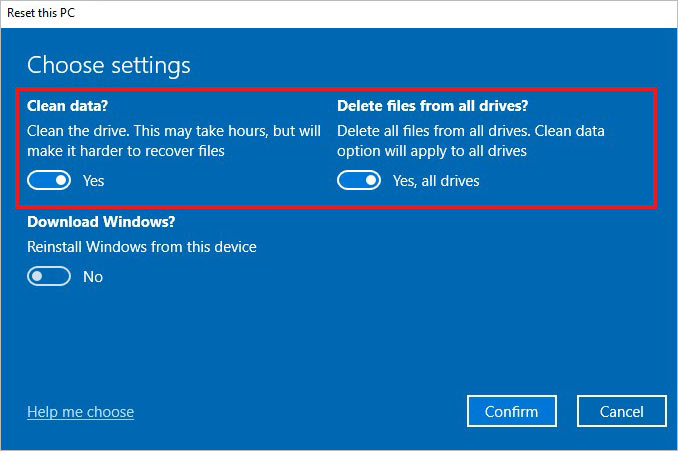
- Toggle all the Clean data? and Delete files from all drives? options to Yes, and click on Confirm.
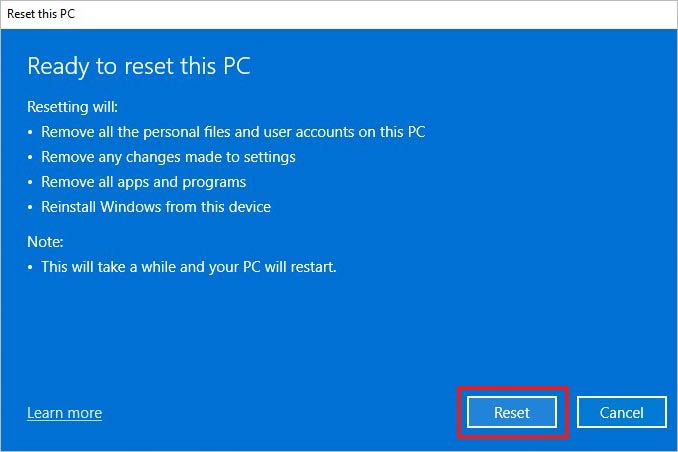
- In the last window, click on Reset after reviewing all the changes that will be made. This will begin resetting your PC and remove all the data and applications present on it.
This method requires no extra software and handles boot drives. It’s user-friendly for most Windows users. But it may not reach certain hidden cells like a manufacturer Secure Erase would and it only works on Windows system drives.
Most SSD makers provide free utilities that issue the drive’s ATA Secure Erase or equivalent command. These trigger the SSD’s firmware to factory-reset all memory cells without unnecessary wear.
Here are the steps:
- Find the right tool for your SSD brand (we’ve listed down a few for you):
- Samsung: Samsung Magician (look for Secure Erase).
- Western Digital: Western Digital Kitfox (Erase or Secure Erase).
- Seagate: SeaTools (Erase option in the Menu).
- Kingston: Kingston SSD Manager (Security > Secure Erase).
- Download/install it with admin rights.
- Launch the utility, select the target SSD and just always use its “Secure Erase” feature.
- Enter any confirmations (e.g. serial number digits) and run the erase.
The drive will reboot and clear itself.
This is a safe and reliable way to wipe an SSD since it’s what the hardware designers recommend. It fully resets the SSD in a few minutes and maintains drive health.
Method 4: BIOS/UEFI Secure Erase (Hardware Level)
Many motherboards have a built-in secure erase or disk utility in their BIOS/UEFI. This lets you erase an SSD without booting the OS. Although the steps for each hardware manufacturer are different as their GUIs differ, the process is done almost the same way for every brand. Navigation can be a bit different in different PCs but the BIOS menu has a simple interface and an average user can easily find it.
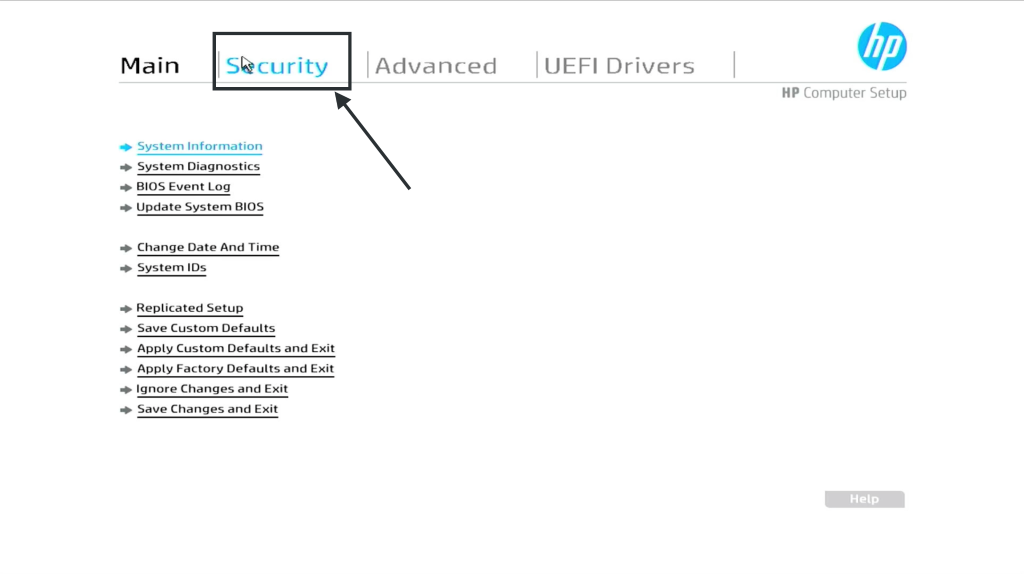
We’ll explain the process through an HP PC’s Bios as it is one of the commonly used brands. Here are the steps:
- Reboot and enter BIOS/UEFI (press Del, F2, F10, etc) and go to Security. On other brands, the page can also be named as Storage or Maintenance or similar.
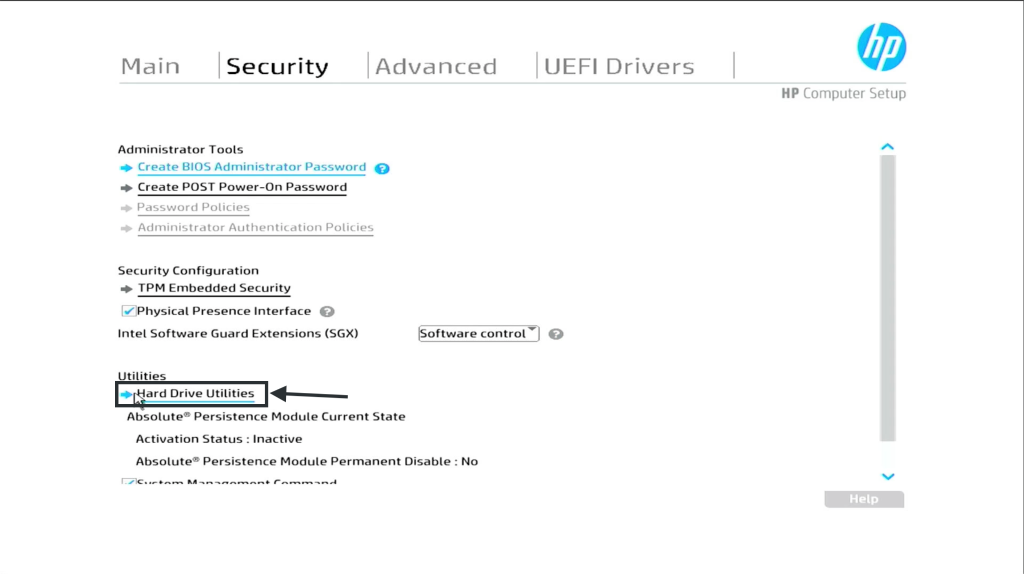
- Choose Hard Drive Utilities here.
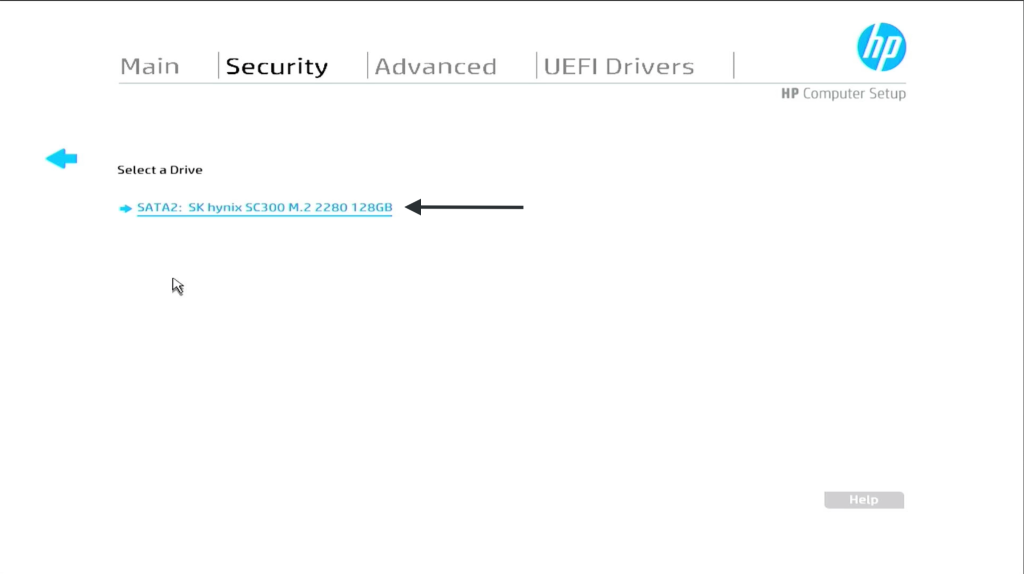
- Select your SSD that you want to wipe off (be careful to choose the correct one!).
- Choose the Secure Erase option (or similar if trying on a different PC).
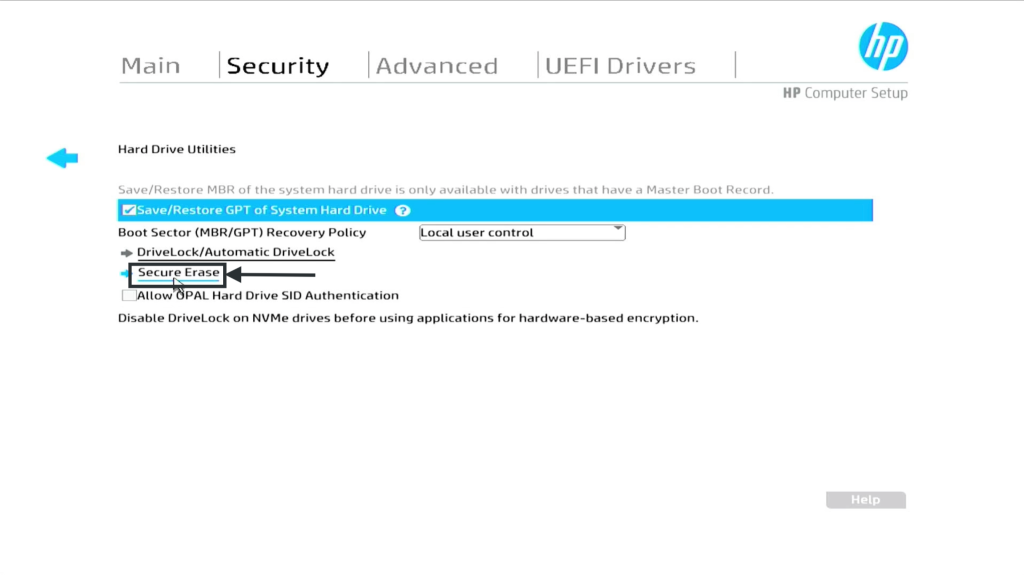
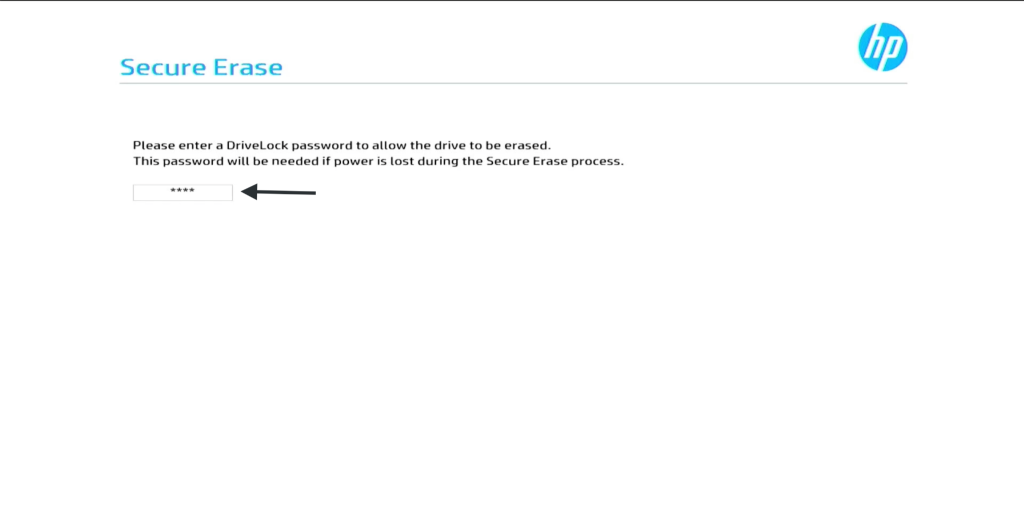
- It may also ask you to provide a temporary password (to be used when this process fails. Provide it and press Enter.
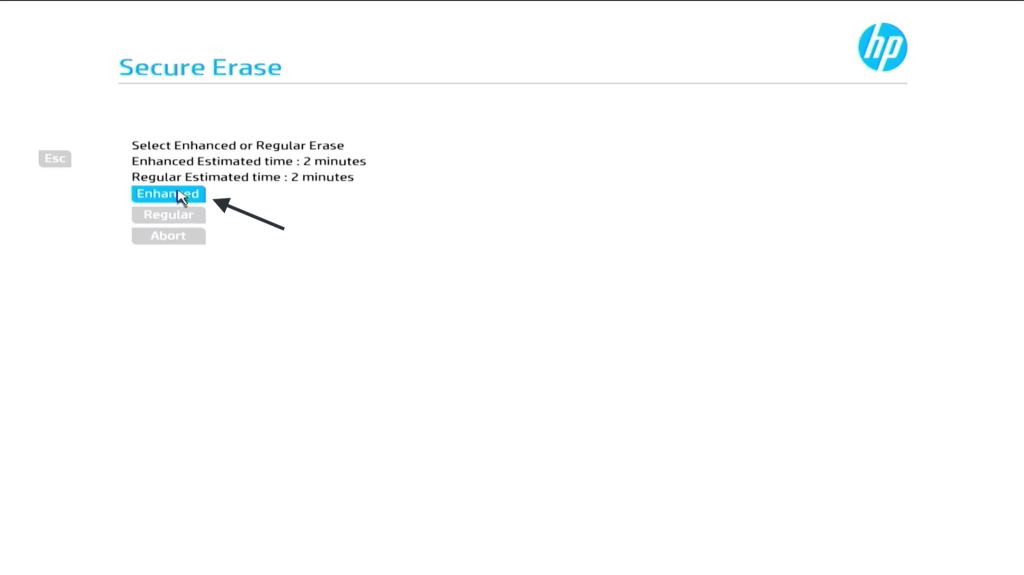
- Now if there is an Enhanced or Advanced Wipe option available, select it.
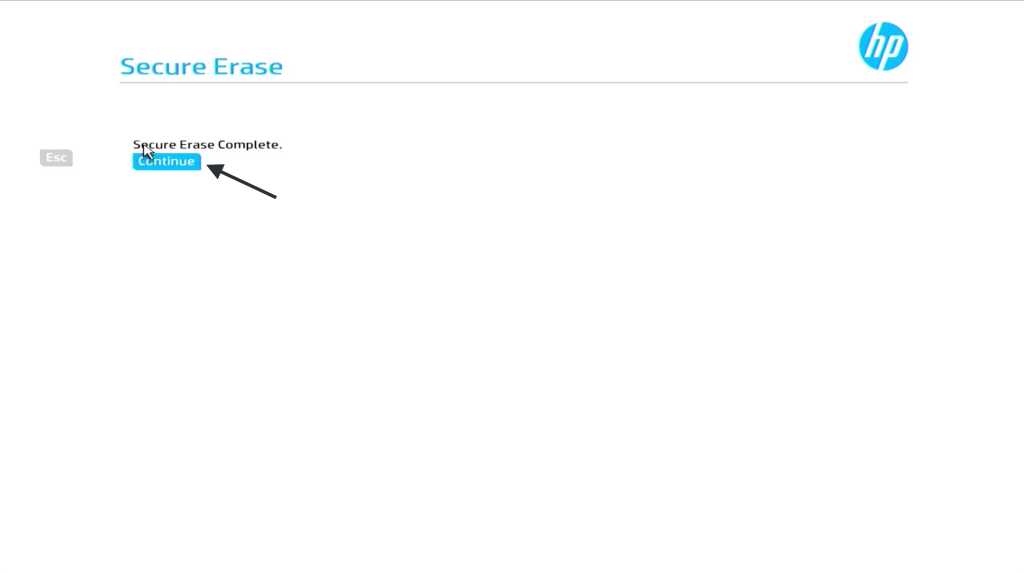
- Ensure that your PC remains powered on and wait for the process to finish. When it is done, click Continue (or Exit) to go to the main menu.
- Save the actions and exit
This is a fairly common operation and if your PC is not HP, you can find steps for your PC manufacturer easily in their Knowledge Base.
For NVMe SSDs, you might need to use a Linux boot disk and a tool like nvme-cli to send the NVMe Format or NVMe Sanitise command. This is an advanced option and is beyond most users but does essentially the same thing at a hardware level.
This is effectively a hardware-erase of the drive. Just double-check you picked the right SSD to avoid accidents!
Note: Under the hood… BIOS/UEFI secure erase and manufacturer tools use the SSD’s own “clean slate” commands to clear data.
Method 5: PSID Revert (for Self-Encrypting SSDs)
If your SSD is an Opal/Self-Encrypting Drive (SED), it may have a Physical Security ID (PSID) printed on the label. The PSID Revert feature immediately resets the drive’s encryption to factory state. Essentially, it discards the encryption key and instantly makes all data unreadable.
Steps are:
- Find the PSID code on your SSD’s sticker (a long alphanumeric key). Some tools (e.g. Samsung Magician or open-source sedutil) offer a “PSID Revert” option.
- Open manufacturer’s erasure tool.
- Enter the PSID when prompted and execute the revert. This will unlock and factory-reset the drive.
PSID Revert is very fast and wipes everything (including hidden blocks) by dropping the crypto key. It’s essentially guaranteed data loss. The catch is tht it only works if the drive was encrypted or locked. If your SSD was never encrypted, PSID Revert may not apply. Also it can only be done with specific tools.
Wipe an SSD on a Mac
For macOS users, secure erase options for SSDs are limited as Apple removed multi-pass in Disk Utility because of wear concerns. The simplest ways are:
On modern Macs (Apple Silicon or T2-chip Macs on Ventura/macOS 13+), the way is to navigate System Settings > General > Transfer or Reset > Erase All Content and Settings.
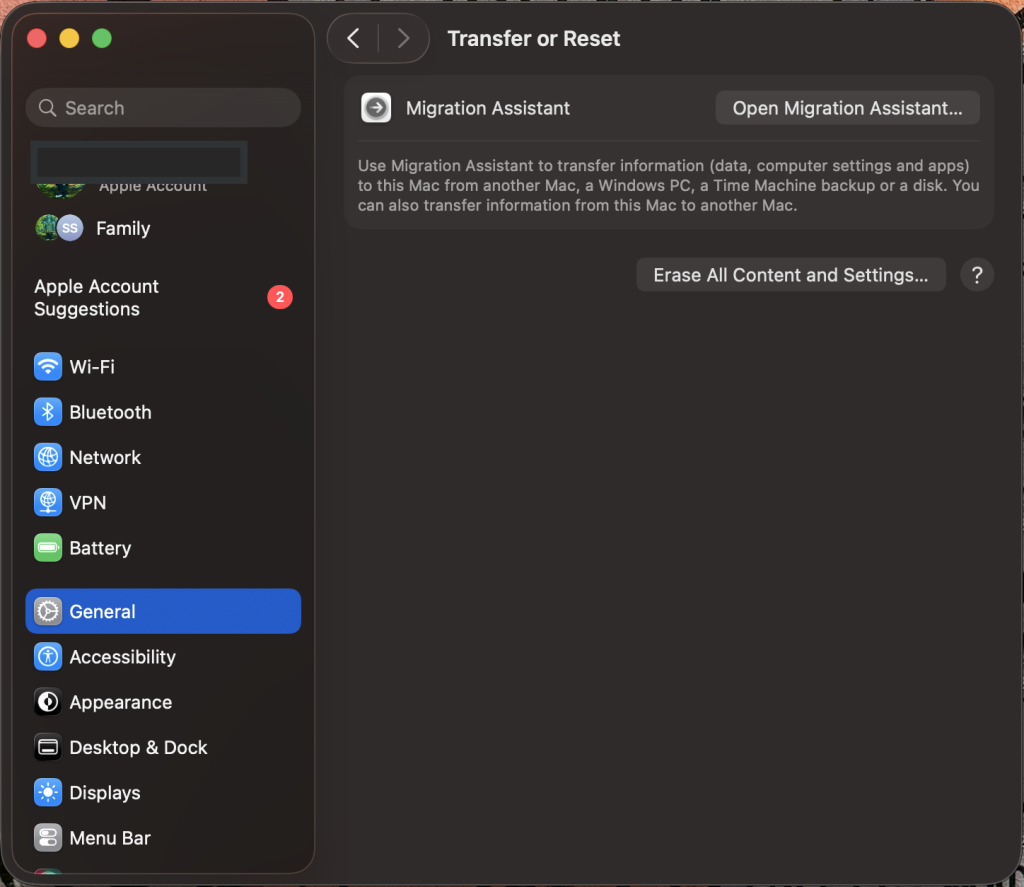
This logs you out and wipes everything in one go.
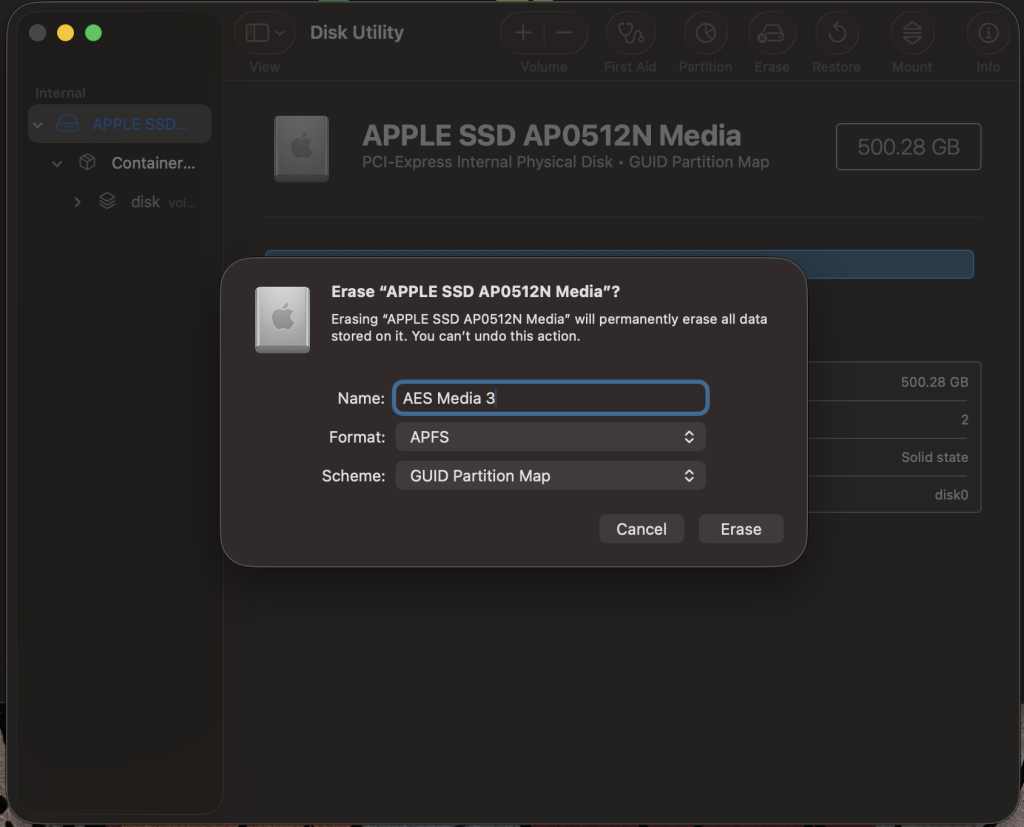
On older Macs, boot into Recovery Mode (hold Cmd+R at startup), open Disk Utility, select the SSD (or “Macintosh HD”), click Erase, and choose APFS.
This reformats the SSD. If you encrypted with a password first (FileVault) and then erase, it’s similar to a crypto-erase. You can also use a professional file erasure software for Mac for an easy and hassle-free job.
Note: After erasing, you’ll need to reinstall macOS or quit Disk Utility to shut down. Apple’s disk utility won’t show multi-pass options for SSDs, so a single-format plus encryption is the practical route.
Verify the SSD is Truly Erased
After wiping, you should verify nothing recoverable remains. A quick check: open Windows Disk Management… the SSD should show as unallocated with no partitions.
For peace of mind, you also can scan the SSD with Stellar Data Recovery for Windows. This free data recovery software will attempt to recover lost files and if there are, it’ll detect them. It’s a handy safety net to ensure you truly are done for the day!
Conclusion
Wiping an SSD completely is not just about deleting files… It is about making sure that the old data is not coming back any time. The safest way for this is to use the right method for your system whether it is Windows, Mac, a manufacturer tool, BIOS/UEFI or PSID revert. But you always verify the drive after wiping so that you know clearly that the data is truly gone and for good!
FAQs