The H.264 codec is everywhere… it’s used by over 83% of video professionals and plays on nearly all modern devices. Yet when any device or program says “missing H.264 codec,” it leaves you staring silently at a blank screen and honestly speaking, it is a frustrating surprise given how common H.264 is. Nonetheless, let’s break it down as to why it happens and then walk through step-by-step fixes.
Even with a top-notch system in place, you still need that right media player by your side. It’s just not enough to have great hardware as without that proper H.264 decoder installed in, your system can’t decode the video stream. Below, in our guide, we cover the typical causes of a missing H.264 codec error very briefly and then move on to those methods to resolve each issue.
Causes of the Missing H.264 Codec Error
Before fixing the error, it helps to know what causes it. Common culprits include:
- Outdated media player or OS.
- Missing codec packs.
- Unsupported format/container.
- Advanced encoding/profile.
- Hardware/driver limitations.
- Corrupted video file.
In short, the video’s H.264 stream might be fine, but something in the software/hardware chain is blocking it. Below we explore each fix in detail.
Methods to Fix the H.264 Codec Error
Depending on the cause, whichever it is from the above, go ahead and try these methods in the given order.
Method 1: Use a Different Media Player
If installing codecs isn’t enough, try a player that has H.264 built in. Modern players like VLC Media Player include a huge range of decoders by default. Let’s understand this here through VLC Media Player’s example as its one of the widely accepted software and is free to use.
- Download and install VLC Media Player: For Windows/Mac, go to the VLC website and download the latest version.
- Open your video with it: Right-click the problematic video file, choose “Open with” and select VLC (or set it as your default player).
- Play the file: In many cases, the new player will decode H.264 automatically and play the video.
A versatile player often resolves codec issues immediately. If this works, you’re done! If not, proceed to the next method.
Method 2: Install or Update H.264 Codecs
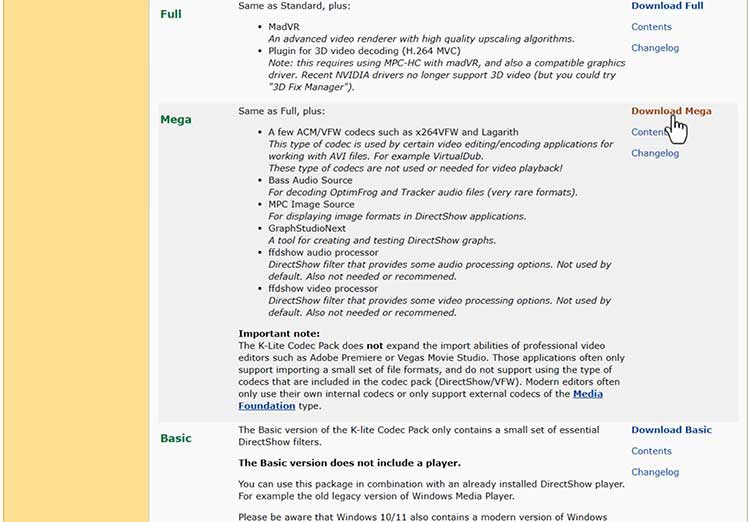
You can try installing the missing codecs, if any. K-Lite for Windows is widely recommended for this purpose.
- Download a trusted codec pack: Go to a reputable K-Lite Codec Pack mirror website. We recommend choosing the “Mega” edition as it includes H.264 as well as most of the other video codecs.
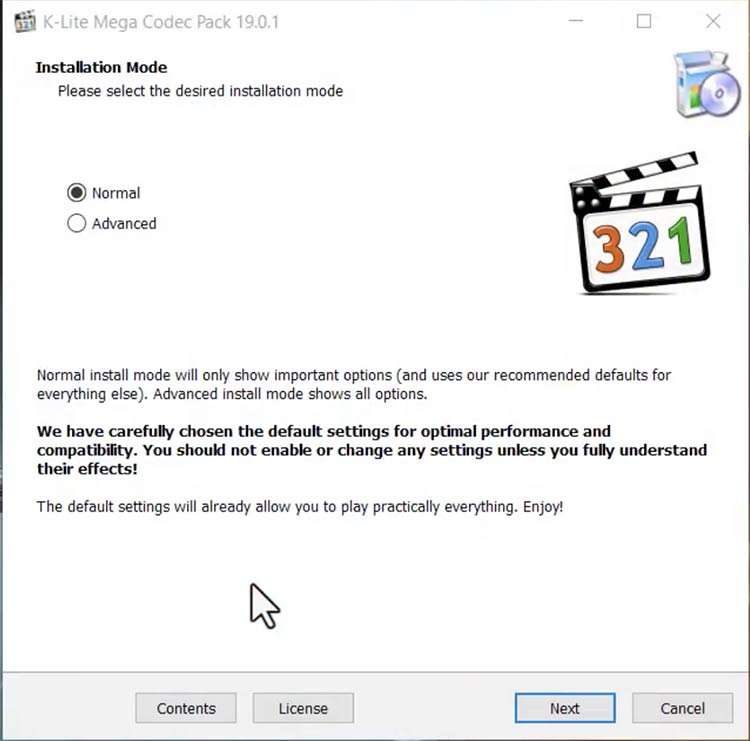
- Choose the “Normal” option and click Next to start that installation process.
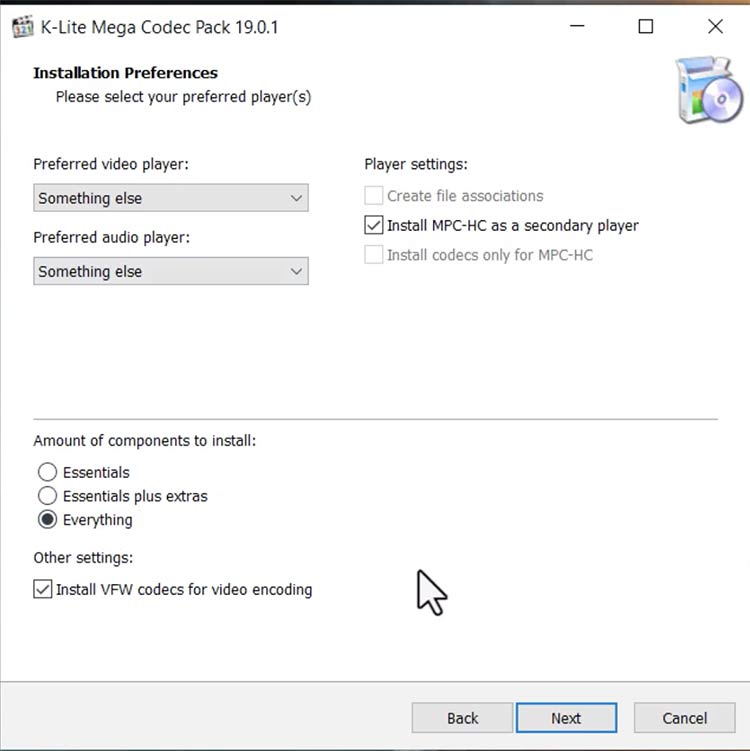
- In the place where it asks you to choose the Preferred video player and audio player, don’t choose a specific one and instead select Something else and move ahead.
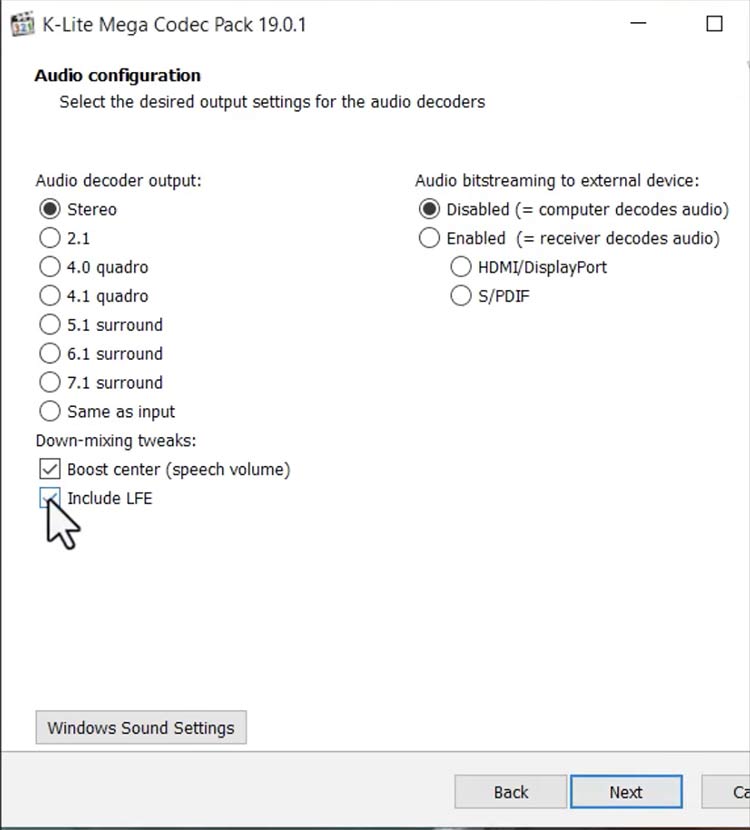
- Keep moving ahead with the default options till the Audio Configuration page. If you plan on using both headphones and speakers to watch these videos, don’t forget to check “Include LFE’. Then, click Next for the Installation page.
- Go ahead and Install the program. The installer will place new codec files on your system right away.
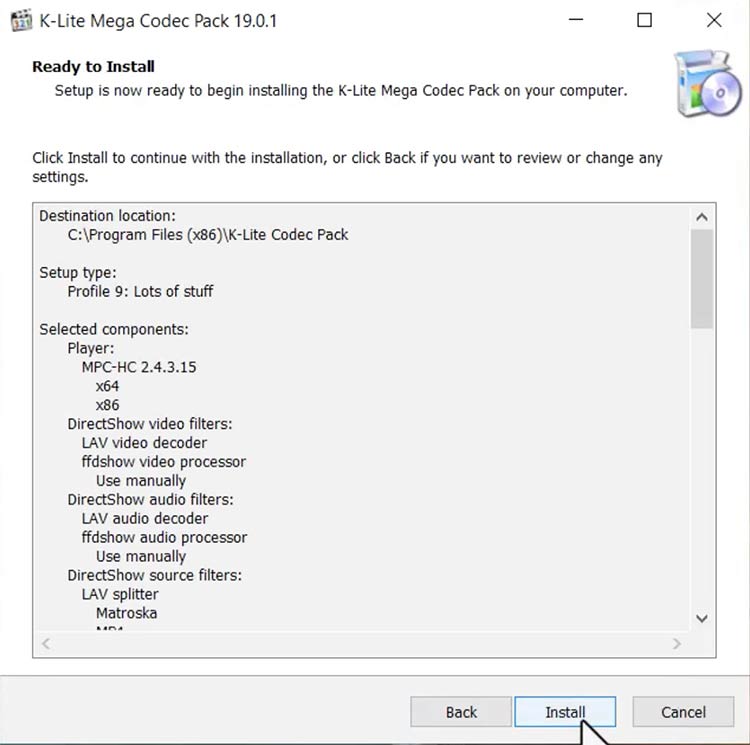
- Restart your player: After installation, close and reopen your media player (or restart your PC) so it loads the new codecs.
Once installed, your player (including Windows Media Player or QuickTime) should now recognize H.264 streams.
If you’re on Linux, install the multimedia extras (e.g. ubuntu-restricted-extras) or run sudo apt-get install ffmpeg libavcodec so H.264 is supported.
Installing codecs fixes problems when the error is simply “codec not found.” If the video was encoded any other way, you may still need to update your player or try another method.
Method 3: Encode the Video Again
Sometimes the file that you have is encoded in such a way that your system just struggles with it. Converting (or as techies call it – re-encoding) the video into a more standard format can fix playback issues. Just remember that you will have to re-encode the video with a compatible codec profile or container. We’ll explain it using a free tool called HandBrake.
- Download HandBrake: Go straight to the official HandBrake website, download the tool based on which OS you are on (Windows in this case) and install it.
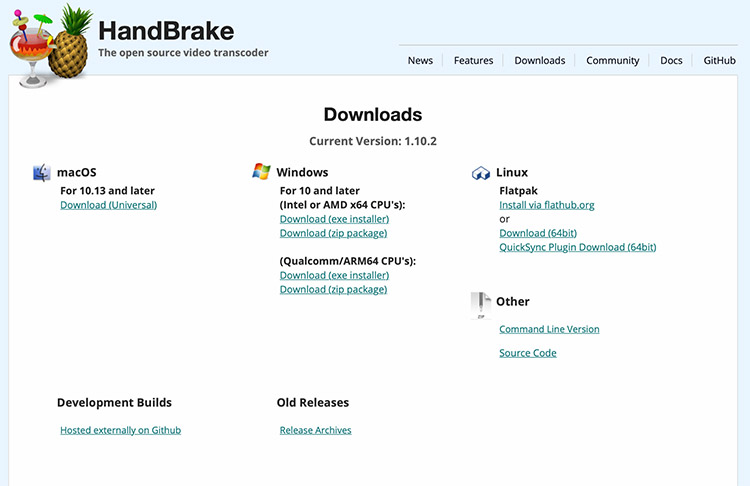
- Add the file: Go to File at the top-left corner and put your video in the tool.
- Go to video Section: Once uploaded, you shall see a preview of your file and multiple options in the form of a grid. Choose Video from here.

- Set the output format: Go ahead to the Video section, fix the codec as shown here, output as MP4 and re-confirm the location where you want to save the video from the Save As section at the bottom.

- Run the conversion: Click Start Encode to kick off the process and wait for it to finish.
- Play the new file: Try opening the converted video.
Re-encoding forces the video into a “known-good” format and usually, after conversion, any player should be able to play it without the missing codec error.
Just remember that converting can be slower for long videos, but if the problem persists even after this whole conversion, the file itself may be damaged to the core.
Method 4: Update System Components and Drivers
If your system components and drivers are not updated, the issue isn’t the codec itself really but how an outdated system handles it. Make sure everything is up to date:
- Install Windows Media Feature Pack (Windows N): If you’re that Windows “N” or “KN” edition, just download the Media Feature Pack from Microsoft’s website and install it right there. This adds the missing media libraries and decoders to Windows by itself.
- Update graphics drivers: Go to Intel/AMD/NVIDIA’s site and download the latest graphics driver for your GPU. Updated drivers often add or improve video decoding support.
These steps ensure your system has the necessary software “plumbing” for H.264. On modern systems, H.264 should work out of the box – so if it’s still failing, an update or missing component is often the reason. After updating, restart your PC and try the video again.
Note: If the error that we have mentioned above has started after a Windows upgrade or that graphics updates we receive, you just go ahead and roll your OS back to a previous restore point or driver version.
Method 5: Repair the Video File using Stellar Repair for Video
If none of the above works, the video file that you have itself may be corrupt. Specialized video repair tools can automatically fix many issues: they rebuild damaged headers and recover missing frames. Stellar’s video repair software is the best video repair software designed to repair corrupt or inaccessible video files. Here’s how to use it:
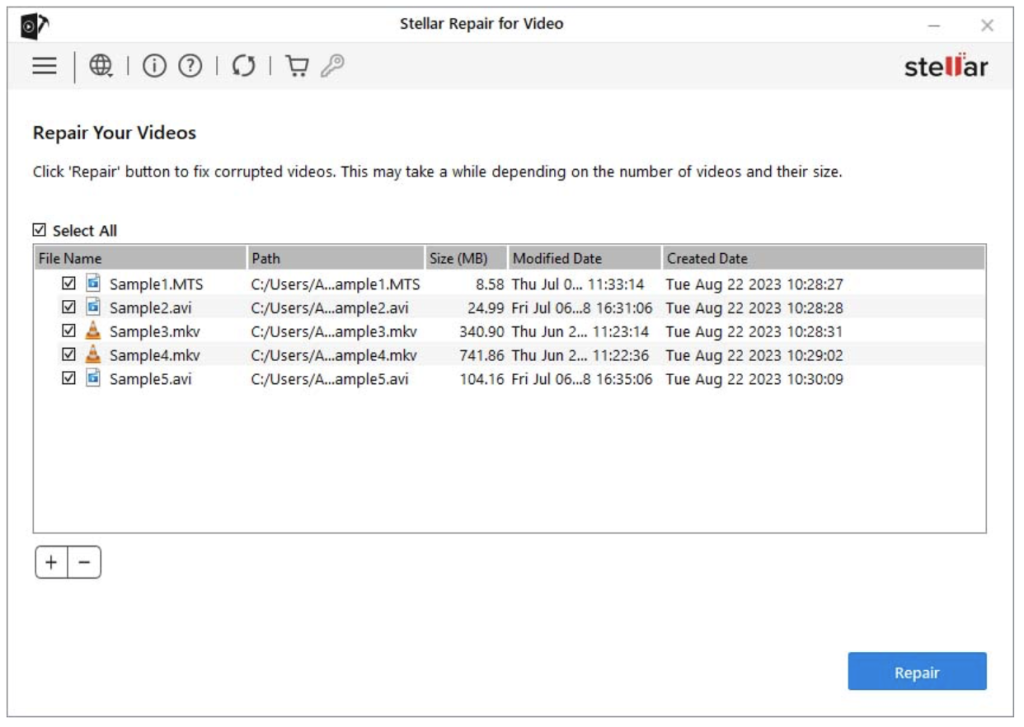
- Download and install the repair software: Get the Stellar Repair for Video program from the official website and install it on your PC.
- Run the program and add your file: Launch the software. Click Add Videos and select the H.264 video that’s giving you that error.

- Start the repair: After that video appears on the list, just choose it and click the Repair button. The tool will scan and fix the video file. This process may take a minute or two depending on file size.
- Preview and save: When it’s done, you’ll be seeing a preview of that repaired video it produced. If all looks good to you, just click that “Save” button and choose a folder location where that output video’ll go.
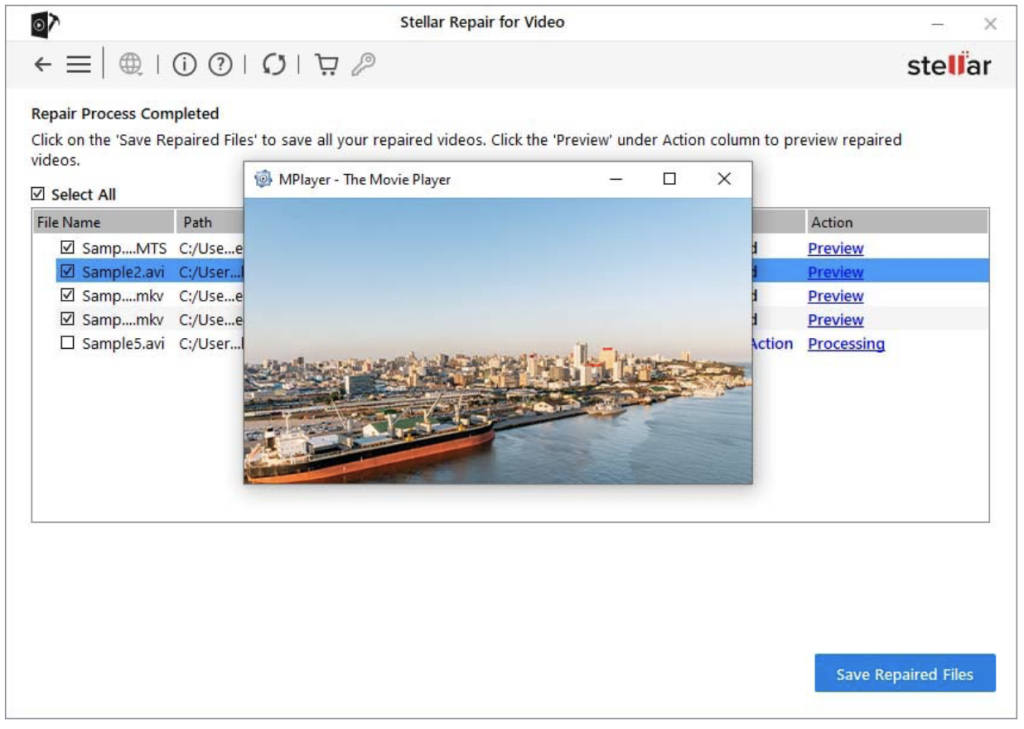
Using a repair tool is effectively a last resort, but it often works when other methods fail. The repaired video will have its internal structure corrected, letting any player decode the H.264 stream properly. In fact, experts note that fixing a corrupted file “allows the media player to correctly identify and play the video using the appropriate codec”. Try playing the saved output – in most cases, the missing codec error will be gone.
Conclusion
A “Missing H.264 codec” error usually isn’t permanent doom – it just means your system needs the right tools or settings to decode the video. As we’ve covered, start by updating or installing the correct codecs (for example, the K-Lite pack on Windows) or by using a player like VLC that has H.264 built in. Converting the file or installing system updates often does the trick. If all else fails, remember that repairing the video file itself is an option.
When even geeky troubleshooting doesn’t help, you have the Best Video Repair Software at your disposal. It can rescue your video by rebuilding its damaged pieces and restoring H.264 playback. Don’t give up on your footage – with the right fixes (or tools), you’ll be watching again in no time!
Sources: We’ve referenced industry guides and codec experts throughout (cited above) to ensure these methods are up-to-date and reliable