A Synology RAID set can fail, degrade, crash, or break due to several reasons. These include mechanical failure with member drive/s, an issue with the hardware components (SATA cable, improper connections, or more), or a logical error introduced because of a malware or a buggy firmware update. When it happens, both the RAID set and the data on it are no longer accessible to the users. In such a scenario, DiskStation Manager (DSM) can be used to ascertain the number of failed drives. Then, a specialized NAS data recovery software to recover data from it.
Read this blog to learn more about a broken Synology RAID set and discuss the step-by-step procedure to recover data from a broken Synology RAID set.
What are the Signs of a Broken Synology RAID Set?
Listed below are some signs to identify a broken/failed RAID set in a Synology NAS:
- Unable to mount the storage pool in the NAS
- DSM shows warning messages like “Problem with the partitions/volumes”
- Drives showing abnormal status in Storage Manager
- Sounds like clicking or grinding noise from the member drives; beeps from Synology NAS, etc.
- LED indicator showing various statuses, such as a blinking green LED denotes Lost Configuration.
As soon as the configured RAID set crashes or fails due to a member drive failure, you’ll receive a notification. Cease all read/write operations immediately and check the system logs, status, and health of the member drives from DiskStation Manager (DSM). This’ll help you gauge the extent of damage.
Here, you’ll also find the details about the number of member drives that have failed. For example: If you are using RAID-5 or RAID-6 configurations that offer data redundancy, they can sustain 1-drive failure and 2-drive failure, respectively.
If the number of disk failure is within the defined limits, you can easily recover data from your broken Synology RAID set using a specialized NAS data recovery software like Stellar Toolkit for Data Recovery.
It is an advanced desktop-based application that recovers all kinds of data, such as files and folders, media files, etc., from a broken Synology RAID set. Its advanced data recovery algorithms can recover lost files from inaccessible Synology NAS drives. It can also recover lost files and folders from SHR and other types of storage media, like HDDs, SSDs, flash drives, CDs/DVDs, and more.
Here is the stepwise procedure to perform Synology data recovery using this software:
Pre-Activity:
Before you use the NAS data recovery software:
- Disconnect the member drives carefully from the NAS enclosure and label them in the given order.
- Connect the drives in the same order to a Windows PC via a RAID controller interface card and SATA cables connected to it.
After connecting the member drives to the Windows PC, follow the steps given below:
- Download and install Stellar Toolkit for Data Recovery from its official website.
- Launch the software.
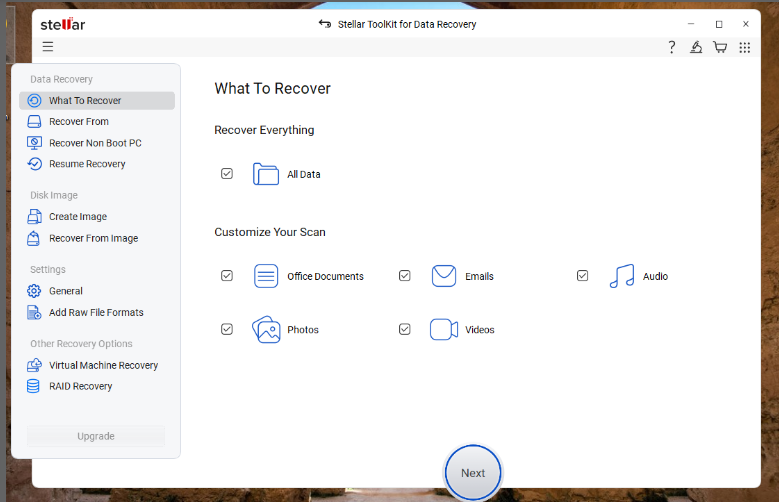
- The Select What to Recover screen will appear. Select the type of data to recover. By default, All Data is selected. Click Next.
- Next, you will see the Recover From screen. The software automatically detects the connected drives and displays the NAS with its brand name under the Connected Drives section. Click Scan to proceed.
- The software will scan the connected NAS drives and show the recoverable data.
- After previewing the files, choose the files that you want to recover. Click Recover.
- Next, click on Browse to select the location to save the selected data.
- After selecting the destination, click on Start Saving.
- The software will start saving the recoverable files at the selected location. When finished, it will show the Data Saved Successfully prompt.
Related Read – Synology NAS: Data Organization and Recovery
How to Rebuild the Failed Synology Raid Set?
After you have successfully recovered data from your broken Synology RAID-based NAS, you can rebuild the failed RAID. However, it will depend upon the type of RAID configuration and the number of disk failure.
If you have a one-bay model or have used a single drive to set up a storage pool without data redundancy (JBOD, single-disk pool, or SHR with 1 drive), you’ll need to restore lost data from a backup such as Synology C2 backup, Hyper Backup, etc., and then rebuild the pool.
In case of a multi-bay model with multiple drives used to configure a RAID configuration with data redundancy – RAID-5, RAID-6, RAID-F1, SHR-1/SHR-2, you can
- Hot-swap the failed member disk/s (if within the limits) and then rebuild the array.
- Rebuild the array if the disk failure has exceeded the permissible limits, and then use an existing backup solution to recover lost data
Related Read – Recovering Data from Synology NAS Server – A Comprehensive Guide
How to Avoid NAS Failure and Consequent Data Loss?
Here are some tips to prevent Synology NAS failure and avoid data loss from it:
- Regularly monitor the health of member drives using S.M.A.R.T. tools.
- Avoid interruptions while writing data or rebuilding the RAID array.
- Avoid using RAID after a disk failure. It becomes prone to subsequent disk failures.
- Use UPS and surge protectors to avoid frequent power cuts and surges.
- Implement a robust backup strategy like the 3-2-1 backup strategy.
- Avoid incorrect RAID configuration while rebuilding the failed RAID array.
- Keep a professional NAS data recovery software installed on your system.
Related Read – How do I recover data from a Synology NAS that is no longer accessible?
Conclusion
Synology NAS based on RAID arrays may break or crash due to disk failure caused by logical, mechanical, or physical issues. Often, it occurs due to logical errors such as file system errors, virus or malware infection, abrupt shutdown, device driver issues, etc.
You can use a powerful NAS data recovery software such as Stellar Toolkit for Data Recovery. It is a DIY tool to help you easily recover data from a failed, crashed, degraded, or broken Synology RAID set.