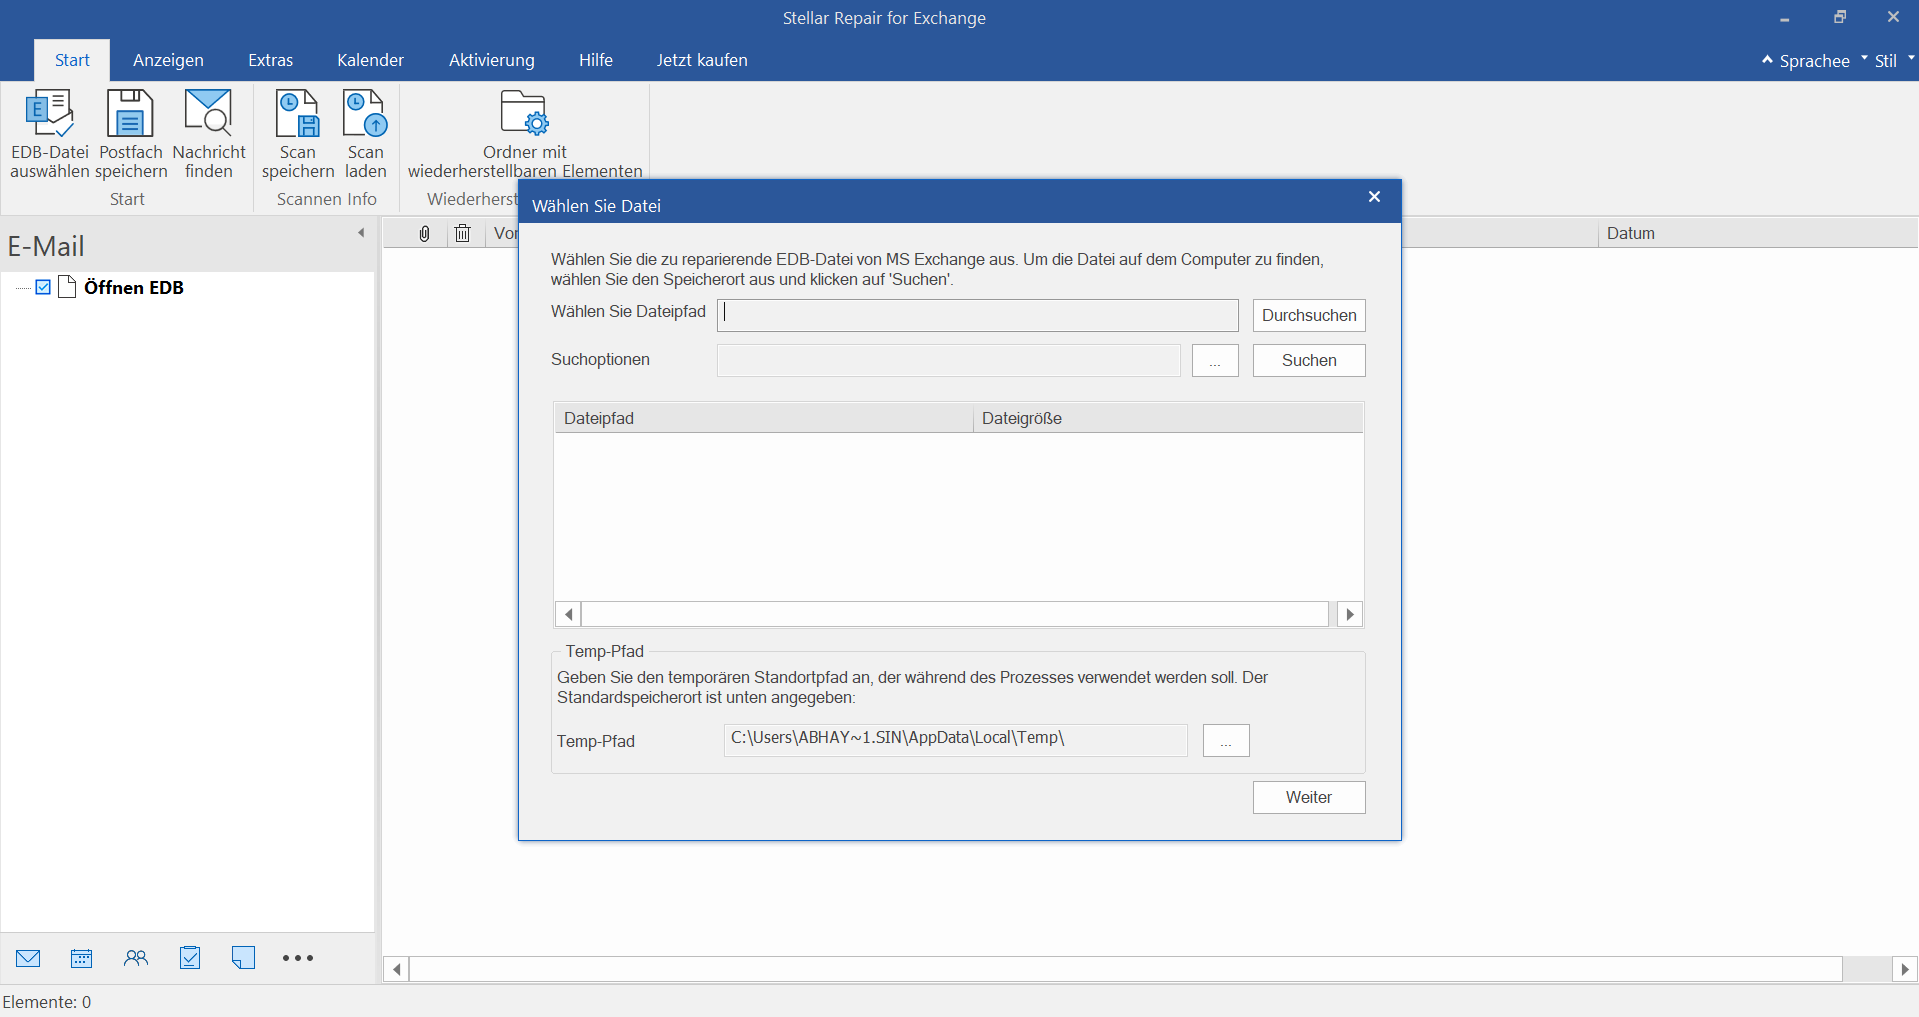
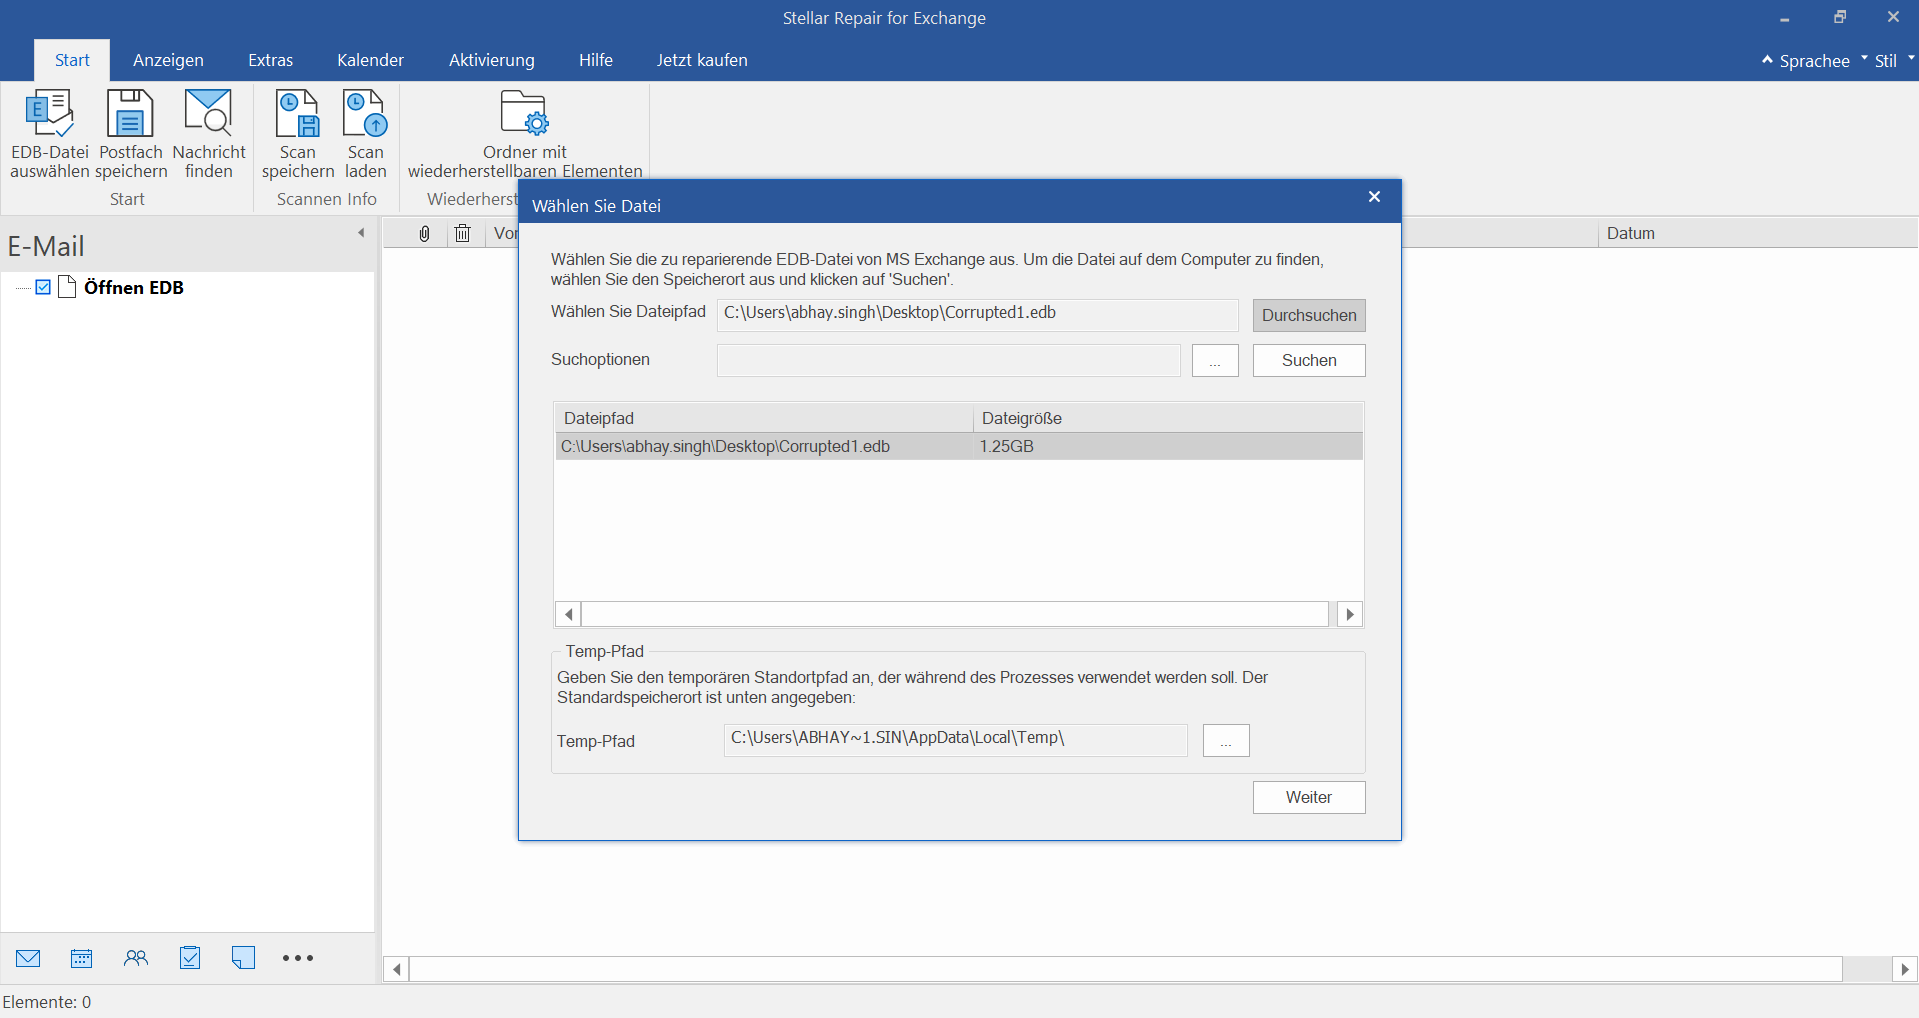
Dies ist der Startbildschirm der Software Stellar Repair for Exchange. Klicken Sie auf Durchsuchen, um die EDB-Datei auszuwählen, wenn Sie den Speicherort der Datei kennen. Klicken Sie auf die Schaltfläche Suchen, wenn Sie den Speicherort der EDB-Datei nicht kennen. Die Software findet automatisch alle EDB-Dateien, die in dem ausgewählten Volume, Ordner oder Unterordner gespeichert sind, und zeigt sie an. Sie können auch den 'Temp-Pfad' ändern, wenn die Datenbank sehr groß ist.
Schritt 2
EDB-Datei auswählen
Wählen Sie im Fenster Datei auswählen die EDB-Datei aus, die Sie reparieren möchten, und klicken Sie auf Weiter.
Schritt 3
Scan-Modus auswählen
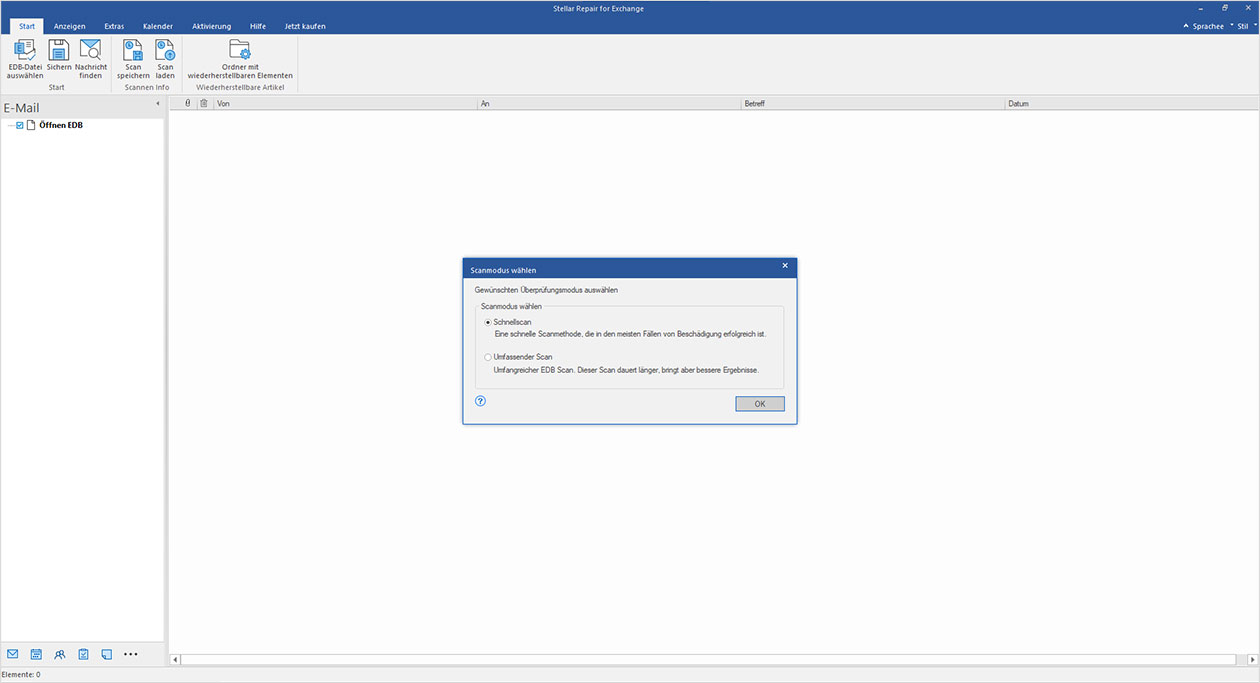
Auf dem nächsten Bildschirm sehen Sie zwei Optionen für die Prüfung - Schnellprüfung und Detailprüfung. Die Option Schnellüberprüfung ist schnell und führt in den meisten Fällen der Beschädigung zum Erfolg. Die Option Detaillierte Prüfung scannt die EDB-Datei gründlich und liefert bessere Ergebnisse. Wählen Sie die gewünschte Scan-Option und klicken Sie auf OK.
Schritt 4
Vorschau und Auswahl von Postfächern
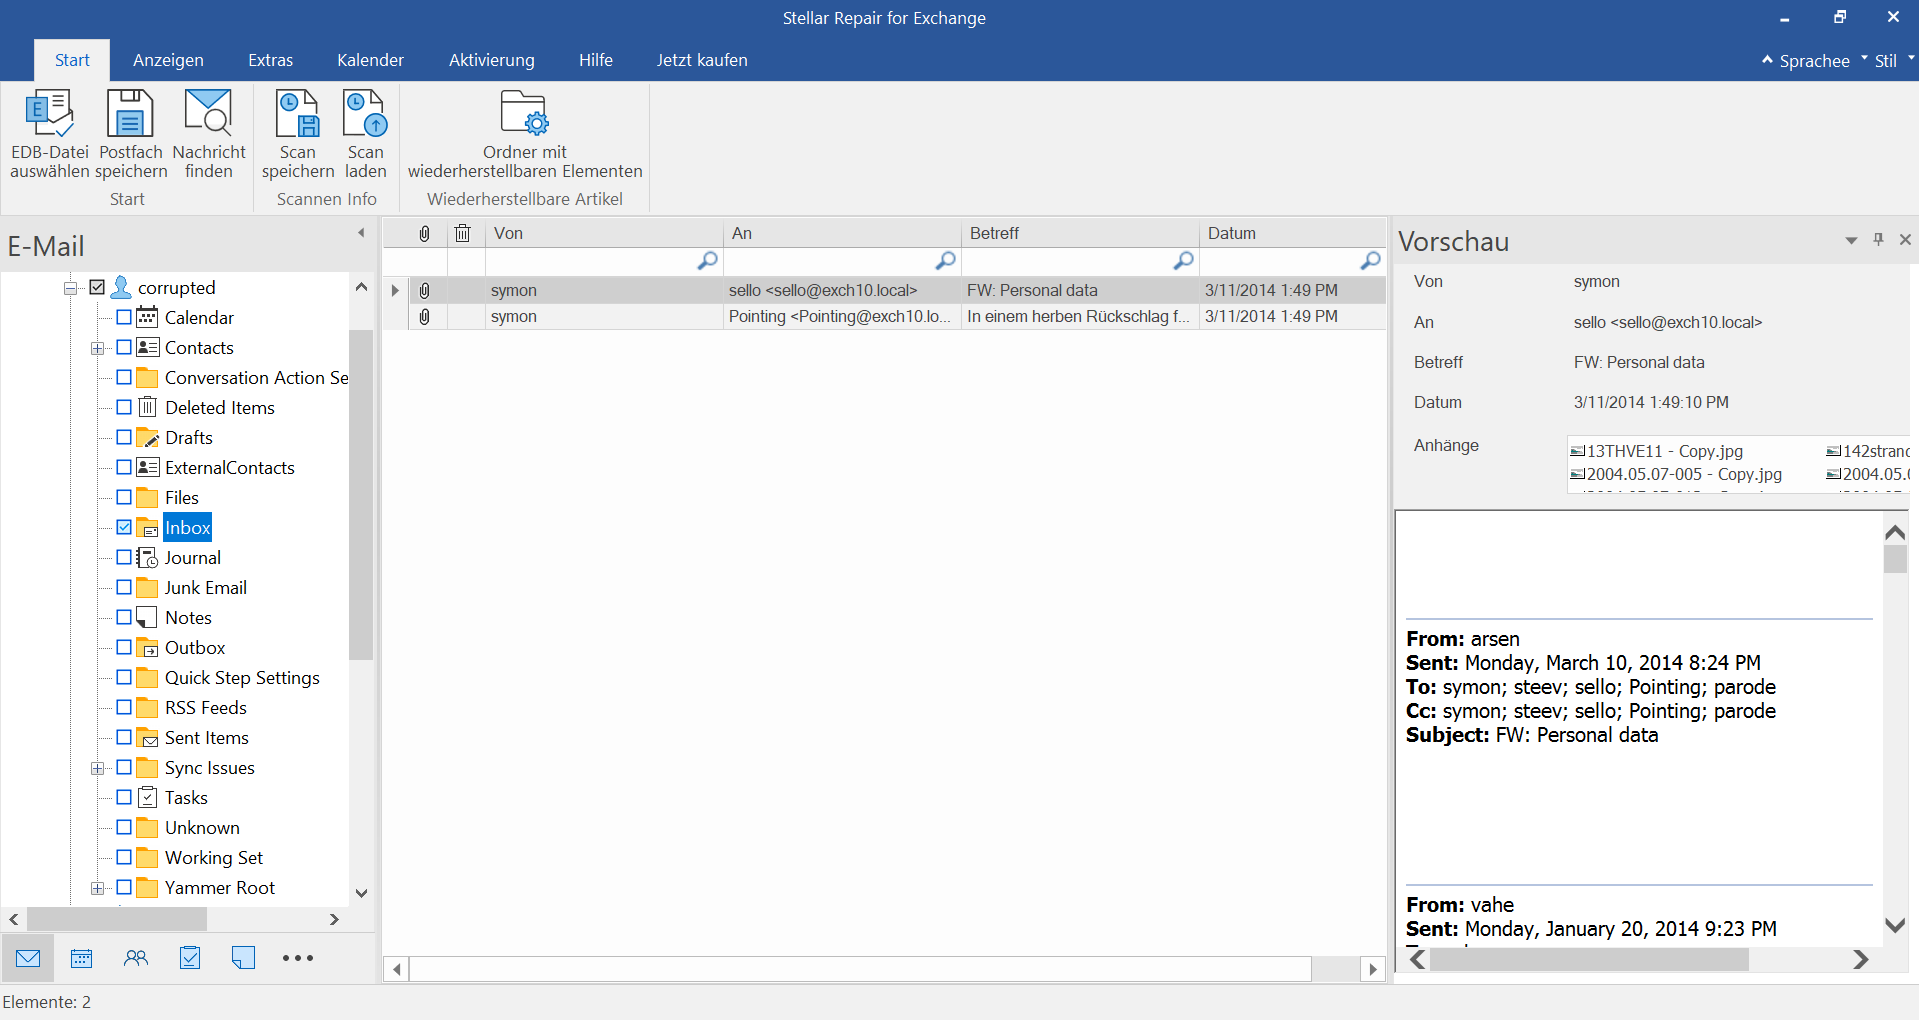
Wenn der Scan abgeschlossen ist, listet die Software alle wiederherstellbaren Postfächer im linken Fensterbereich auf. Sie können eine Vorschau der wiederherstellbaren Daten anzeigen. Wählen Sie dann alle oder bestimmte Postfächer aus, die Sie wiederherstellen möchten, und klicken Sie auf der Registerkarte Start auf Postfach speichern.
Schritt 5
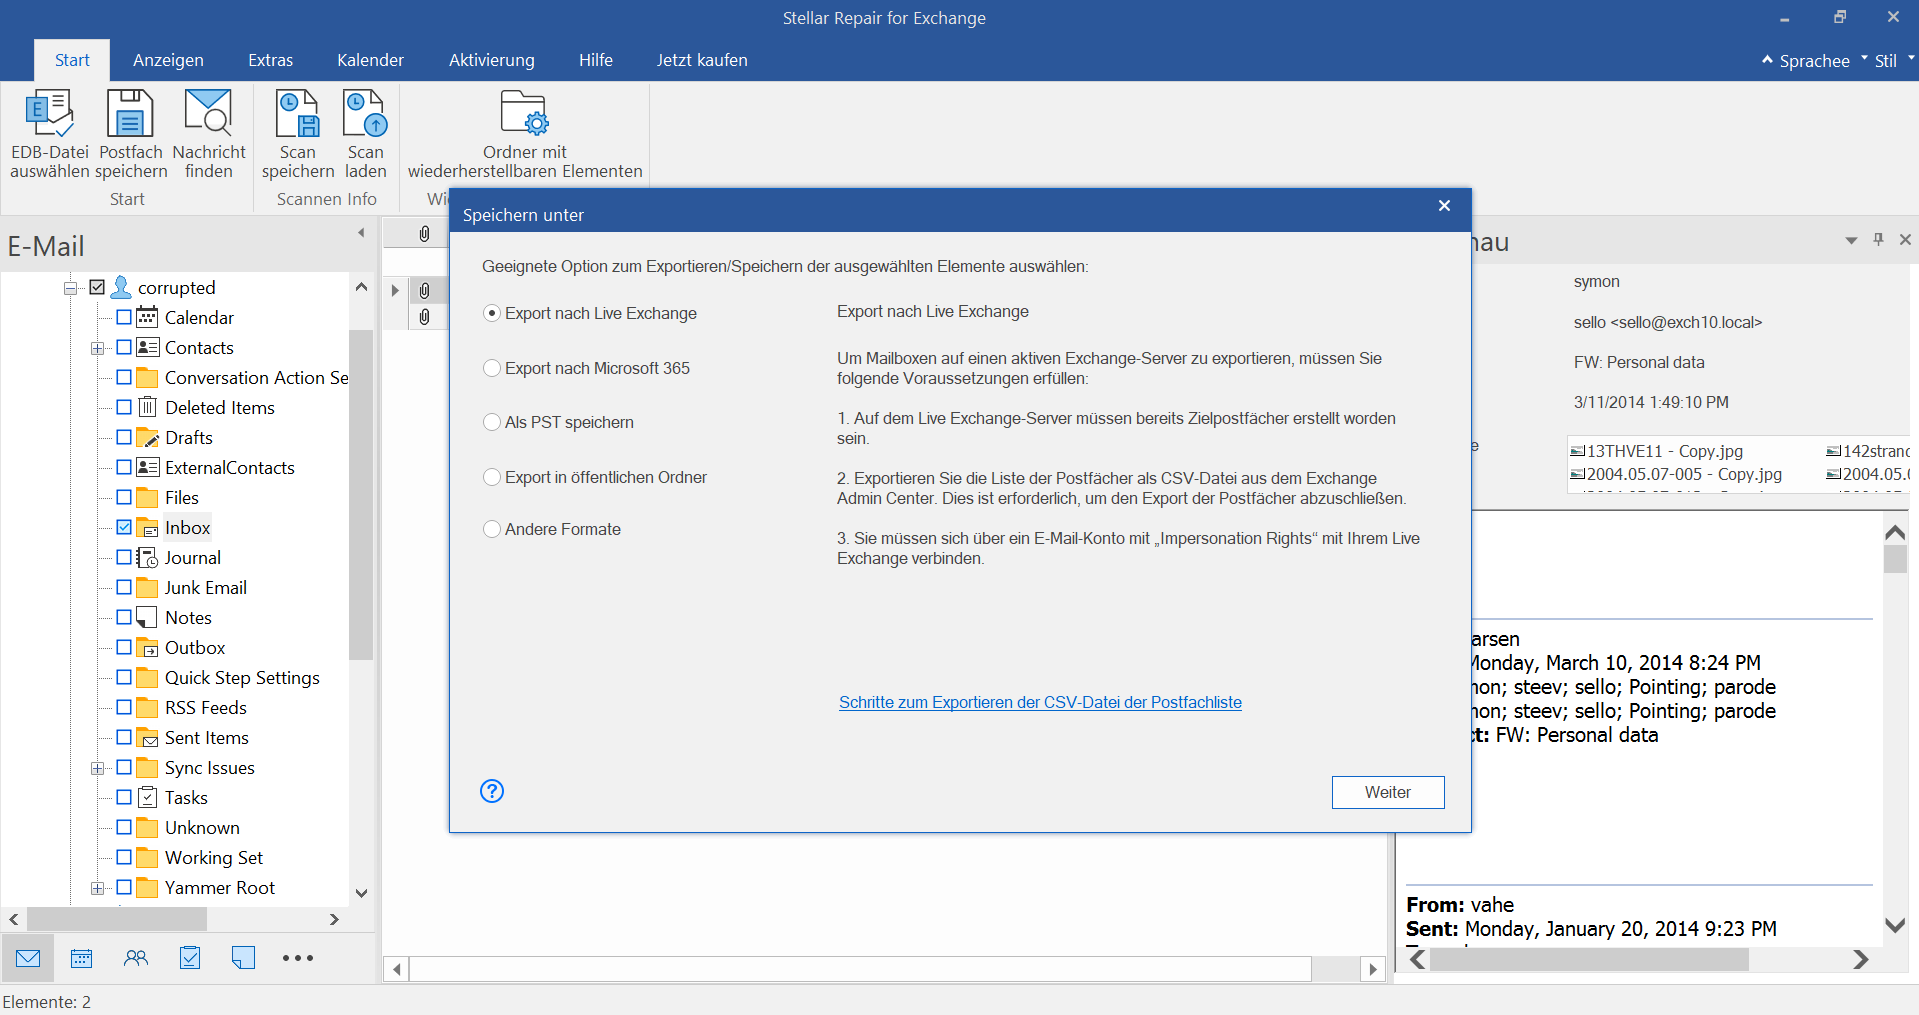
Zu Live Exchange exportieren
Um die wiederhergestellten Postfächer auf den Live Exchange Server zu exportieren, wählen Sie Fenster Speichern unter die Option Zu Live Exchange exportieren und klicken auf Weiter.
Schritt 6
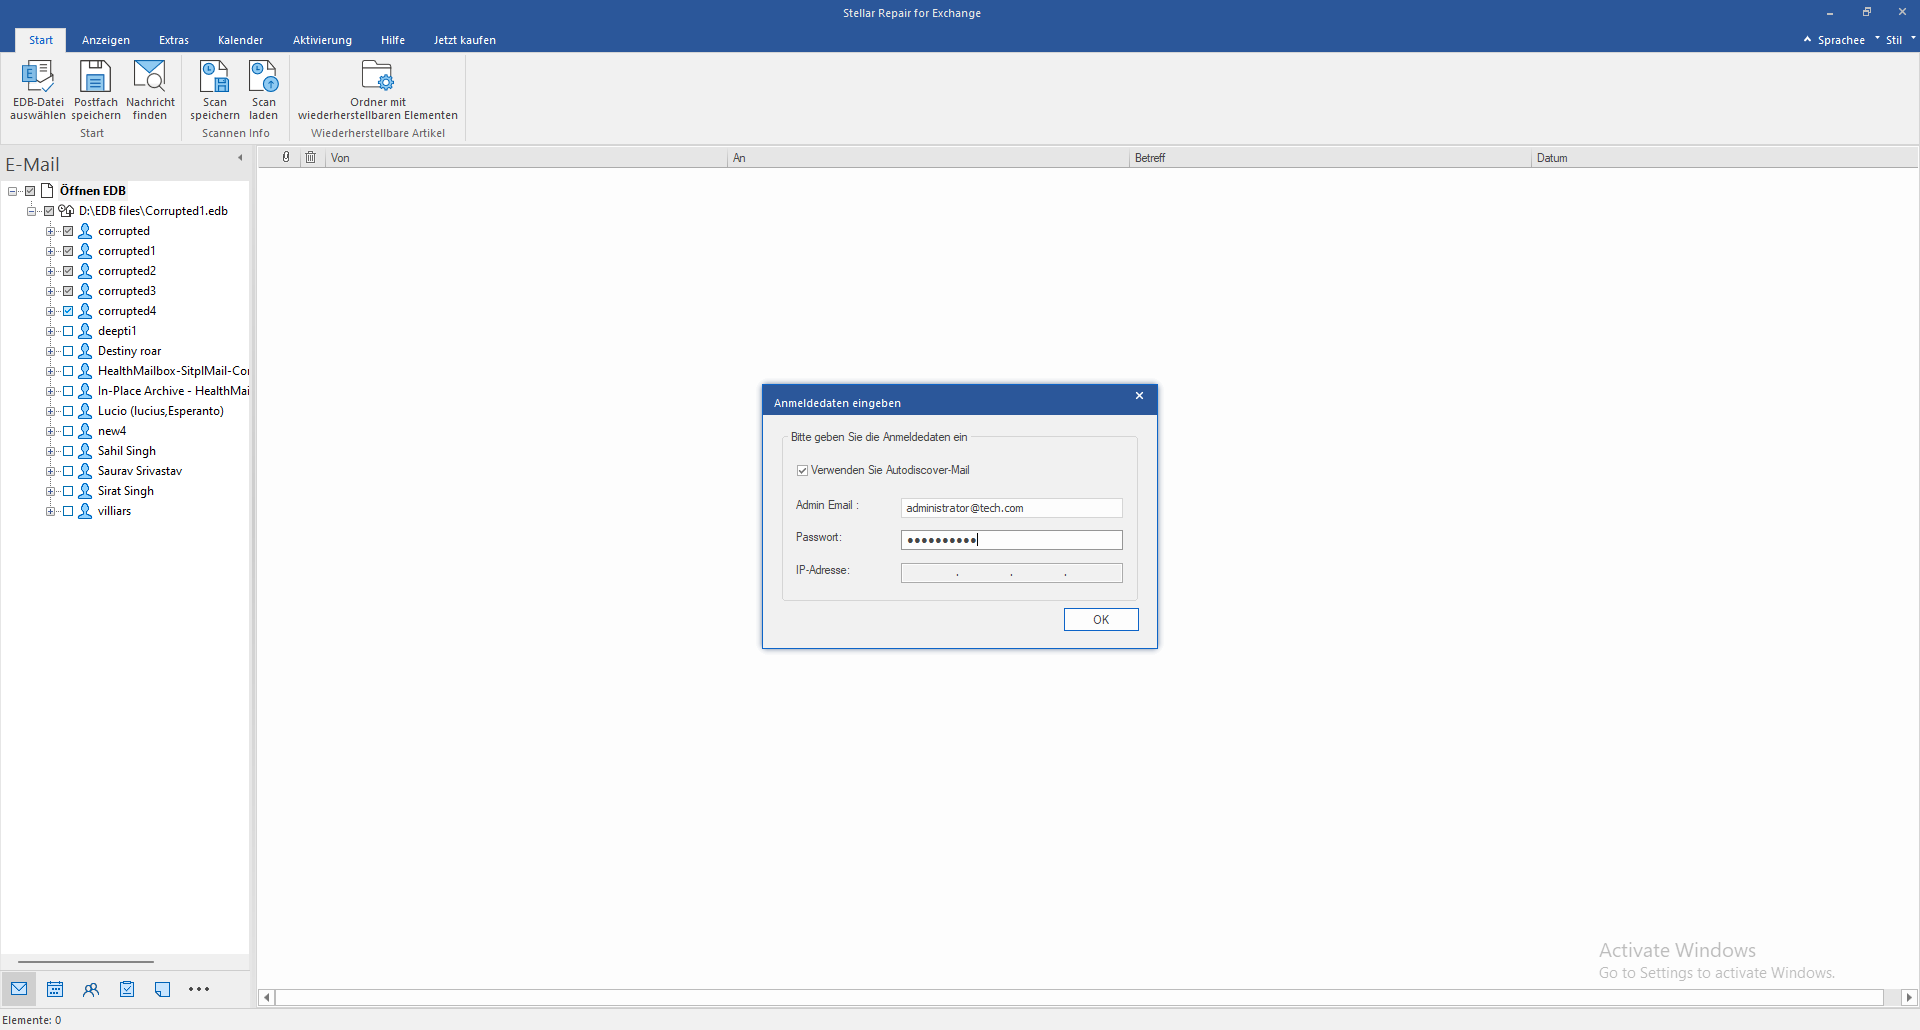
Anmeldedaten eingeben
Auf dem nächsten Bildschirm müssen Sie eine Verbindung zu dem aktiven Exchange-Server herstellen. Aktivieren Sie dazu das Kontrollkästchen Autodiscover E-Mail verwenden und geben Sie die Admin-E-Mail und das Passwort ein. Die Software stellt dann automatisch eine Verbindung zu dem mit der E-Mail-ID verbundenen Exchange-Server her. Wenn Sie die Anmeldedaten und die IP-Adresse des Zielservers manuell eingeben möchten, können Sie das Kontrollkästchen Automatische E-Mail-Erkennung verwenden deaktivieren. Sobald Sie die Details eingegeben haben, klicken Sie auf OK.
Schritt 7
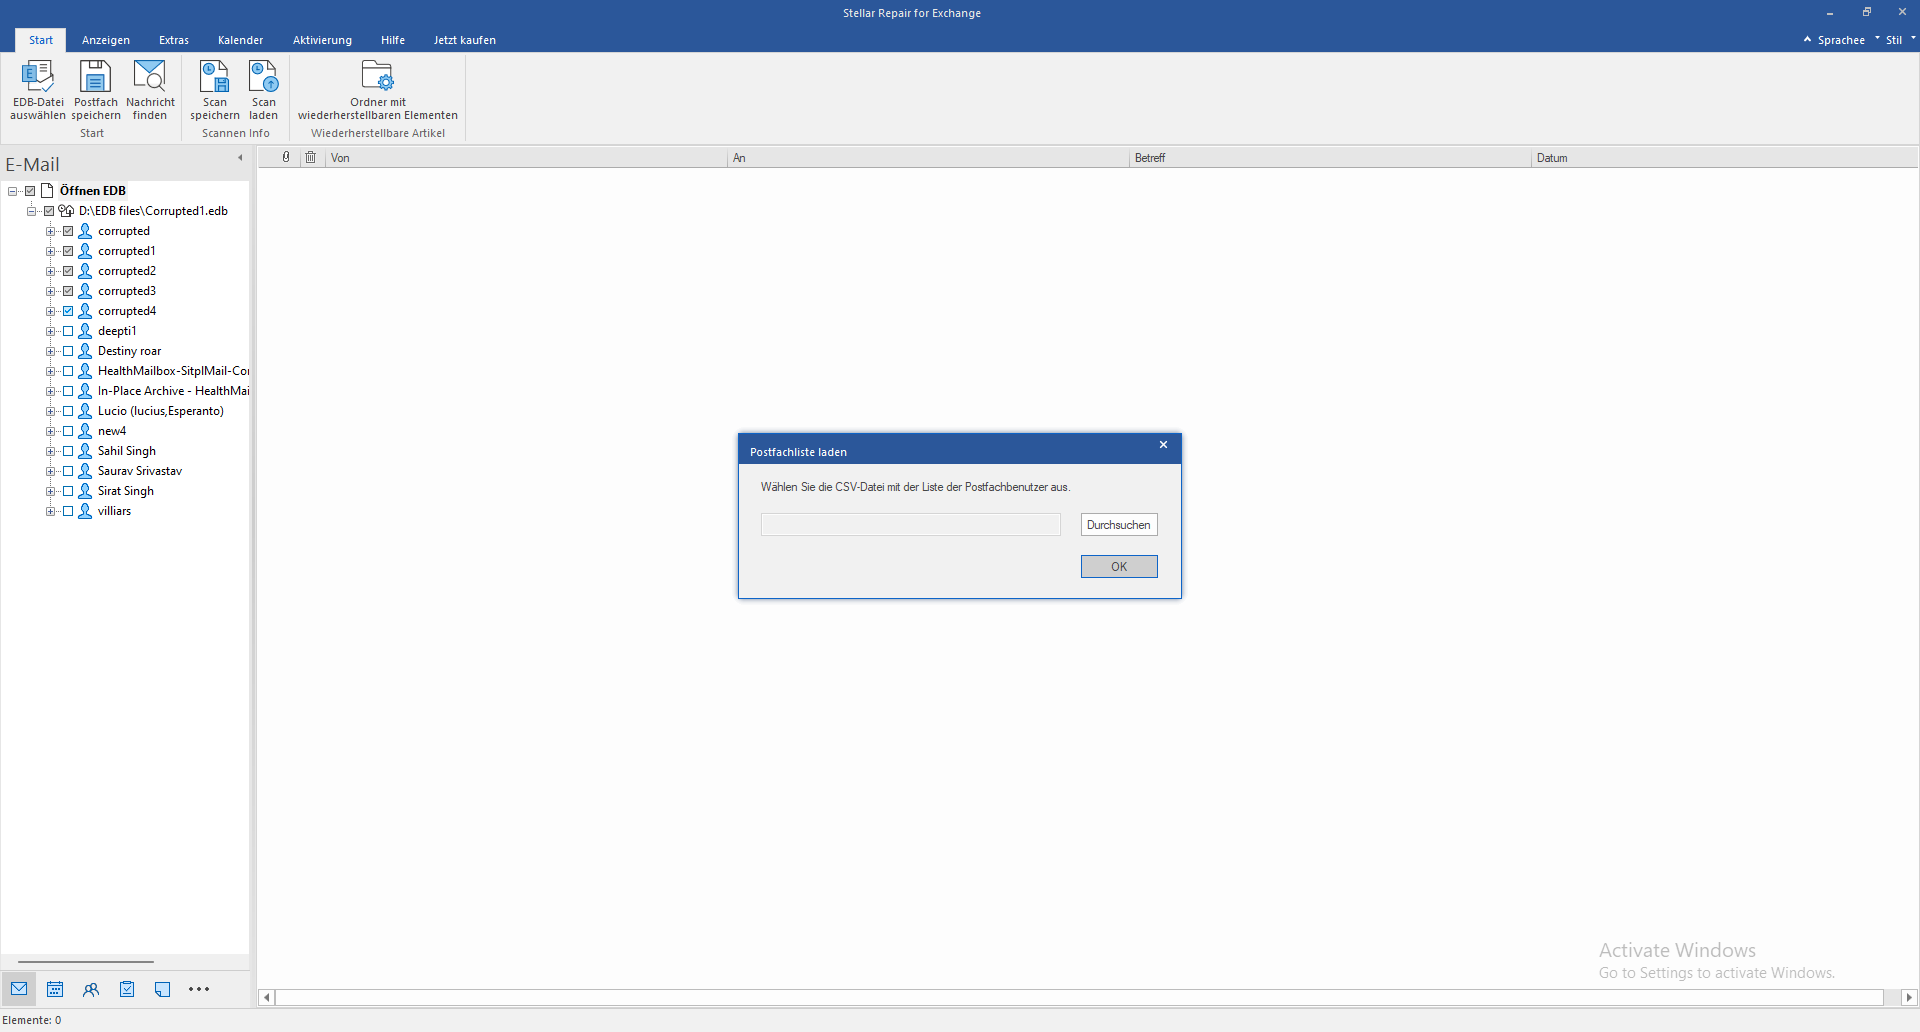
CSV-Datei hochladen
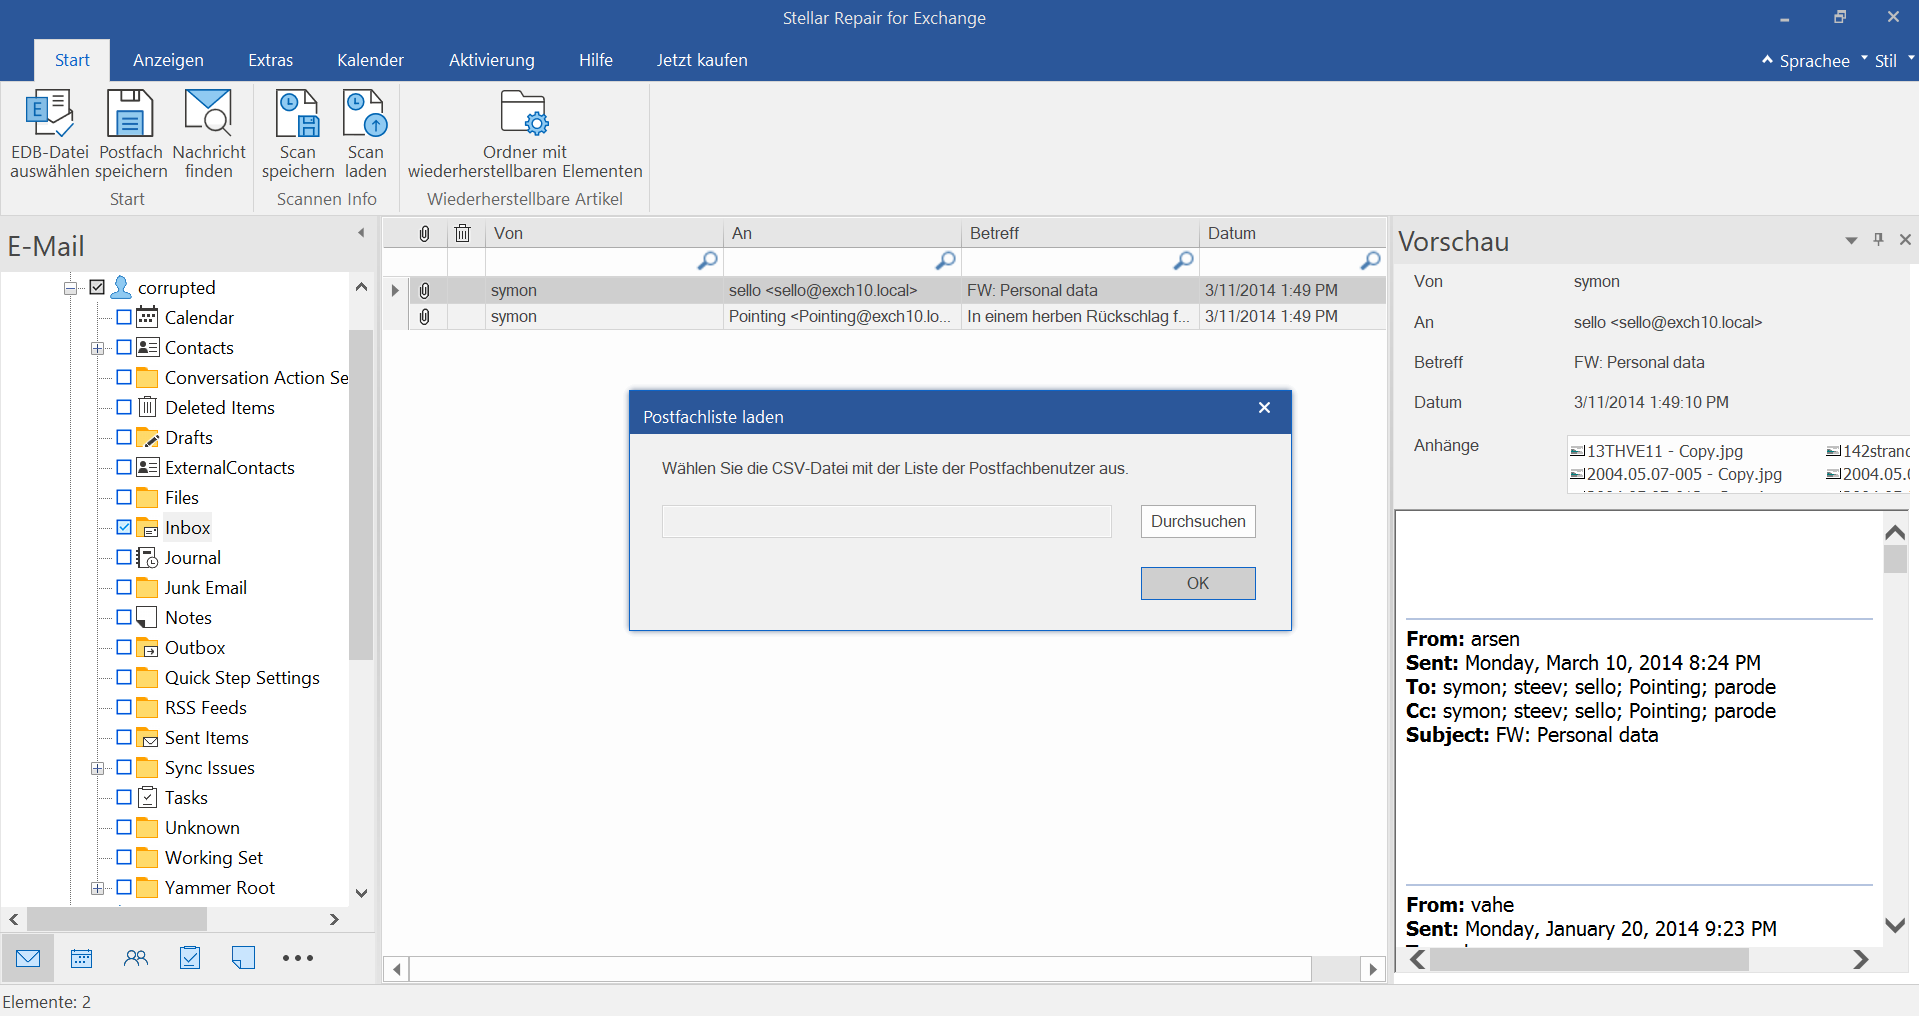
Das Dialogfeld Mailboxliste laden wird angezeigt. Hier müssen Sie die CSV-Datei auswählen, die die Liste der Postfachbenutzer des Zielservers enthält. Klicken Sie auf die Schaltfläche Durchsuchen, um die CSV-Datei auszuwählen, und klicken Sie dann auf OK.
Schritt 8
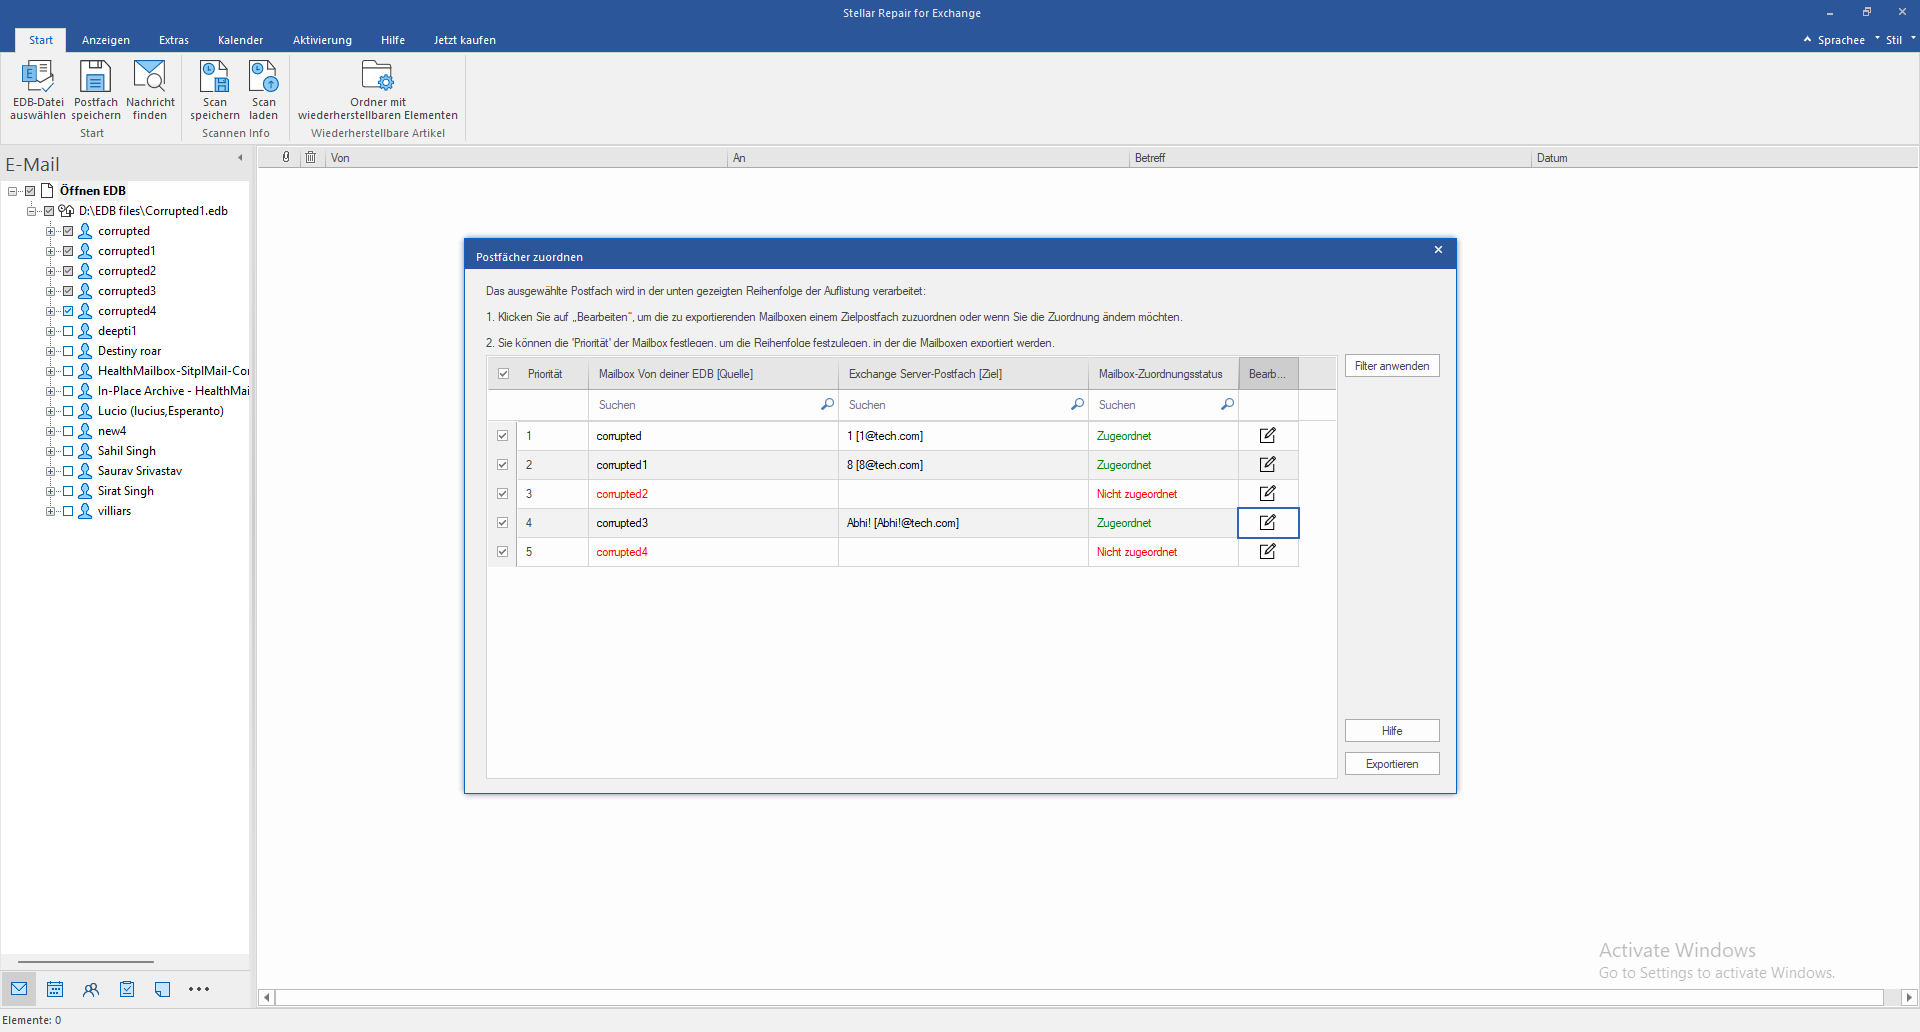
Karte der Briefkästen
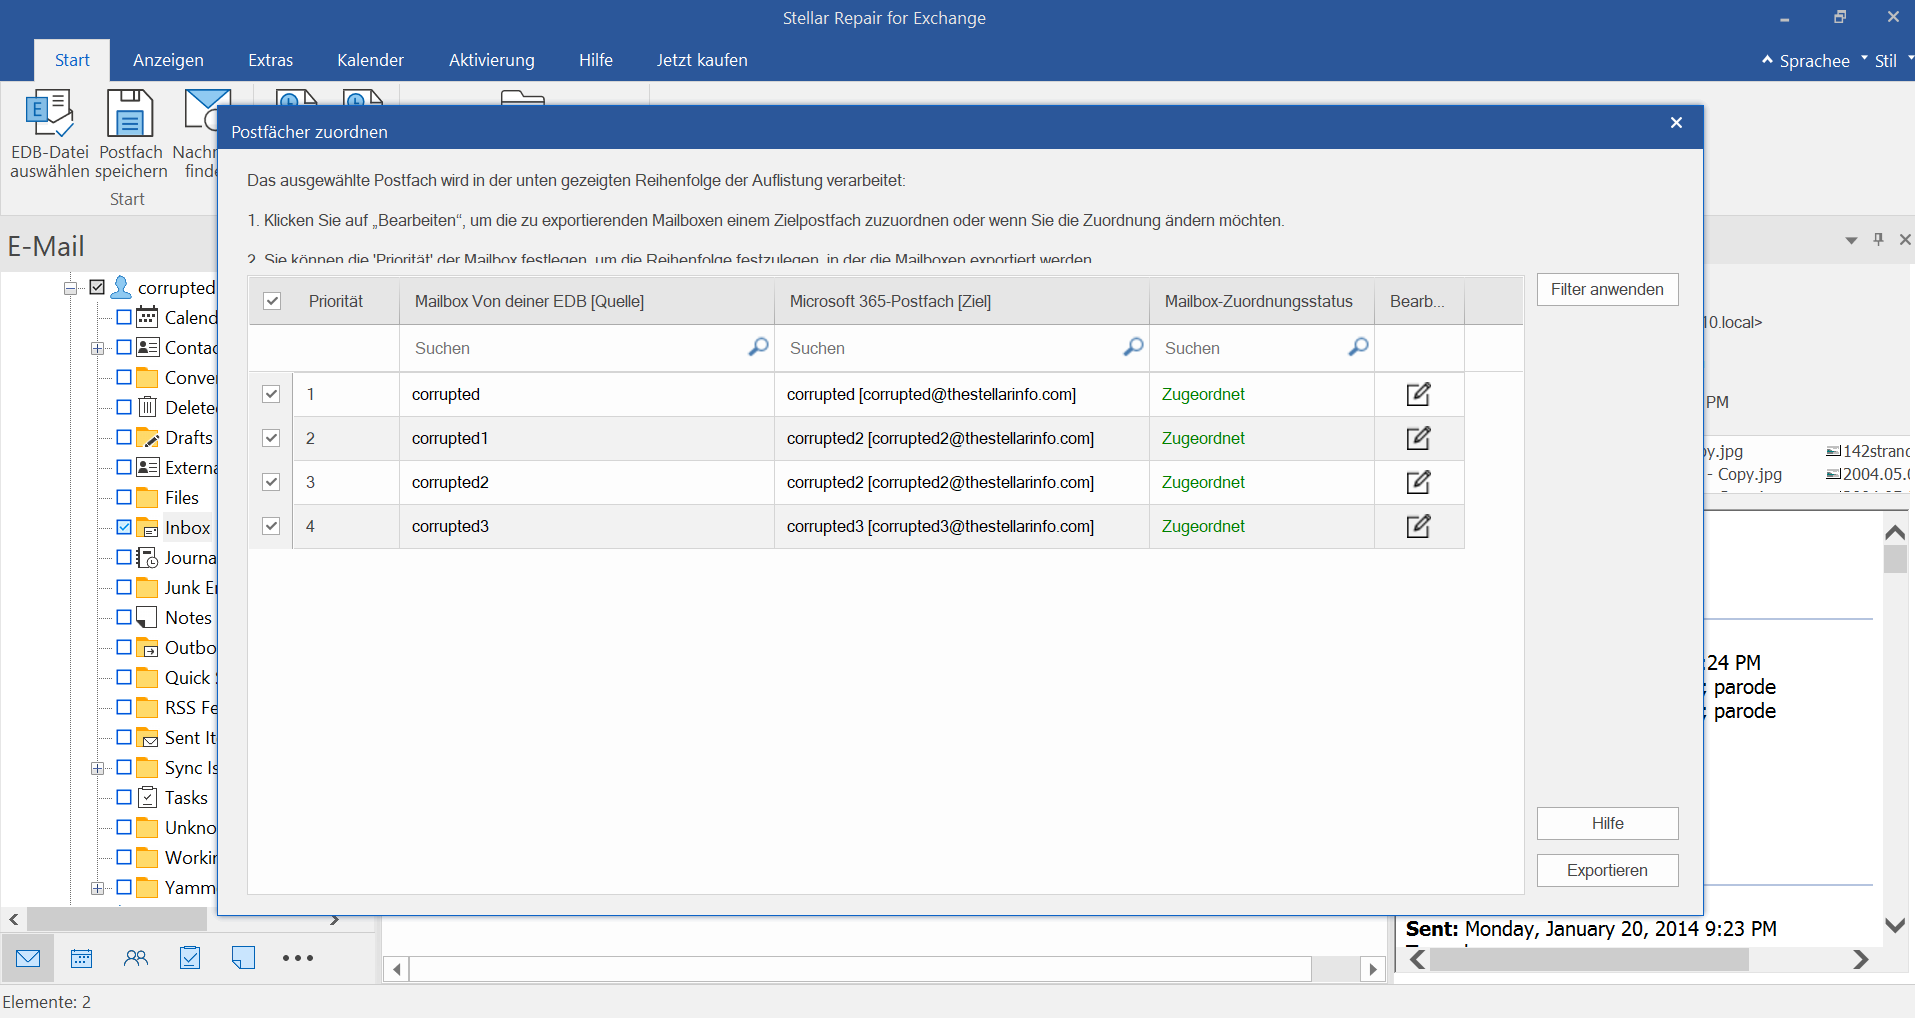
Die Software weist die Postfächer der Benutzer automatisch dem Ziel-Exchange-Server zu. Sie können die Postfächer auch manuell zuweisen, indem Sie auf das Symbol Bearbeiten klicken. Wenn Sie einige Postfächer zuerst exportieren möchten, können Sie die Reihenfolge in der Spalte Priorität ändern.
Schritt 9
Speichern von Postfächern
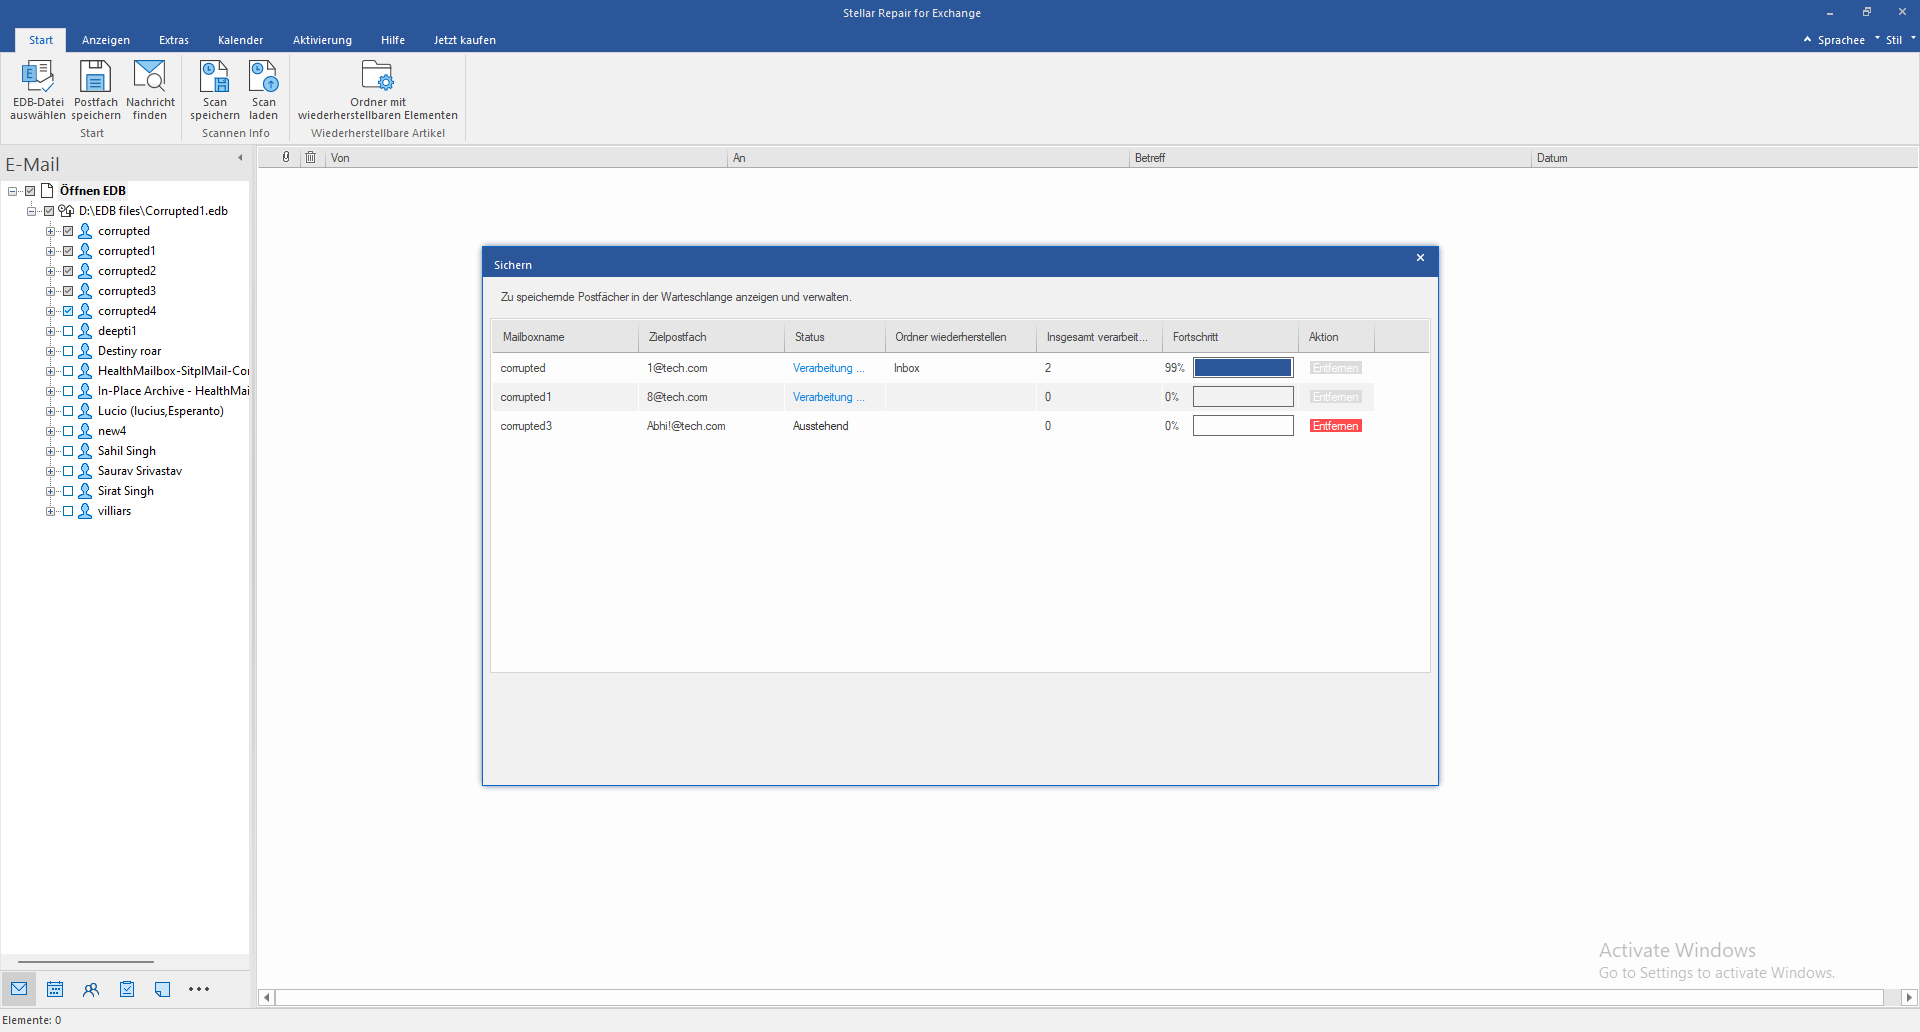
Im Dialogfeld Speichern können Sie die Postfächer in der Warteschlange anzeigen und verwalten. Sie können auf die Schaltfläche Entfernen klicken, wenn Sie den Export der ausstehenden Postfächer stoppen möchten.
Schritt 10
Erledigt speichern
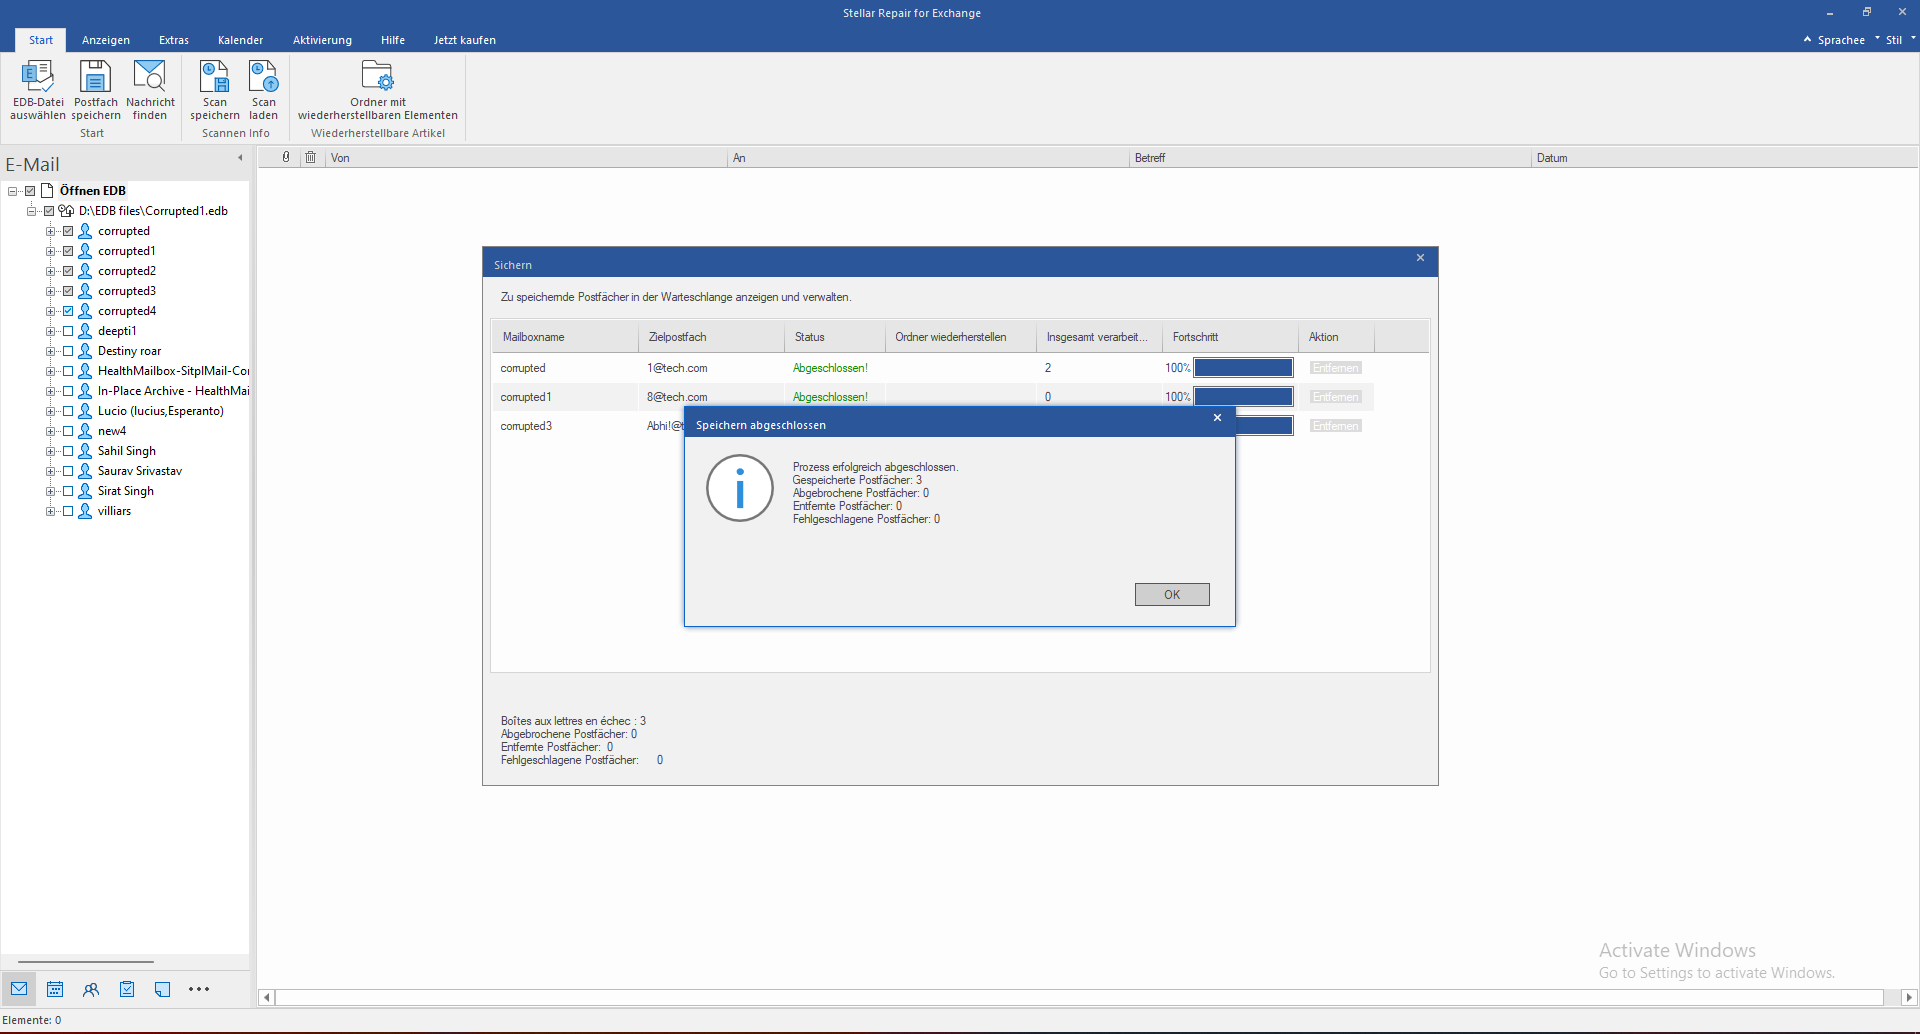
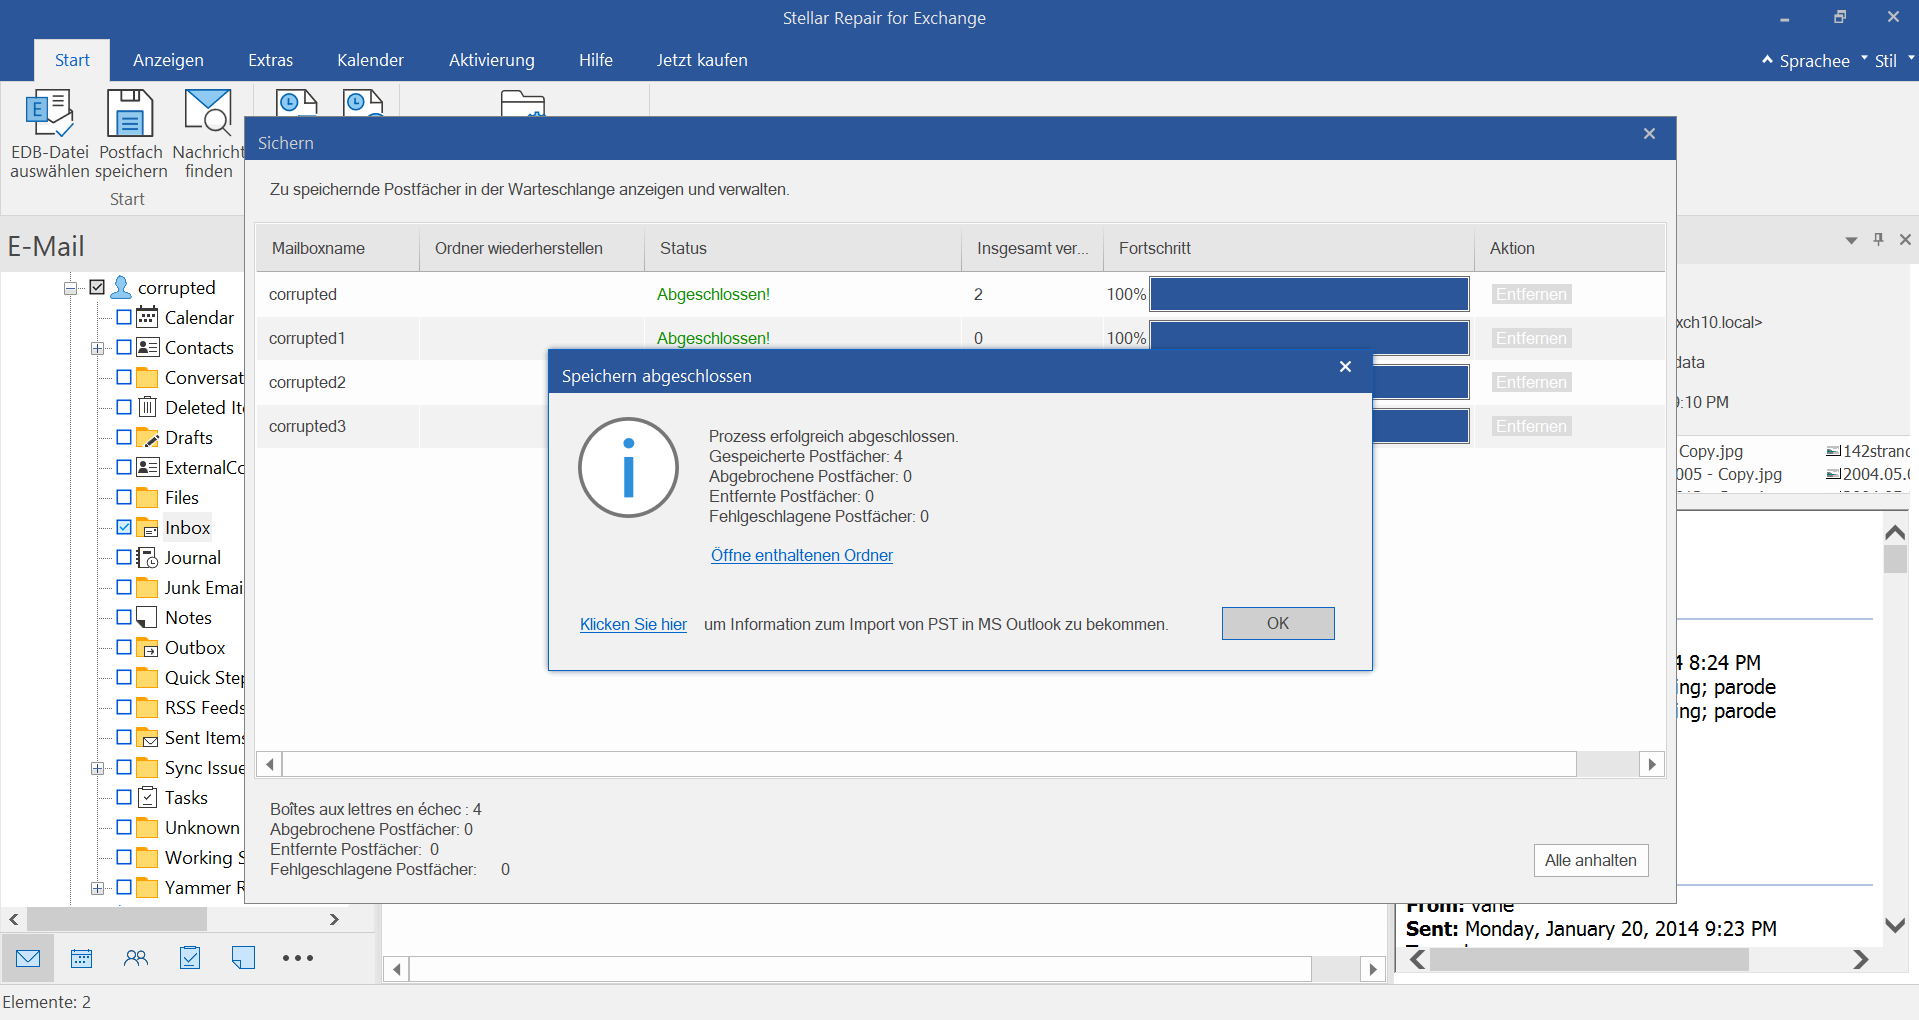
Wenn alle Postfächer erfolgreich gespeichert wurden, öffnet sich ein Dialogfeld Speichern abgeschlossen, in dem die Anzahl der gespeicherten Postfächer, der abgebrochenen Postfächer, der entfernten Postfächer und der fehlgeschlagenen Postfächer angezeigt wird. Klicken Sie auf OK.
Schritt 11
In den lokalen Archivordner exportieren
Wenn Sie die Postfächer in den lokalen Archivordner auf dem Ziel-Exchange-Server exportieren möchten, wählen Sie das Optionsfeld „In lokalen Archivordner exportieren“ und klicken Sie auf „Weiter“. Stellen Sie anschließend eine Verbindung zum Exchange-Server her und klicken Sie auf „OK“.
Schritt 12
In öffentlichen Ordner exportieren
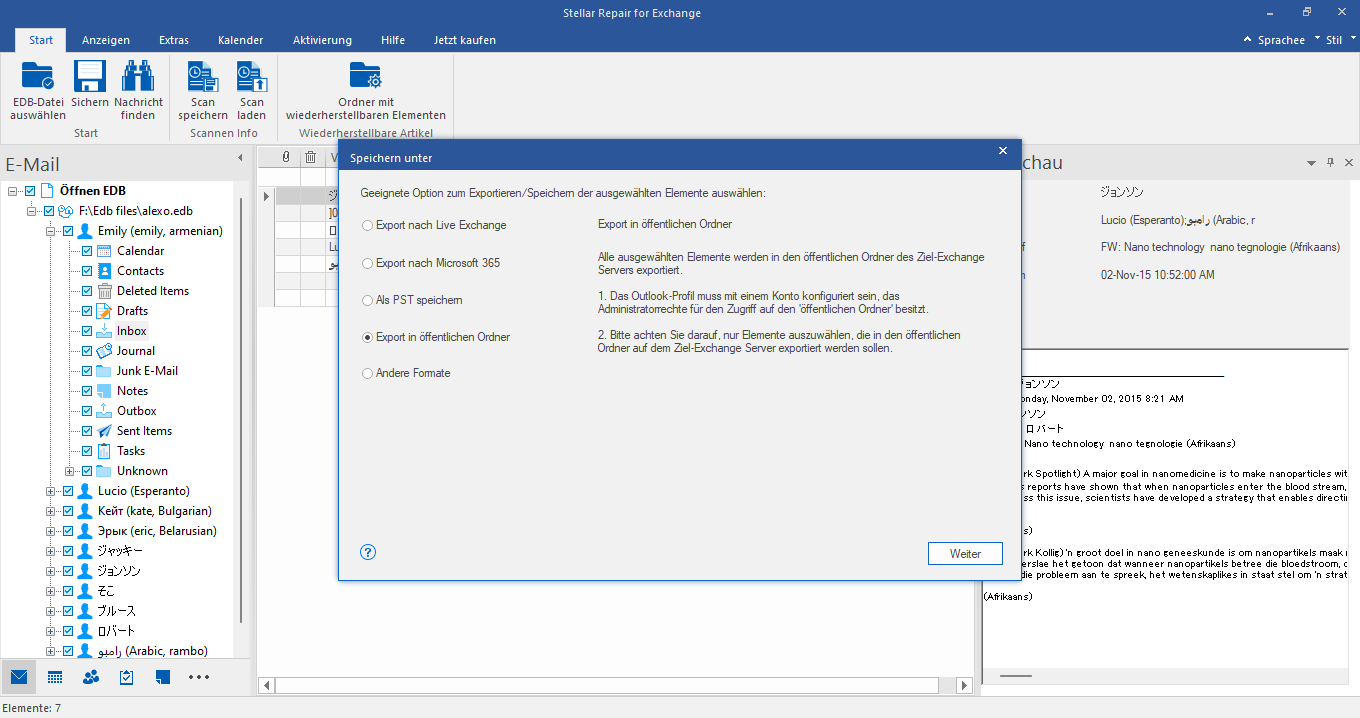
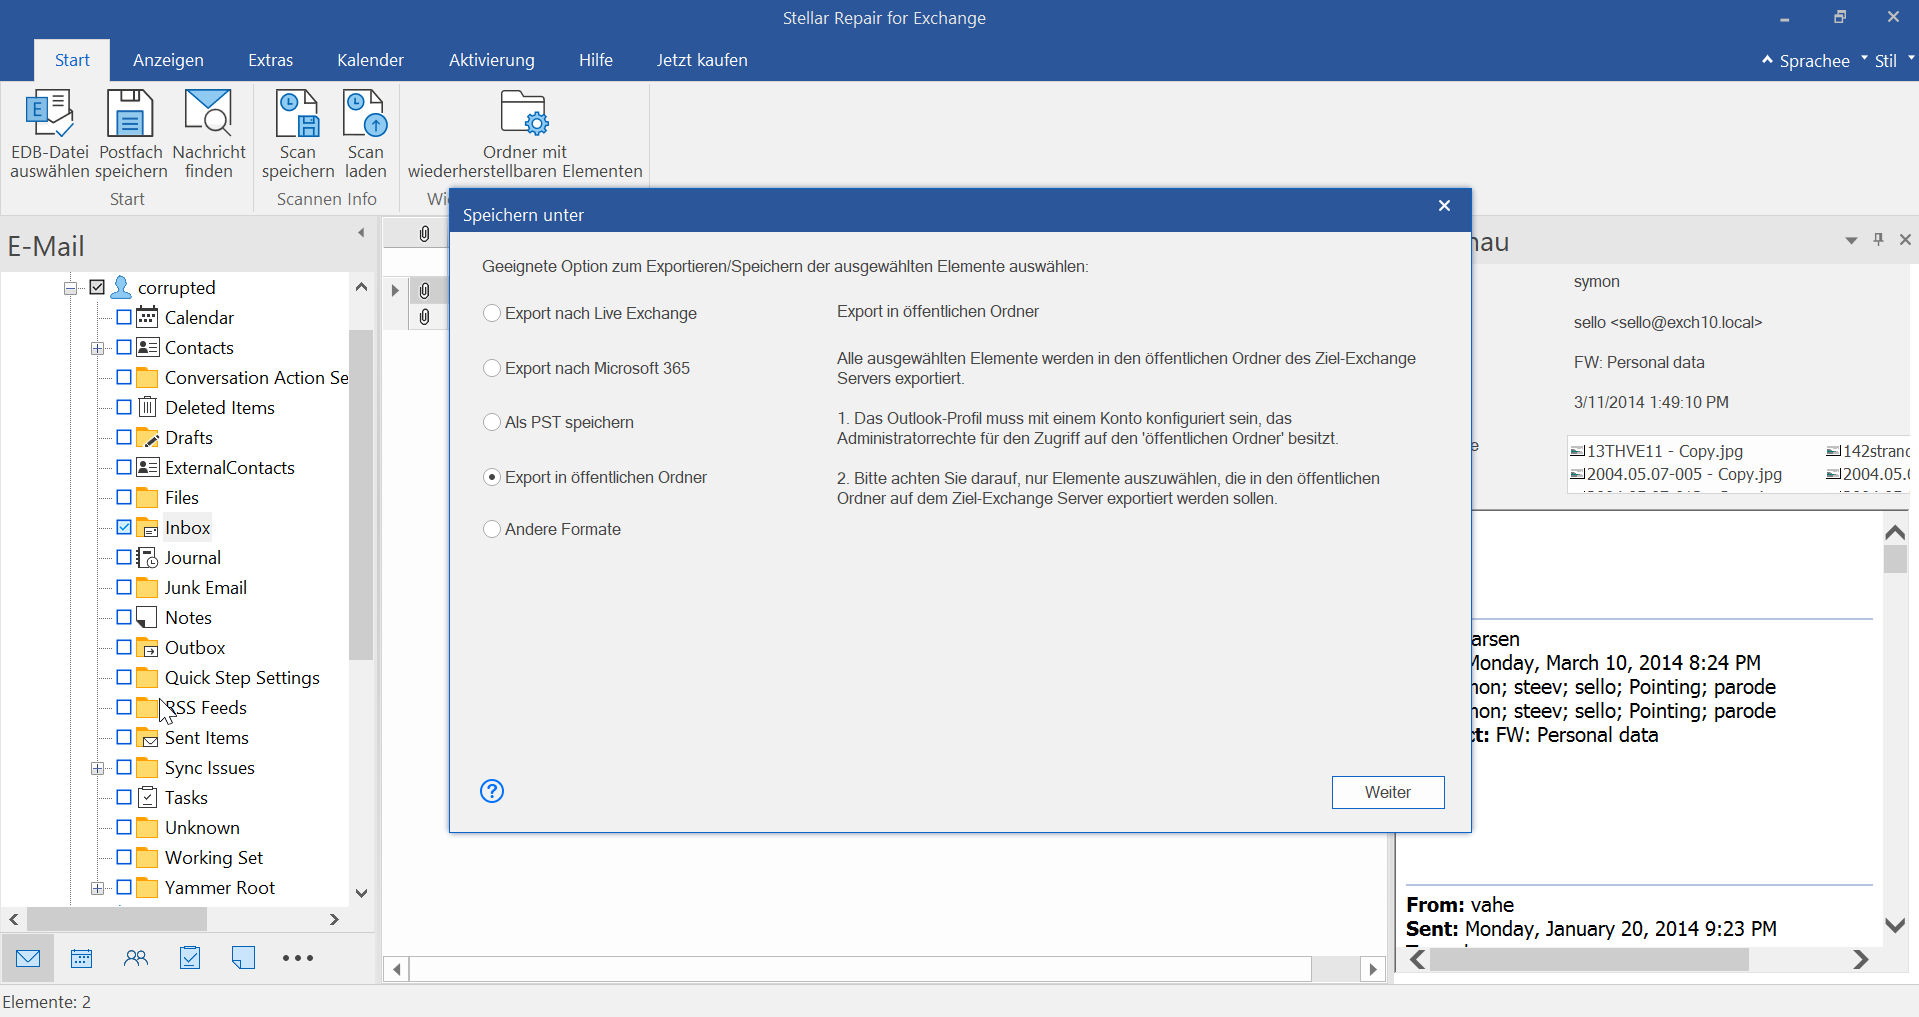
Wenn Sie die wiederhergestellten Postfächer in öffentlichen Ordnern auf dem Exchange-Zielserver speichern möchten, wählen Sie im Fenster Speichern unter die Option In öffentlichen Ordner exportieren und klicken Sie auf Weiter.
Schritt 13
Anmeldedaten eingeben
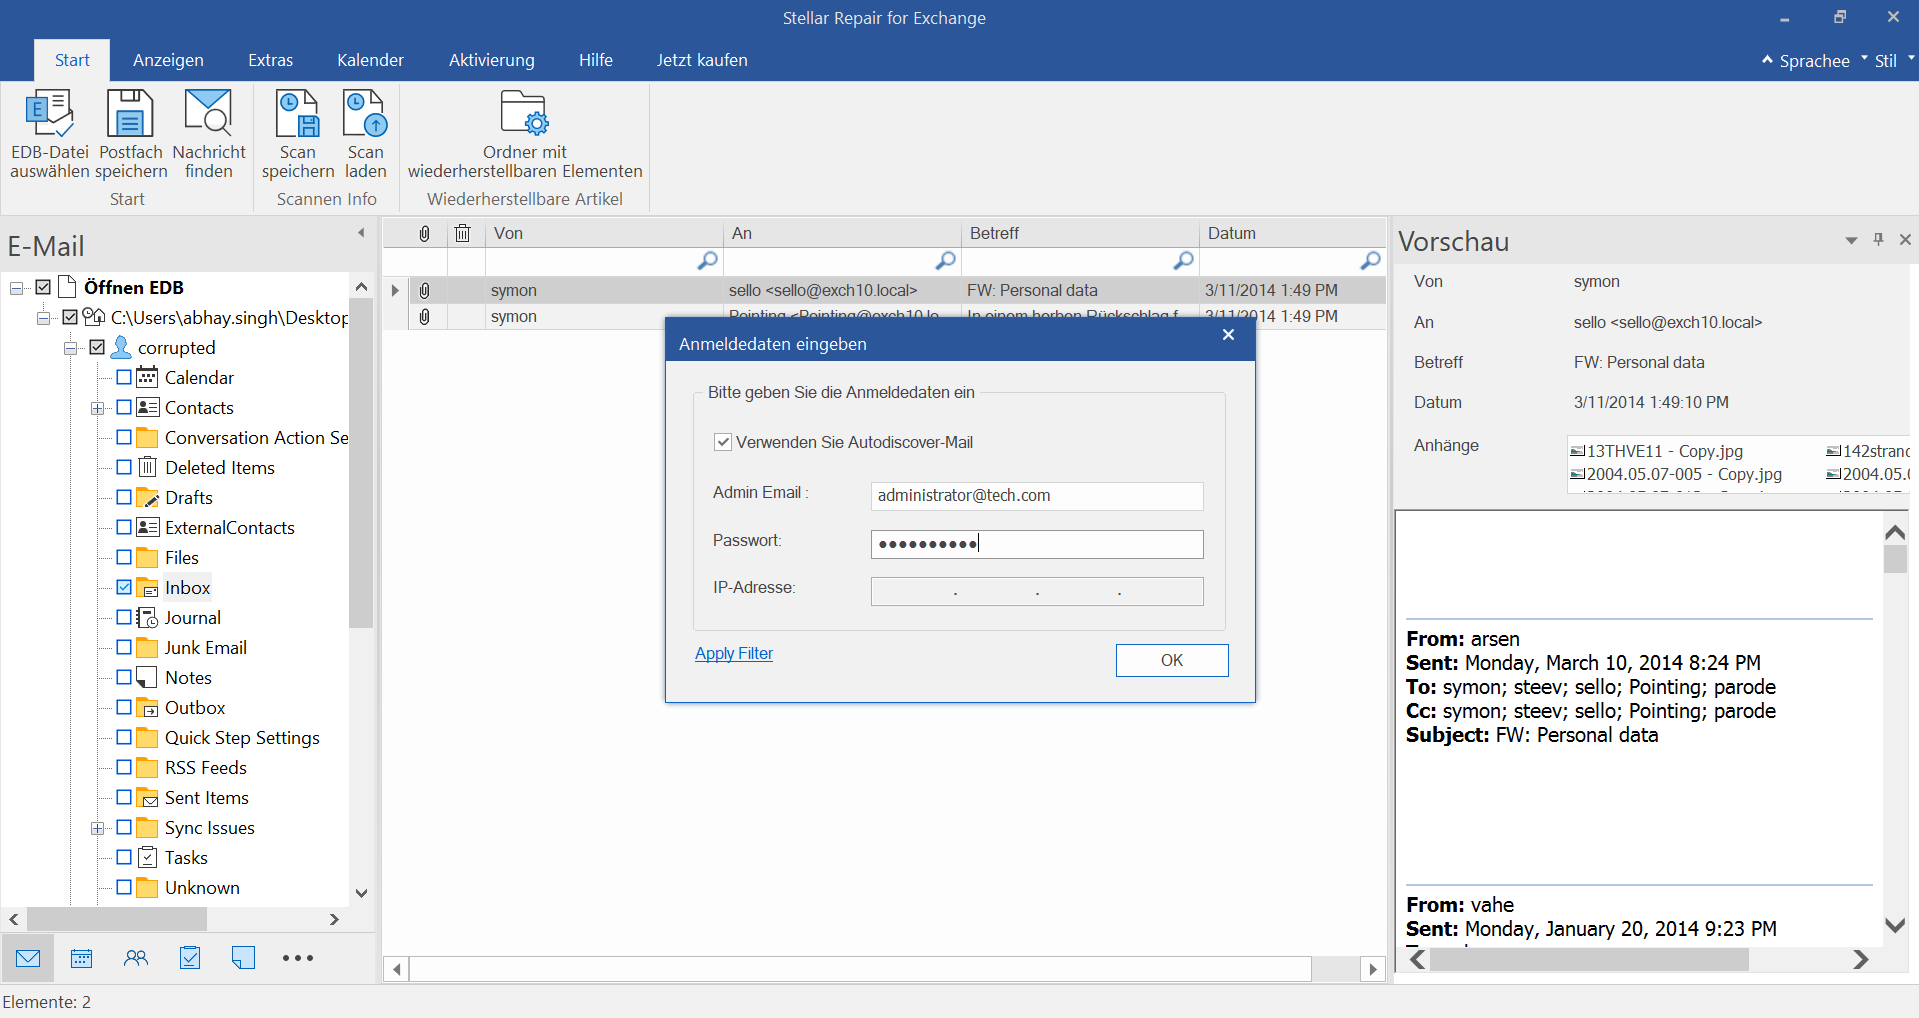
Im nächsten Fenster müssen Sie eine Verbindung mit dem Live Exchange Server herstellen. Aktivieren Sie dazu das Kontrollkästchen Autodiscover E-Mail verwenden und geben Sie die Admin-E-Mail und das Passwort ein. Die Software stellt automatisch eine Verbindung zu dem mit der E-Mail-ID verbundenen Exchange Server her. Wenn Sie die Anmeldedaten und die IP-Adresse des Zielservers manuell eingeben möchten, können Sie das Kontrollkästchen Automatische E-Mail-Erkennung verwenden deaktivieren. Sobald Sie die Details eingegeben haben, klicken Sie auf OK.
Schritt 14
Prozess abgeschlossen
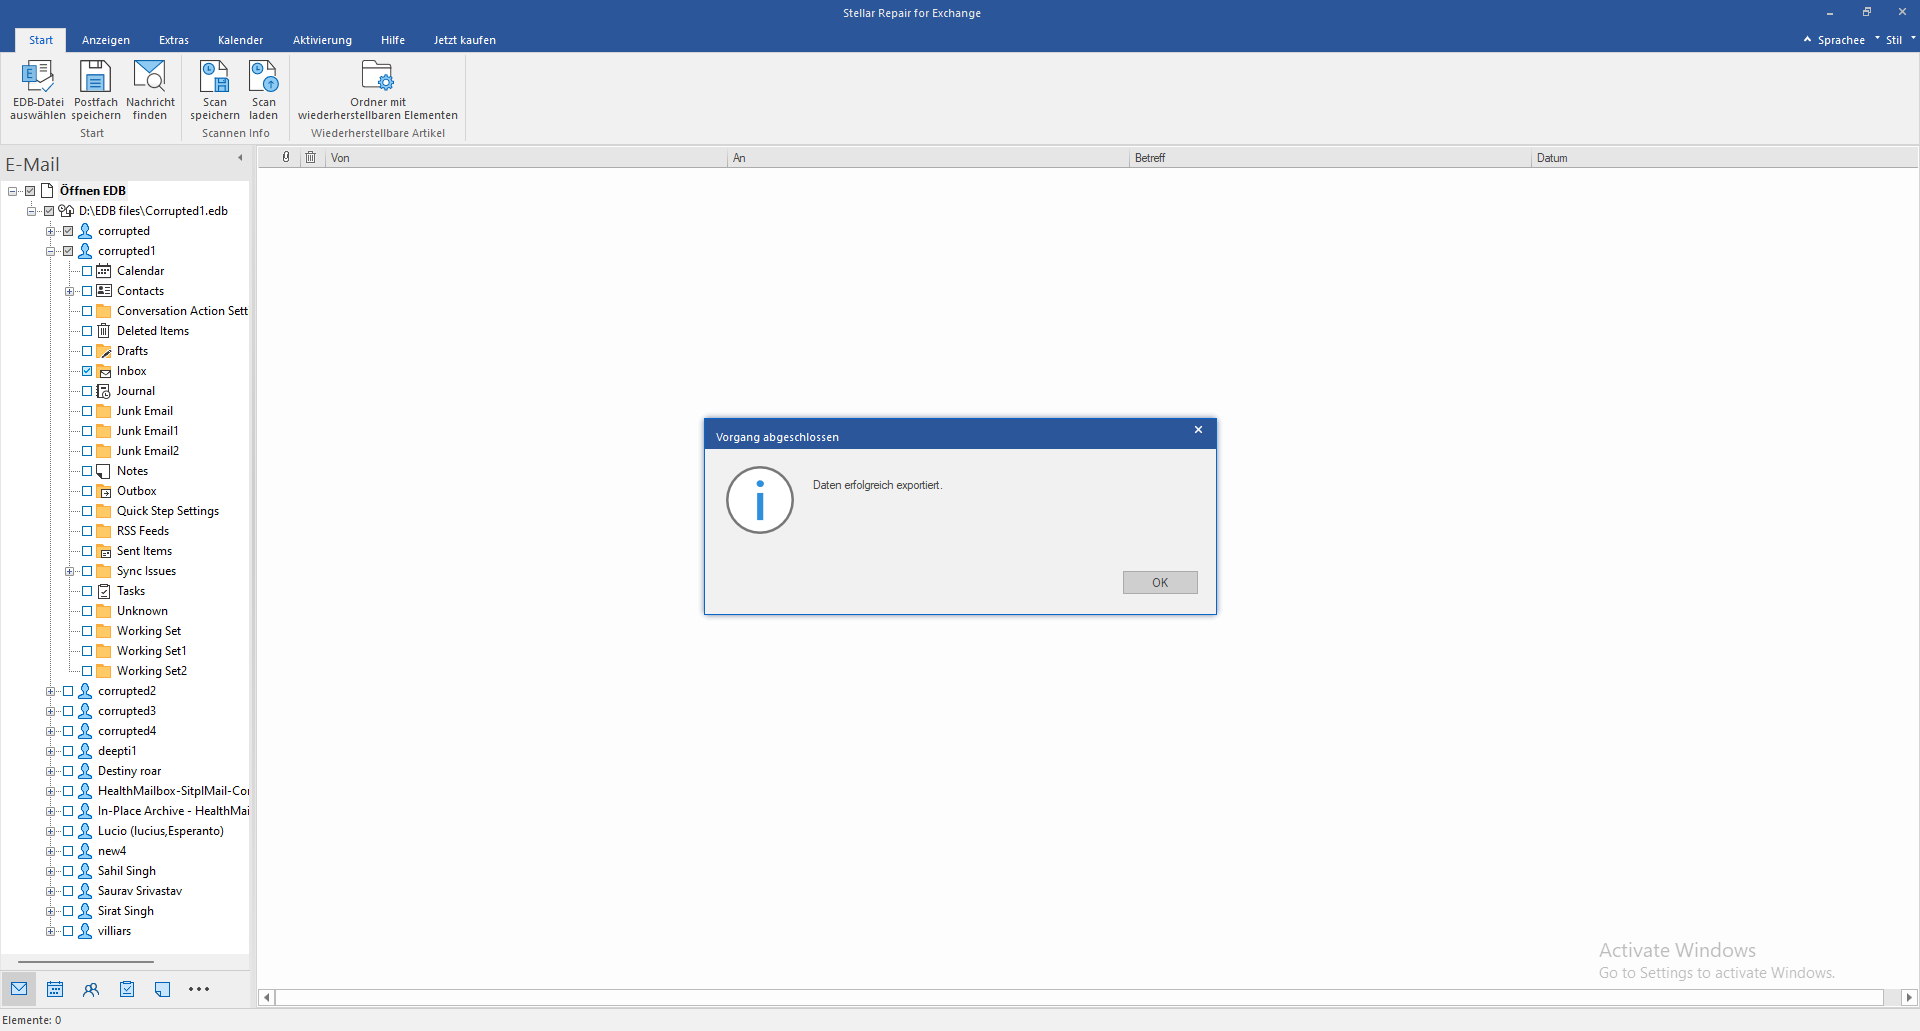
Klicken Sie im Dialogfeld Prozess abgeschlossen auf OK.
Schritt 15
Zu Microsoft 365 exportieren
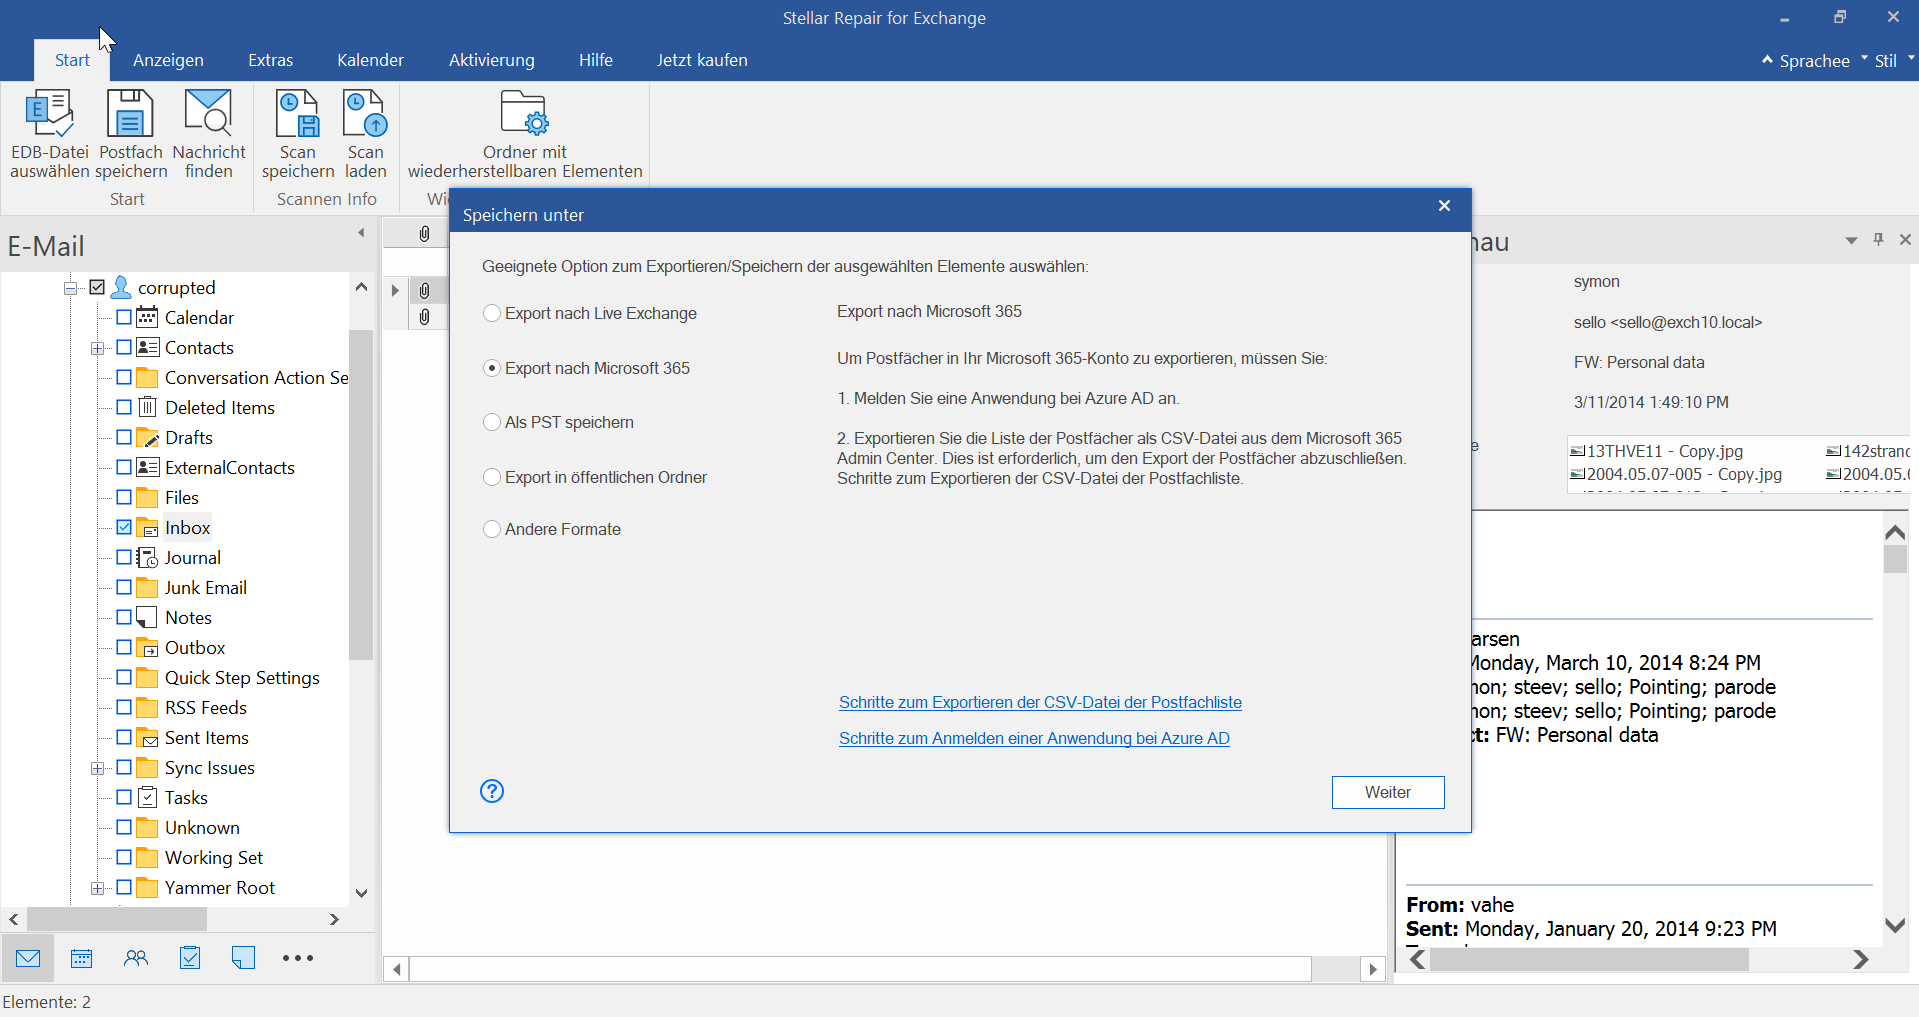
Wenn Sie die wiederhergestellten Postfächer nach Microsoft 365 exportieren möchten, wählen Sie im Fenster Speichern unter die Option Nach Microsoft 365 exportieren und klicken Sie auf Weiter. Um zu Microsoft 365 zu exportieren, müssen Sie die Anwendung bei Azure AD anmelden. Melden Sie sich im Microsoft Entra Admin Centre an, melden Sie die Anwendung an und notieren Sie sich die Client ID, Tenant ID und den Client Secret Value.
Schritt 16
Mit dem Ziel verbinden
Im Fenster „Mit Ziel verbinden“ werden zwei Optionen angezeigt: „Automatische Registrierung“ und „Manuelle Registrierung“. Wählen Sie „Automatische Registrierung“, um automatisch eine Verbindung zum Microsoft 365-Ziel herzustellen. Geben Sie auf dem Anmeldebildschirm von Microsoft Azure die E-Mail-ID des globalen Administrators ein und klicken Sie auf „Weiter“. Wenn Sie „Manuelle Registrierung“ auswählen, müssen Sie die Anwendung bei Azure AD anmelden und die Anmeldedaten für Microsoft 365 eingeben.
Schritt 17
Geben Sie die Anmeldedaten ein
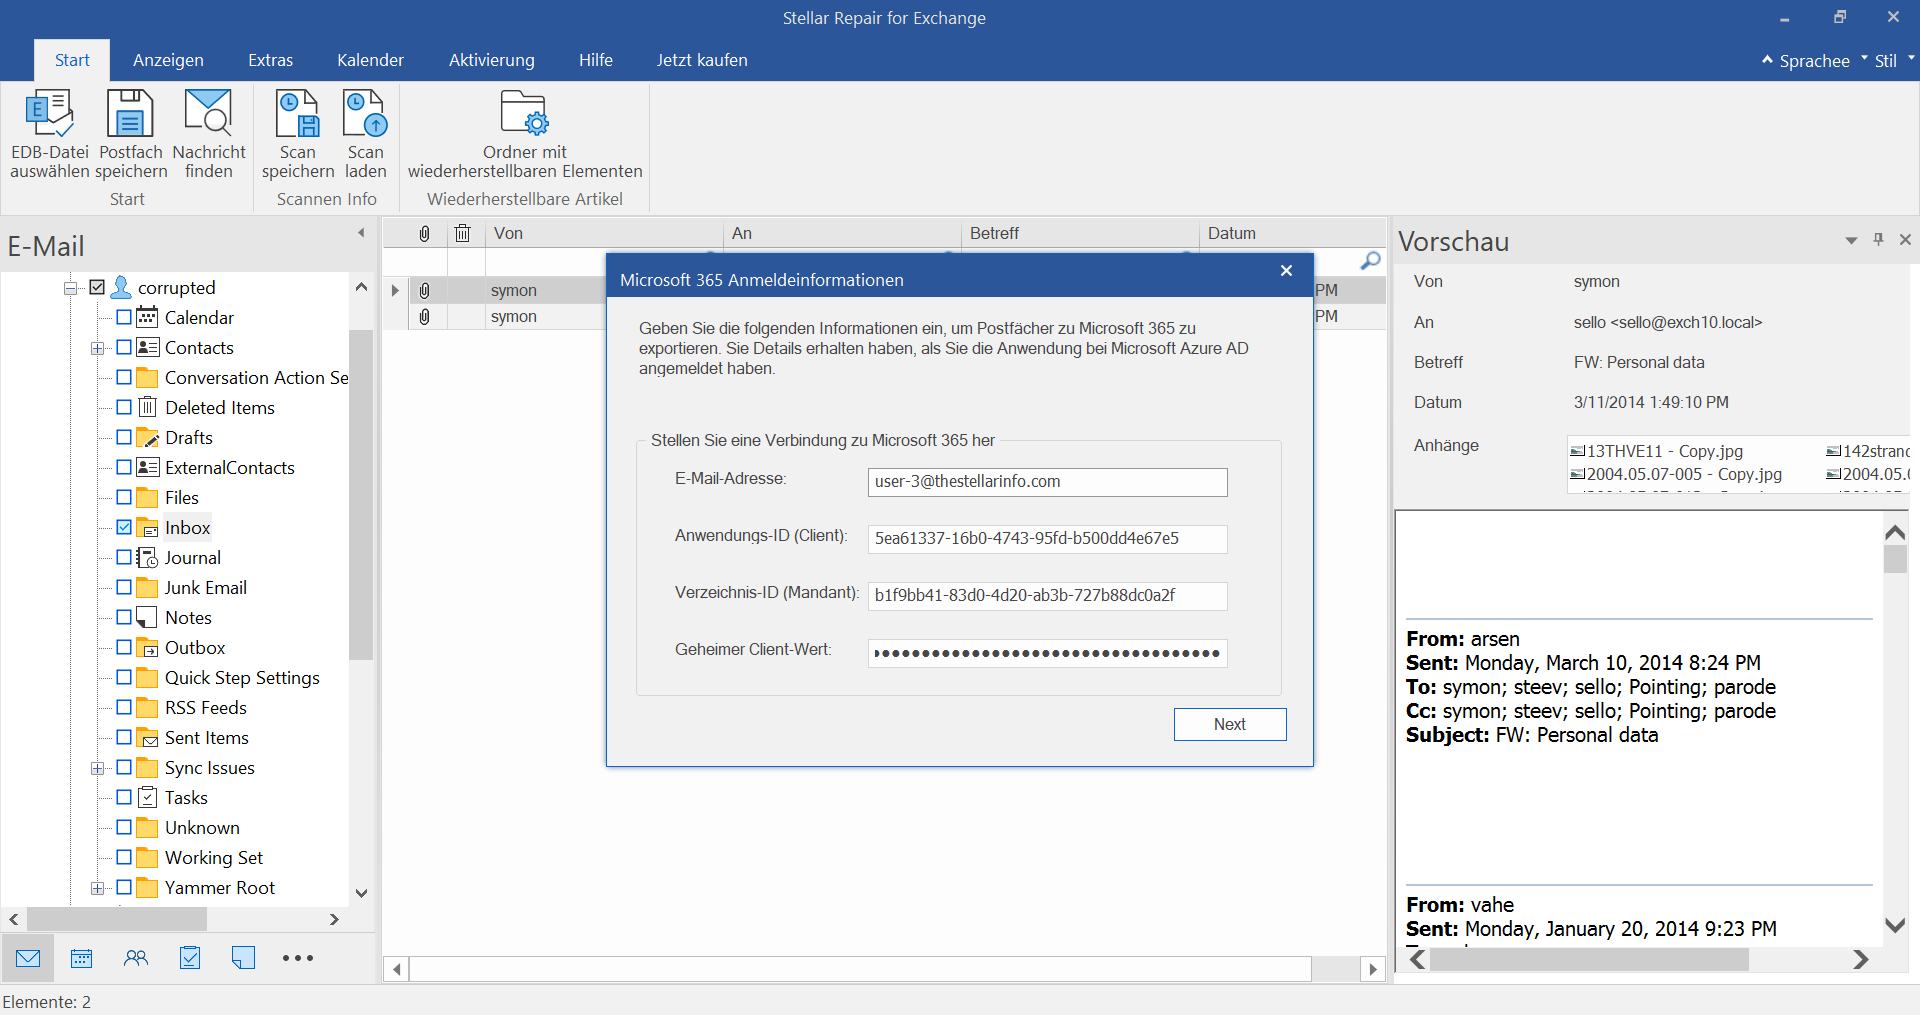
Geben Sie im Dialogfeld Microsoft 365-Anmeldeinformationen die E-Mail-Adresse, die Anwendungs- (Client-) ID, die Verzeichnis- (Tenant-) ID und den geheimen Client-Wert ein. Klicken Sie auf Weiter, um fortzufahren.
Schritt 18
CSV-Datei auswählen
Wählen Sie die CSV-Datei aus, die die Liste der Postfachbenutzer des Zielservers enthält. Klicken Sie auf die Schaltfläche Durchsuchen, um die CSV-Datei auszuwählen, und klicken Sie dann auf OK.
Schritt 19
Karte der Briefkästen
Die Software weist die Postfächer der Benutzer automatisch auf dem Microsoft 365-Server zu. Sie können die Postfächer auch manuell zuweisen, indem Sie auf das Symbol Bearbeiten klicken. Wenn Sie einige Postfächer zuerst exportieren möchten, können Sie die Reihenfolge in der Spalte Priorität ändern. Wenn Sie bestimmte Elemente ein- oder ausschließen möchten, können Sie die Option Filter anwenden verwenden. Wenn Sie fertig sind, klicken Sie auf Exportieren.
Schritt 20
Speichern von Postfächern
Im Dialogfeld Speichern können Sie die Postfächer in der Warteschlange anzeigen und verwalten. Sie können auf die Schaltfläche Entfernen klicken, um den Export der ausstehenden Postfächer zu beenden.
Schritt 21
Erledigt speichern
Wenn der Vorgang erfolgreich abgeschlossen wurde, wird ein Dialogfeld Speichern abgeschlossen geöffnet. Es zeigt auch die Anzahl der gespeicherten Postfächer, der abgebrochenen Postfächer, der entfernten Postfächer und der fehlgeschlagenen Postfächer an.
Schritt 22
In den öffentlichen Ordner von Microsoft 365 exportieren
Wenn Sie die wiederhergestellten Postfächer in öffentlichen Ordnern von Microsoft 365 speichern möchten, wählen Sie im Fenster „Speichern unter“ die Option „In öffentliche M365-Ordner exportieren“ und klicken Sie auf „Weiter“.
Schritt 23
Geben Sie Ihre M365-Anmeldedaten ein
Geben Sie Ihre Microsoft 365-Anmeldedaten ein, um eine Verbindung zu Microsoft 365 herzustellen
Schritt 24
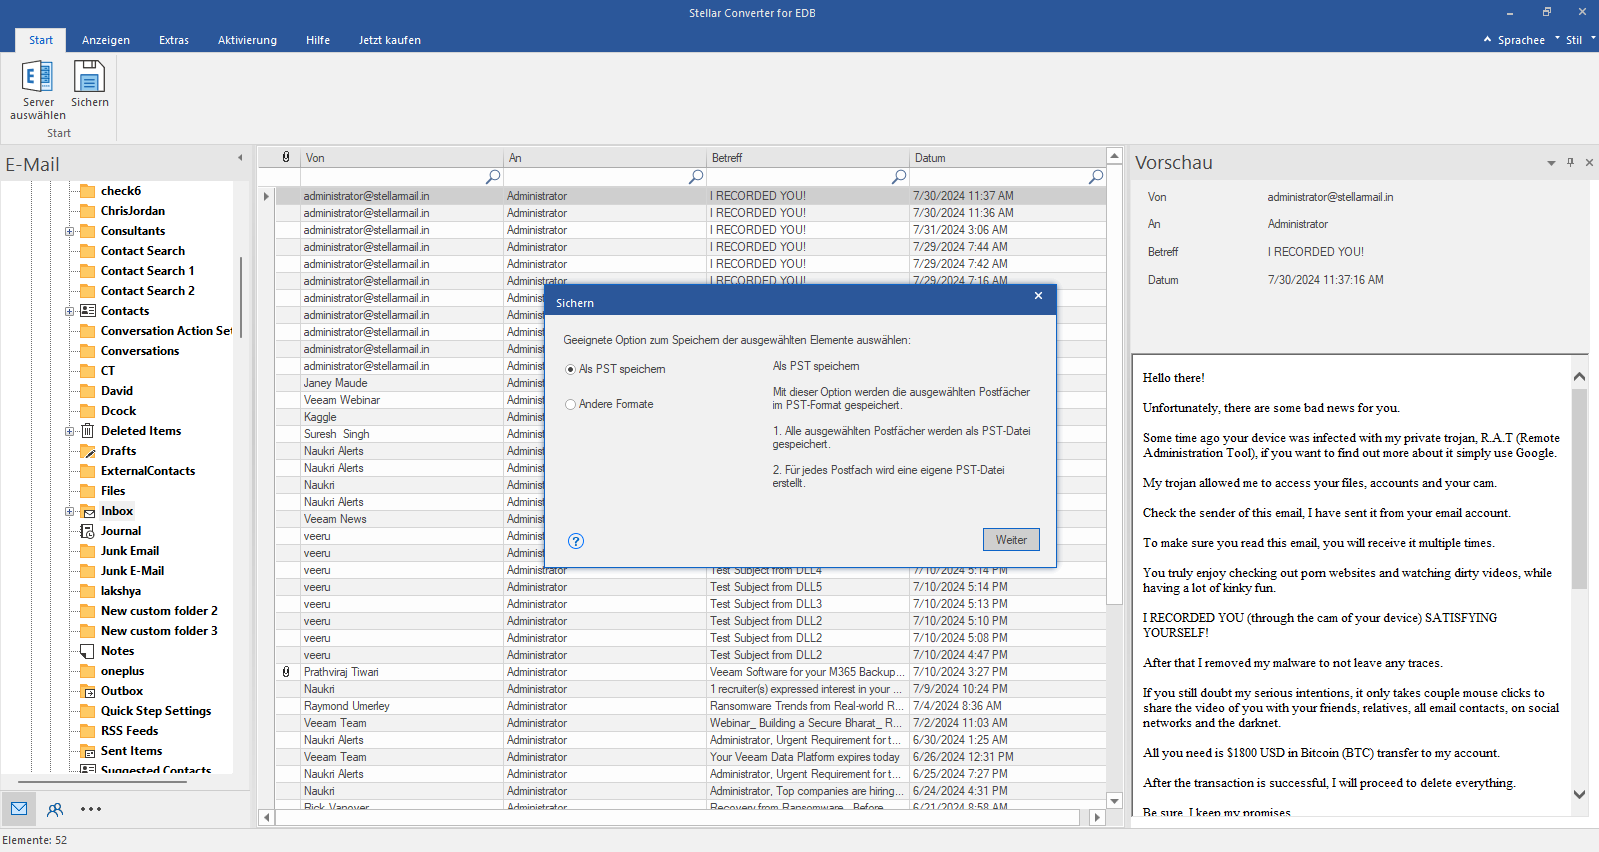
In PST exportieren
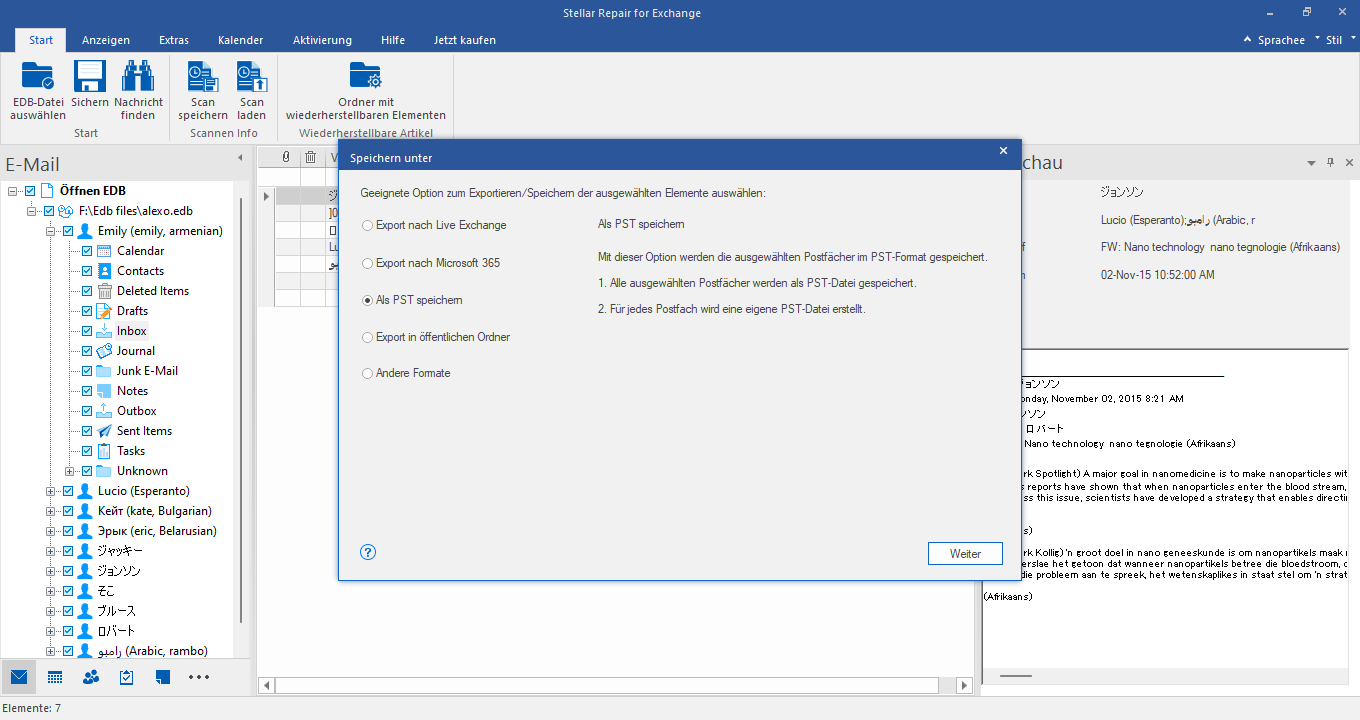
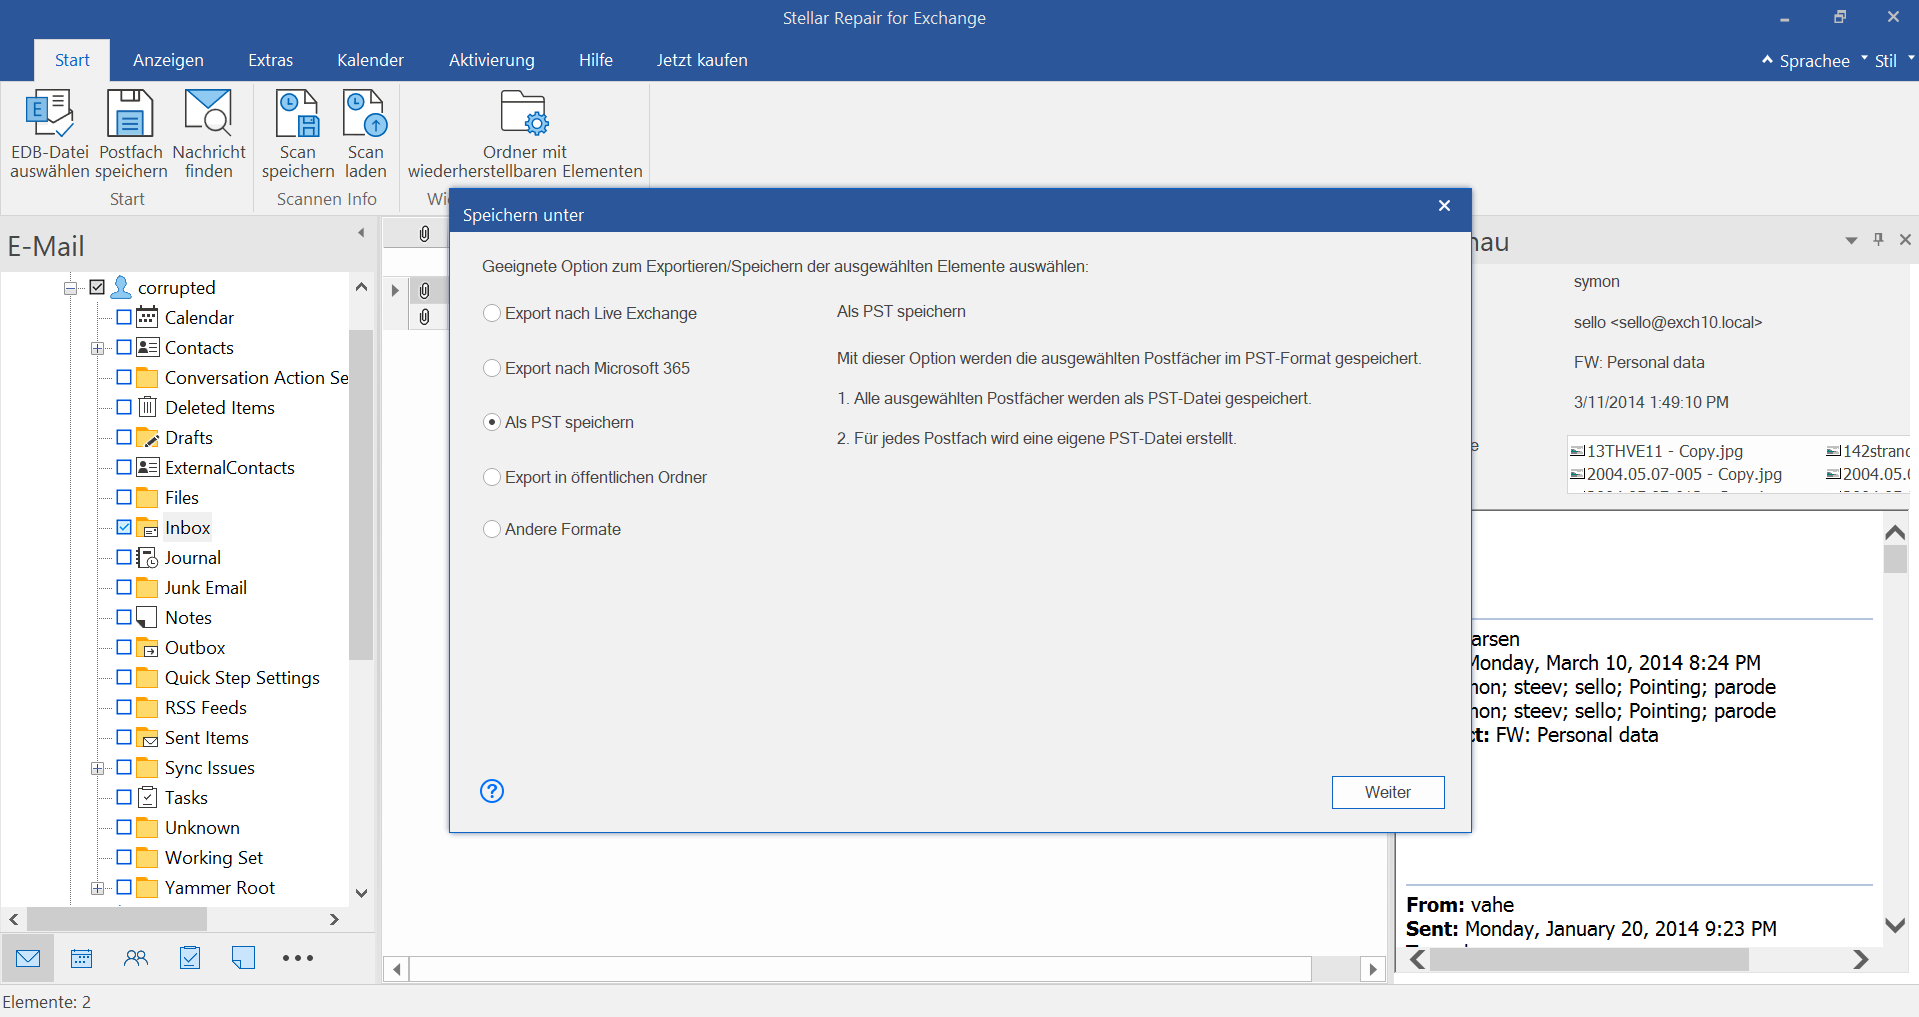
Wenn Sie die wiederhergestellten Postfächer in das PST-Format exportieren möchten, wählen Sie im Fenster Speichern unter die Option Als PST speichern und klicken Sie auf Weiter.
Schritt 25
Wählen Sie den Speicherort für die PST-Dateien
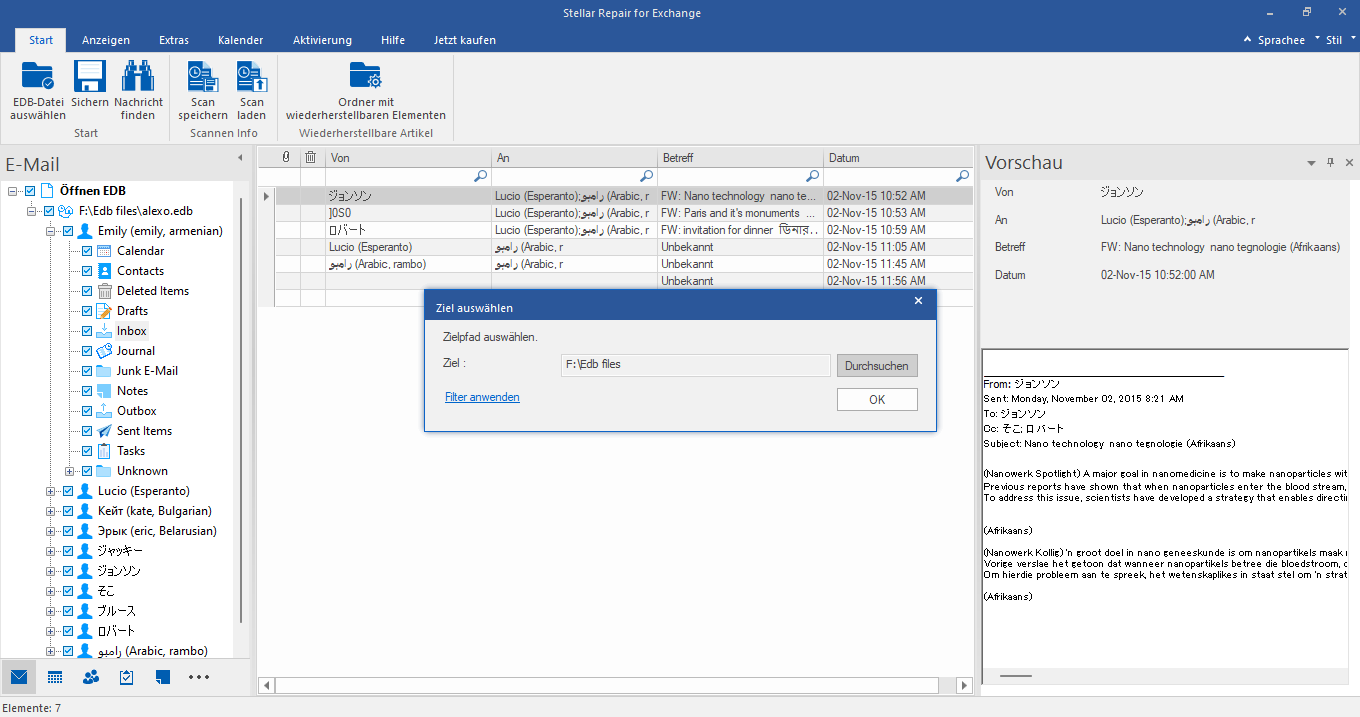
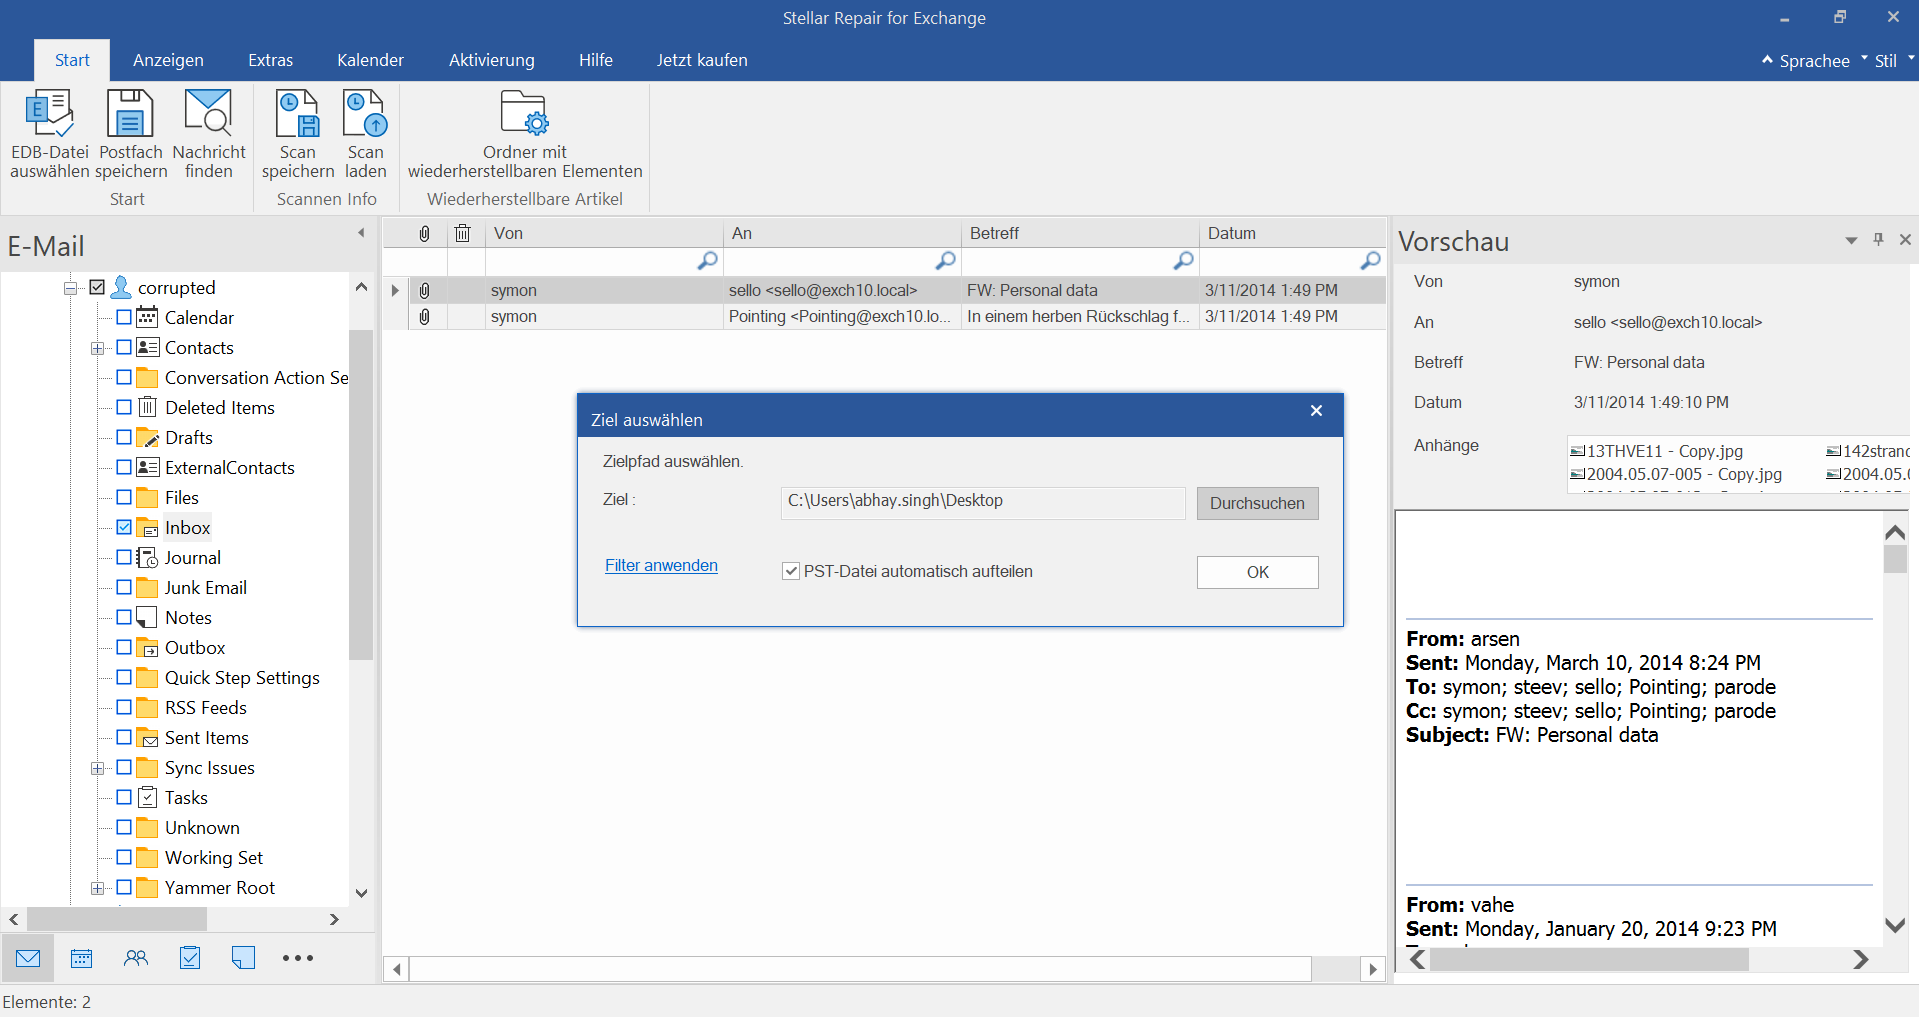
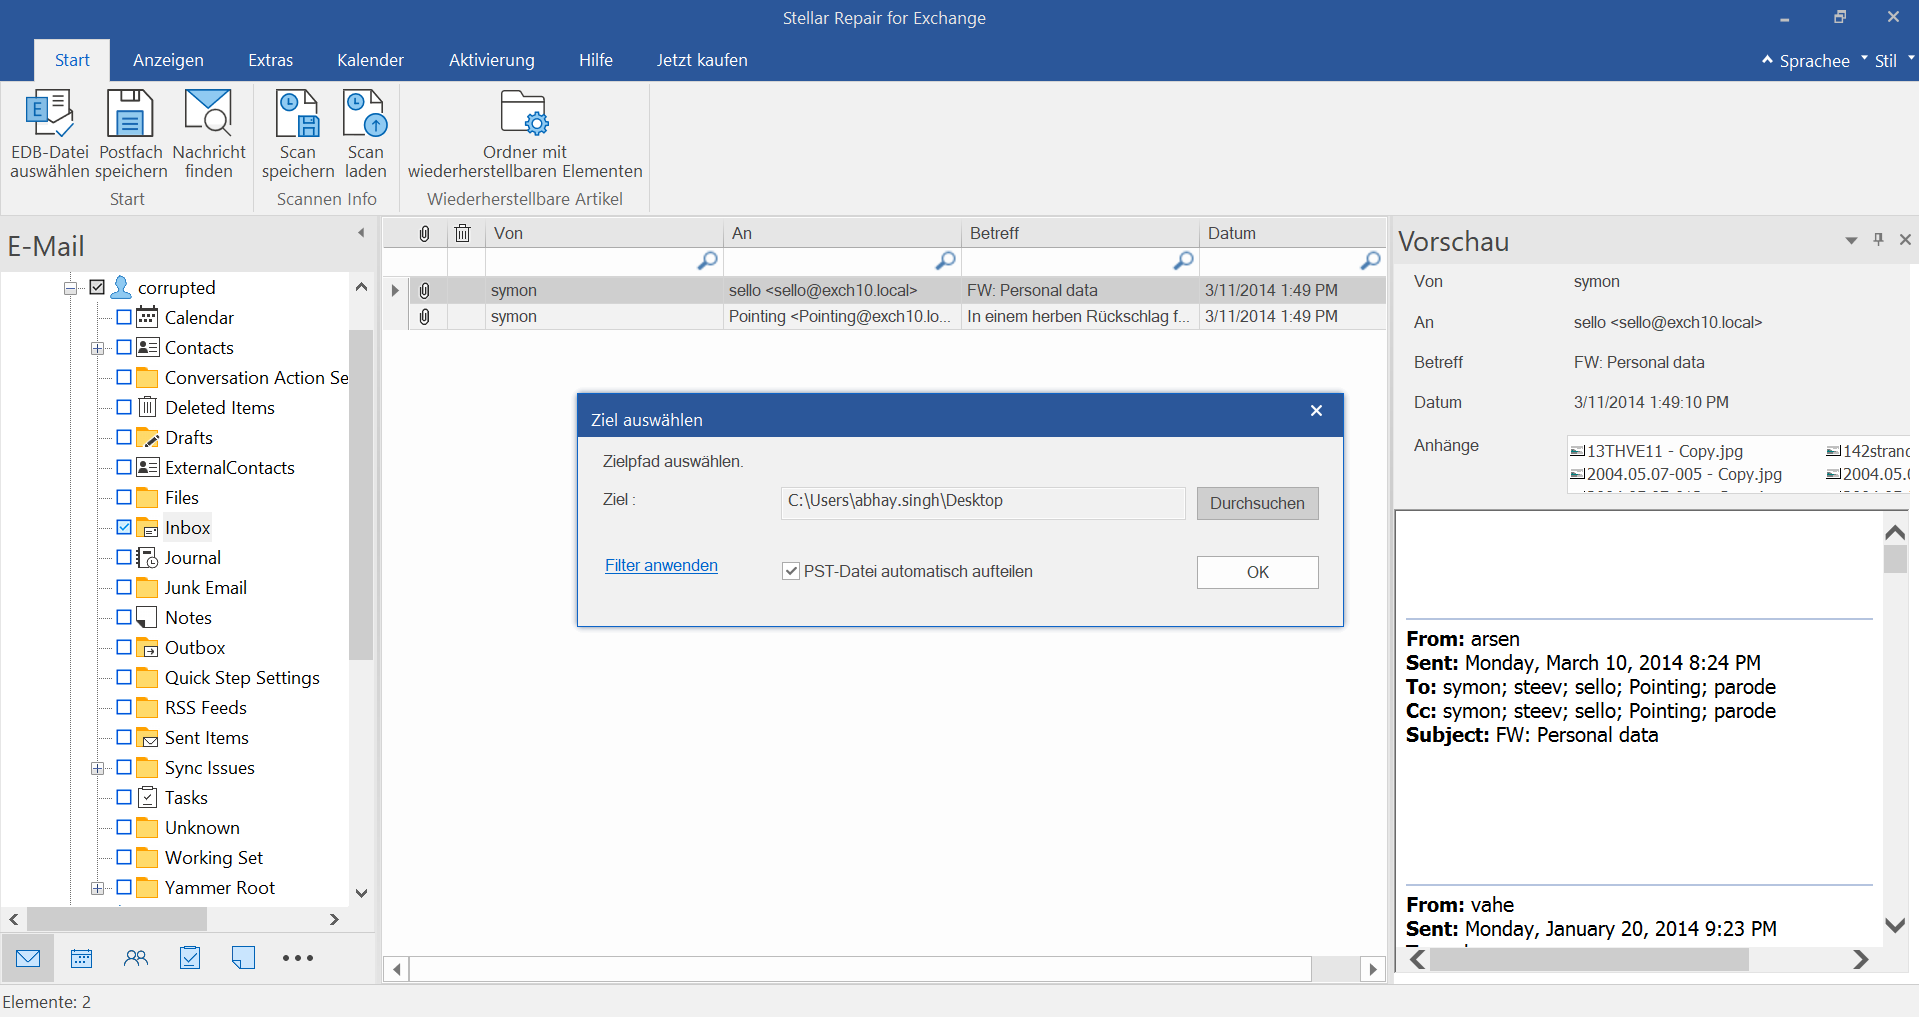
Klicken Sie auf Durchsuchen, um den Ort zu wählen, an dem Sie die PST-Dateien speichern möchten. Klicken Sie dann auf OK. Wenn Sie die konvertierte PST-Datei in kleinere Segmente aufteilen möchten, wählen Sie PST-Datei automatisch aufteilen. Sie können auch die Option Filter anwenden verwenden, um die E-Mail-Elemente auszuschließen oder einzuschließen.
Schritt 26
Fenster Postfächer speichern
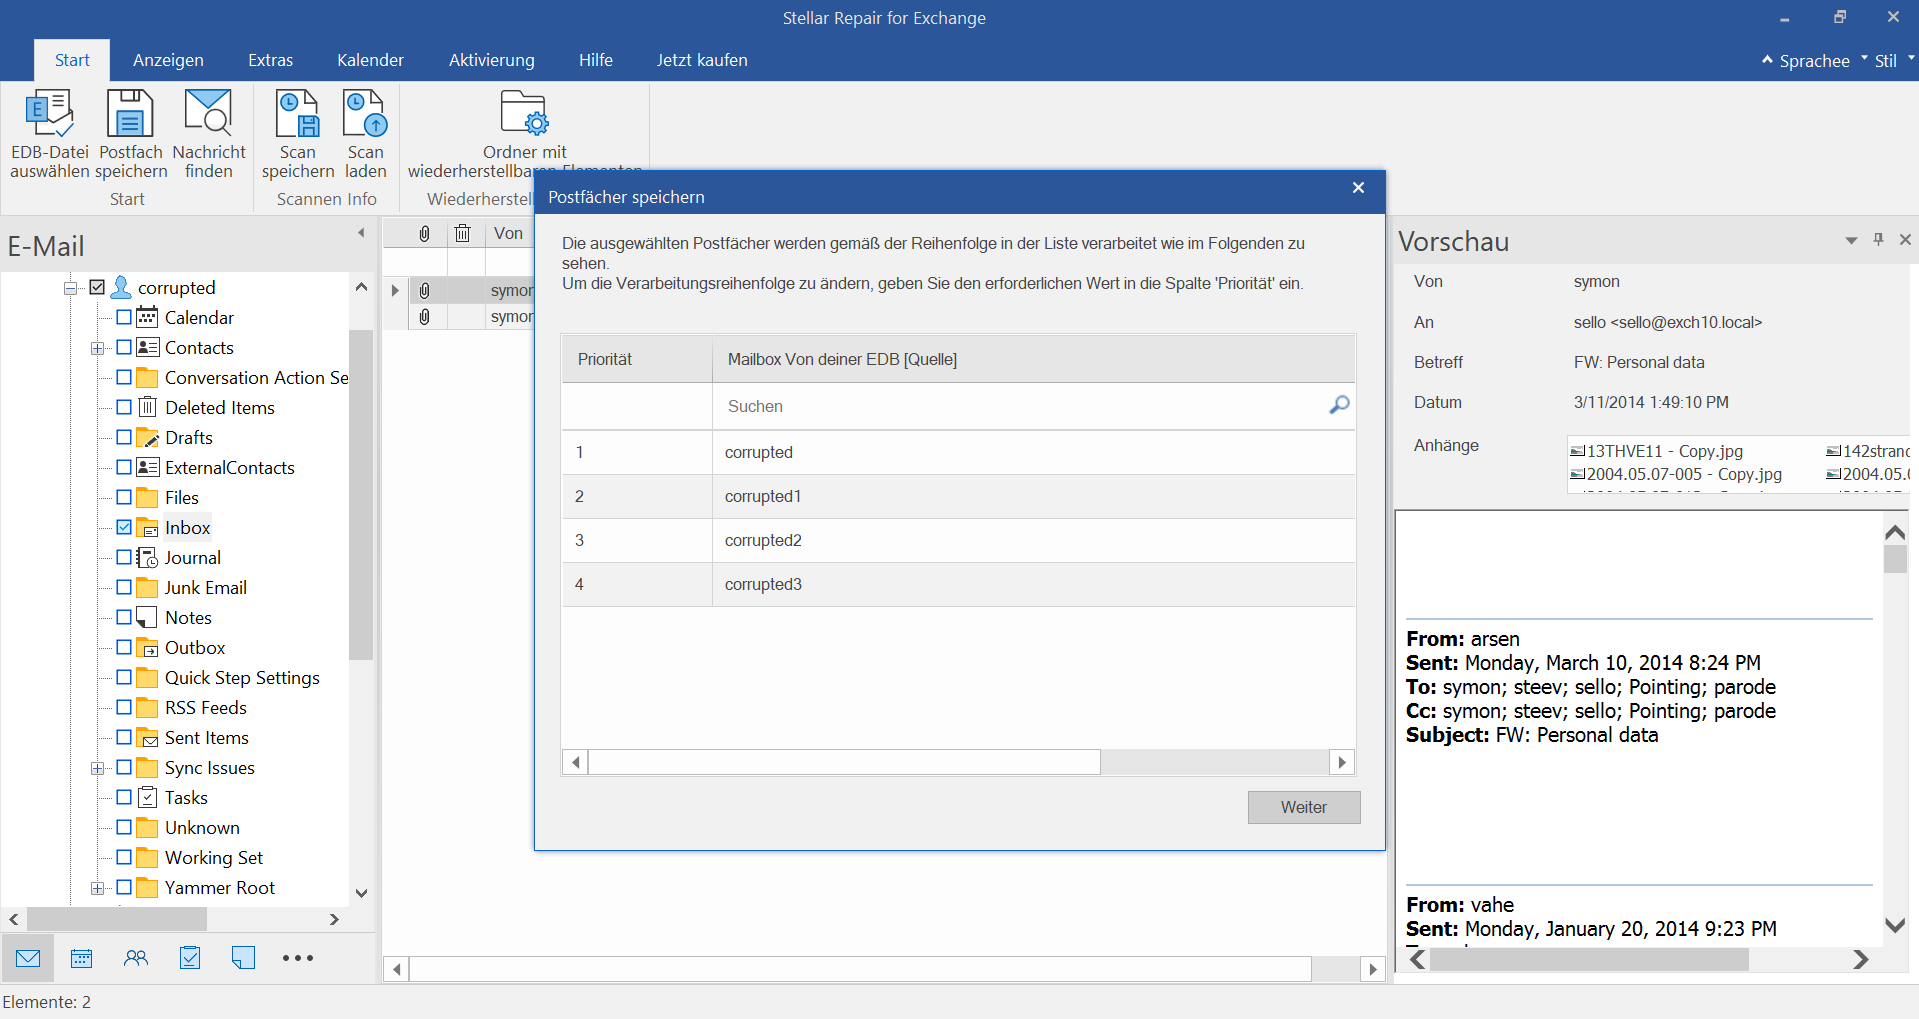
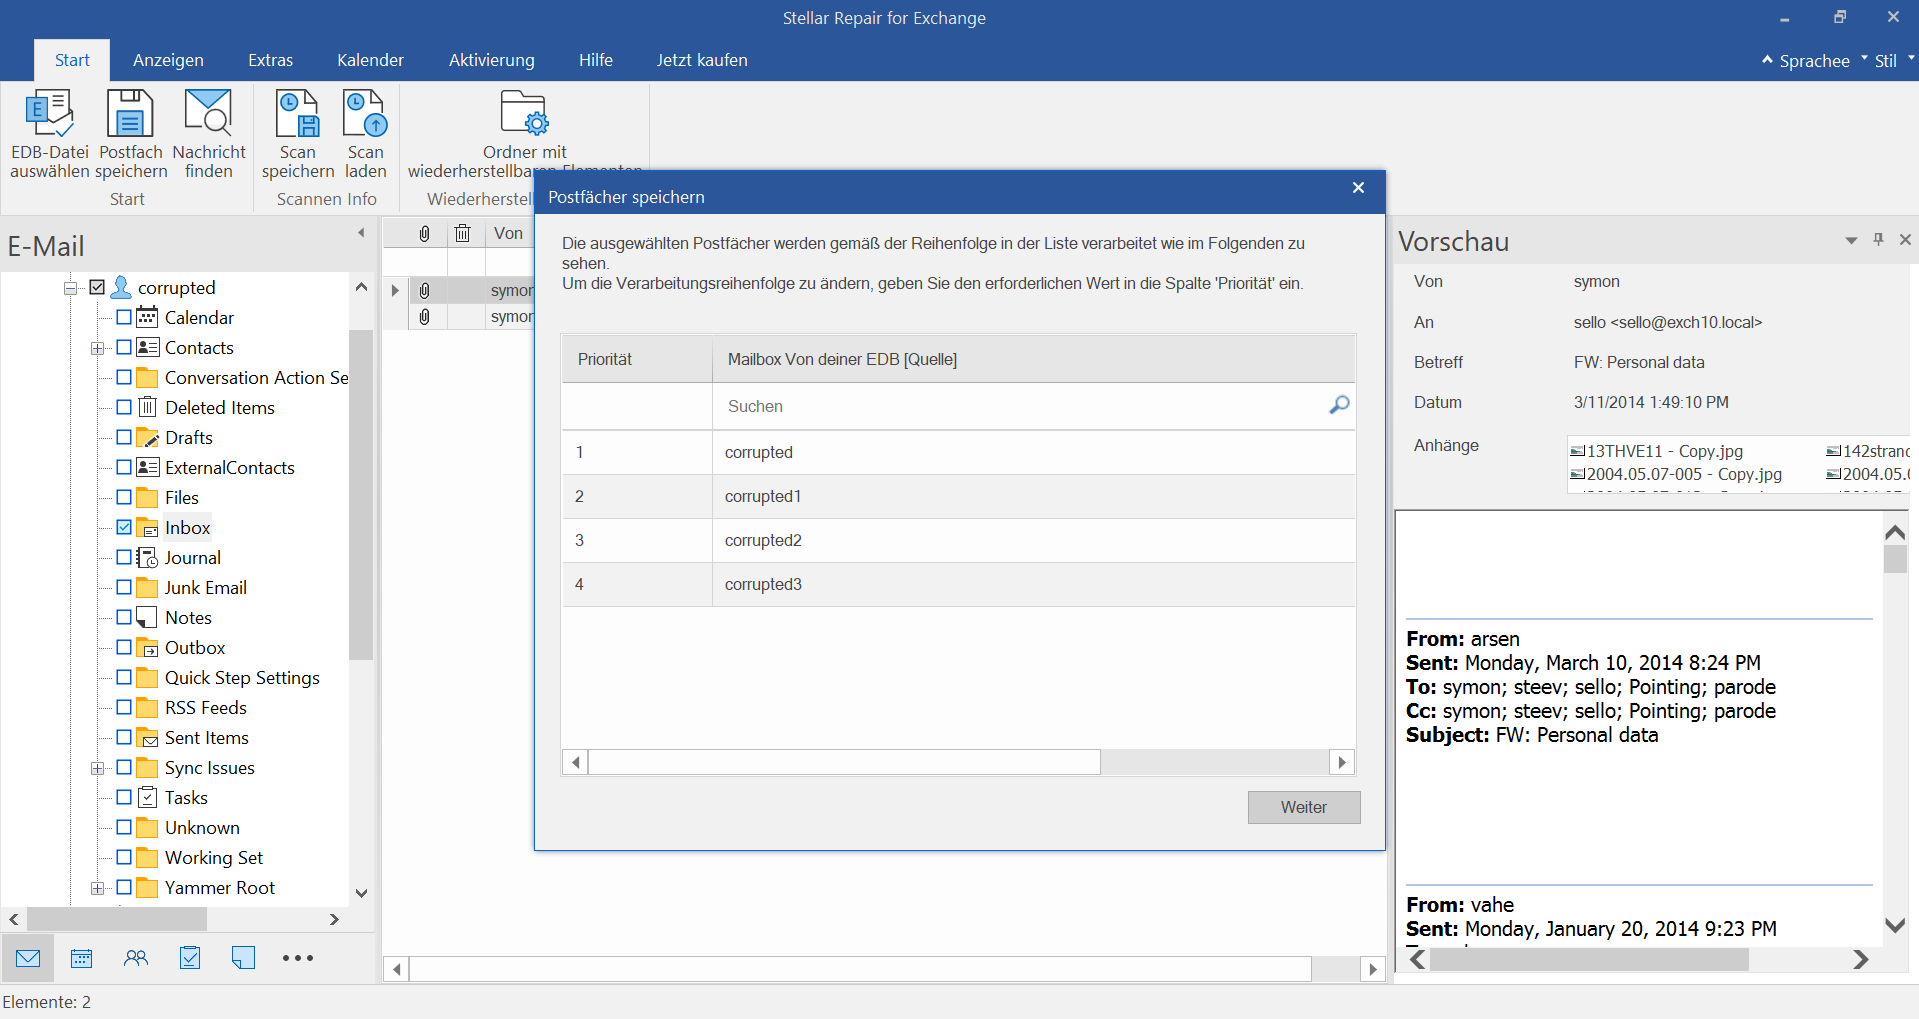
Sie können die Priorität der Postfächer im Fenster Postfächer speichern festlegen oder ändern. Standardmäßig werden die Postfächer in alphabetischer Reihenfolge aufgelistet.
Schritt 27
Speichern des Status von Postfächern
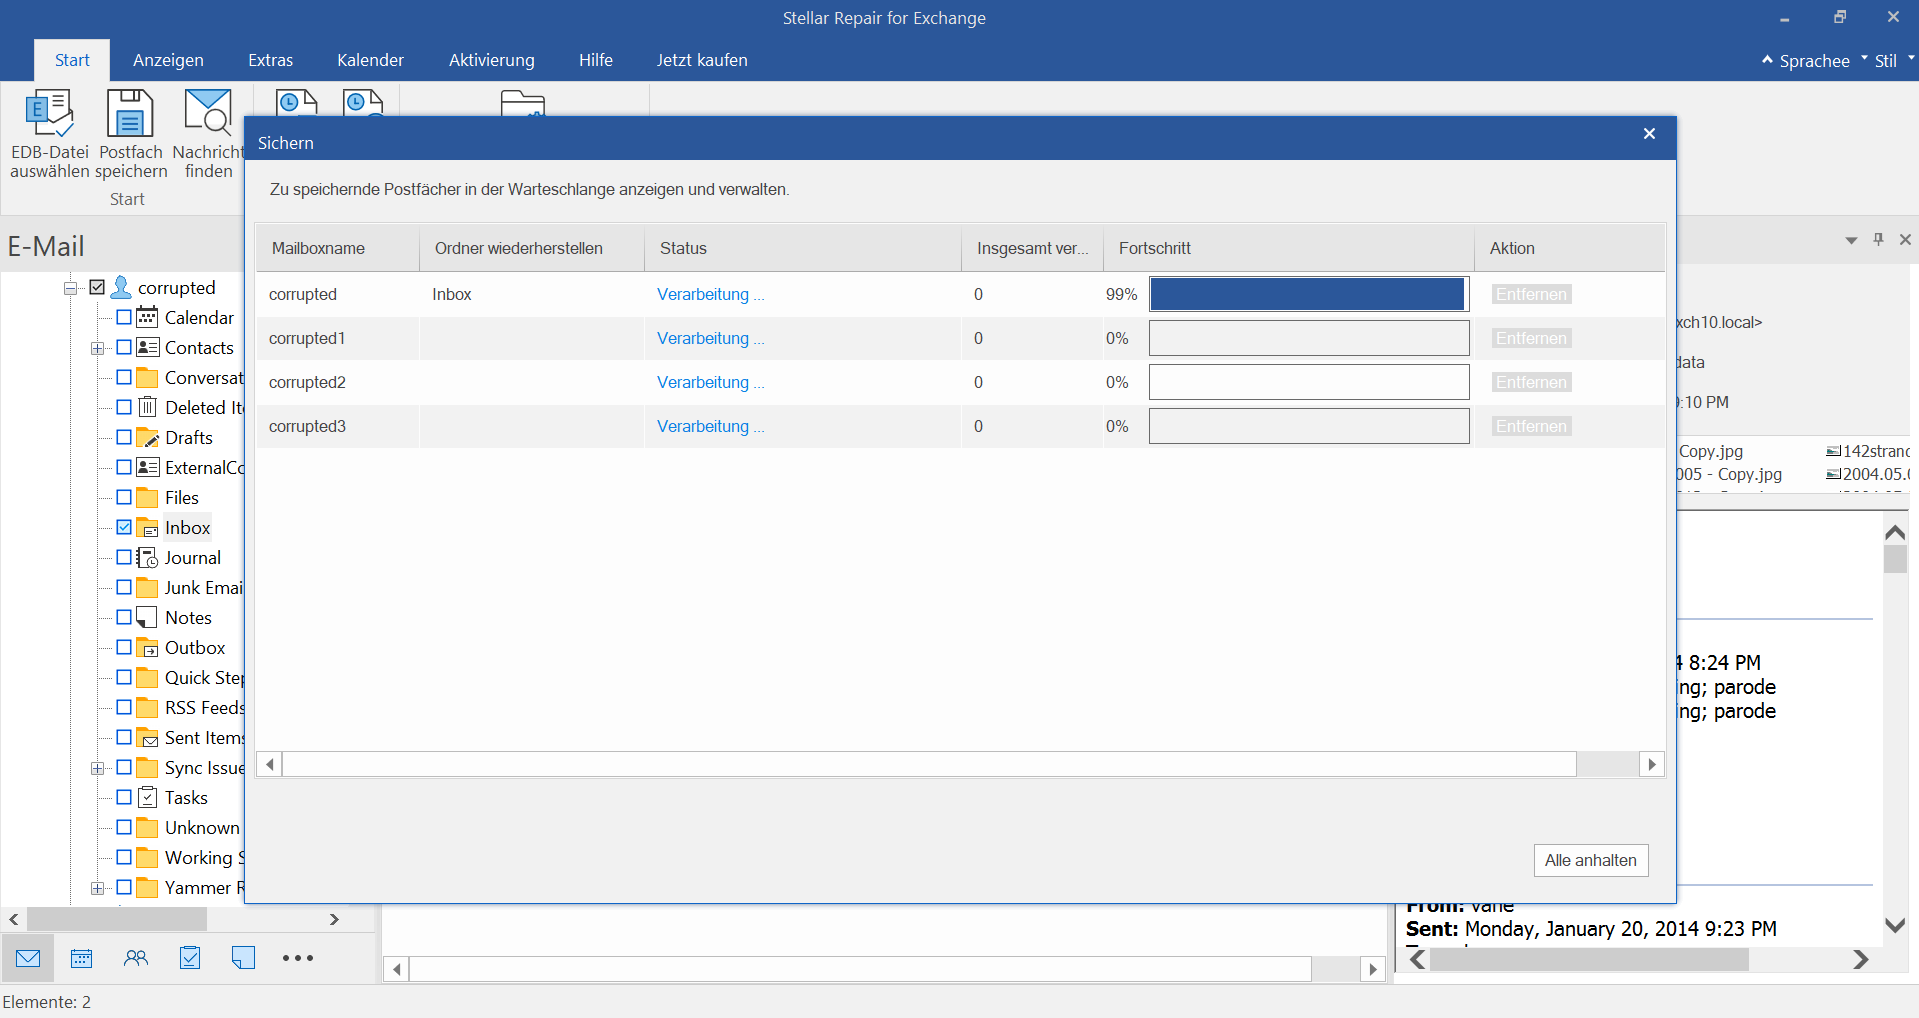
Es wird ein Fenster Speichern mit 6 Spalten angezeigt. Hier können Sie die Postfächer mit dem Status "Ausstehend" aus der Liste entfernen, indem Sie auf die Schaltfläche Entfernen klicken, oder den gesamten Speichervorgang für Postfächer anhalten, indem Sie auf die Schaltfläche Alle anhalten klicken.
Schritt 28
Komplettes Fenster speichern
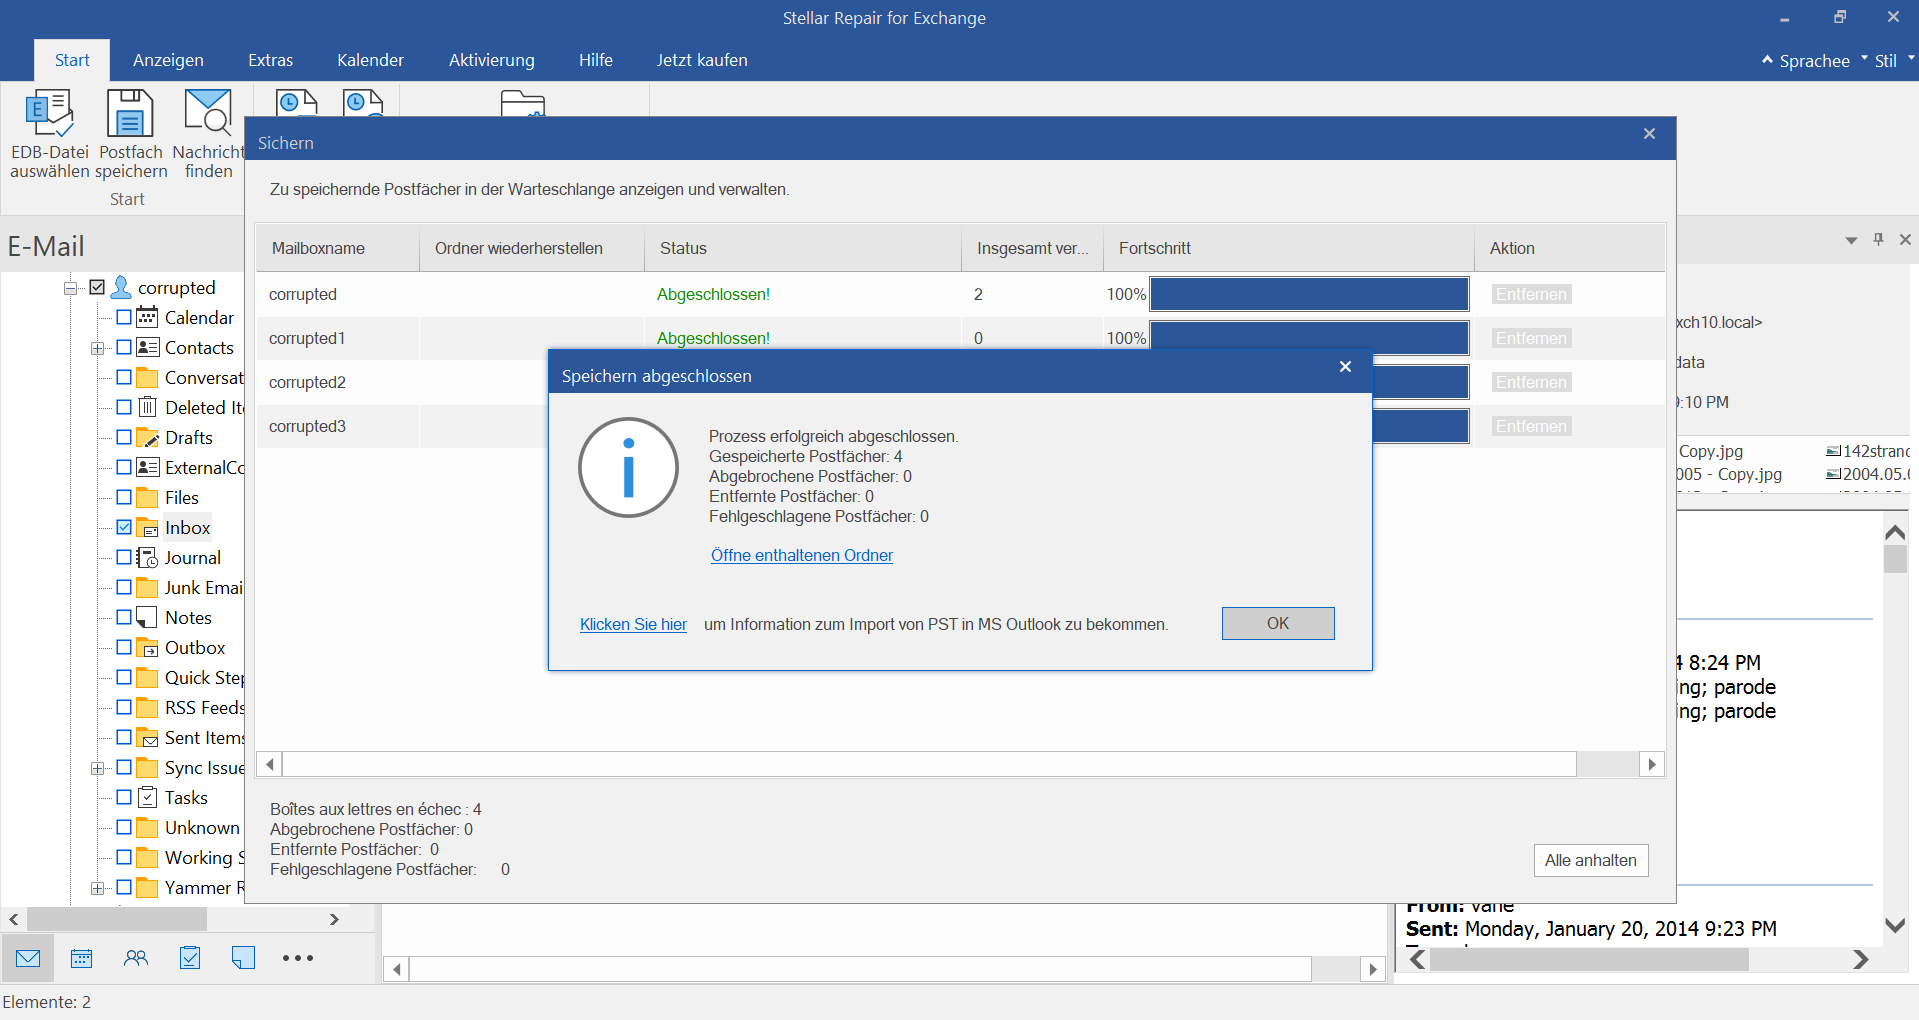
Es öffnet sich ein Dialogfeld Vollständig speichern, in dem eine Zusammenfassung der gespeicherten Postfächer angezeigt wird. Um den Ordner zu öffnen, der die PST-Dateien enthält, klicken Sie auf Enthaltenden Ordner öffnen. Klicken Sie auf OK, um den Speichervorgang abzuschließen.
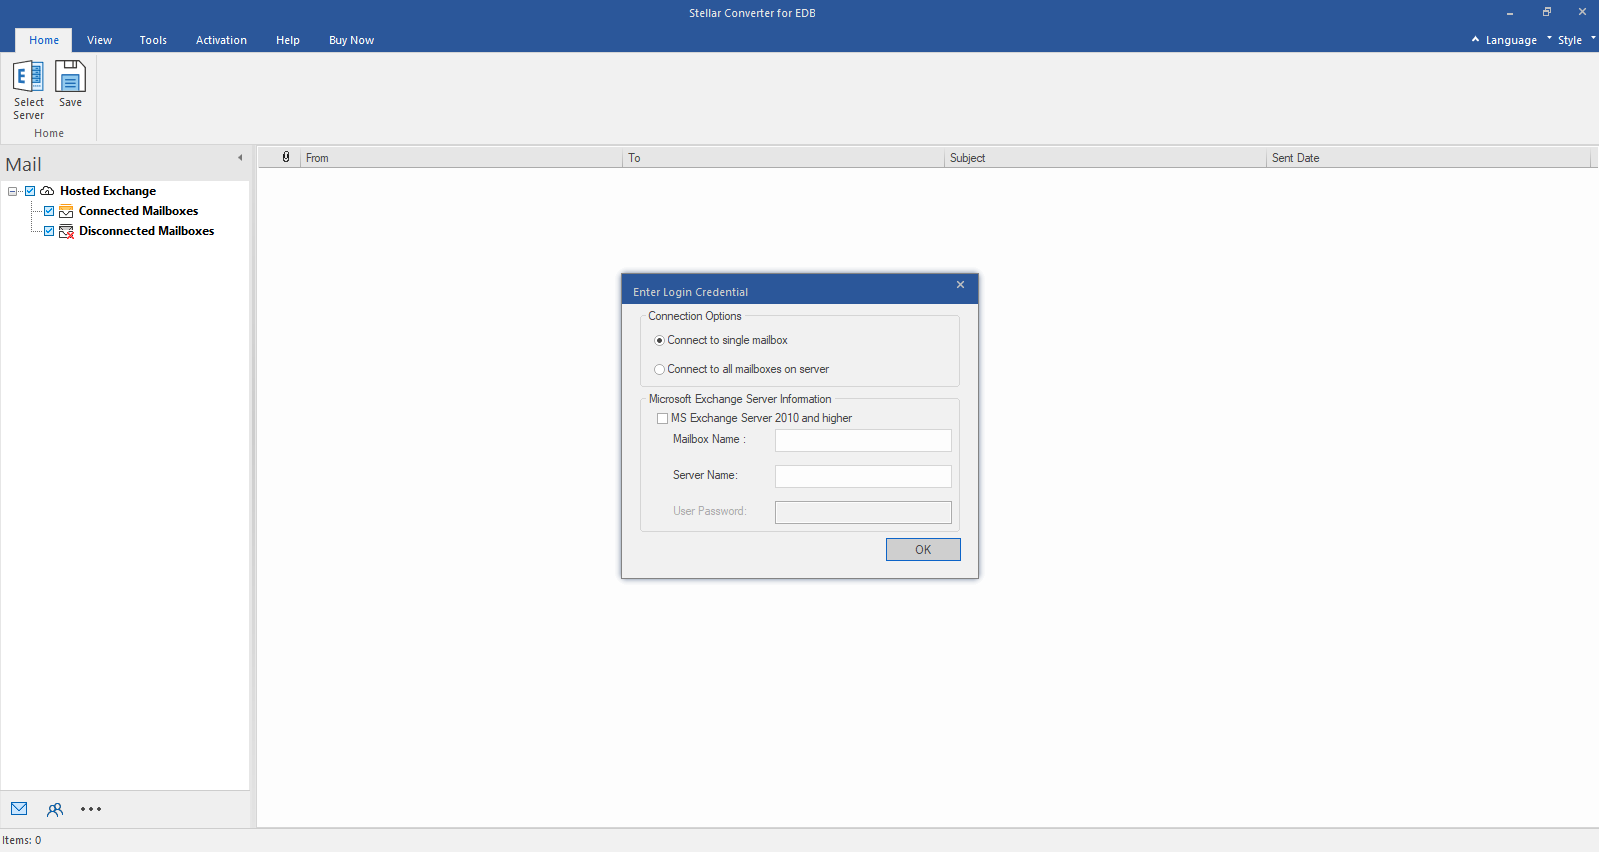
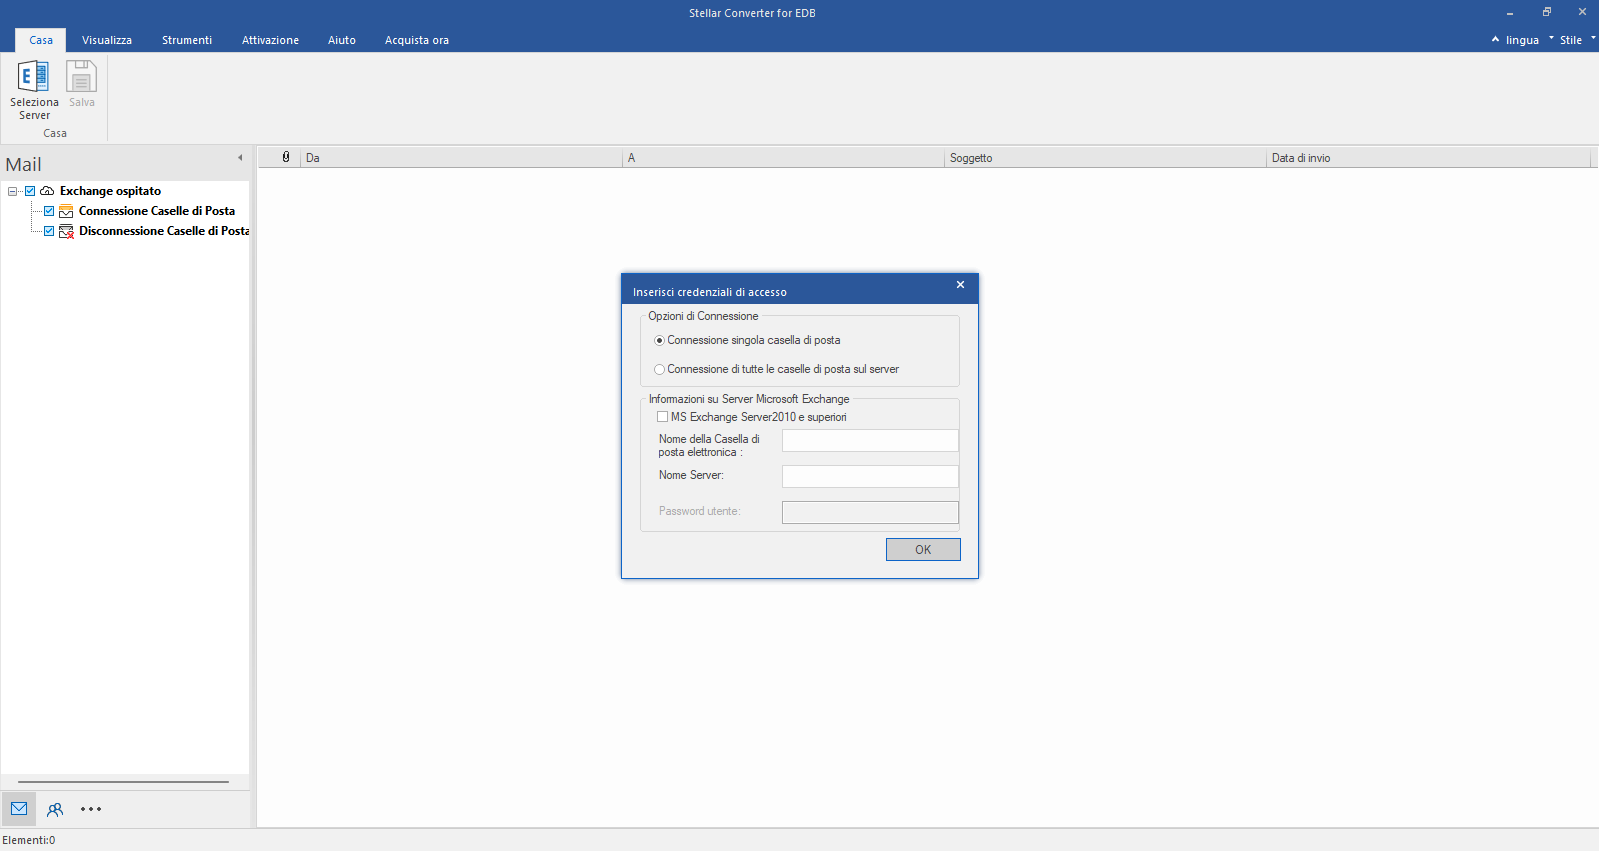
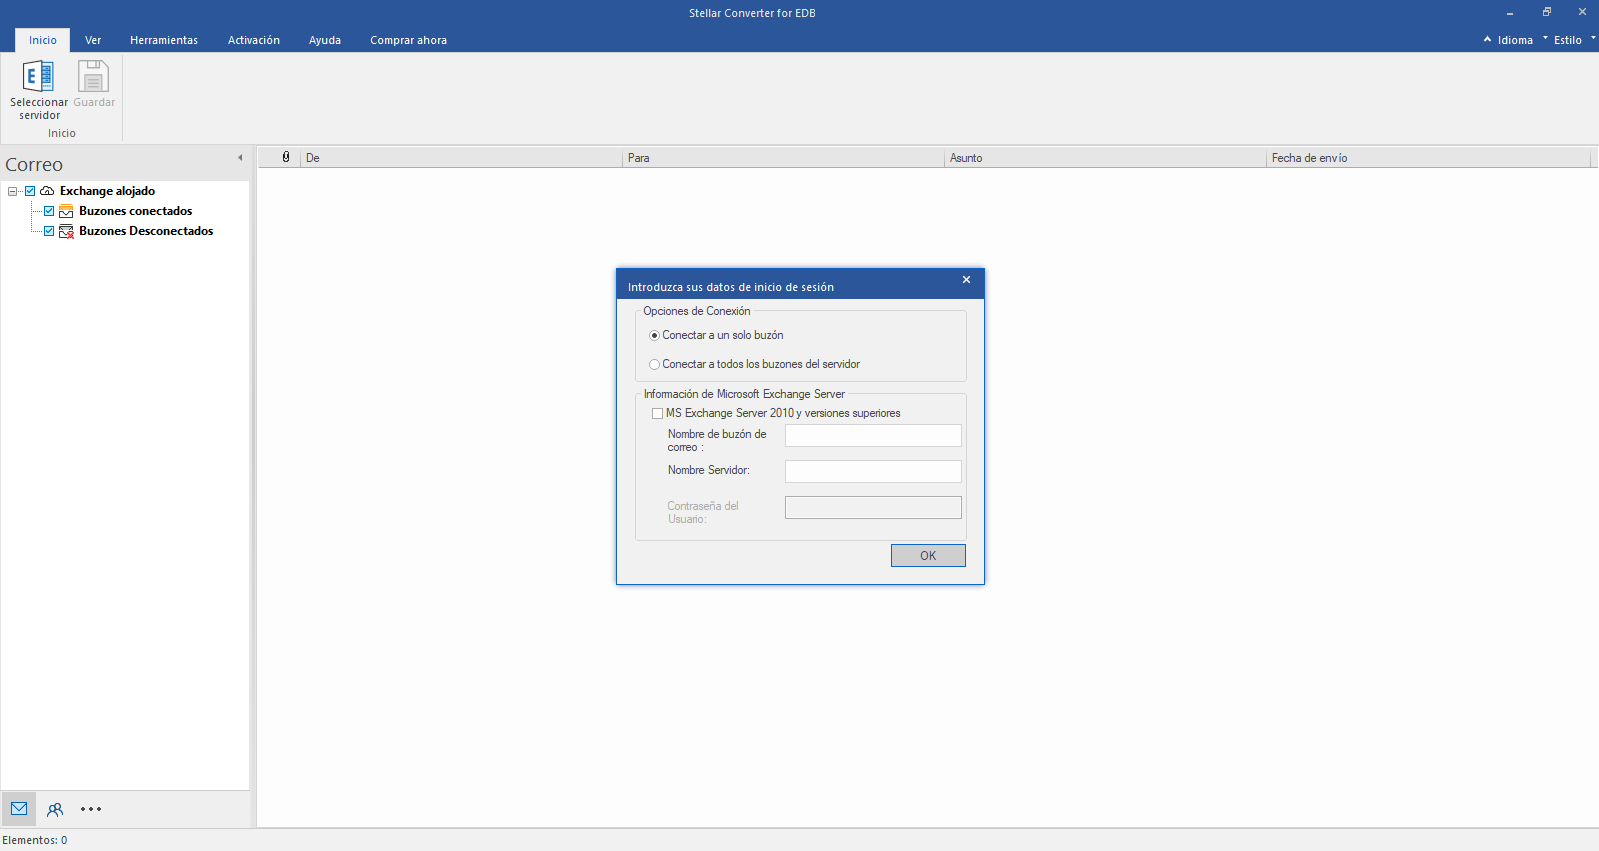
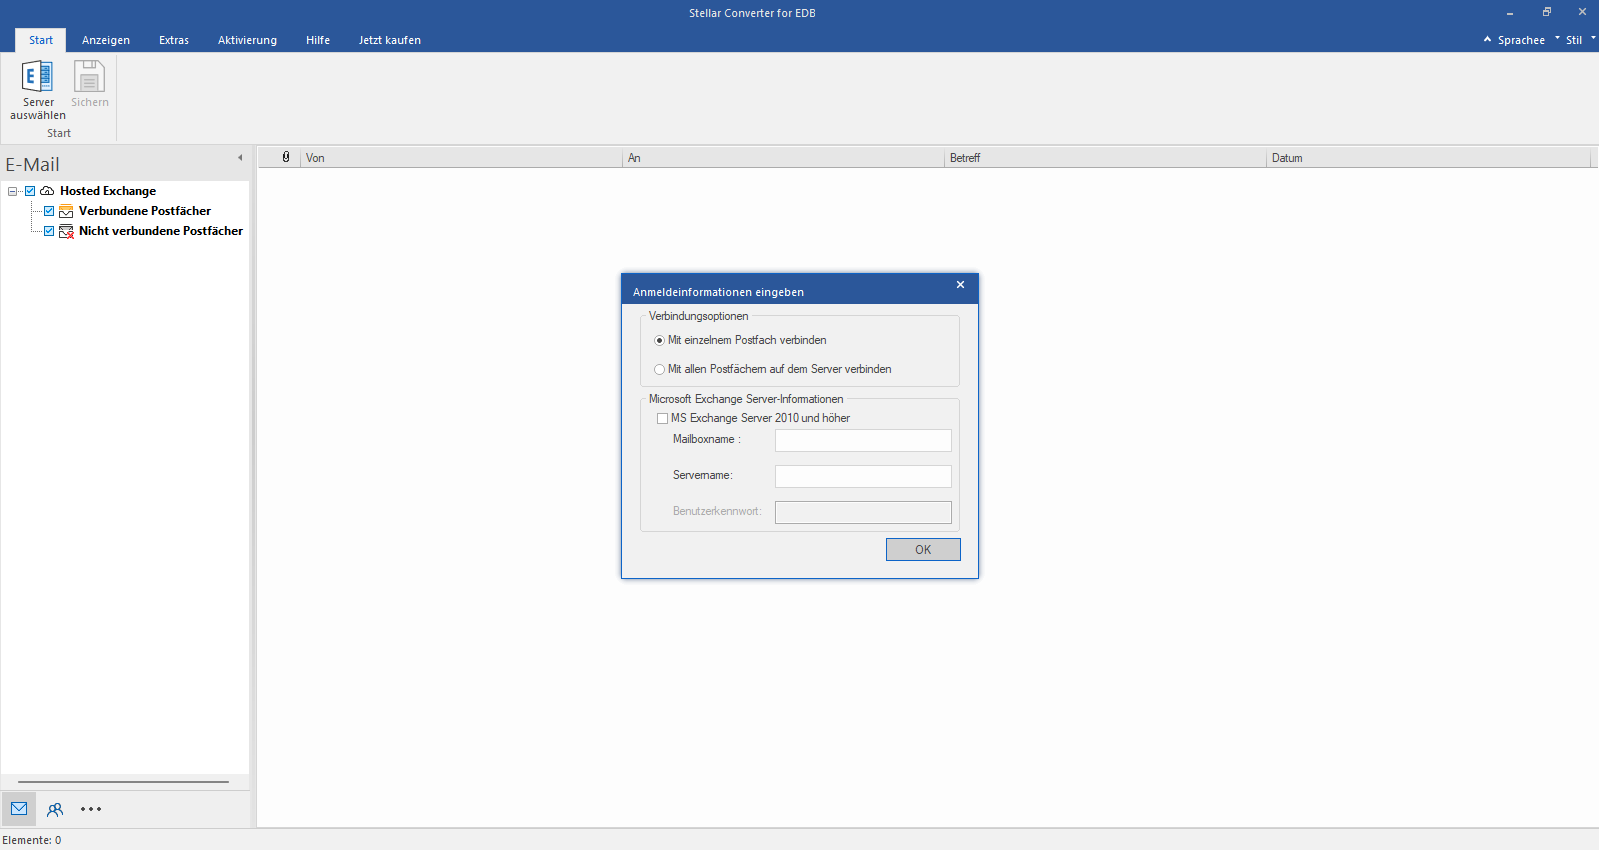
Select Hosted Exchange to export mailboxes from an online EDB file. Select Connect to Single Mailbox or Connect to Single Mailbox from Connection Options
Step 2
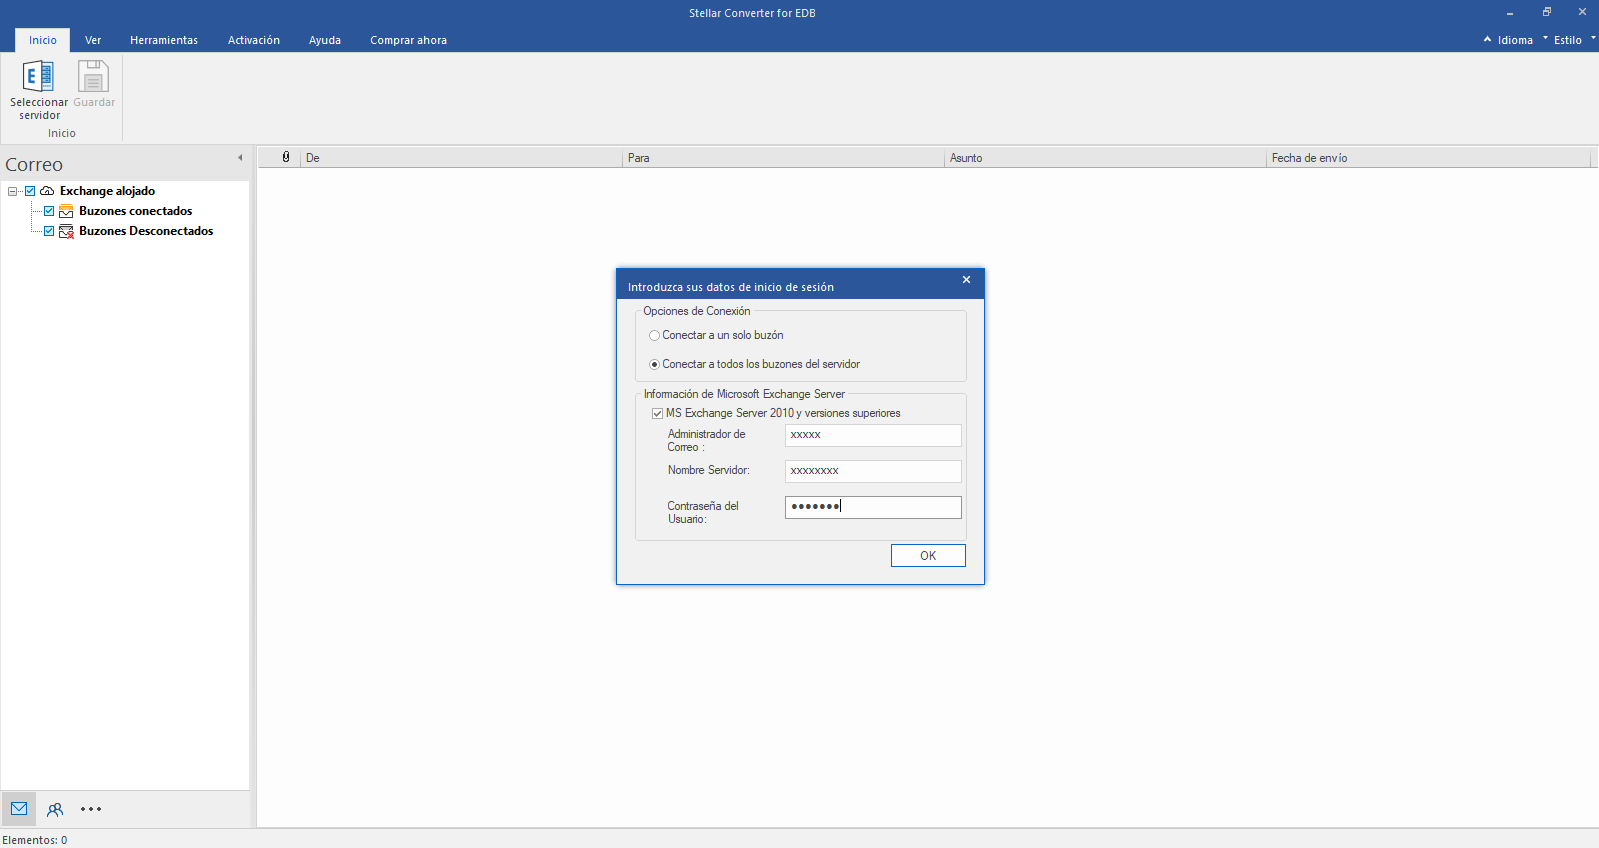
Enter Admin Email and Server Name
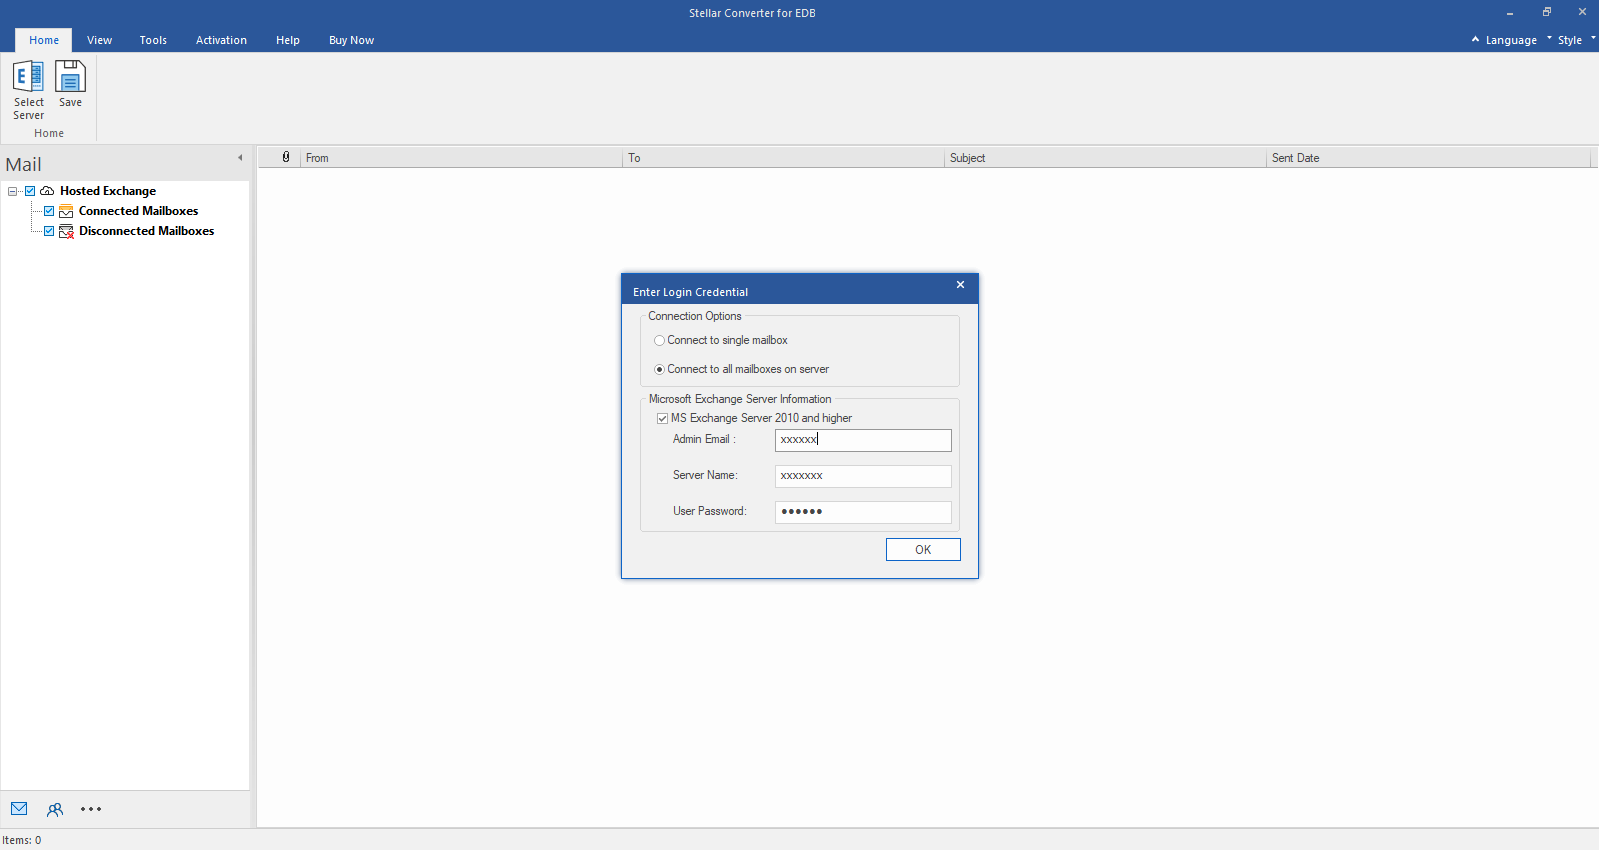
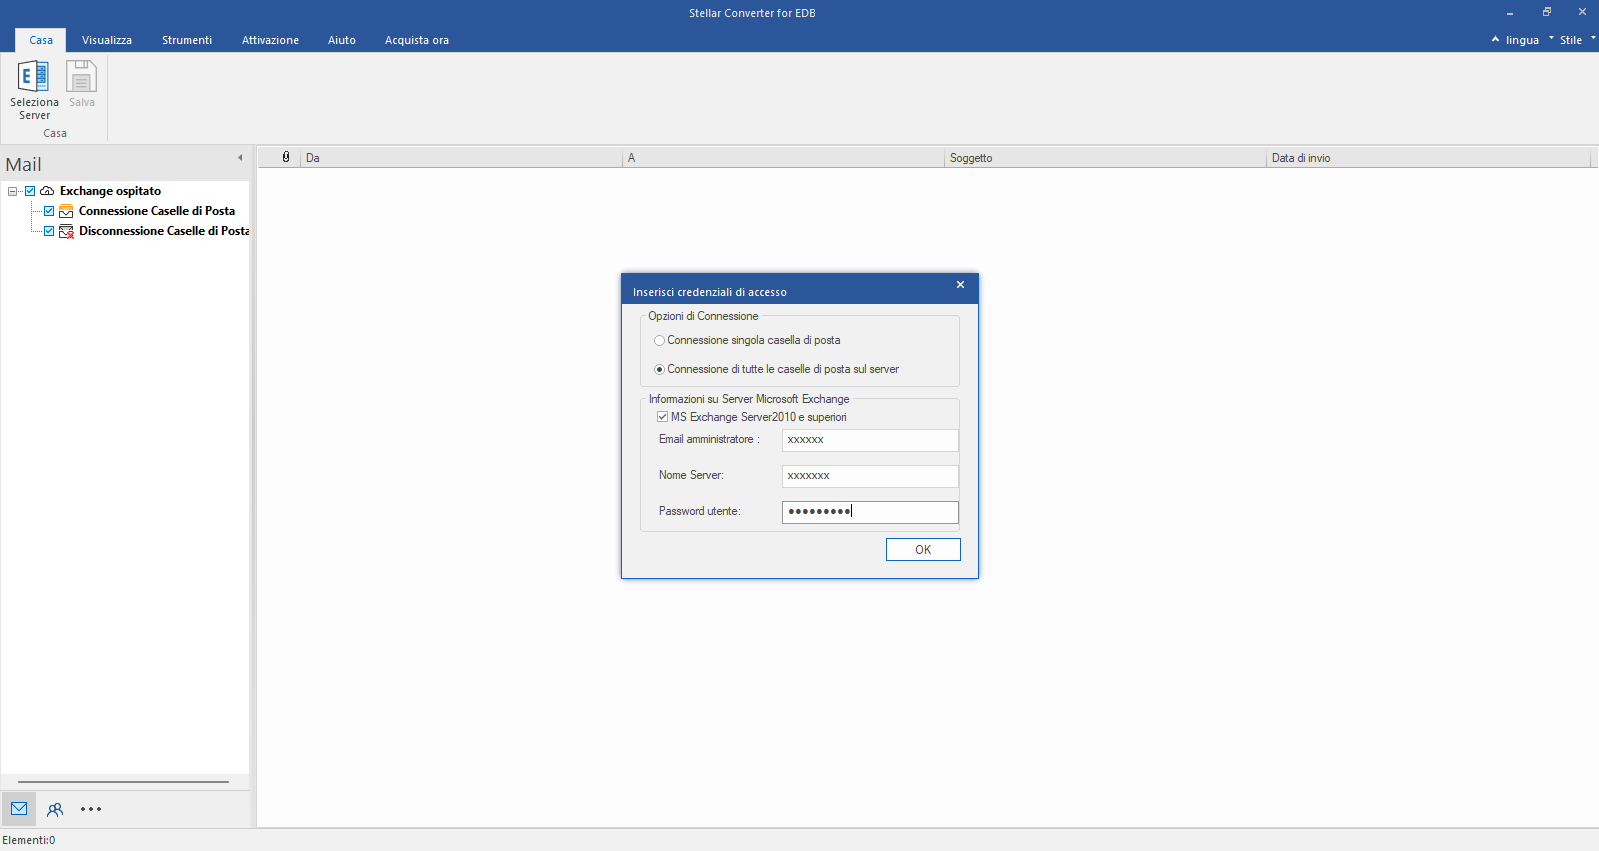
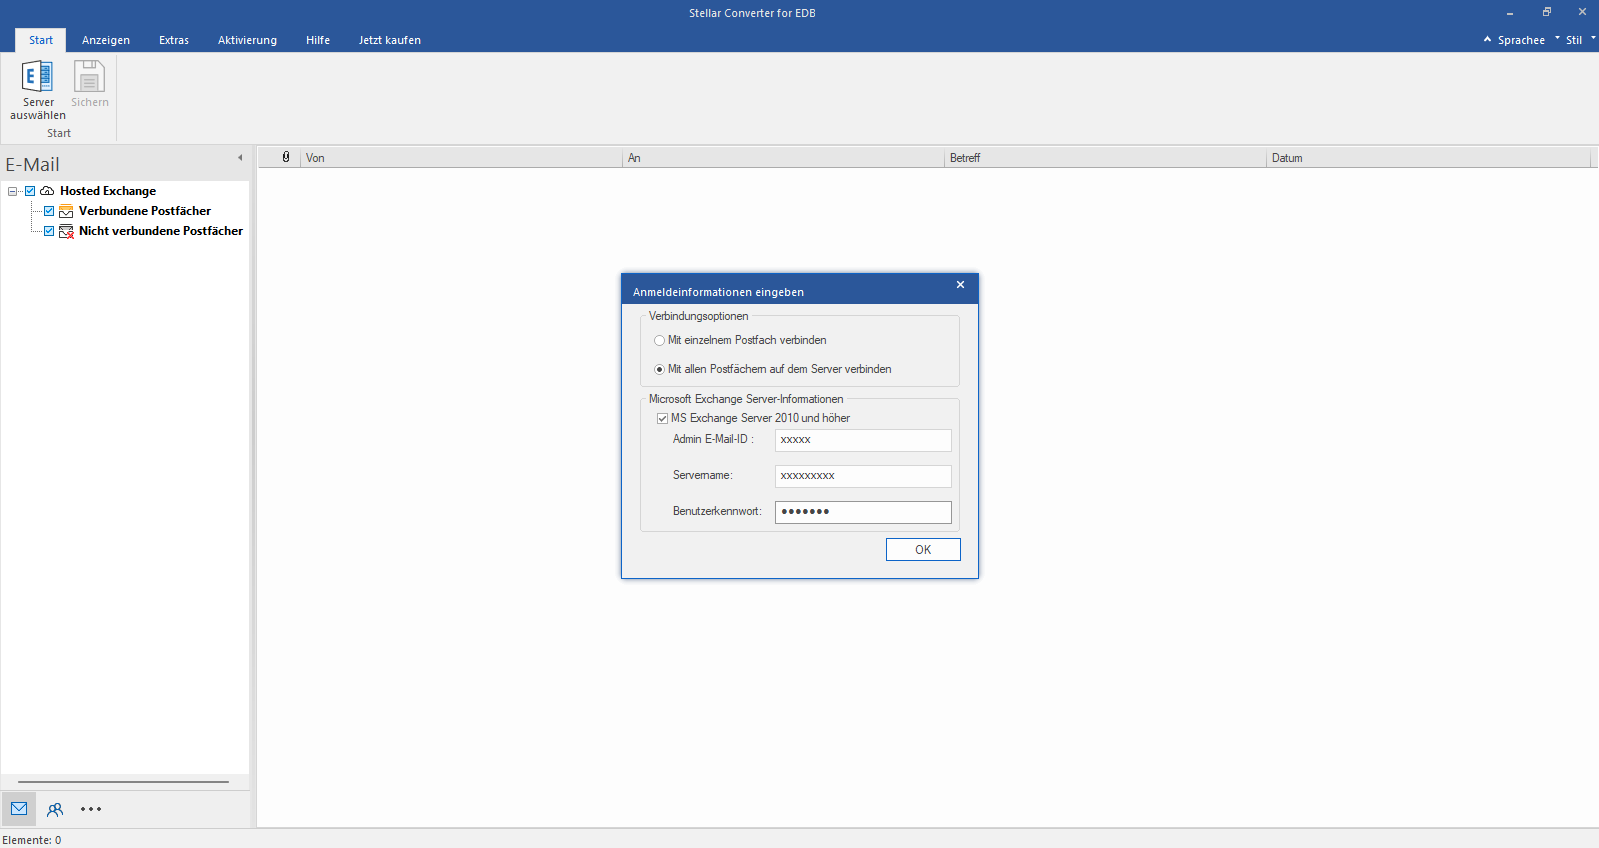
Enter Admin and Server Name (for Exchange 5.5, 2000, 2003, 2007) or tick "Exchange Server 2010 and higher" checkbox to enter Admin Email, Server Name and Password (for MS Exchange 2010, 2013, 2016, and 2019). Click OK.
Step 3
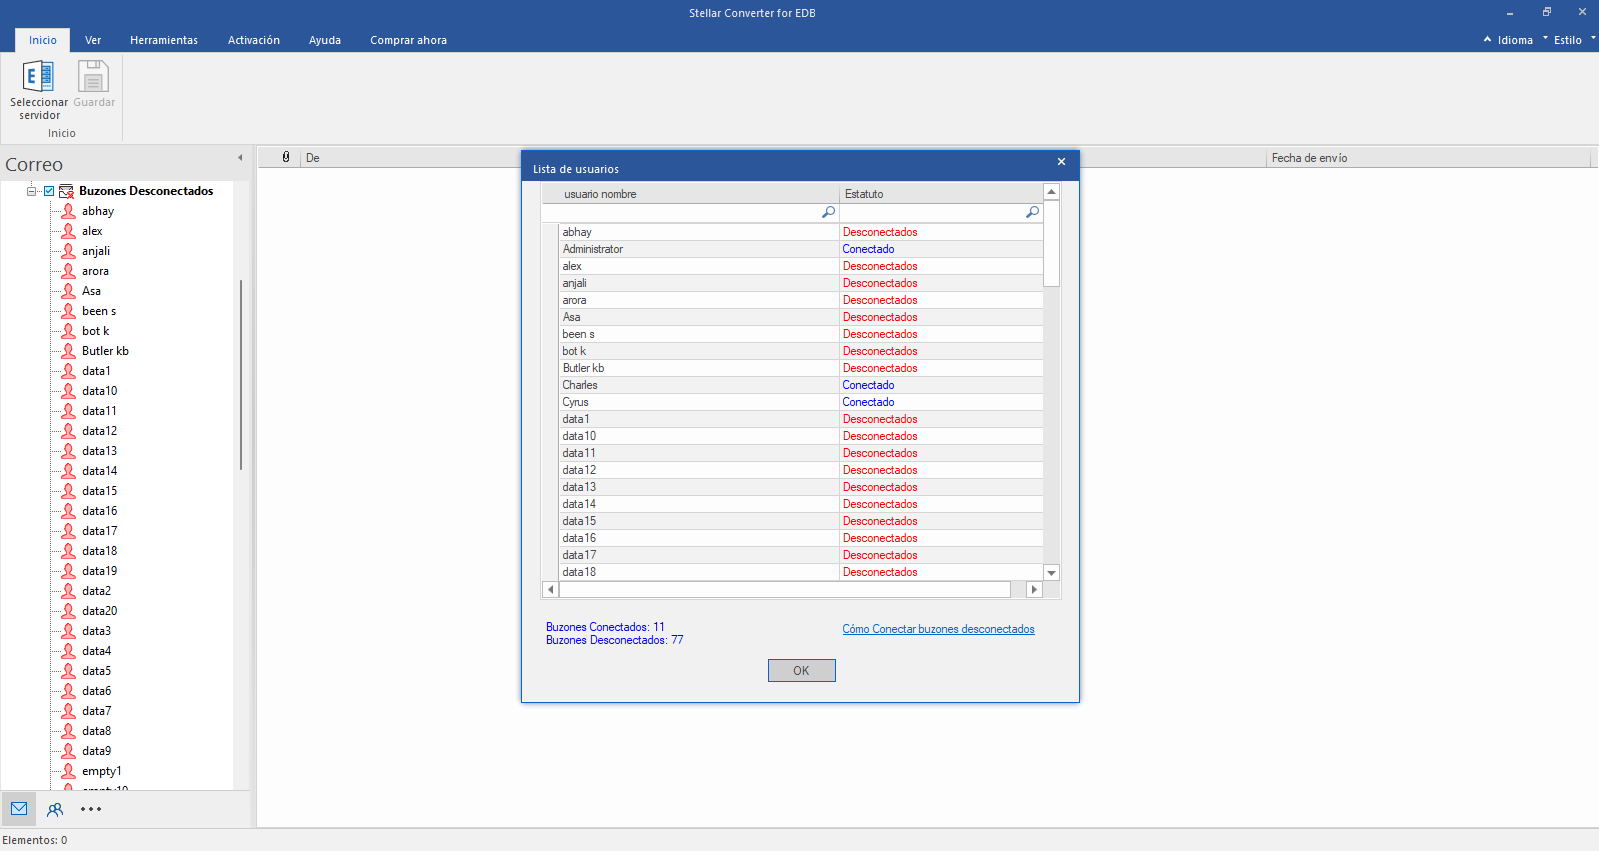
Check Connected/Disconnected Mailbox Status
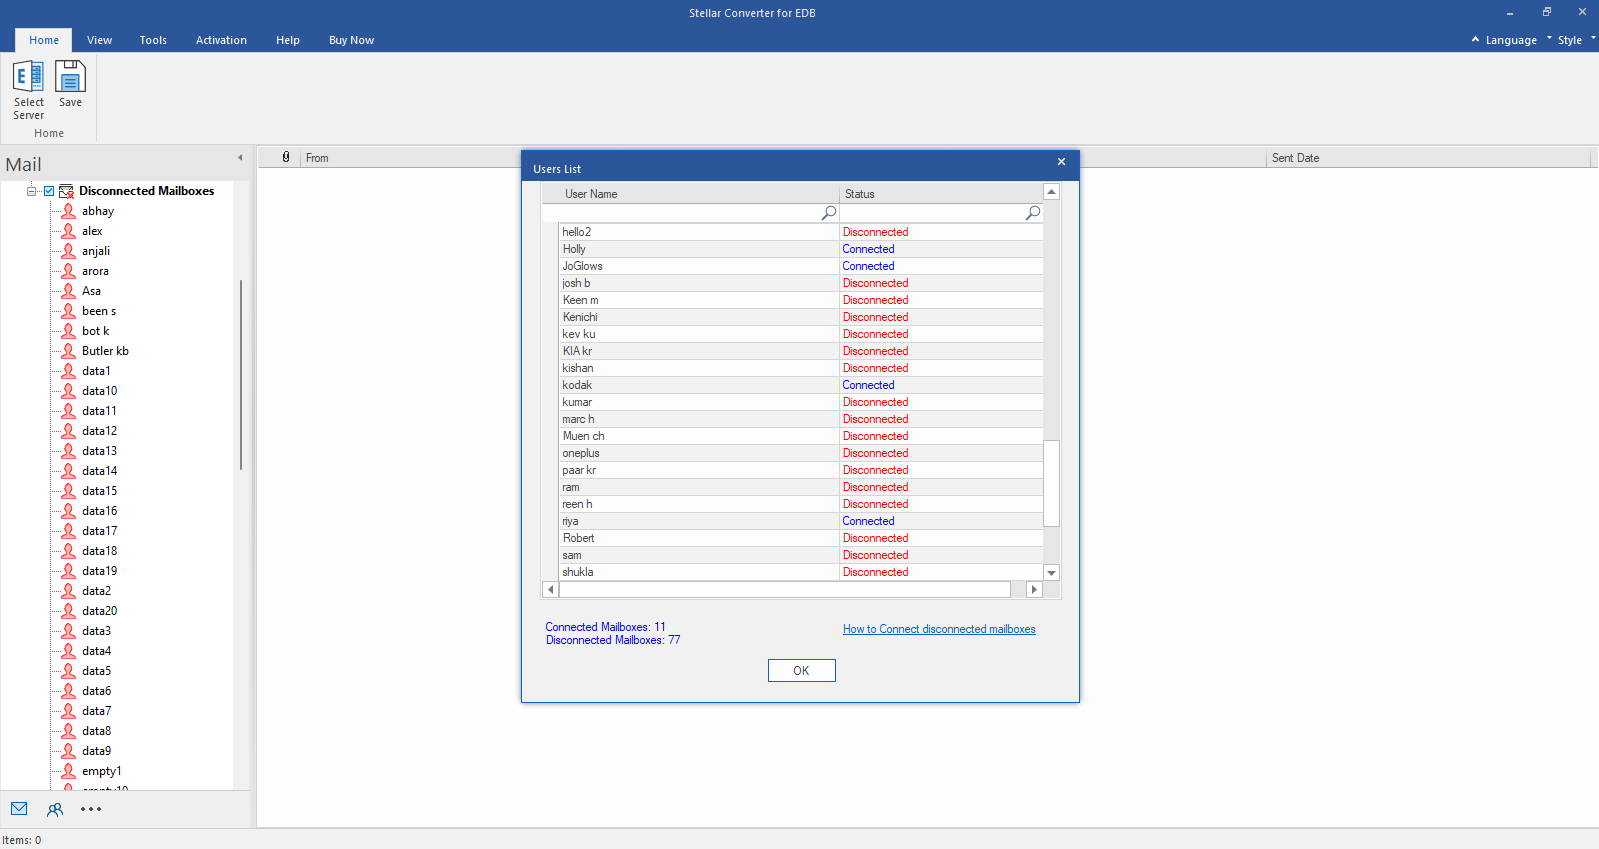
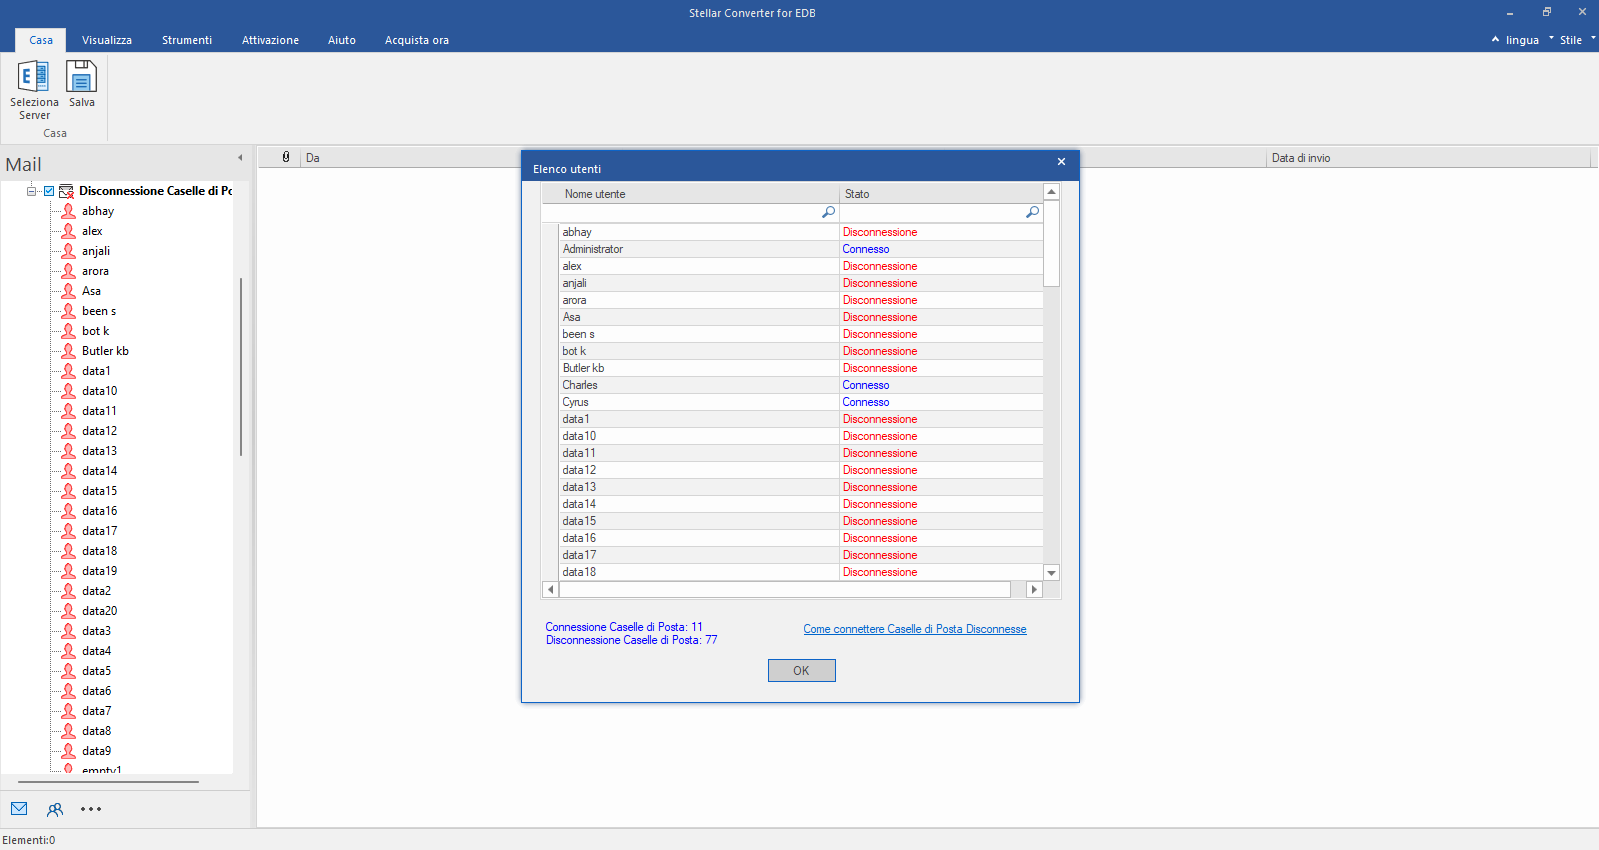
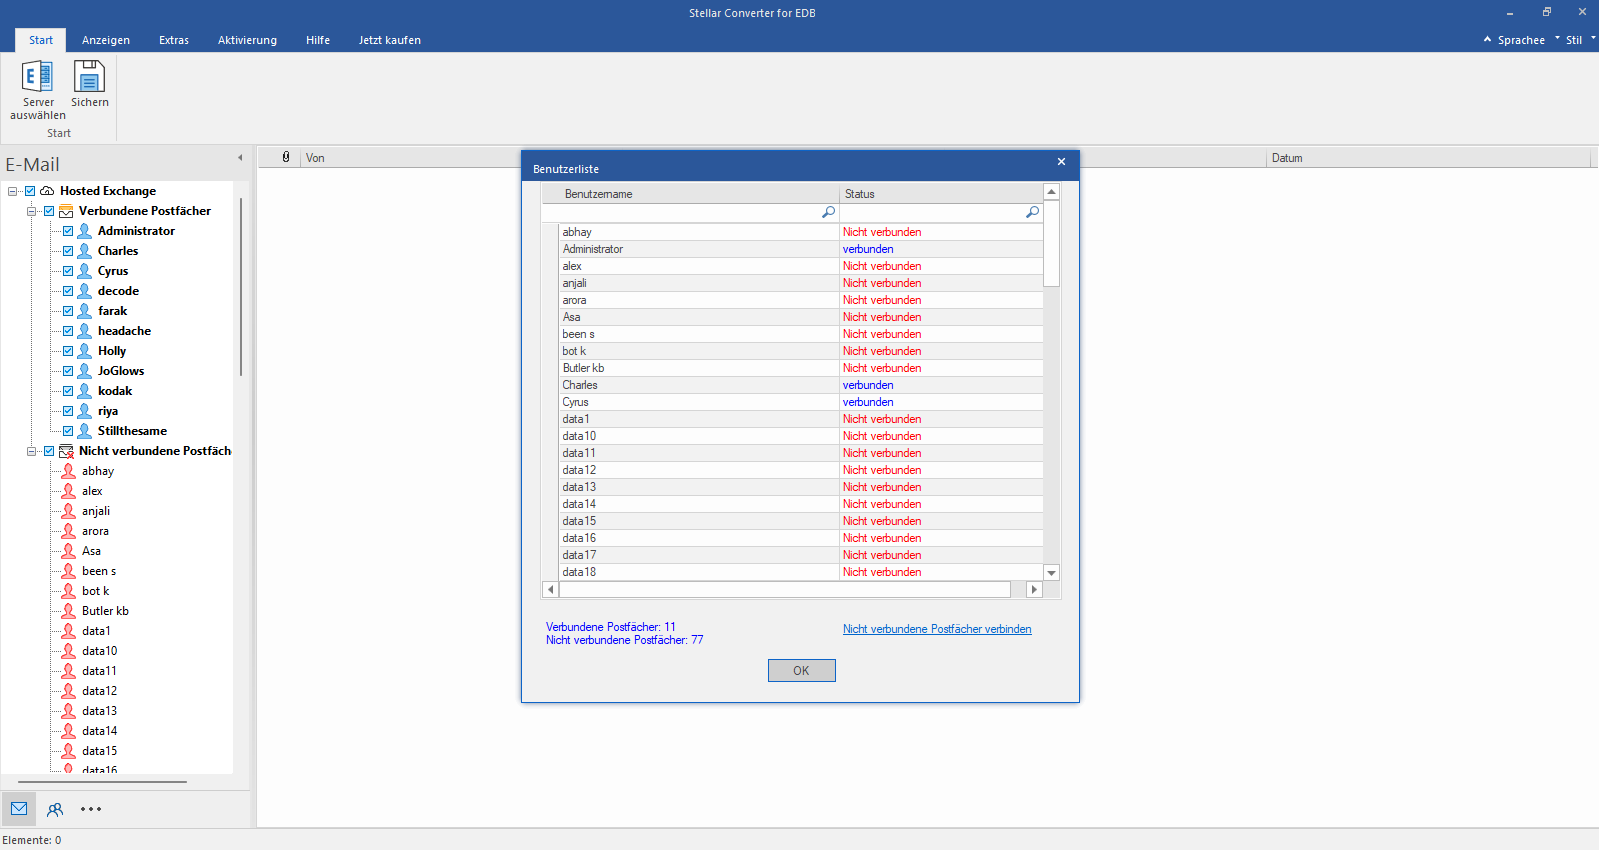
After establishing the connection with Exchange Server, Next window displays list of connected and disconnected mailboxes. Click "OK" to proceed.
Step 4
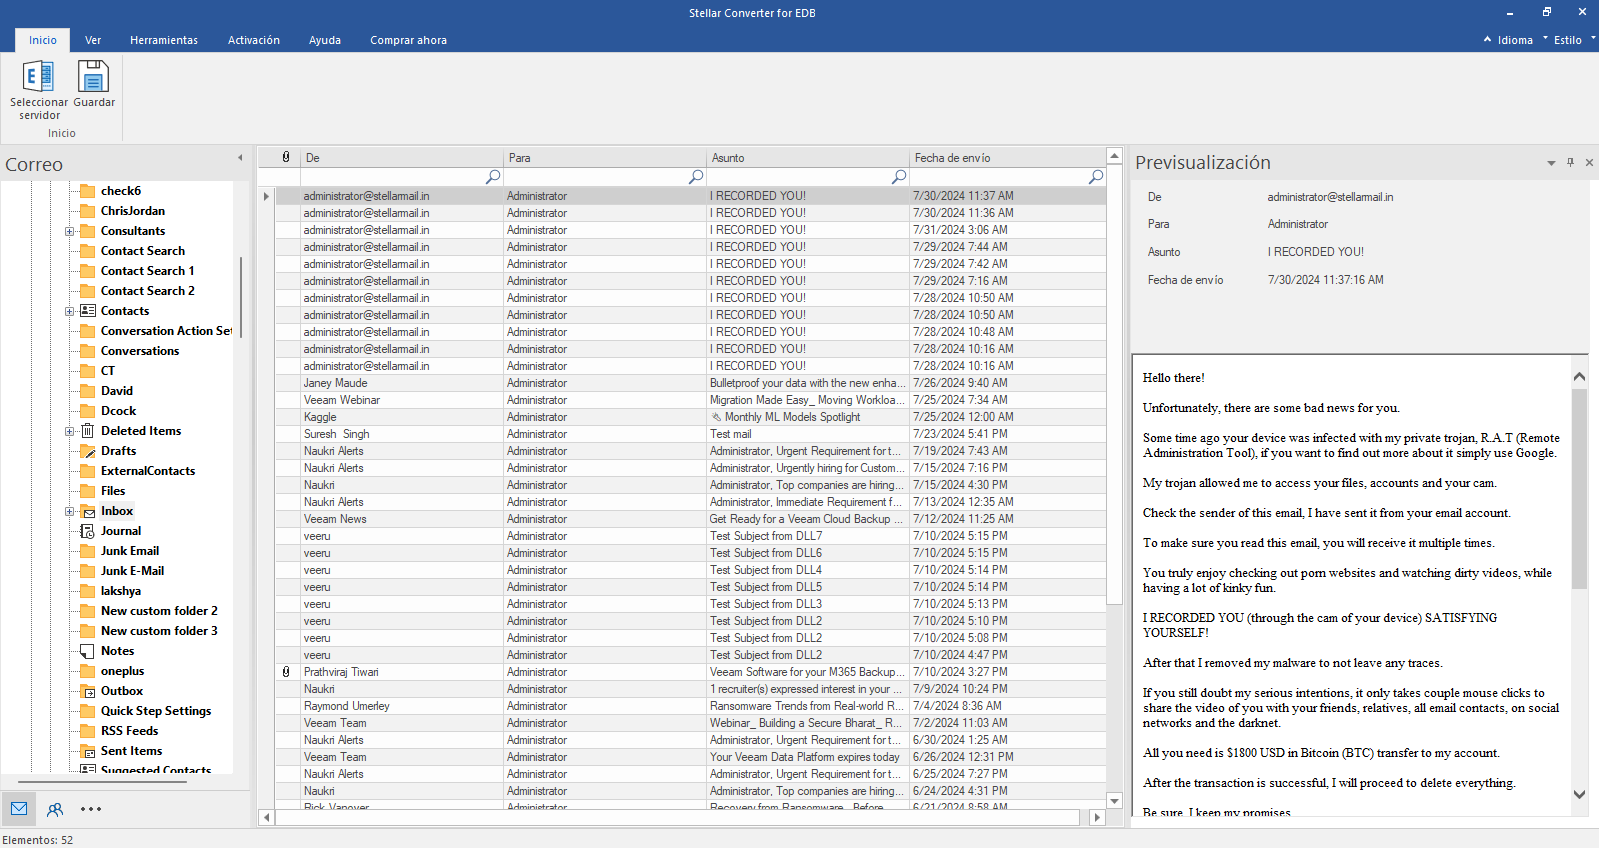
Check the Preview of all Mailboxes
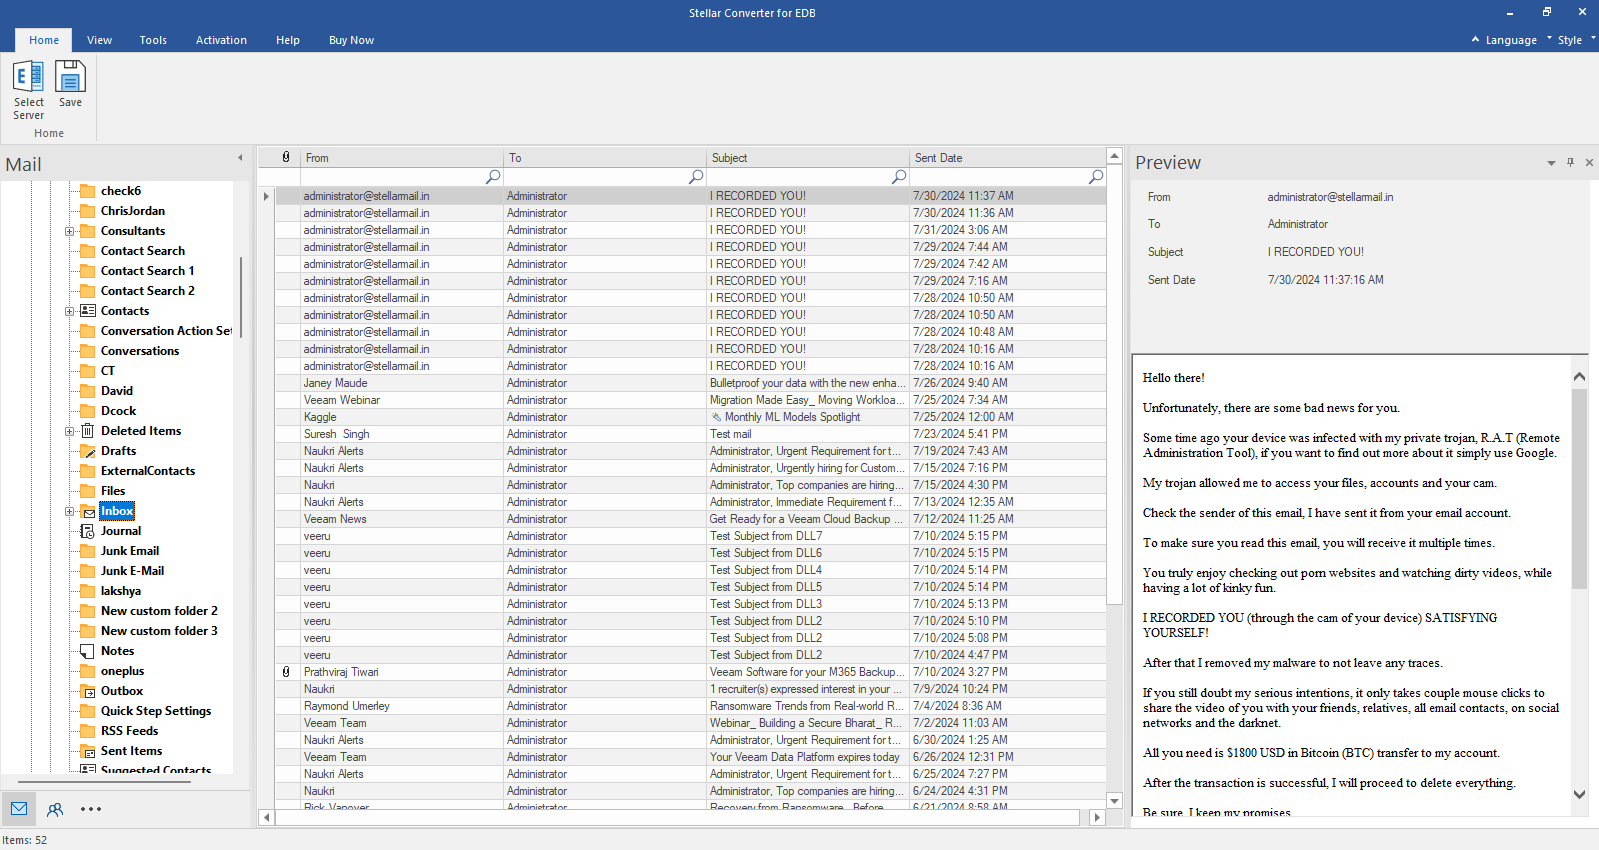
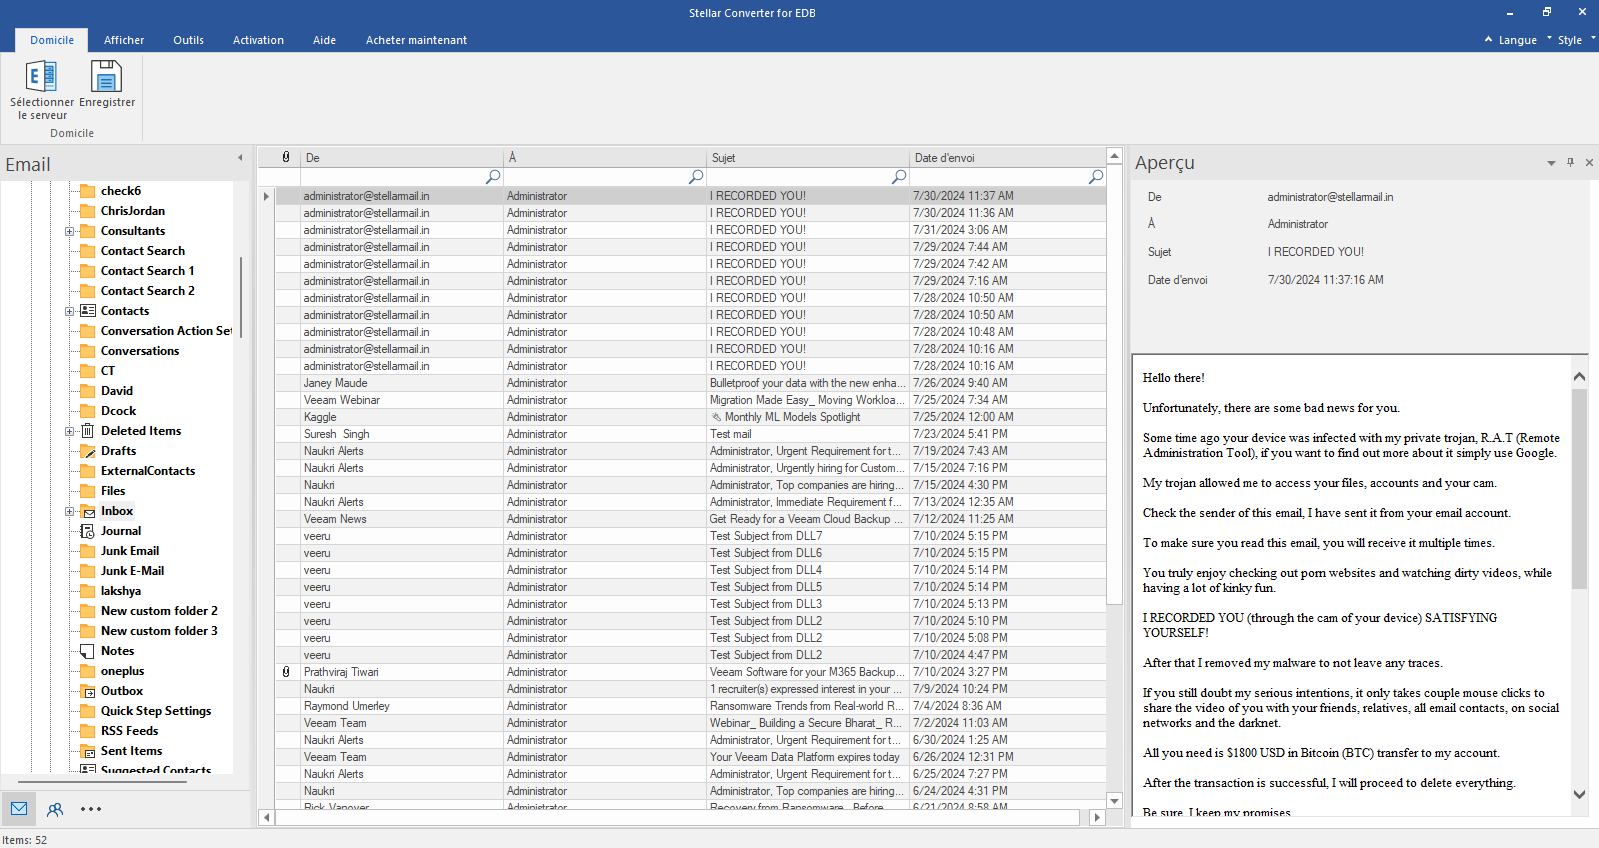
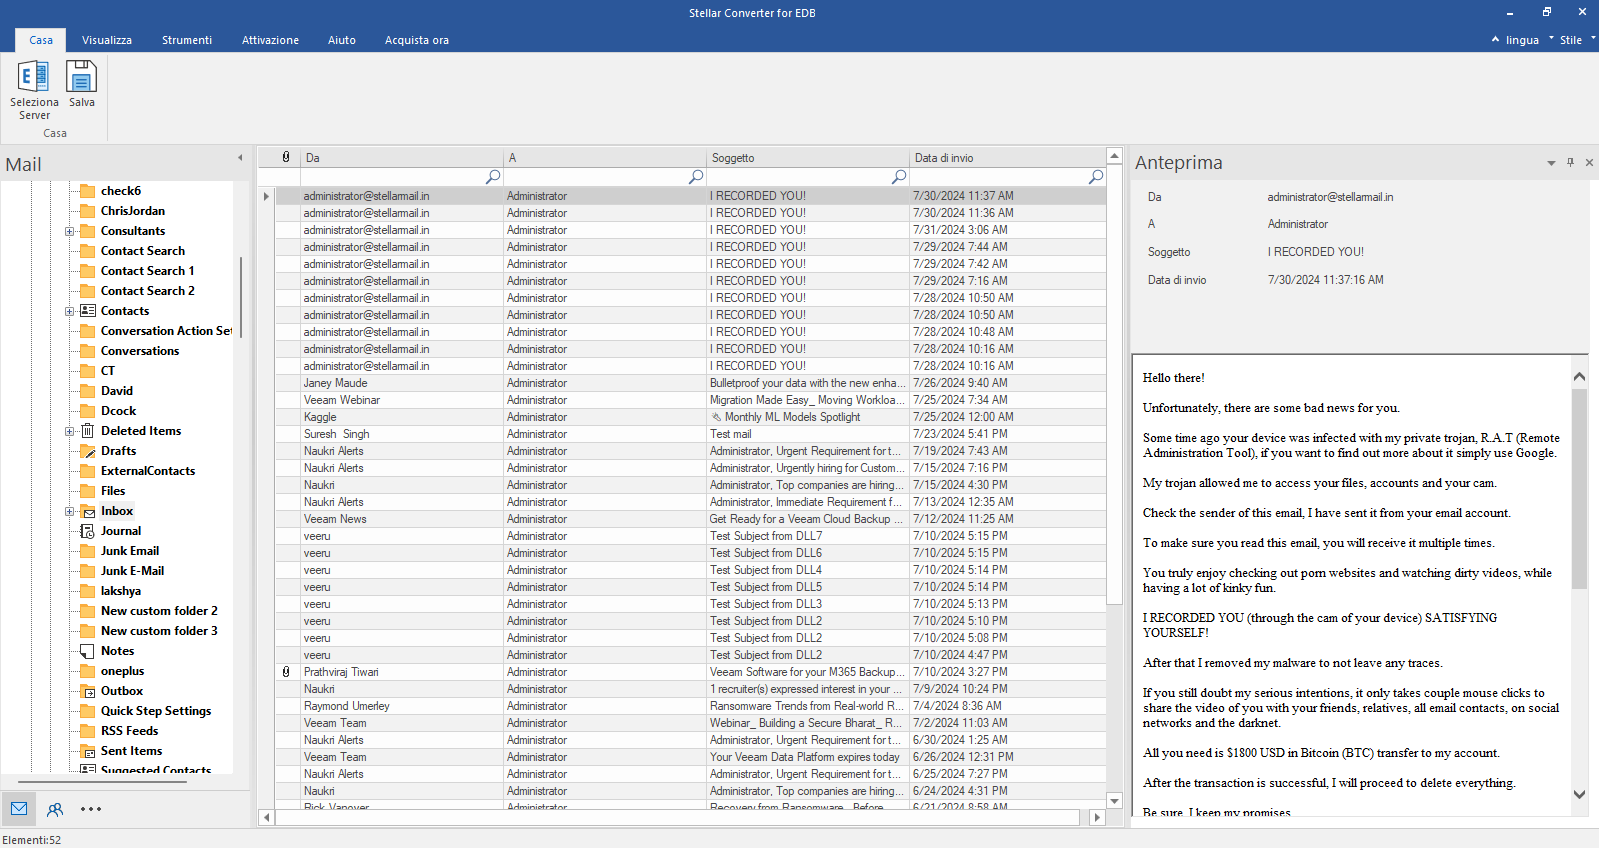
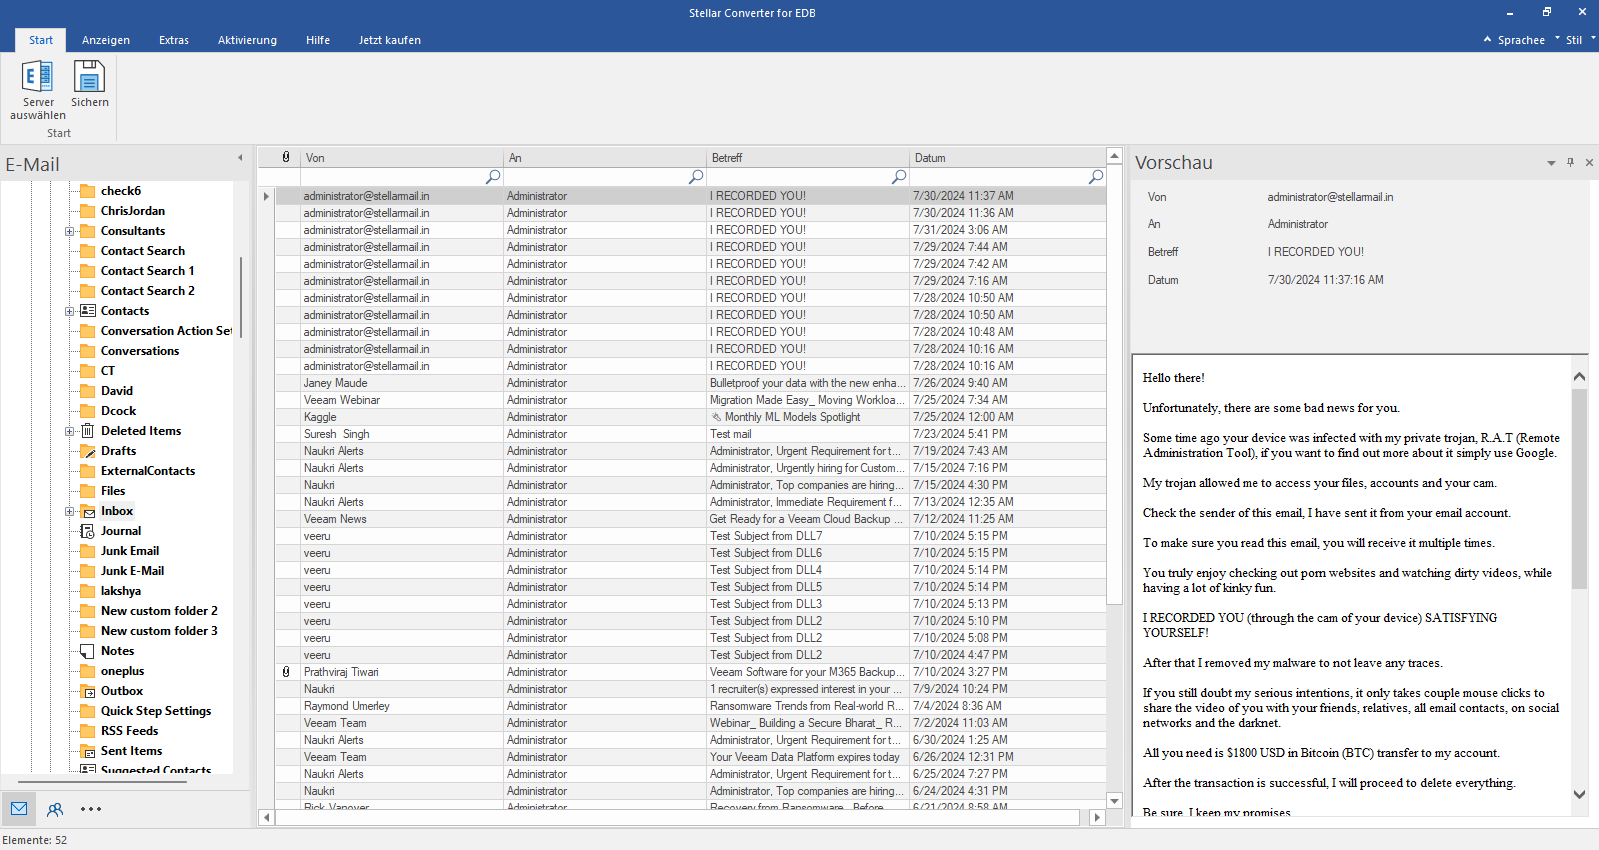
Check the preview of all mailbox items- Emails, Calendars, Contacts etc.
Step 5
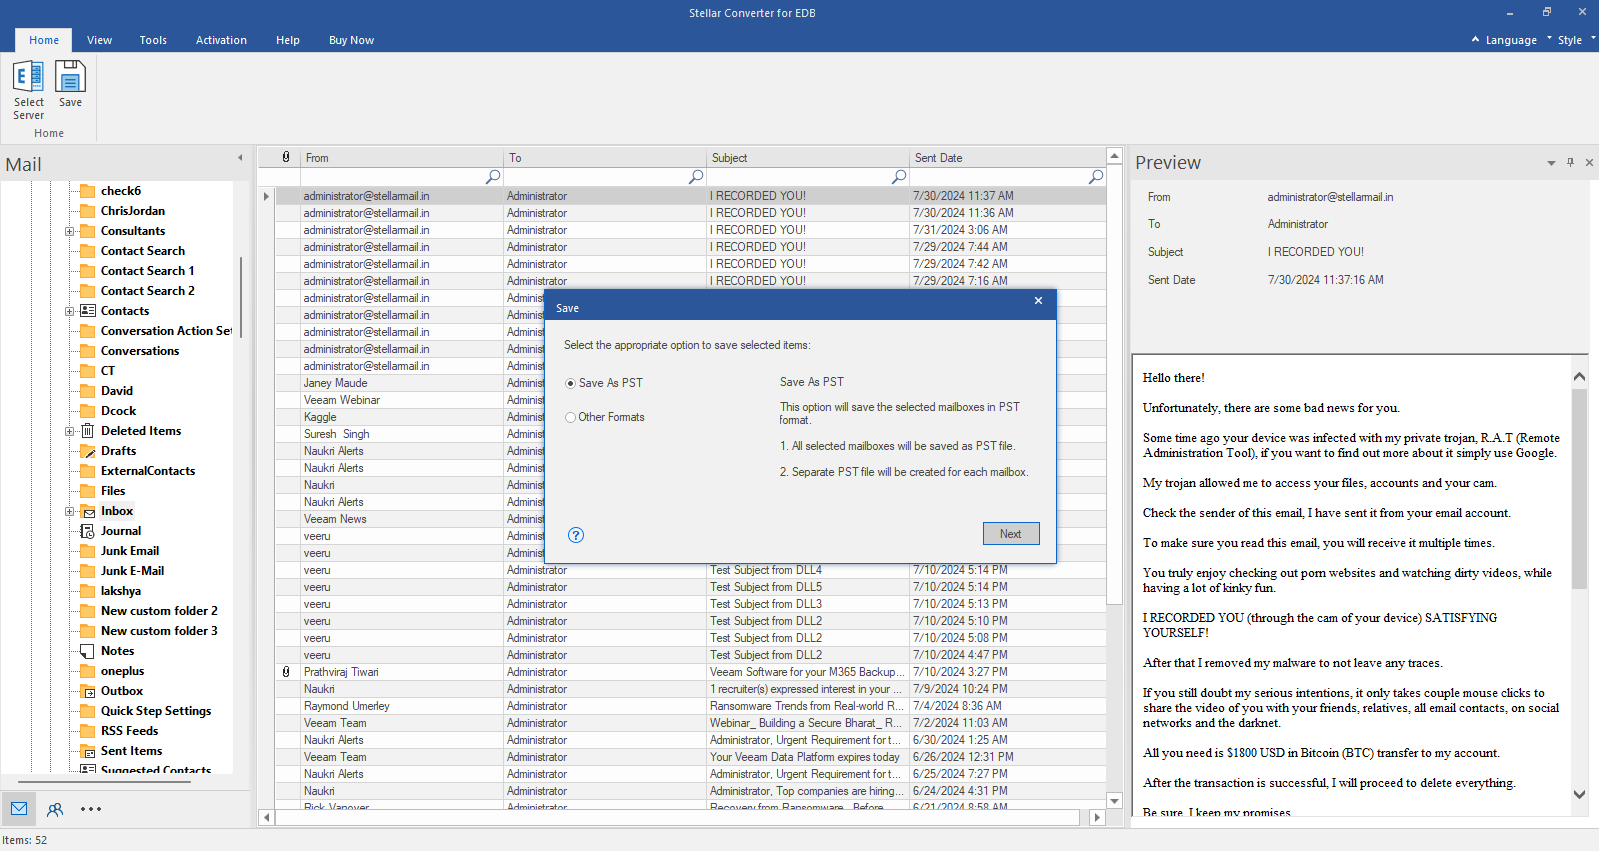
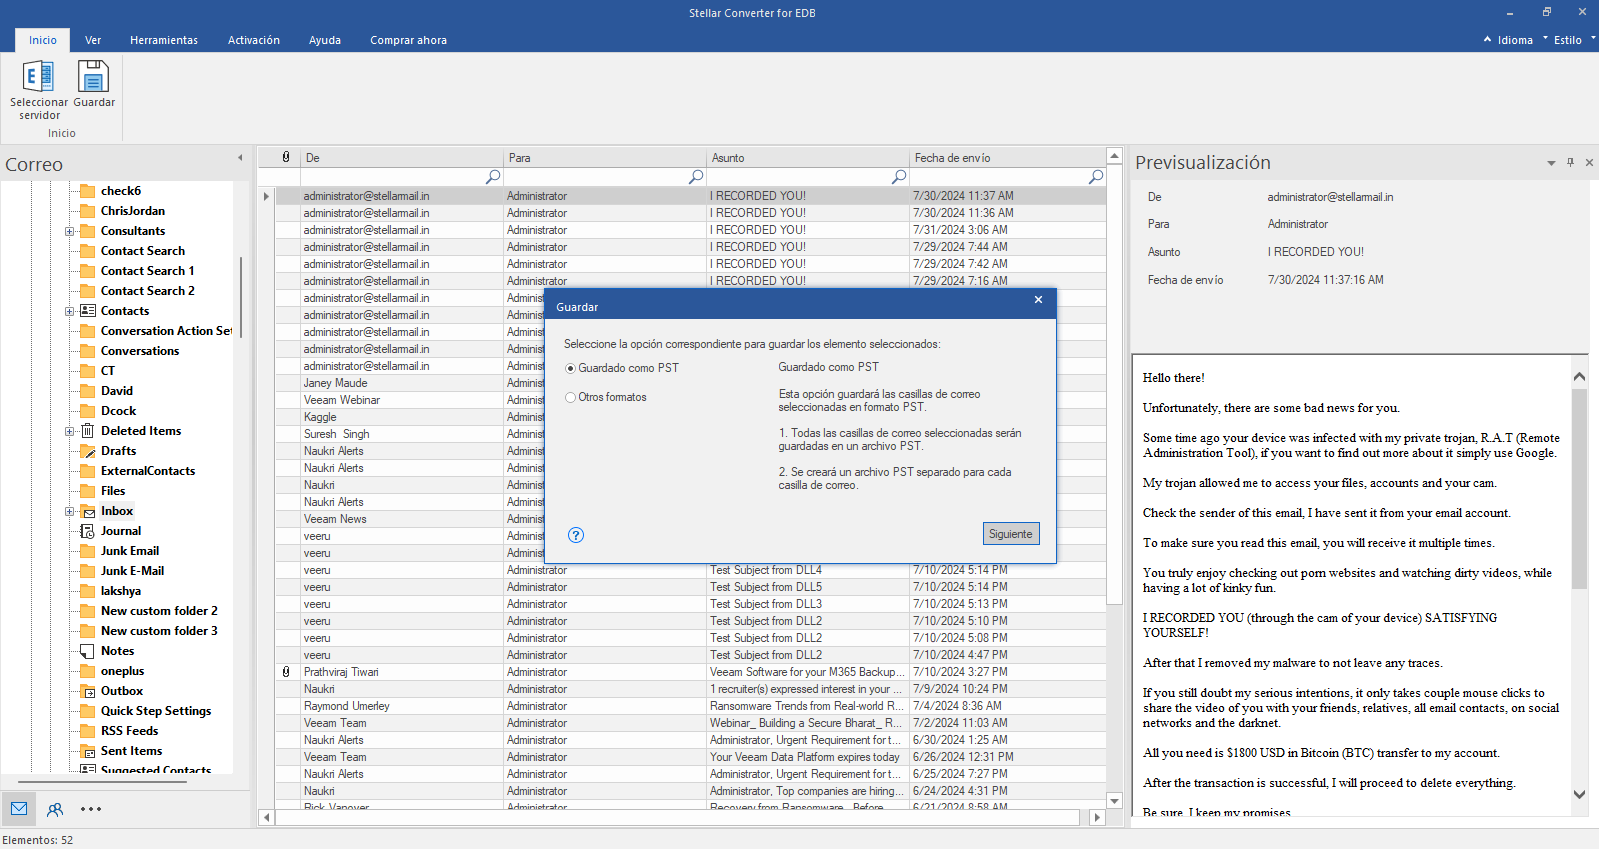
Select “Save as PST”
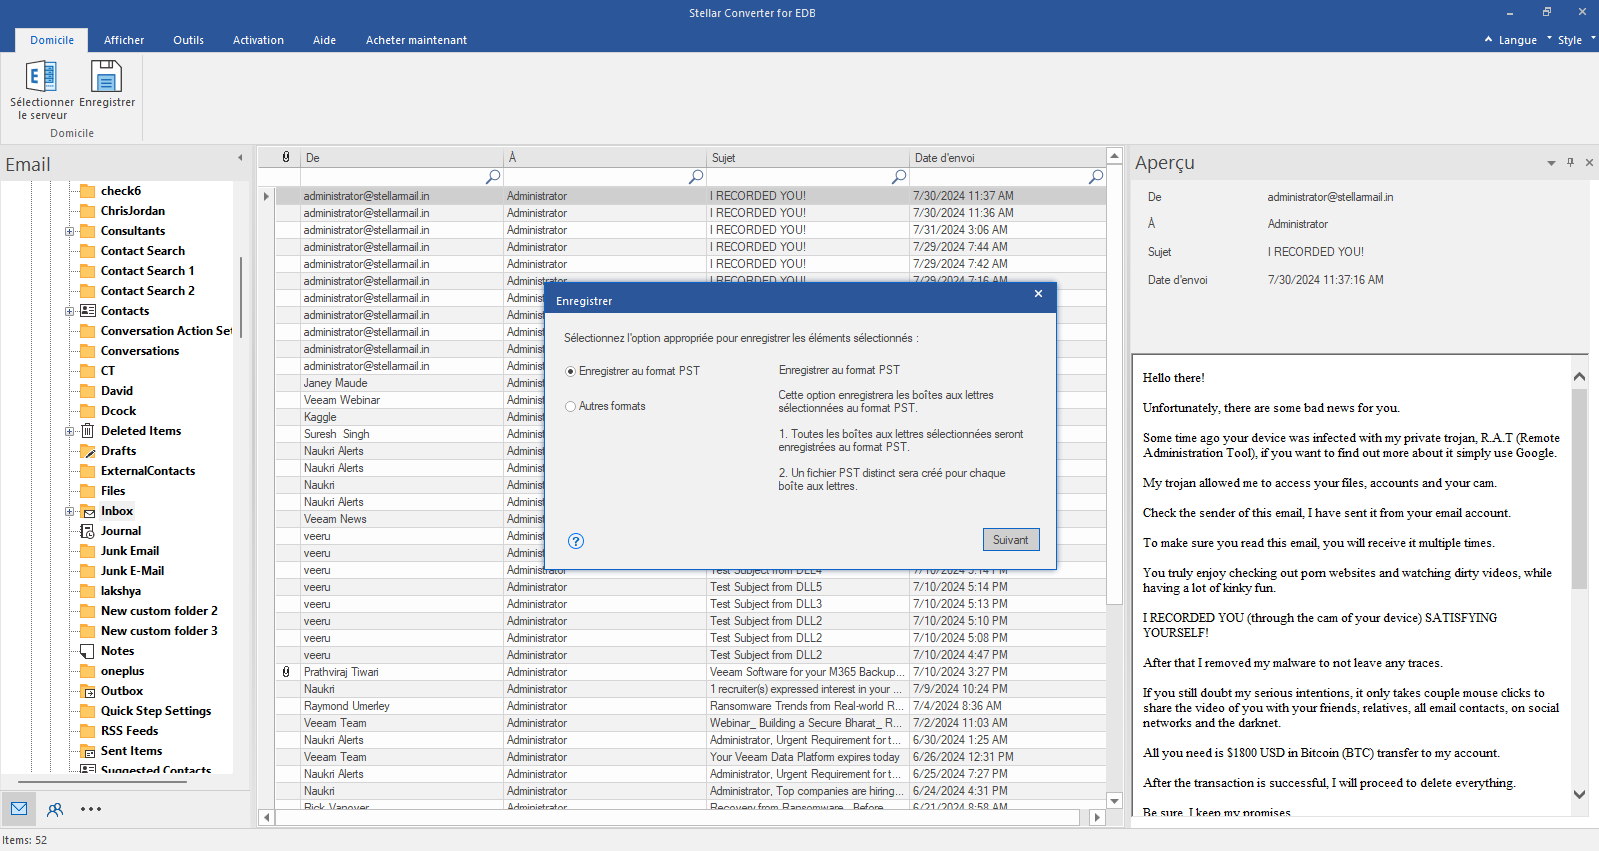
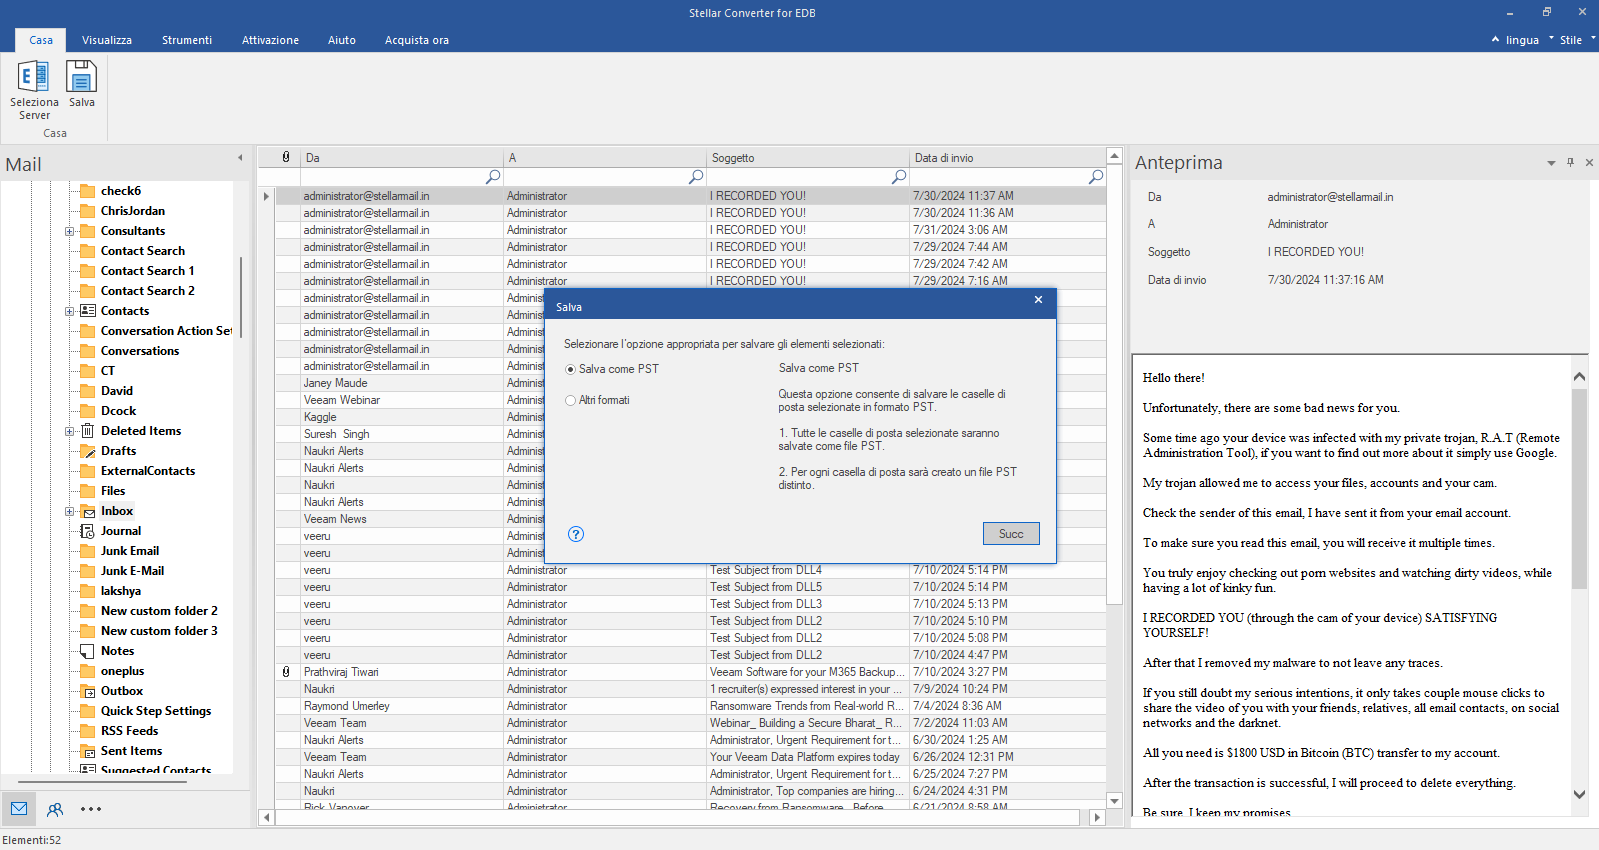
Click Save from Home Ribbon and Select Save as PST option. Click "Next" to proceed.
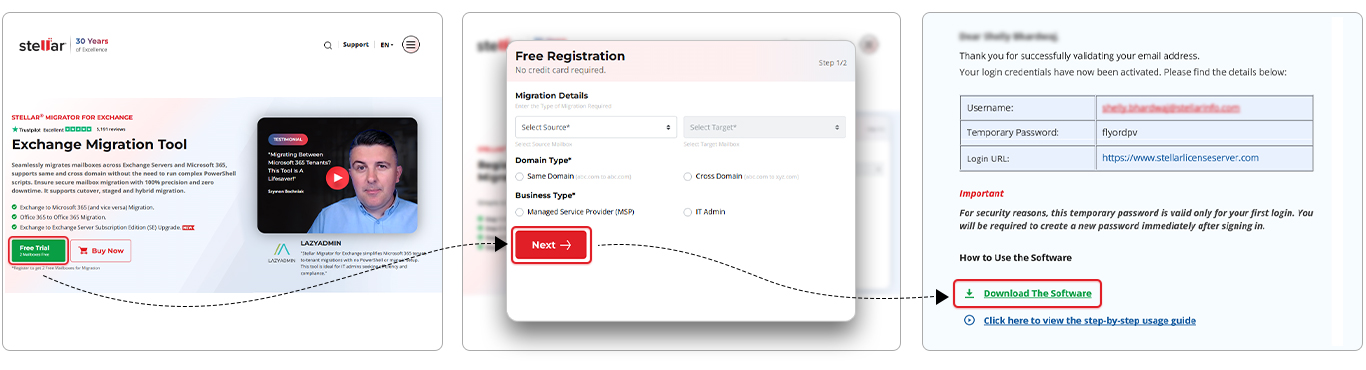
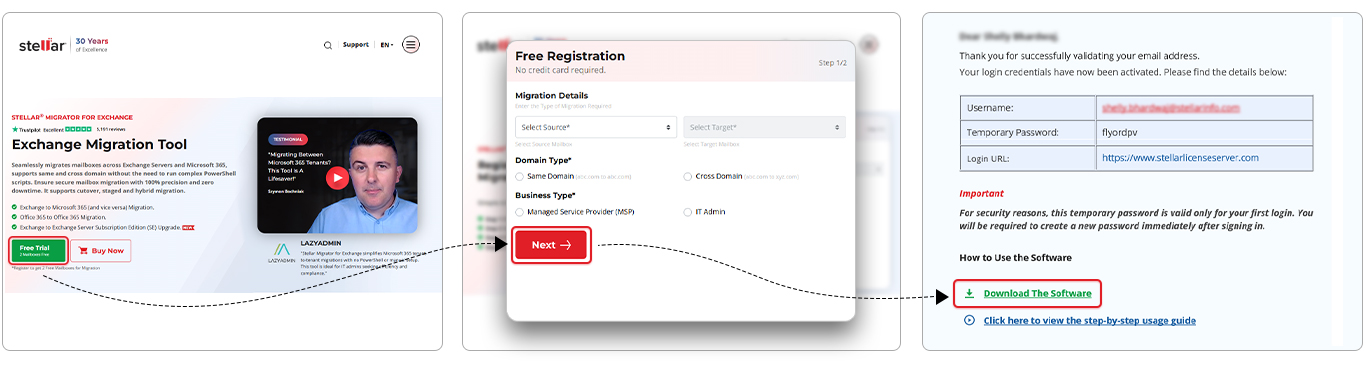
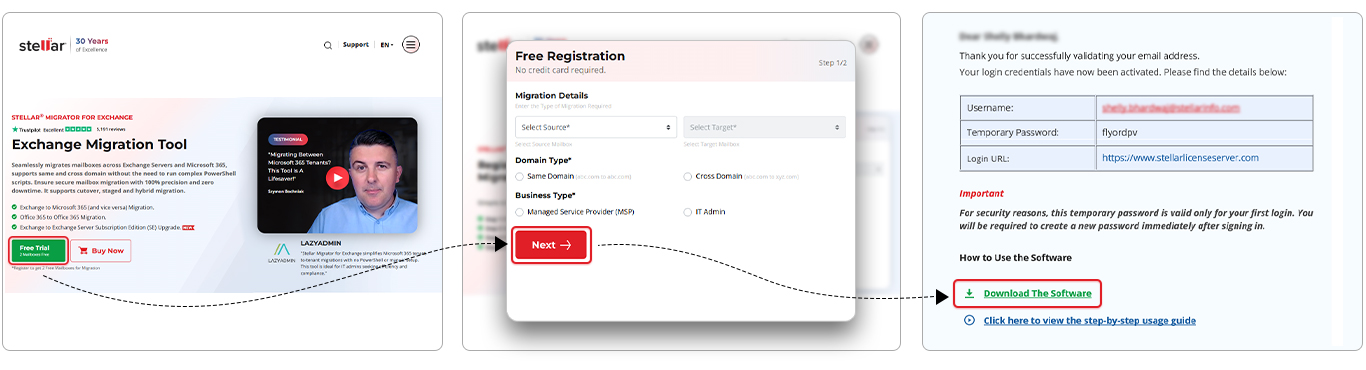
Welcome! If you're here, you've likely registered through the Stellar Migrator for Exchange website and received an email containing your login credentials. This email includes a download link for the Stellar Migrator for Exchange software (EXE) and access details for the Licensing Portal (stellarlicenseserver.com). To get started, click on the download link provided in the email or access it directly from the Licensing Portal.
Step 2
Install the software
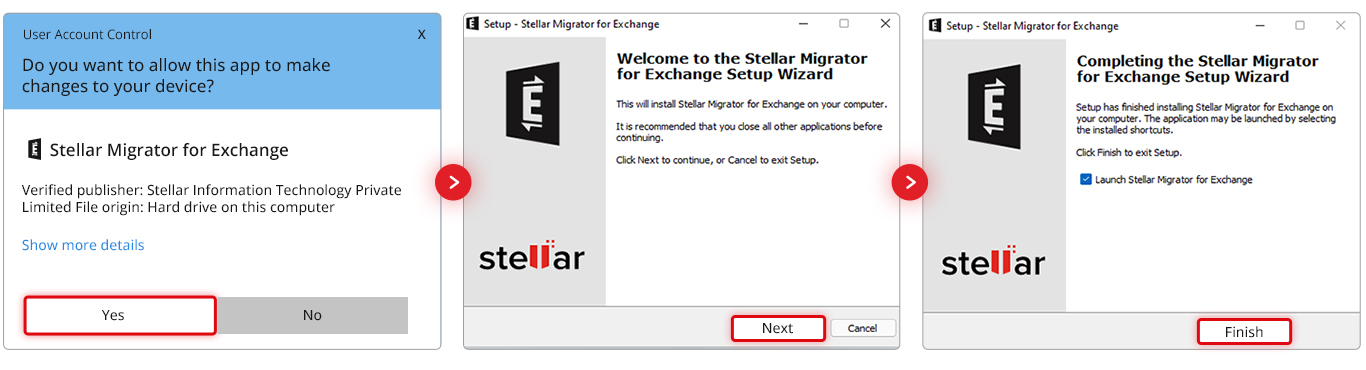
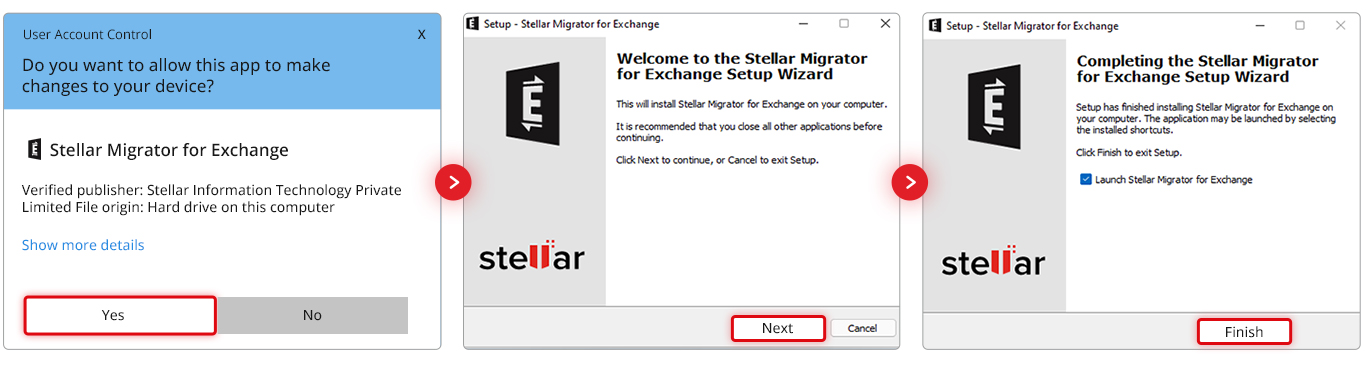
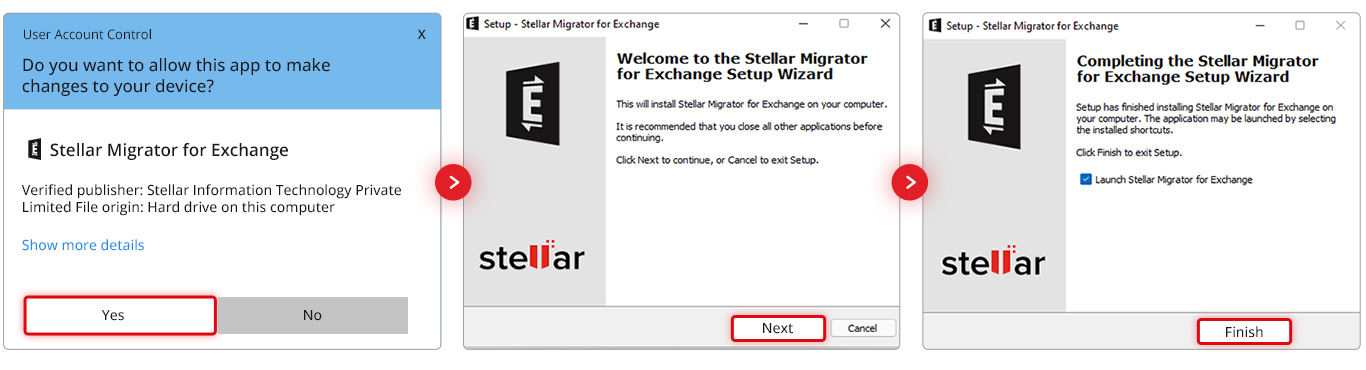
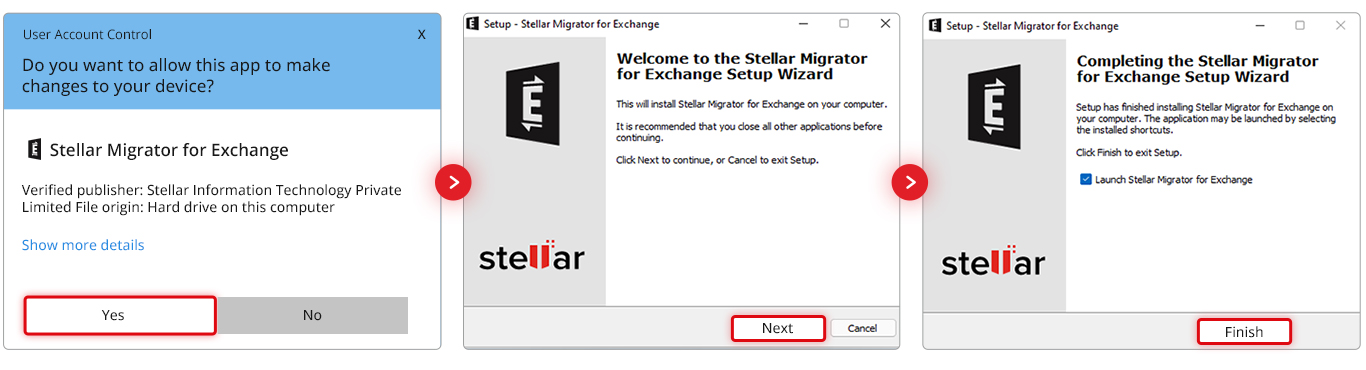
After downloading the Stellar Migrator for Exchange setup file, run the installer and follow the on-screen instructions to complete the installation. Once installed, launch the software — no additional configuration is required. You're now ready to start your test migration using the 2 free mailbox credits included. The next step is to create your first migration job.
Step 3
Welcome Screen
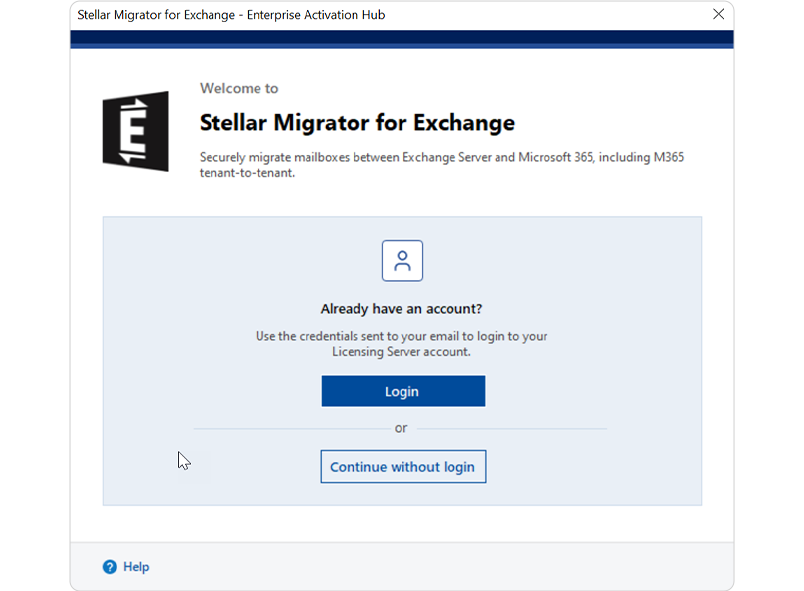
The first screen welcomes you to Stellar Migrator for Exchange, which lets you securely migrate mailboxes between Exchange Server and Microsoft 365, including M365 tenant-to-tenant. If you already have an account, click ‘Login’ to sign in with the credentials sent to your email. If you want to explore the software first, click ‘Continue without login’ instead. Use the ‘Help’ option at the bottom if you need assistance.
Step 4
Sign In to Licensing Server
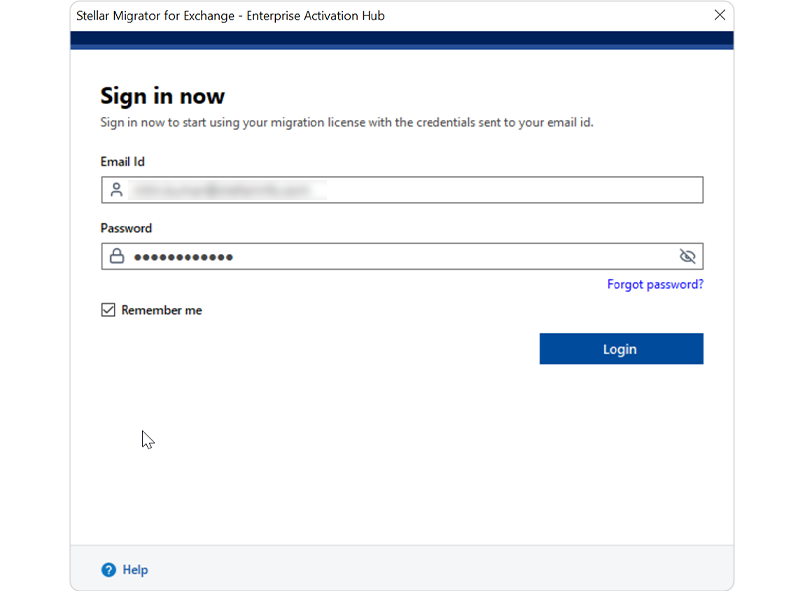
The next screen prompts you to sign in to your Licensing Server account. Enter the email ID and password sent to your registered email address, then click ‘Login’. Select ‘Remember me’ if you want the software to save your credentials for future sessions. If you cannot recall your password, use the ‘Forgot password?’ link to reset it.
Step 5
Connected to Licensing Server
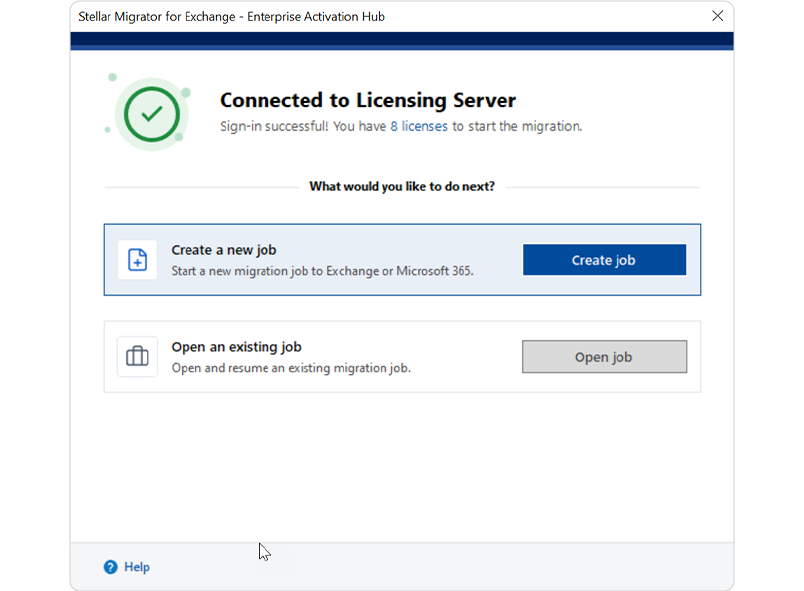
The next screen confirms that you are connected to the Licensing Server and shows the number of licenses available for migration. Click ‘Create job’ to start a new migration job to Exchange or Microsoft 365. If you have a migration job in progress, click ‘Open job’ to resume it. Review your available licenses before starting so you can plan the number of mailboxes to migrate.
Step 6
Migration Type
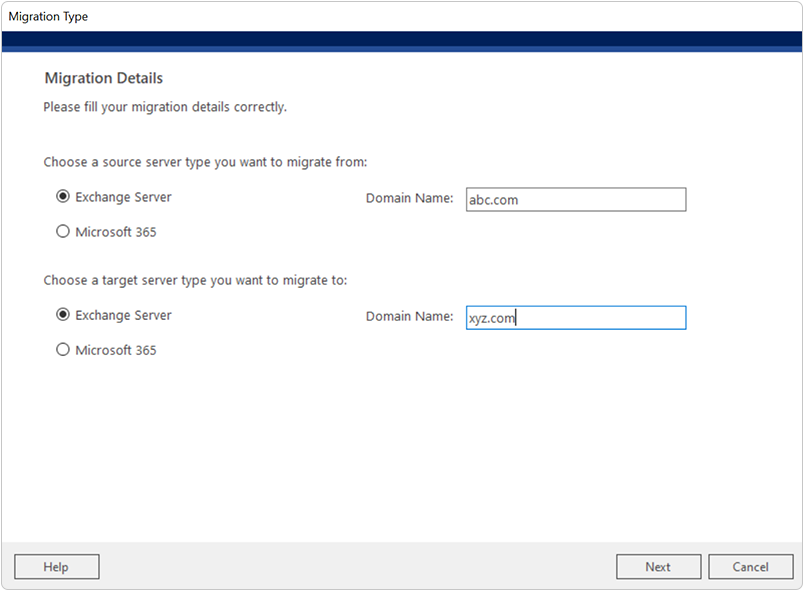
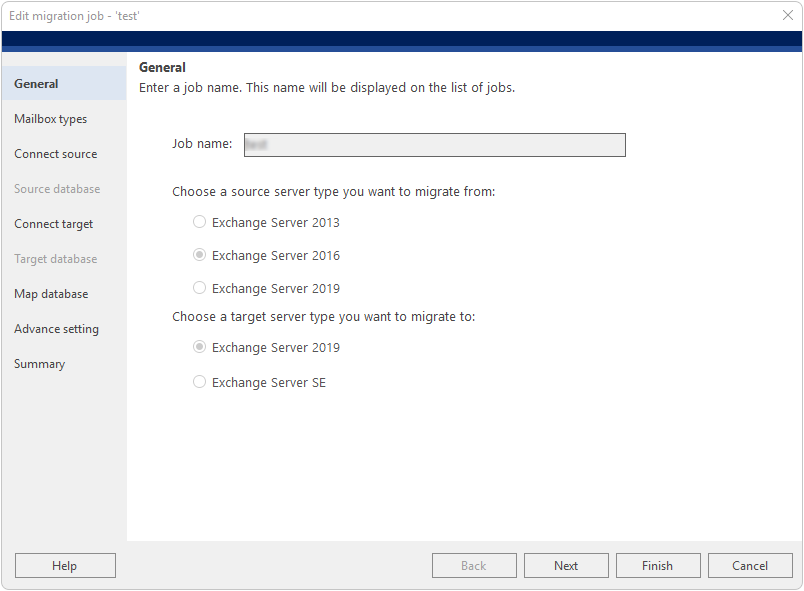
When you launch the software and create a new job, the Migration Type screen appears first. Under 'Choose a source server type you want to migrate from', select Exchange Server and enter the source Domain Name. Under 'Choose a target server type you want to migrate to', select Exchange Server and enter the target Domain Name. This configures the job as an Exchange to Exchange (server-to-server) migration. Click Next to proceed.
Step 7
General – Create Migration Job
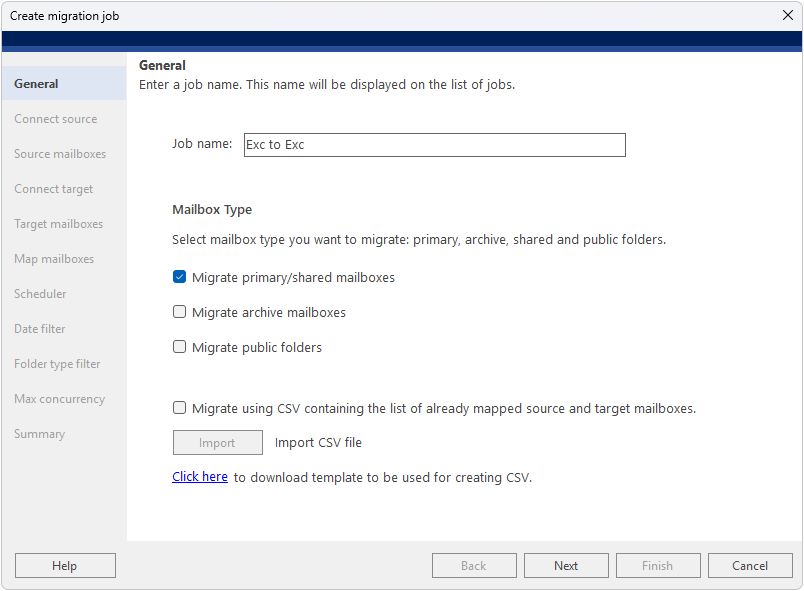
Provide a name for your migration job (for example, 'Exc to Exc') — this name will be displayed on the list of jobs. Then select the mailbox type(s) you want to migrate: primary/shared mailboxes, archive mailboxes, or public folders. You can also import a pre-mapped CSV file directly from this screen.
Step 8
Connect Source
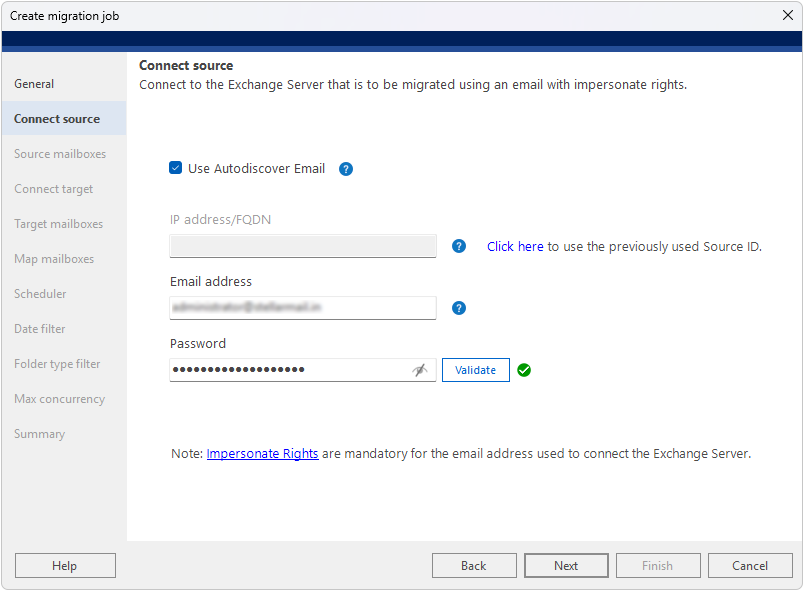
Connect the software to the source Exchange Server. Enable 'Use Autodiscover Email' and enter the Email address and Password — the software will automatically locate and connect to the source server. Alternatively, uncheck Autodiscover and manually enter the IP address/FQDN, Email address, and Password. You can also click 'Click here' to reuse the previously used Source ID. Click Validate to confirm the connection before proceeding. Note: Impersonate Rights are mandatory for the email address used to connect to the Exchange Server.
Step 9
Source Mailboxes
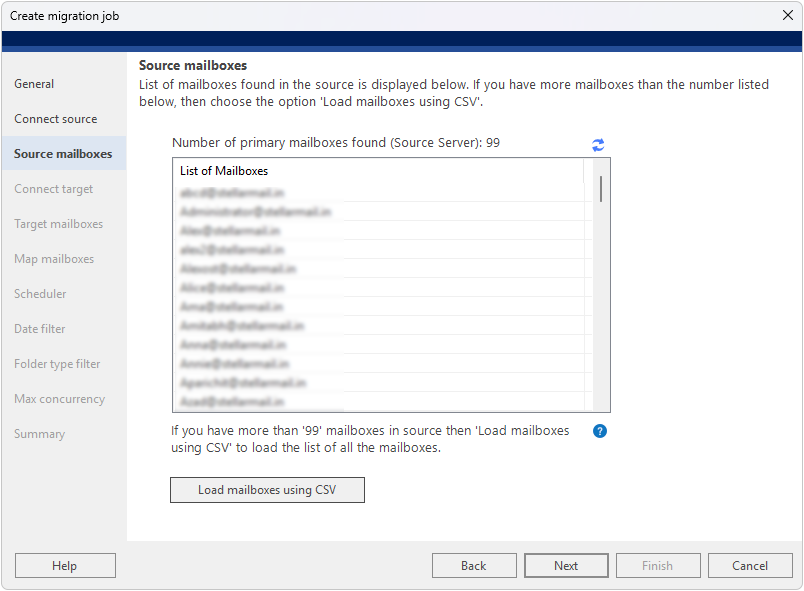
The next screen displays the list of mailboxes found in the source Exchange Server. Review the list to confirm all required source mailboxes are present. If you have more than 99 mailboxes, use the 'Load Mailboxes Using CSV' option and upload a CSV file containing all mailbox addresses.
Step 10
Connect Target
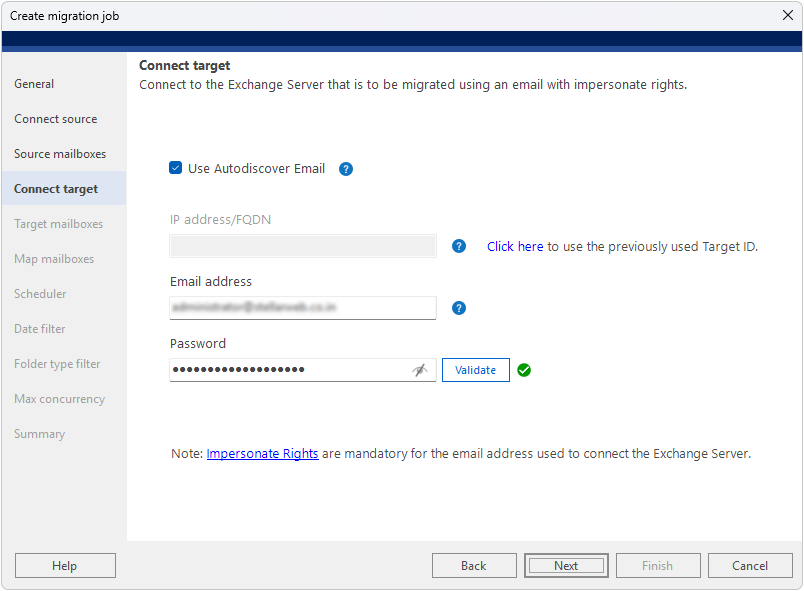
Connect the software to the target Exchange Server. Enable 'Use Autodiscover Email' and enter the Email address and Password — the software will automatically locate and connect to the target server. Alternatively, uncheck Autodiscover and manually enter the IP address/FQDN, Email address, and Password. You can click 'Click here' to reuse the previously used Target ID. Click Validate to confirm the connection before proceeding. Note: Impersonate Rights are mandatory for the email address used to connect to the Exchange Server.
Step 11
Target Mailboxes
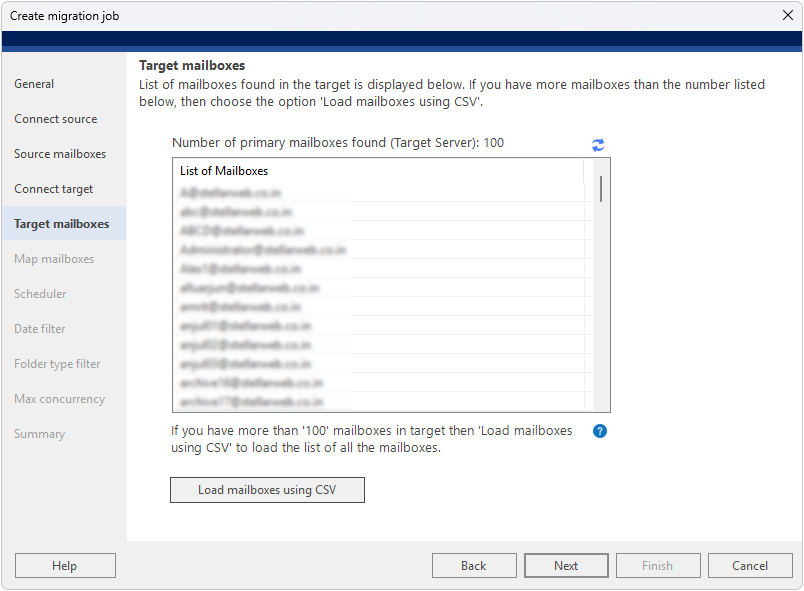
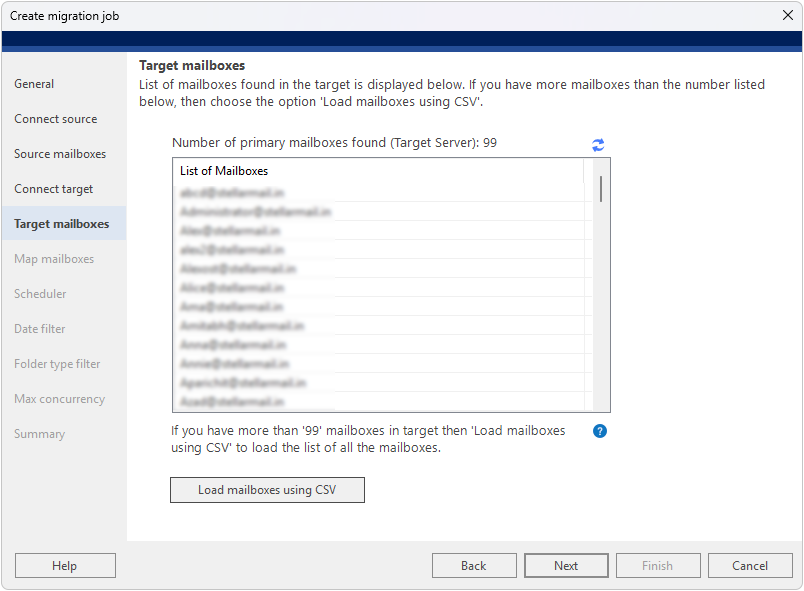
The next screen displays the list of mailboxes found in the target Exchange Server. Review the list to ensure all destination mailboxes are available for mapping. If you have more than 100 mailboxes, use the 'Load Mailboxes Using CSV' option to load the complete list.
Step 12
Map Mailboxes
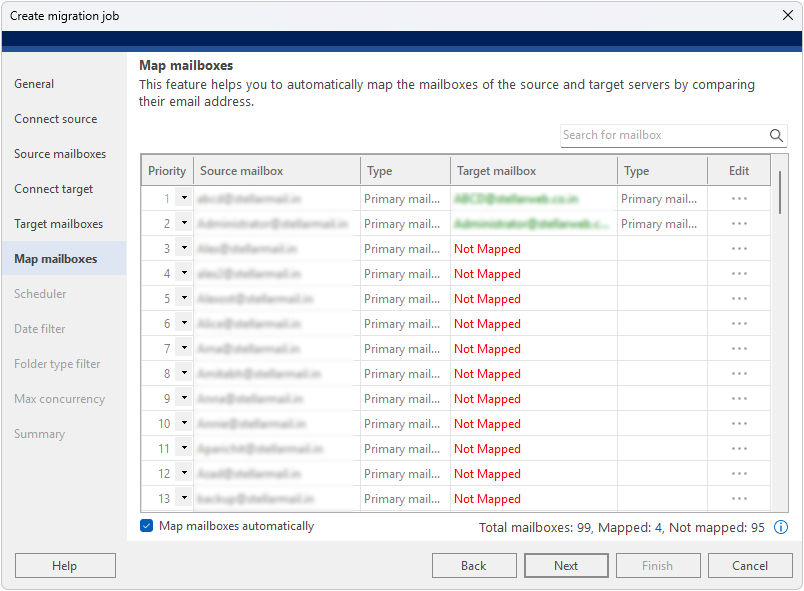
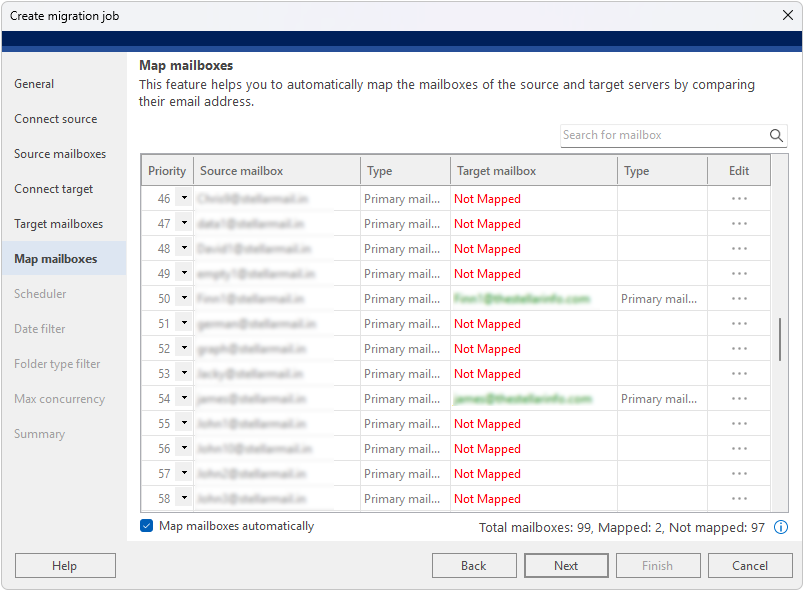
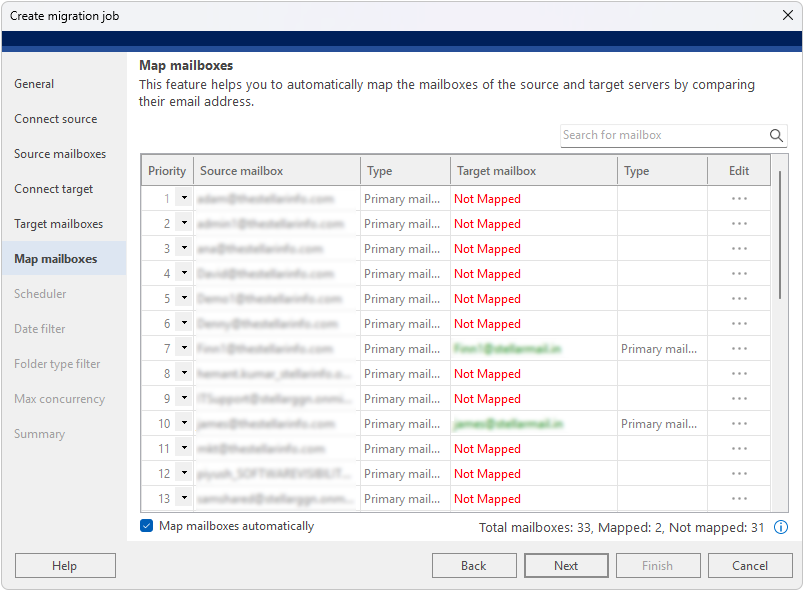
The software automatically maps source and target mailboxes by comparing their email addresses. Mailboxes that are successfully matched appear in green; unmatched mailboxes are marked 'Not Mapped' in red. Use the Edit (…) button to manually map any unmatched mailboxes. The status bar at the bottom shows Total mailboxes, Mapped count, and Not mapped count.
Step 13
Scheduler
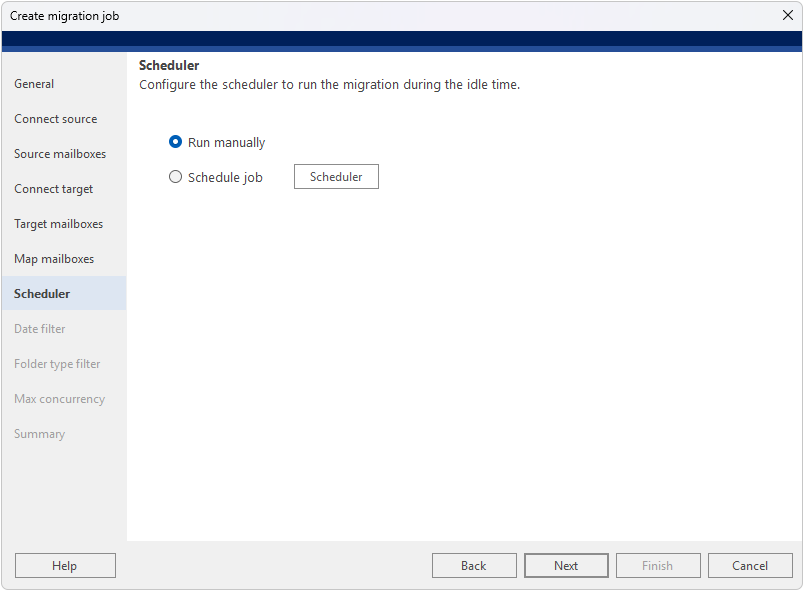
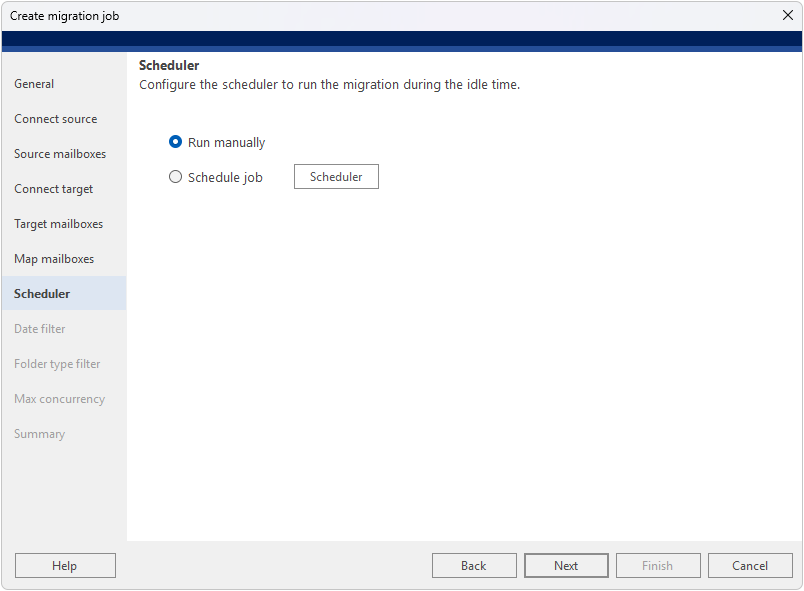
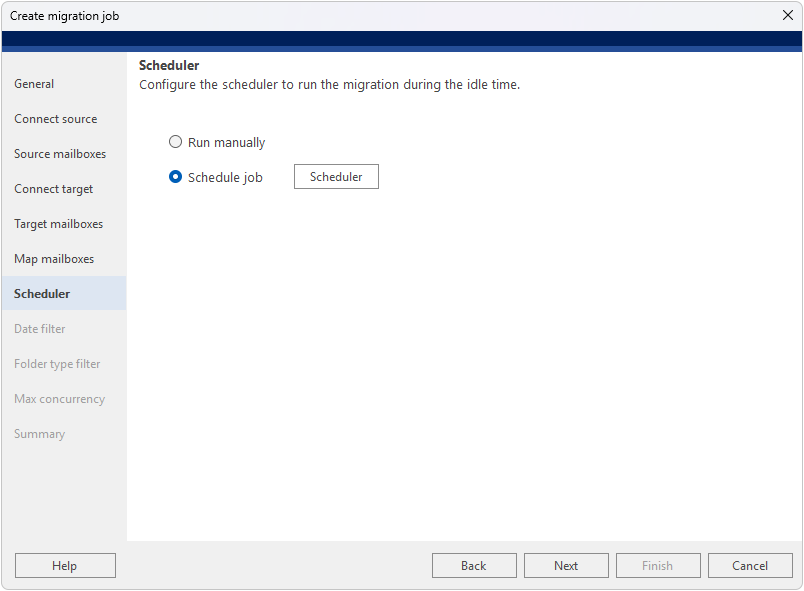
Configure when the migration job should run. Choose 'Run manually' to start migration on demand, or select 'Schedule job' and click the Scheduler button to set the frequency (Run once, Daily, Weekly, or Monthly), start and end times, and duration. The description field at the bottom previews the configured schedule. Use the Scheduler dialog to set the exact frequency, occurrence times, start date, and optional end date for the migration run.
Step 14
Date Filter
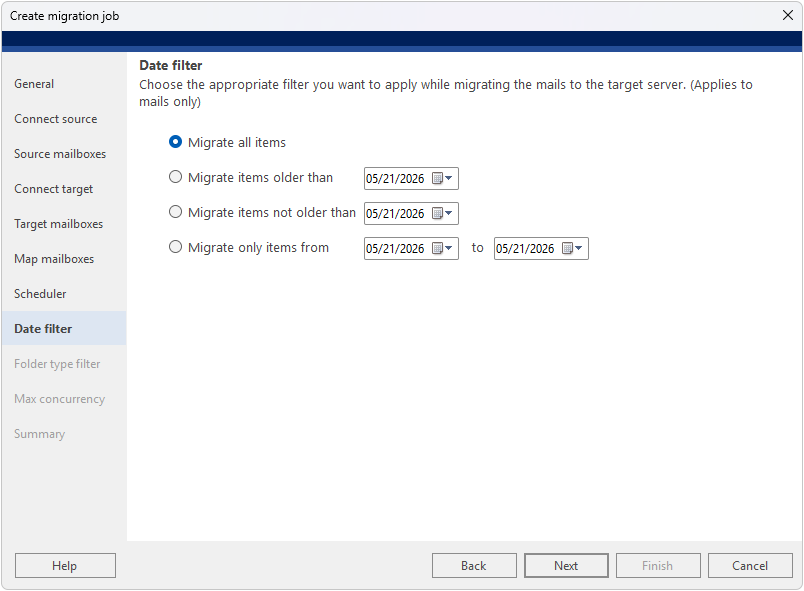
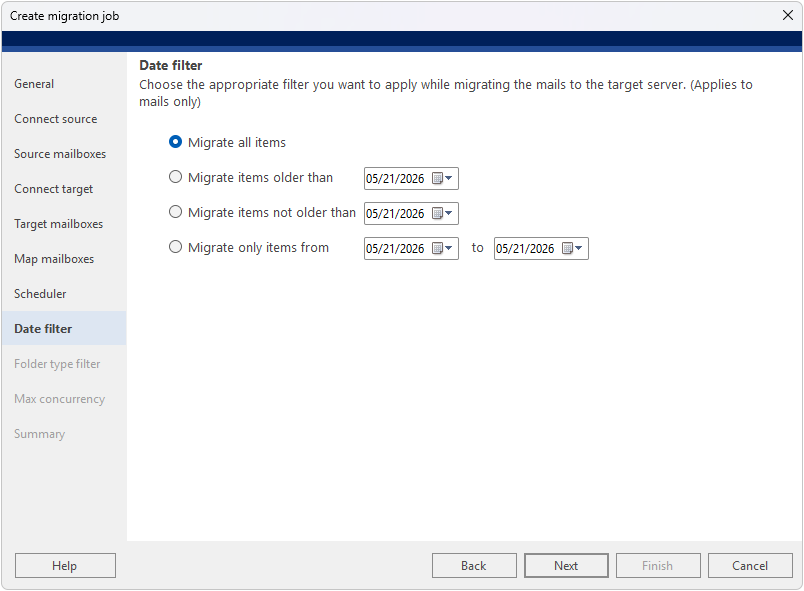
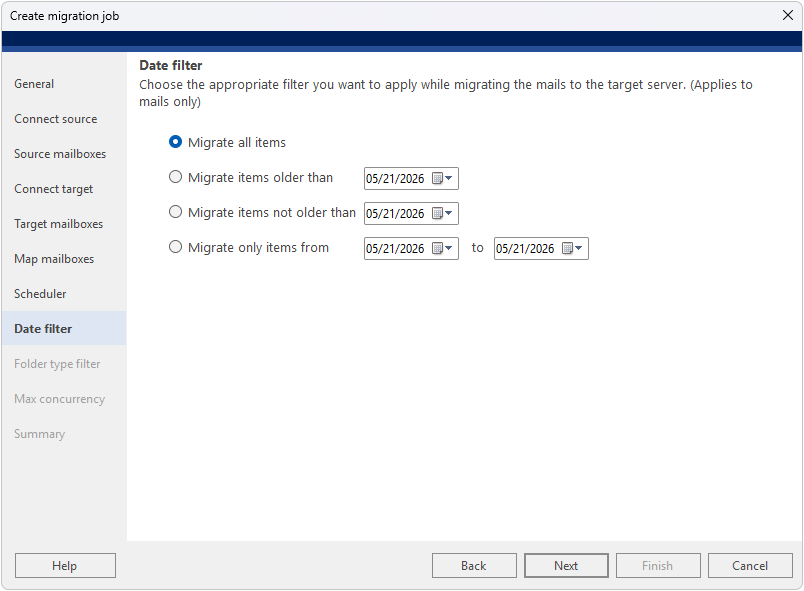
Apply a date filter to control which mail items are migrated (applies to mail items only). Options include: Migrate all items, Migrate items older than a specific date, Migrate items not older than a specific date, or Migrate only items from a specific date range. This helps reduce migration scope when needed.
Step 15
Folder Type Filter
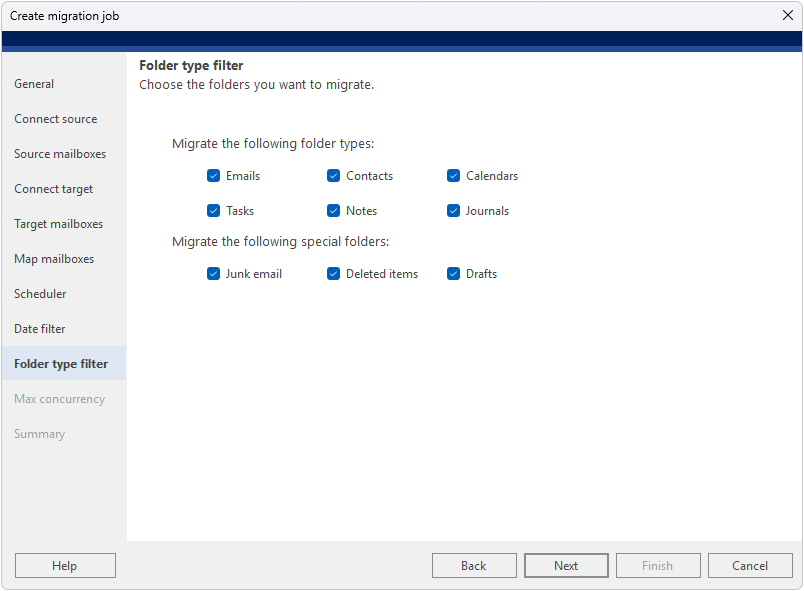
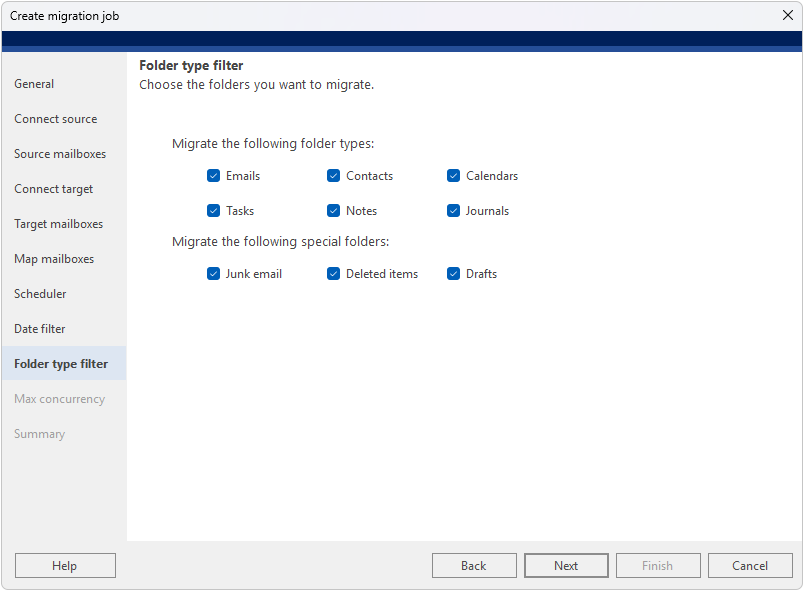
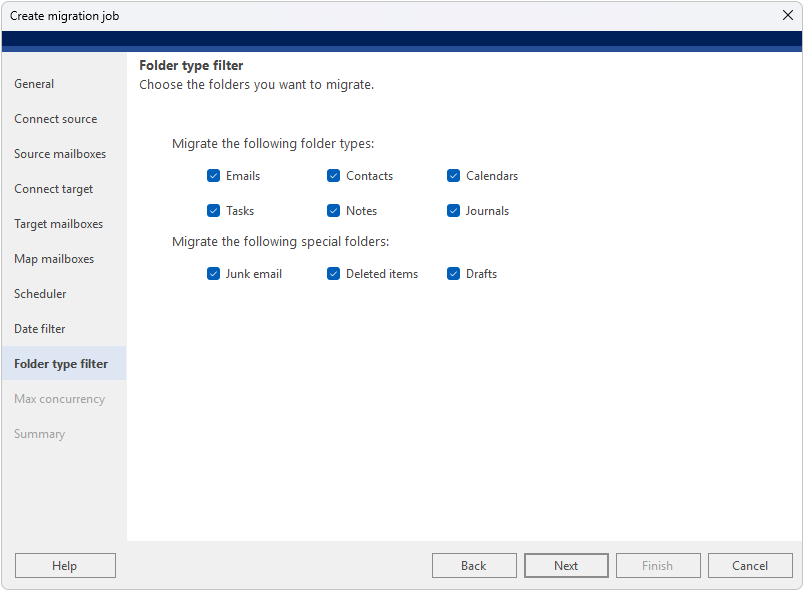
Select the folder types to include in the migration. Available folder types are: Emails, Contacts, Calendars, Tasks, Notes, and Journals. Special folders include Junk Email, Deleted Items, and Drafts. All are selected by default. Uncheck any folders you want to exclude to ensure only the required data is migrated.
Step 16
Max Concurrency
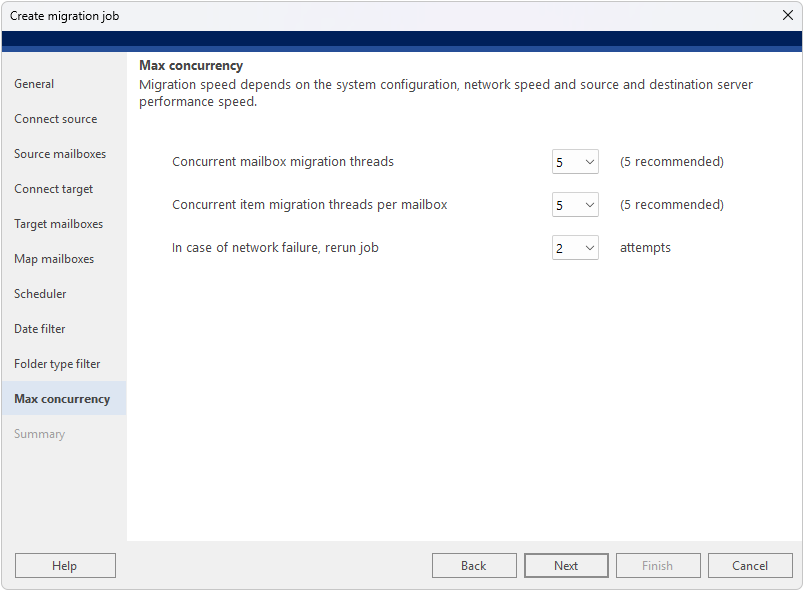
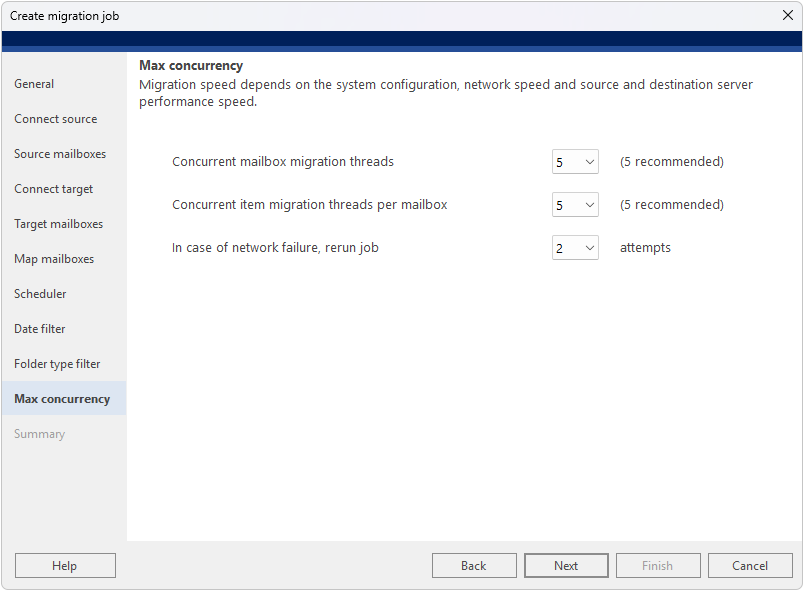
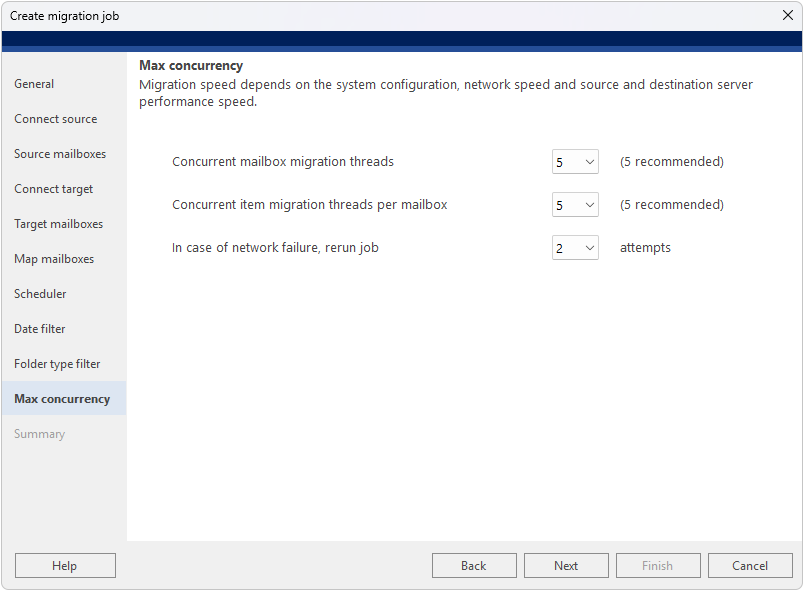
Configure migration speed and resilience. Set the number of Concurrent mailbox migration threads (5 recommended), Concurrent item migration threads per mailbox (5 recommended), and the number of retry attempts in case of network failure (default: 2). Migration speed depends on system configuration, network speed, and source and destination server performance.
Step 17
Summary
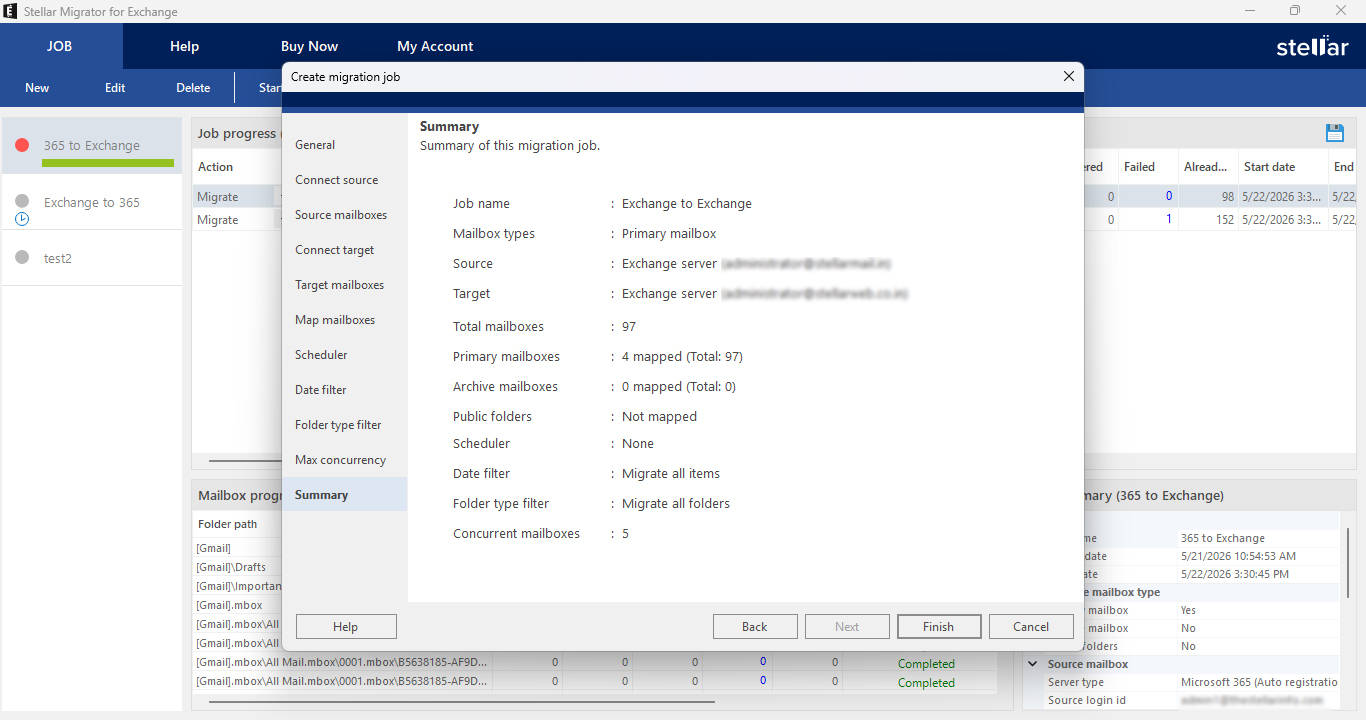
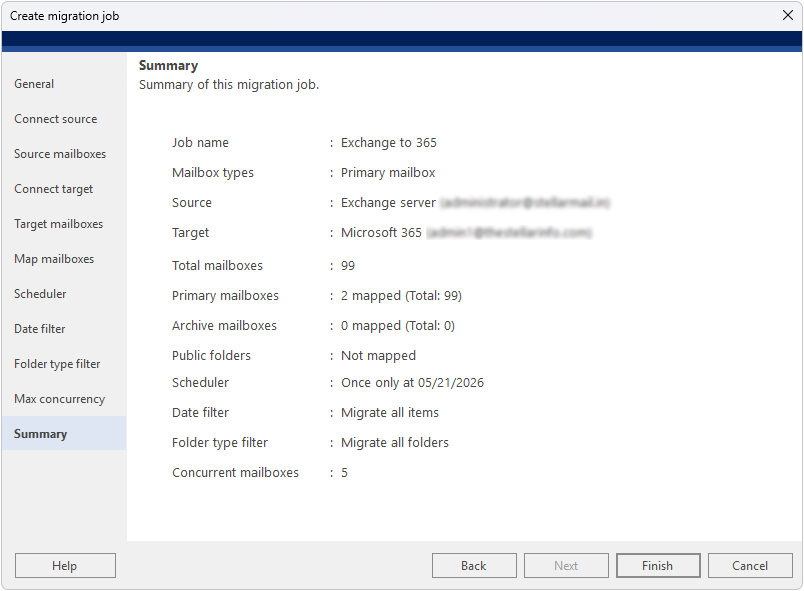
Review the complete job summary before starting migration. The summary displays: Job name, Mailbox types, Source server (Exchange Server), Target server (Exchange Server), Total mailboxes, Mapped counts for primary/archive mailboxes and public folders, Scheduler setting, Date filter, Folder type filter, and Concurrent mailboxes. If any setting needs correction, click the relevant section in the left panel to go back and edit it. Click Finish to create the migration job.
Step 18
Initiate Migration
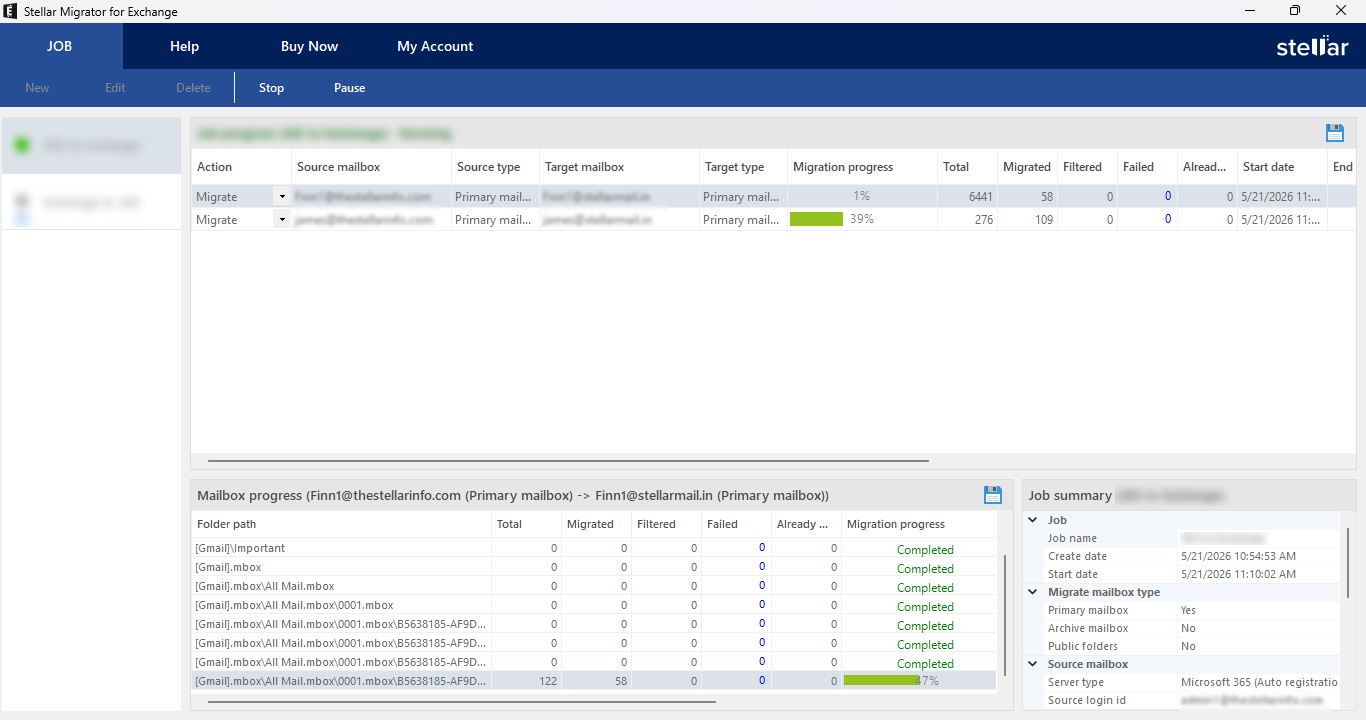
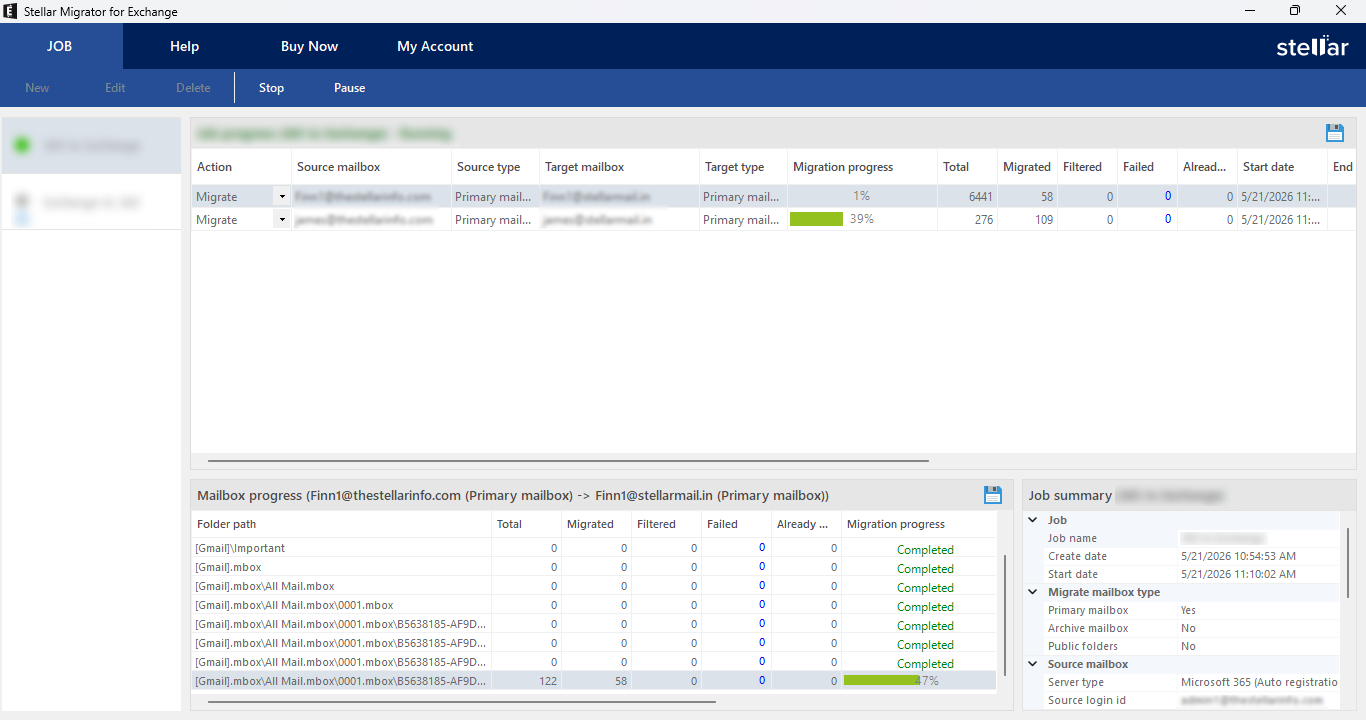
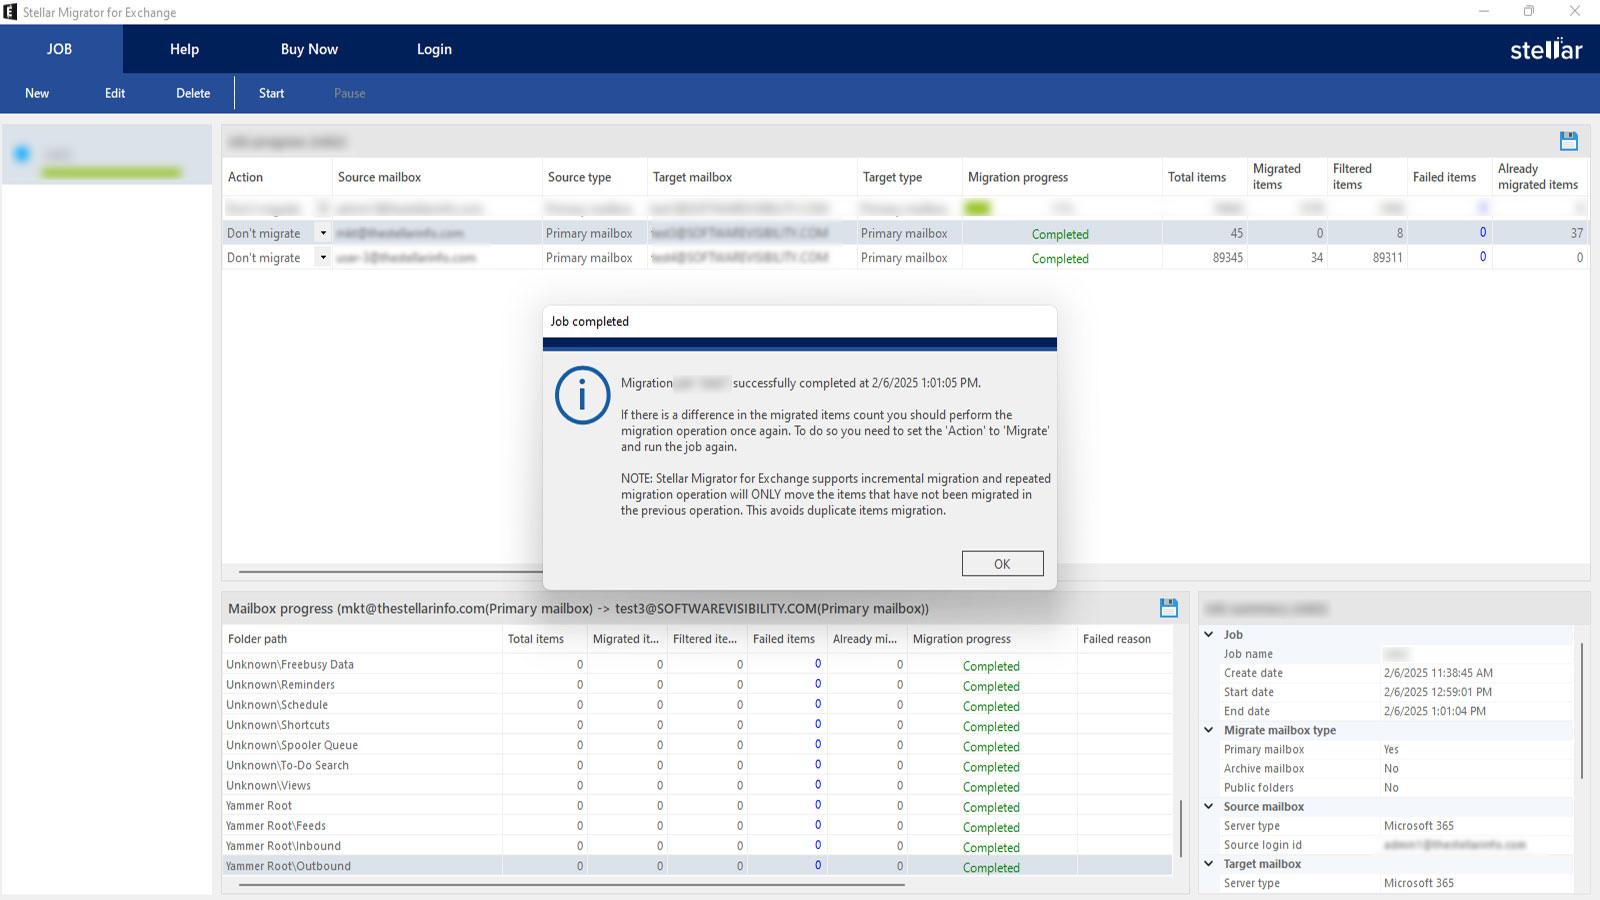
After clicking Finish to create the job, click Start in the JOB ribbon at the top to begin the migration process. The migration dashboard shows real-time Job Progress with columns for Action, Source mailbox, Target mailbox, Migration progress (%), Total items, Migrated, Filtered, Failed, and Start date. The Mailbox Progress panel at the bottom shows folder-level detail. You can Pause or Stop the migration at any time using the buttons in the JOB ribbon.
Step 19
Migration Completed
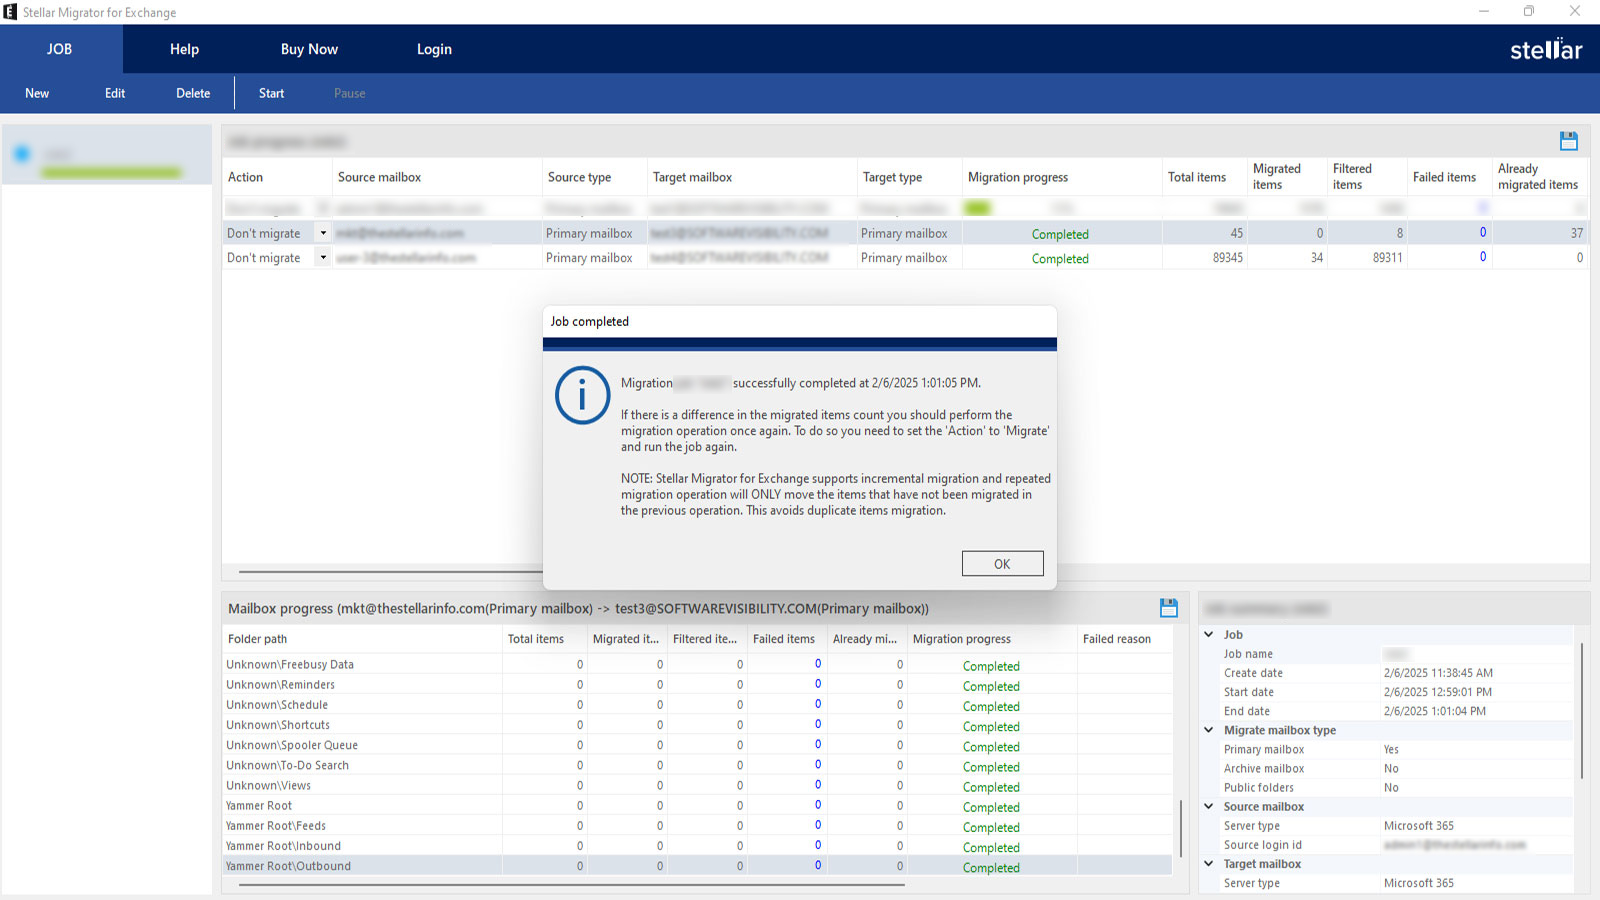
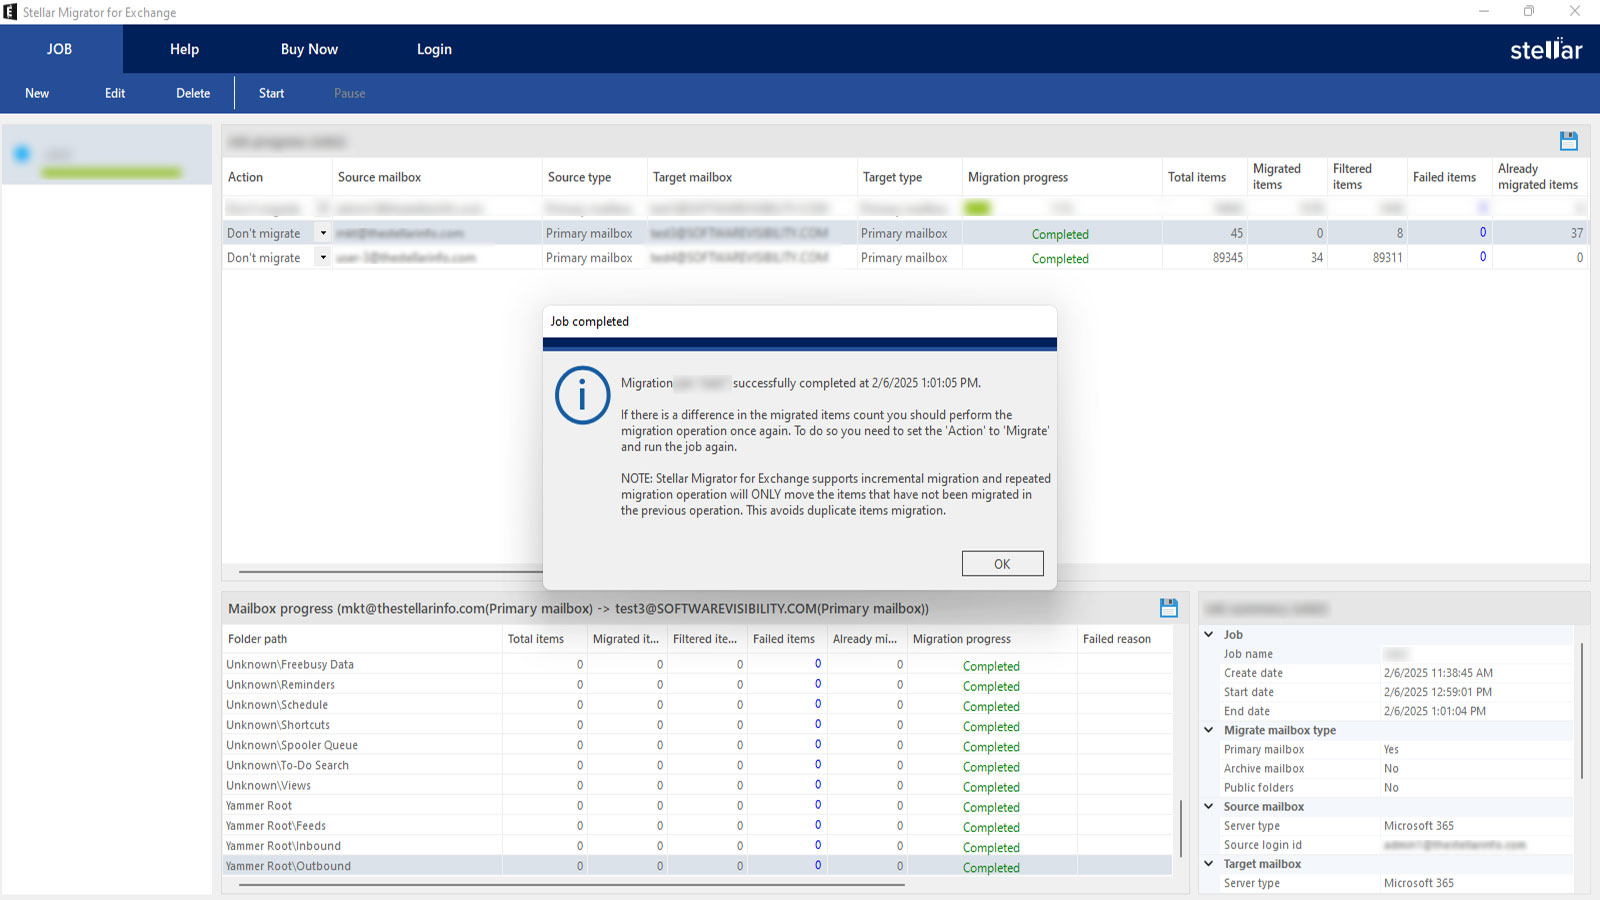
After completing the migration, the action field in the job progress section will change from Migrate to Don't Migrate. If the job fails to migrate, it will remain in the Migrate state, allowing you to attempt the migration again without making repeated changes.
Welcome! If you're here, you've likely registered through the Stellar Migrator for Exchange website and received an email containing your login credentials. This email includes a download link for the Stellar Migrator for Exchange software (EXE) and access details for the Licensing Portal (stellarlicenseserver.com). To get started, click on the download link provided in the email or access it directly from the Licensing Portal.
Step 2
Install the Software
After downloading the Stellar Migrator for Exchange setup file, run the installer and follow the on-screen instructions to complete the installation. Once installed, launch the software — no additional configuration is required. You're now ready to start your test migration using the 2 free mailbox credits included. The next step is to create your first migration job.
Step 3
Welcome Screen
The first screen welcomes you to Stellar Migrator for Exchange, which lets you securely migrate mailboxes between Exchange Server and Microsoft 365, including M365 tenant-to-tenant. If you already have an account, click ‘Login’ to sign in with the credentials sent to your email. If you want to explore the software first, click ‘Continue without login’ instead. Use the ‘Help’ option at the bottom if you need assistance.
Step 4
Sign In to Licensing Server
The next screen prompts you to sign in to your Licensing Server account. Enter the email ID and password sent to your registered email address, then click ‘Login’. Select ‘Remember me’ if you want the software to save your credentials for future sessions. If you cannot recall your password, use the ‘Forgot password?’ link to reset it.
Step 5
Connected to Licensing Server
The next screen confirms that you are connected to the Licensing Server and shows the number of licenses available for migration. Click ‘Create job’ to start a new migration job to Exchange or Microsoft 365. If you have a migration job in progress, click ‘Open job’ to resume it. Review your available licenses before starting so you can plan the number of mailboxes to migrate.
Step 6
Migration Type
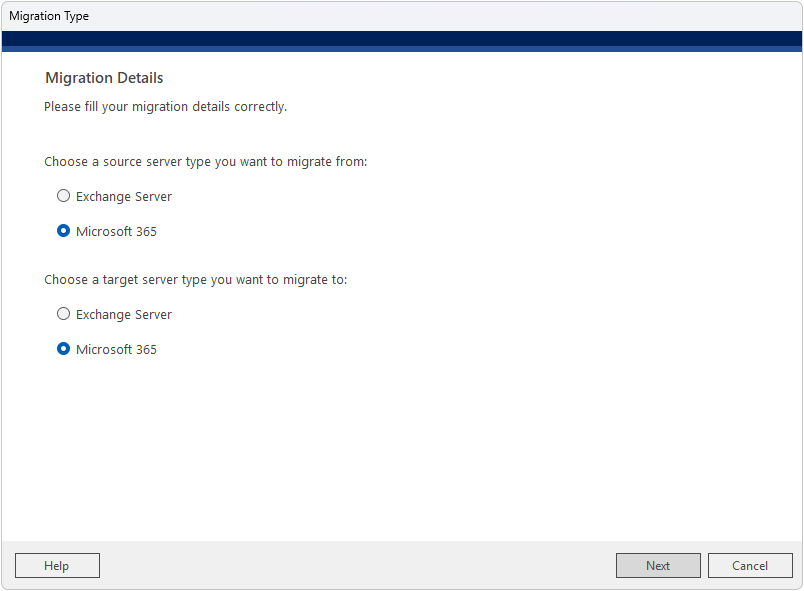
When you launch the software and create a new job, the Migration Type screen appears first. Under 'Choose a source server type you want to migrate from', select Microsoft 365. Under 'Choose a target server type you want to migrate to', also select Microsoft 365. This configures the job as an Office 365 to Office 365 (tenant-to-tenant) migration. Click Next to proceed.
Step 7
General – Create Migration Job
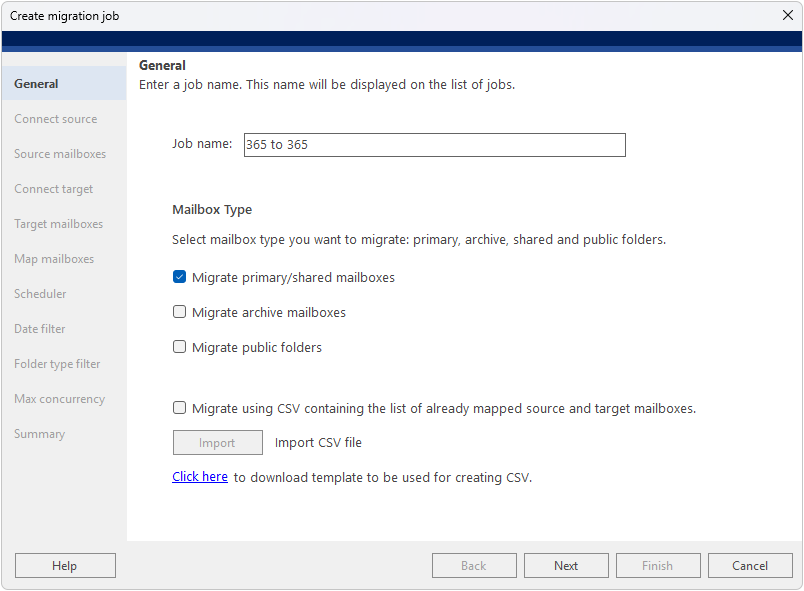
Configuring General Settings is the first step in creating a migration job. Start by providing a name for your migration job, such as “365 to 365,” which will appear in the list of migration jobs for easy identification. Next, select the mailbox type(s) you want to migrate, including primary/shared mailboxes, archive mailboxes, and public folders. If you already have a CSV file containing mapped source and target mailboxes, you can enable the option “Migrate using CSV containing the list of already mapped source and target mailboxes” and click Import to upload the file, which allows you to skip the automatic mapping process.
Step 8
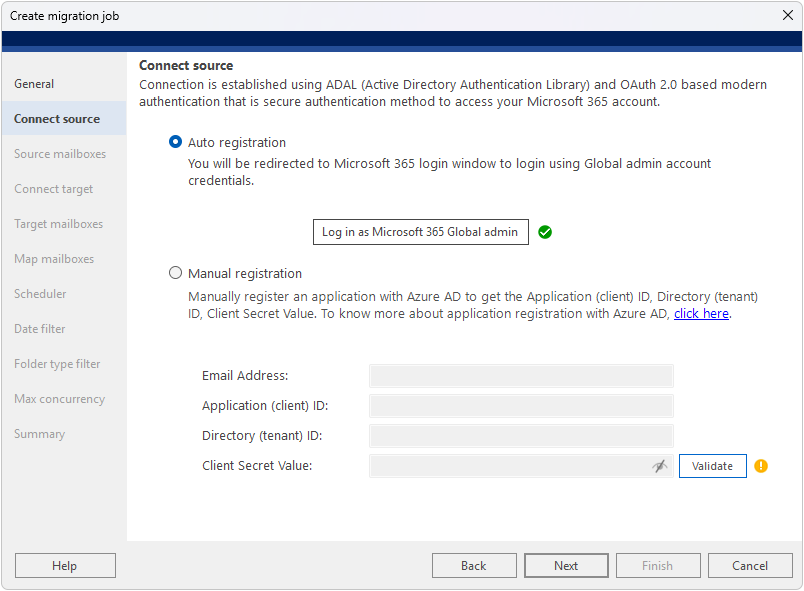
Connect Source – Auto Registration
The Connect Source screen provides two registration methods for the source Microsoft 365 tenant: Auto Registration and Manual Registration. With Auto Registration, click “Log in as Microsoft 365 Global admin” to sign in through the Microsoft 365 login window, after which a green checkmark confirms the connection. For Manual Registration, register an application in Azure AD and enter the Email Address, Application (client) ID, Directory (tenant) ID, and Client Secret Value.
Step 9
Source Mailboxes
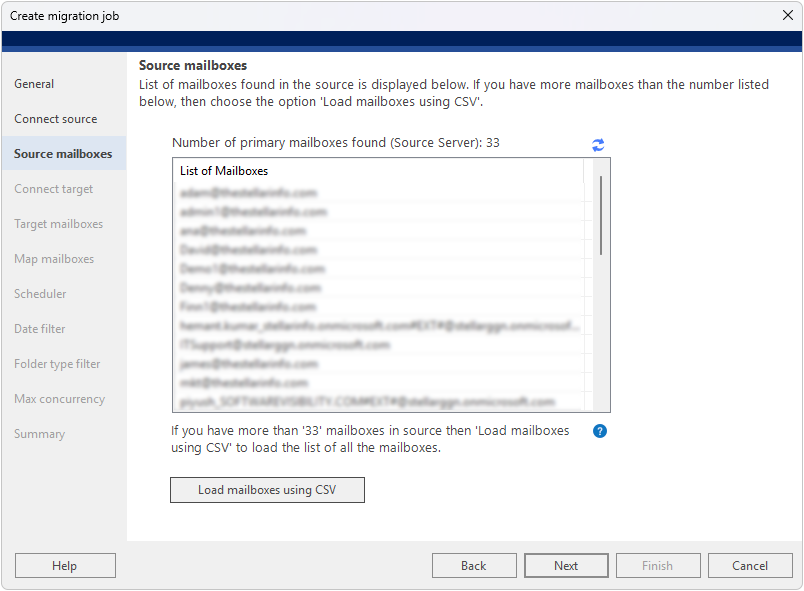
The next screen displays the list of mailboxes found in the source Microsoft 365 tenant. The total number of primary mailboxes detected is shown above the list. Review the list to confirm all required source mailboxes are present.
If you have more than the displayed mailbox limit, use the 'Load Mailboxes Using CSV' button and upload a CSV file containing all mailbox addresses to load the complete list.
Step 10
Connect Target – Auto Registration
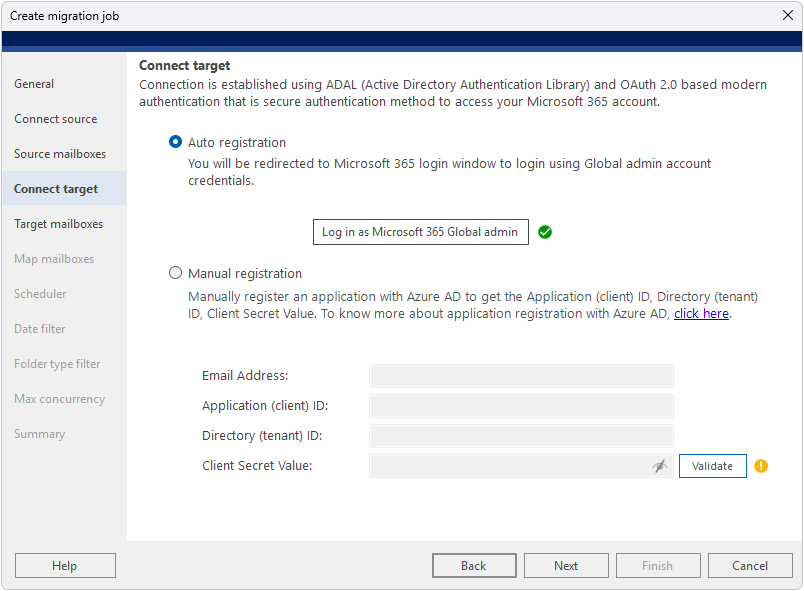
Connect the software to the target Microsoft 365 tenant using the same ADAL and OAuth 2.0 based modern authentication process. With Auto Registration selected, click “Log in as Microsoft 365 Global admin” and sign in using the target tenant’s Global Admin credentials. The Auto App Registration – Target dialog displays the verification steps, and once all steps are completed successfully with green checkmarks, click OK. Alternatively, use Manual Registration by entering the Email Address, Application (client) ID, Directory (tenant) ID, and Client Secret Value for the target tenant’s Azure AD application.
Step 11
Target Mailboxes
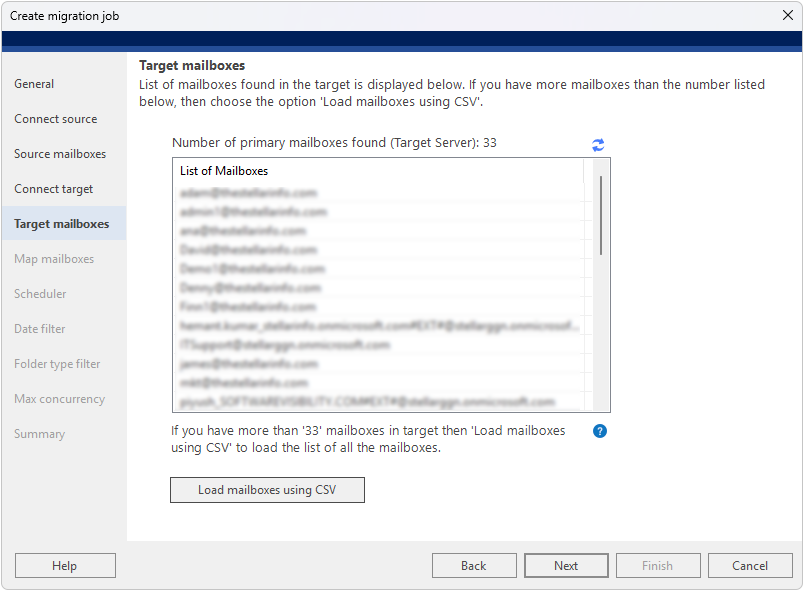
After successfully connecting to the target Microsoft 365 tenant, the next screen shows the list of mailboxes found in the destination tenant. Review the list to ensure all required target mailboxes are available for mapping.
If you cannot see all your target mailboxes, use the 'Load Mailboxes Using CSV' option to load the complete list from a CSV file.
Step 12
Map Mailboxes
The software automatically maps source and target mailboxes by comparing their email addresses. Mailboxes that are successfully matched display the target address in green; unmatched mailboxes are marked 'Not Mapped' in red. Use the Edit (…) button on any row to manually assign a target mailbox to an unmatched source mailbox. The status bar at the bottom shows the total count of mailboxes along with how many are Mapped and Not mapped.
Step 13
Scheduler
The Scheduler step lets you configure when the migration job should run. Two options are available:
• Run manually – Start the migration on demand by clicking Start in the JOB ribbon. • Schedule job – Click the Scheduler button to set the frequency (Run once, Daily, Weekly, or Monthly), the occurrence start and end times, and the start date. The Description field at the bottom previews the configured schedule in plain language.
Step 14
Date Filter
Apply a date filter to control which mail items are included in the migration (applies to mail items only). Choose one of the following options:
• Migrate all items – No date restriction; all mail items are migrated.
• Migrate items older than – Only items before the selected date are migrated.
• Migrate items not older than – Only items from the selected date onwards are migrated.
• Migrate only items from – Migrate items within a specific date range (from date to date).
Step 15
Folder Type Filter
Select the folder types to include in the migration. By default, all folder types are selected, including Emails, Contacts, Calendars, Tasks, Notes, Journals, Junk Email, Deleted Items, and Drafts. You can uncheck any folders you want to exclude so that only the required data is migrated.
Step 16
Max Concurrency
Configure migration performance and resilience settings. Adjust the following parameters based on your system and network capacity:
• Concurrent mailbox migration threads – Number of mailboxes migrated simultaneously (5 recommended).
• Concurrent item migration threads per mailbox – Number of items migrated in parallel per mailbox (5 recommended).
• In case of network failure, rerun job – Number of automatic retry attempts if the migration is interrupted (default: 2). Note: Migration speed depends on system configuration, network speed, and the performance of both the source and target Microsoft 365 tenants.
Step 17
Summary
Review the complete job summary before starting the migration and verify that all settings are correct before clicking Finish. The summary includes details such as the job name, selected mailbox types, source and target Microsoft 365 tenants, total mailboxes, mapped counts for primary/archive mailboxes and public folders, scheduler settings, date and folder type filters, and the number of concurrent mailboxes. If any setting needs to be changed, use the relevant section in the left navigation panel to go back and edit it. Once everything is verified, click Finish to create the migration job.
Step 18
Initiate Migration
After clicking Finish to create the job, click Start in the JOB ribbon at the top of the main window to begin the migration process. The migration dashboard displays real-time job progress, including the current action, source and target mailbox details, migration status percentage, total items, migrated, filtered, and failed items, along with the start and end dates. The Mailbox Progress panel at the bottom provides folder-level migration details, and you can pause or stop the migration at any time using the corresponding buttons in the JOB ribbon.
Step 19
Migration Completed
After the migration completes successfully, the Action field in the Job Progress section changes from 'Migrate' to 'Don't Migrate' for each completed mailbox, indicating that those mailboxes have been fully migrated.
If a mailbox fails to migrate, it remains in the 'Migrate' state, allowing you to retry the migration for that mailbox without reconfiguring the entire job or making repeated changes to other mailboxes.
Welcome! If you’ve registered through the Stellar Migrator for Exchange website, you will have received an email containing your login credentials. This email includes a download link for the Stellar Migrator for Exchange software (EXE) and access details for the Licensing Portal (stellarlicenseserver.com). To get started, click the download link provided in the email or access it directly from the Licensing Portal.
Step 2
Install the Software
After downloading the Stellar Migrator for Exchange setup file, run the installer and follow the on-screen instructions to complete the installation. Once installed, launch the software — no additional configuration is required. You’re now ready to start your test migration using the 2 free mailbox credits included. The next step is to create your first migration job.
Step 3
Welcome Screen
The first screen welcomes you to Stellar Migrator for Exchange, which lets you securely migrate mailboxes between Exchange Server and Microsoft 365, including M365 tenant-to-tenant. If you already have an account, click ‘Login’ to sign in with the credentials sent to your email. If you want to explore the software first, click ‘Continue without login’ instead. Use the ‘Help’ option at the bottom if you need assistance.
Step 4
Sign In to Licensing Server
The next screen prompts you to sign in to your Licensing Server account. Enter the email ID and password sent to your registered email address, then click ‘Login’. Select ‘Remember me’ if you want the software to save your credentials for future sessions. If you cannot recall your password, use the ‘Forgot password?’ link to reset it.
Step 5
Connected to Licensing Server
The next screen confirms that you are connected to the Licensing Server and shows the number of licenses available for migration. Click ‘Create job’ to start a new migration job to Exchange or Microsoft 365. If you have a migration job in progress, click ‘Open job’ to resume it. Review your available licenses before starting so you can plan the number of mailboxes to migrate.
Step 6
Migration Type
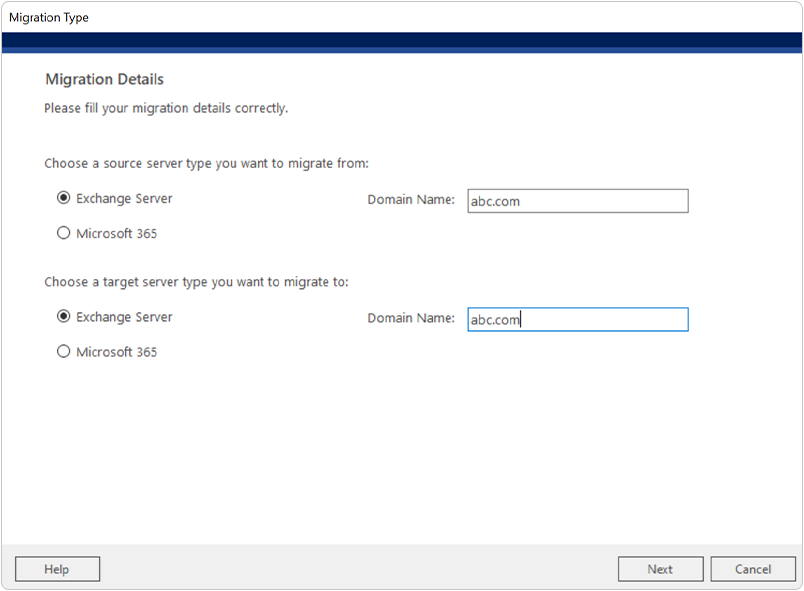
When you launch the software and create a new job, the Migration Type screen appears first. Under 'Choose a source server type you want to migrate from', select Exchange Server and enter the source Domain Name. Under 'Choose a target server type you want to migrate to', select Exchange Server and enter the target Domain Name. This configures the job as an Exchange to Exchange (server-to-server) migration. Click Next to proceed.
Step 7
Migration Scenario
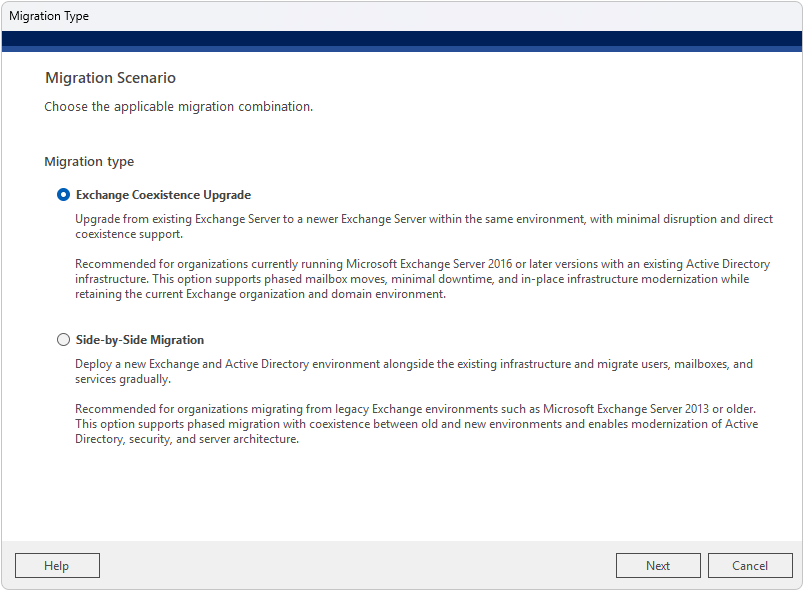
Choose the applicable migration combination. Based on your migration requirements, you can choose options such as Exchange Coexistence Upgrade or Side-by-Side Migration. Choose Exchange Coexistence Upgrade migration approach when you want to upgrade your existing Microsoft Exchange Server to a newer version within the same environment. Choose Side-by-Side Migration approach when you want to build a completely new Exchange and Active Directory environment alongside your existing infrastructure. Here we are selecting Exchange Coexistence Upgrade.
Step 8
General – Create Migration Job
Provide a name for your migration job (for example, 'Exc to Exc') — this name will be displayed on the list of jobs. Then select the mailbox type(s) you want to migrate: primary/shared mailboxes, archive mailboxes, or public folders. You can also import a pre-mapped CSV file directly from this screen.
Step 9
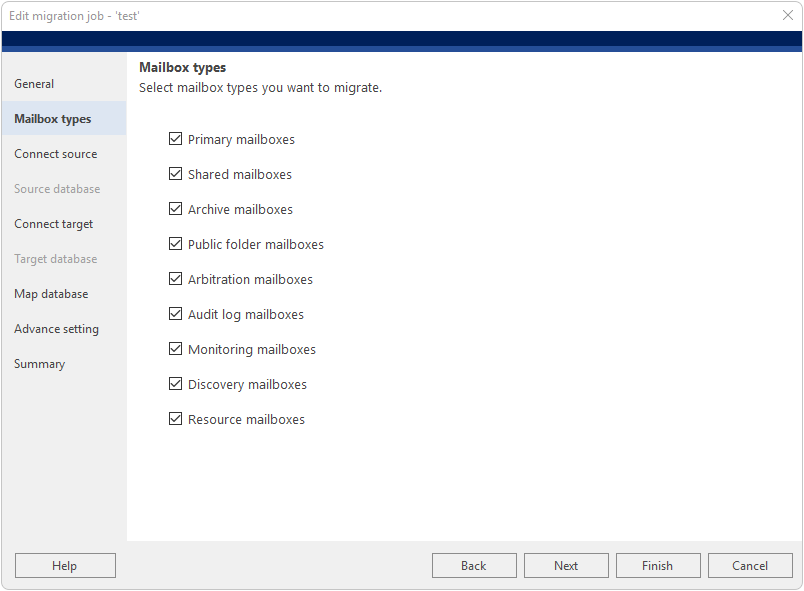
Mailbox Types
Select the mailbox types you want to include in the migration. All types are selected by default. Uncheck any types you want to exclude:
Click Next to proceed once your selection is complete.
Step 10
Connect Source
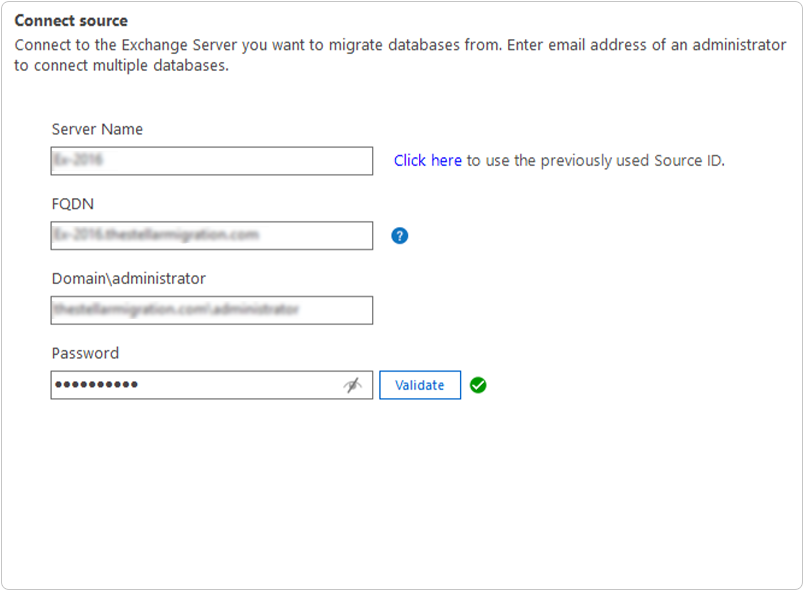
Connect the software to the source Exchange Server 2016. Enter the following details:
• Server Name — e.g., Ex-2016 • FQDN — e.g., Ex-2016.thestellarmigration.com • Domain\Administrator — e.g., thestellarmigration.com\administrator • Password — enter the administrator password
Click Validate to confirm the connection. A green checkmark will appear upon successful authentication. You can also click ‘Click here’ to reuse a previously saved Source ID and skip re-entering credentials.
Note: Administrator or impersonation rights are required for the account used to connect to the source Exchange Server.
Step 11
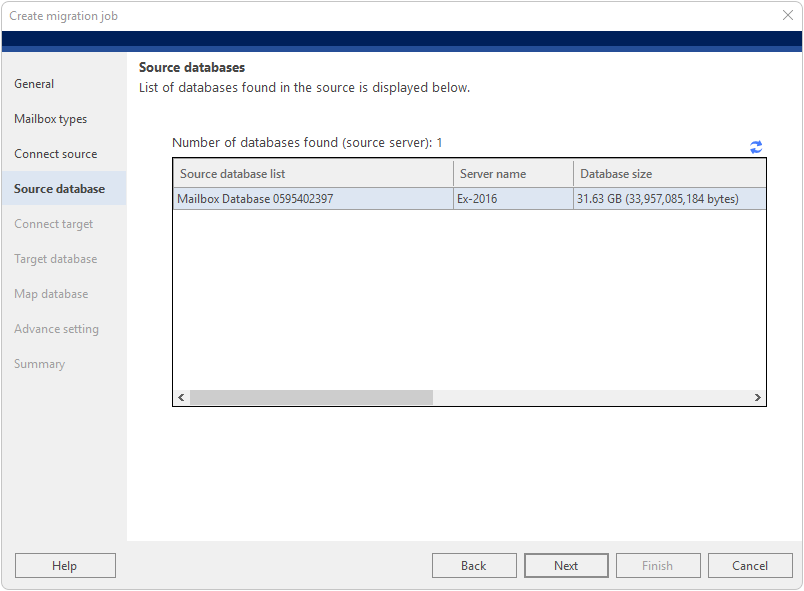
Source Databases
The software automatically discovers and displays all mailbox databases found on the source Exchange Server 2016. Review the list to confirm all required source databases are present. The database name, server name, and database size are shown for reference.
In this example, Mailbox Database 0595402397 is found on Ex-2016 with a size of 31.63 GB. Click Next to proceed.
Step 12
Connect Target
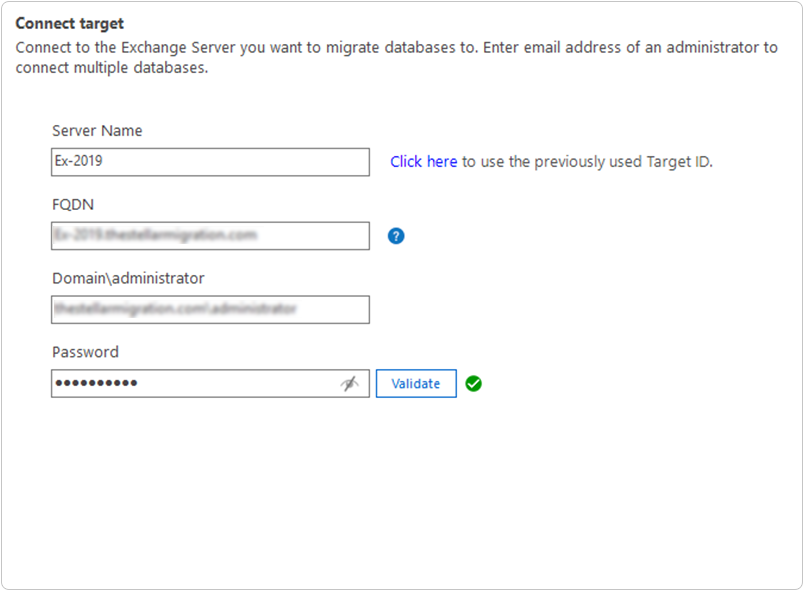
Connect the software to the target Exchange Server 2019. Enter the following details:
• Server Name — e.g., Ex-2019 • FQDN — e.g., Ex-2019.thestellarmigration.com • Domain\Administrator — e.g., thestellarmigration.com\administrator • Password — enter the administrator password
Click Validate to confirm the connection. A green checkmark will appear upon success. Alternatively, click ‘Click here’ to load a previously saved Target ID from the Saved Connections dialog — this allows you to skip re-entering credentials and streamlines the setup process.
Note: Administrator or impersonation rights are required for the account used to connect to the target Exchange Server.
Step 13
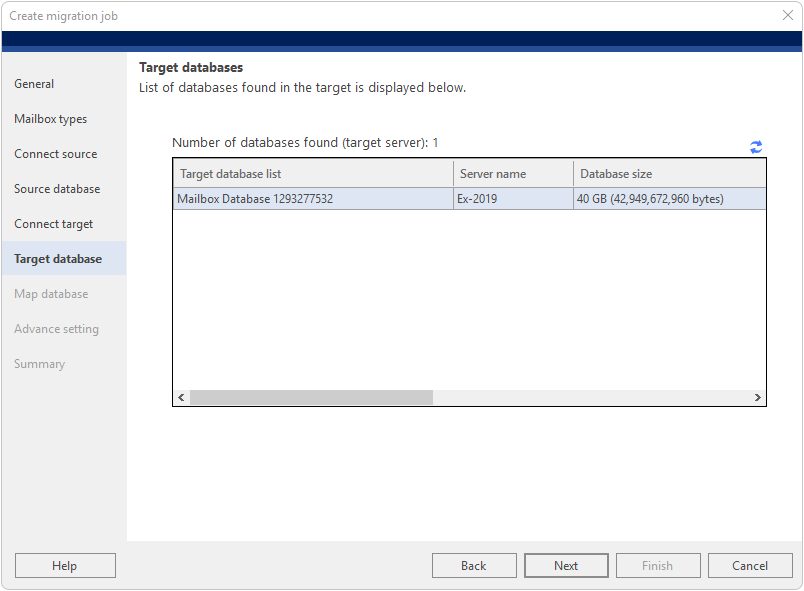
Target Databases
The software automatically discovers and displays all mailbox databases found on the target Exchange Server 2019. Verify that the destination database is available and has sufficient storage space to accommodate the migrated data.
In this example, Mailbox Database 1293277532 is found on Ex-2019 with a size of 40 GB. Click Next to proceed
Step 14
Map Databases
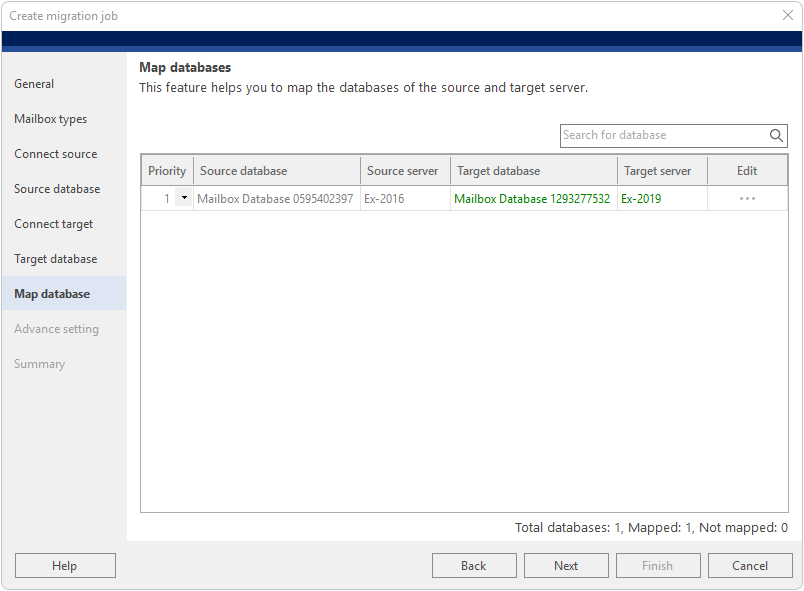
The software maps the source database (Exchange Server 2016) to the target database (Exchange Server 2019). The mapping screen displays the source database alongside the available target databases for pairing.
Review the mapping to ensure the correct source and target databases are paired. If the auto-mapping is incorrect, use the dropdown to select the correct target database for each source database. Click Next once all databases are correctly mapped.
Step 15
Advance Setting
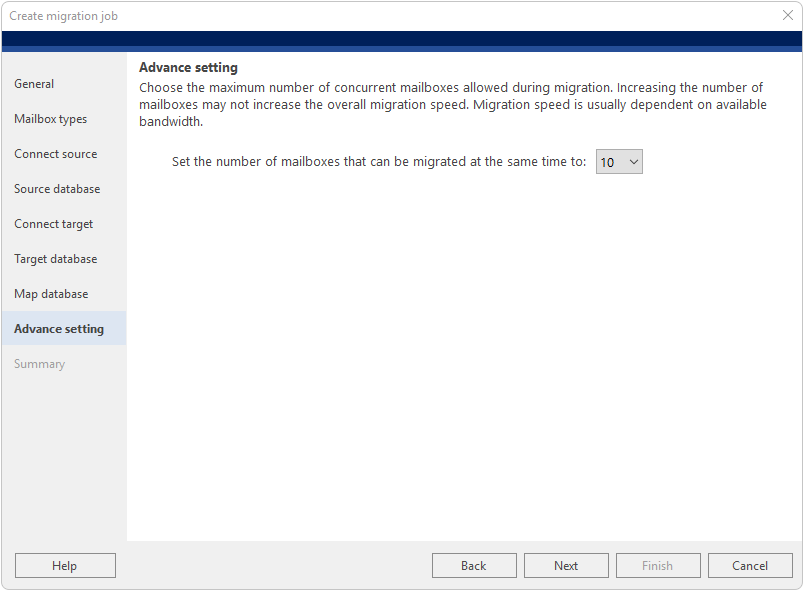
Configure the maximum number of concurrent mailboxes allowed during migration. This setting controls how many mailboxes are migrated simultaneously.
Note that increasing the concurrency does not necessarily improve overall migration speed — performance is primarily dependent on available network bandwidth and server load. The default value is 10 concurrent mailboxes. Adjust as required and click Next to proceed.
Step 16
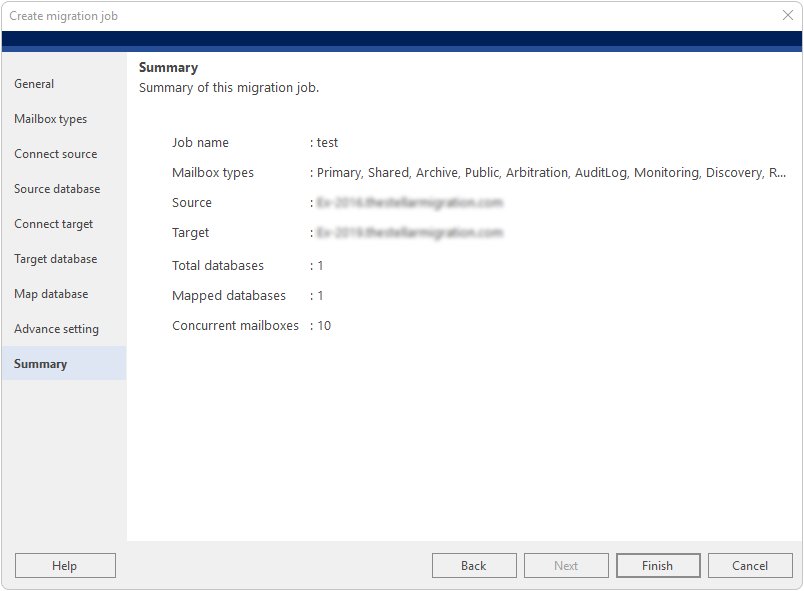
Summary
Review the complete migration job summary before finishing. The summary screen displays all configured settings for the job:
• Job name • Mailbox types selected (Primary, Shared, Archive, Public, Arbitration, AuditLog, Monitoring, Discovery, Resource) • Source server — Ex-2016.thestellarmigration.com • Target server — Ex-2019.thestellarmigration.com • Total databases and Mapped databases • Concurrent mailboxes setting
If any setting requires correction, click the relevant section in the left panel to go back and edit it. Once satisfied, click Finish to create the migration job.
Step 17
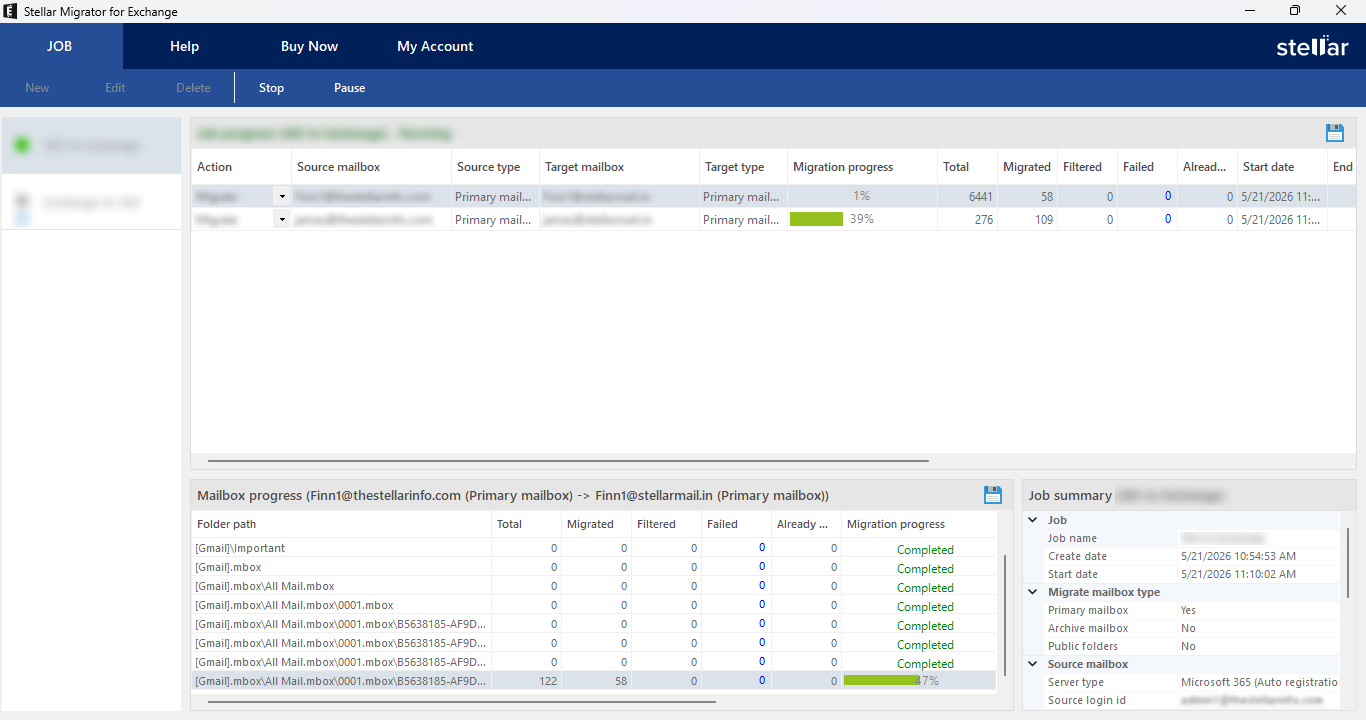
Initiate Migration
After clicking Finish to create the job, the job will appear in the jobs list. Click Start in the JOB ribbon at the top to begin the migration process.
The migration dashboard shows real-time Job Progress with the following columns:
• Action — current operation (Migrate / Don’t Migrate) • Source mailbox — the mailbox being migrated from • Target mailbox — the mailbox being migrated to • Migration progress (%) — percentage completion • Total items, Migrated, Filtered, and Failed counts • Start date — when the mailbox migration began
The Mailbox Progress panel at the bottom shows folder-level detail for each mailbox being processed. You can Pause or Stop the migration at any time using the buttons in the JOB ribbon.
Step 18
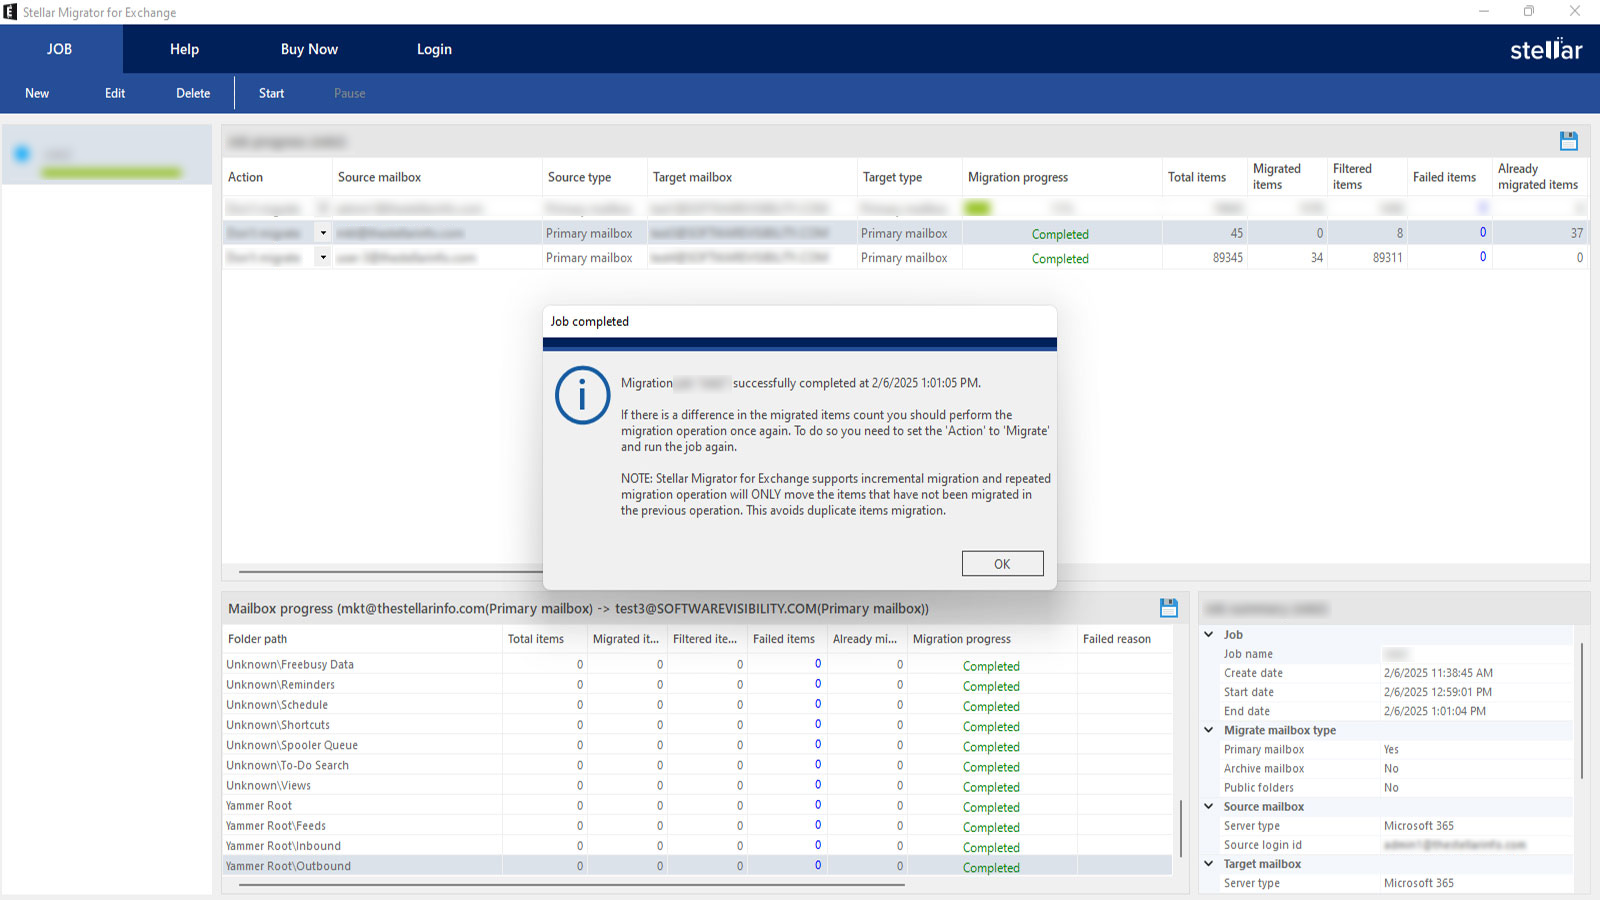
Migration Completed
After completing the migration, the Action field in the Job Progress section will change from ‘Migrate’ to ‘Don’t Migrate’, indicating the job has finished successfully.
If any mailbox fails to migrate, it will remain in the ‘Migrate’ state, allowing you to retry the failed mailboxes without reconfiguring the entire job. Review the progress report to identify and address any failures before re-running the job.
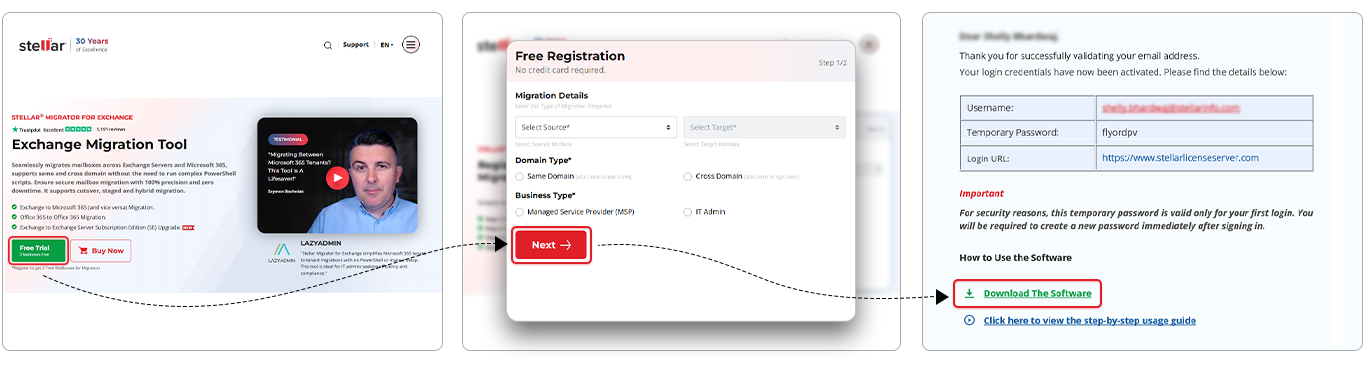
Welcome! If you're here, you've likely registered through the Stellar Migrator for Exchange website and received an email containing your login credentials. This email includes a download link for the Stellar Migrator for Exchange software (EXE) and access details for the Licensing Portal (stellarlicenseserver.com). To get started, click on the download link provided in the email or access it directly from the Licensing Portal.
Step 2
Install the Software
After downloading the Stellar Migrator for Exchange setup file, run the installer and follow the on-screen instructions to complete the installation. Once installed, launch the software — no additional configuration is required. You're now ready to start your test migration using the 2 free mailbox credits included. The next step is to create your first migration job.
Step 3
Welcome Screen
The first screen welcomes you to Stellar Migrator for Exchange, which lets you securely migrate mailboxes between Exchange Server and Microsoft 365, including M365 tenant-to-tenant. If you already have an account, click ‘Login’ to sign in with the credentials sent to your email. If you want to explore the software first, click ‘Continue without login’ instead. Use the ‘Help’ option at the bottom if you need assistance.
Step 4
Sign In to Licensing Server
The next screen prompts you to sign in to your Licensing Server account. Enter the email ID and password sent to your registered email address, then click ‘Login’. Select ‘Remember me’ if you want the software to save your credentials for future sessions. If you cannot recall your password, use the ‘Forgot password?’ link to reset it.
Step 5
Connected to Licensing Server
The next screen confirms that you are connected to the Licensing Server and shows the number of licenses available for migration. Click ‘Create job’ to start a new migration job to Exchange or Microsoft 365. If you have a migration job in progress, click ‘Open job’ to resume it. Review your available licenses before starting so you can plan the number of mailboxes to migrate.
Step 6
Migration Type
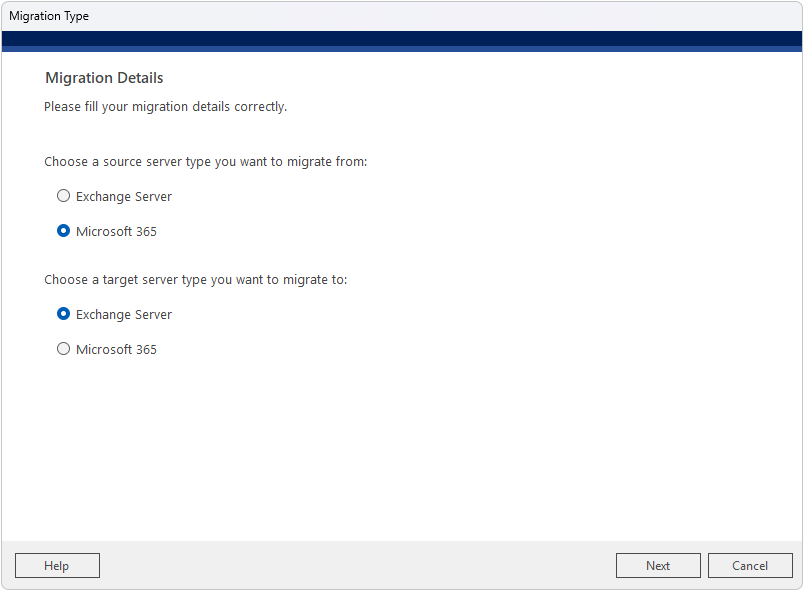
When you launch the software and create a new job, the Migration Type screen appears first. Under 'Choose a source server type you want to migrate from', select Microsoft 365. Under 'Choose a target server type you want to migrate to', select Exchange Server. This configures the job as an Office 365 to Exchange Server migration. Click Next to proceed.
Step 7
General – Create Migration Job
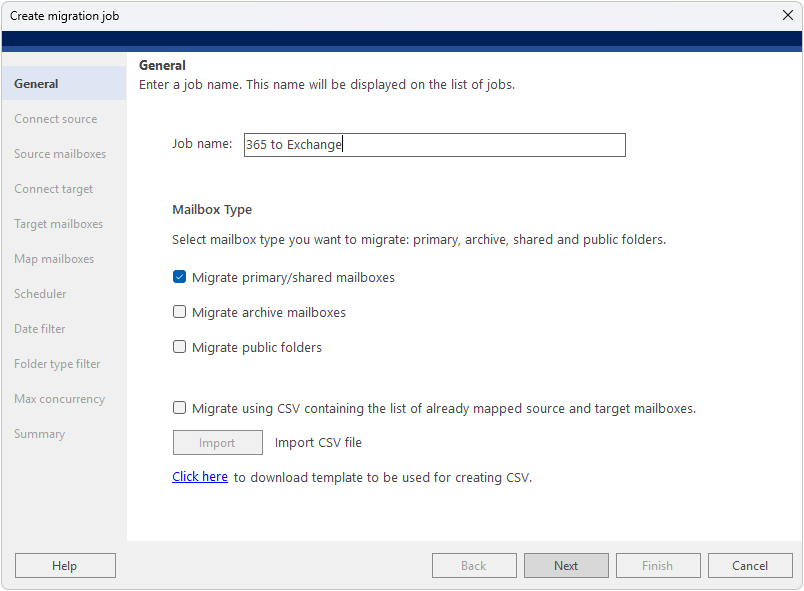
Provide a name for your migration job (for example, '365 to Exchange') — this name will be displayed on the list of jobs. Then select the mailbox type(s) you want to migrate: primary/shared mailboxes, archive mailboxes, or public folders. You can also import a pre-mapped CSV file directly from this screen.
Step 8
Connect Source
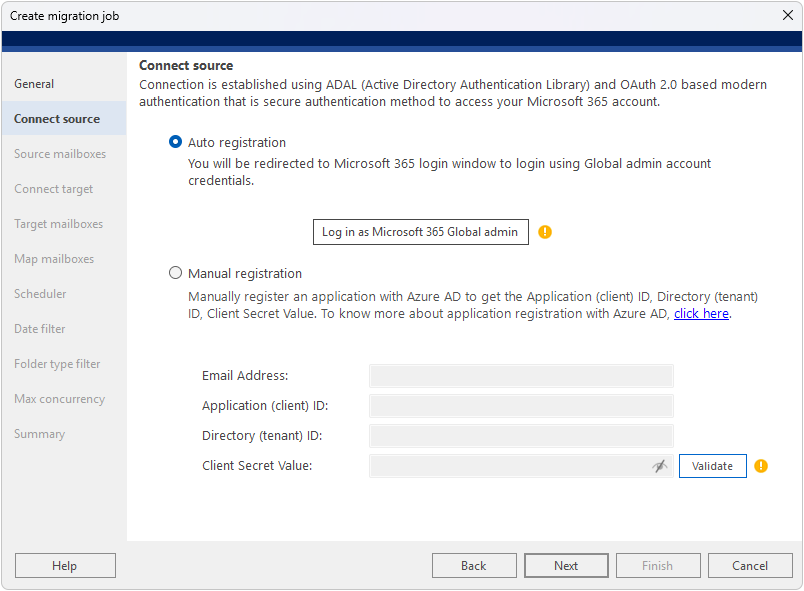
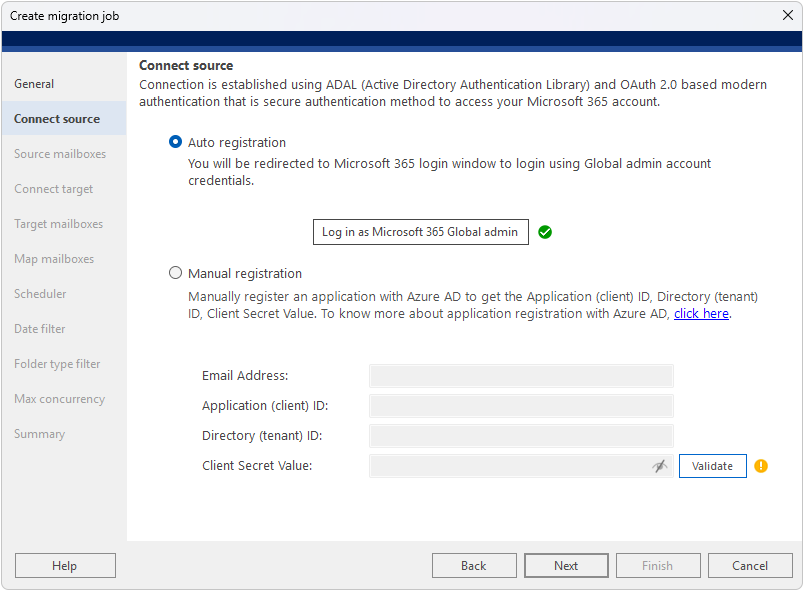
The Connect Source screen provides two registration methods for the source Microsoft 365 tenant: Auto Registration and Manual Registration. With Auto Registration, click “Log in as Microsoft 365 Global admin” to sign in through the Microsoft 365 login window, after which a green checkmark confirms the connection. For Manual Registration, register an application in Azure AD and enter the Email Address, Application (client) ID, Directory (tenant) ID, and Client Secret Value.
Step 9
Connect Source – Auto Registration
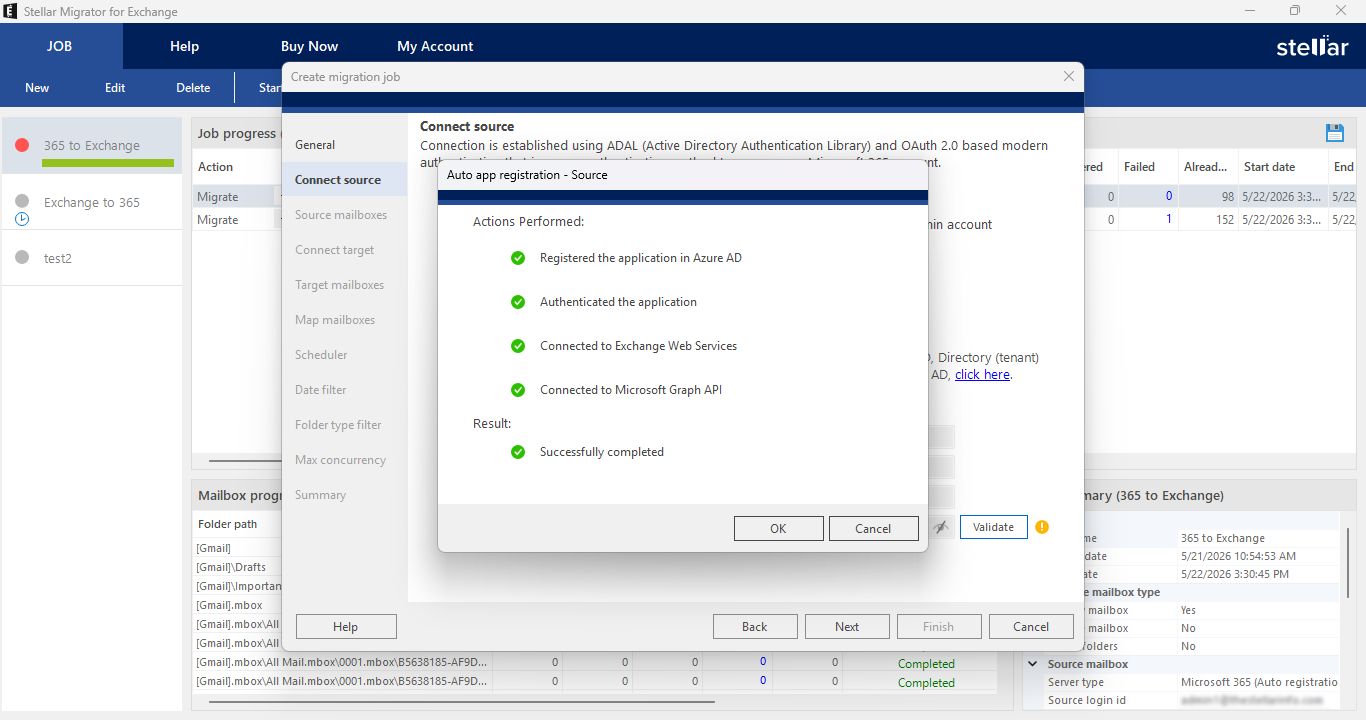
Once all Auto registration steps finish successfully, the dialog shows green checkmarks for all actions performed: Registered the application in Azure AD, Authenticated the application, Connected to Exchange Web Services, and Connected to Microsoft Graph API. The Result section confirms 'Successfully completed'. Click OK to return to the Connect Source screen.
Step 10
Connect Source – Connection Confirmed
After successful authentication, a green checkmark appears next to the 'Log in as Microsoft 365 Global admin' button, confirming the source Microsoft 365 tenant is connected.
Step 11
Source Mailboxes
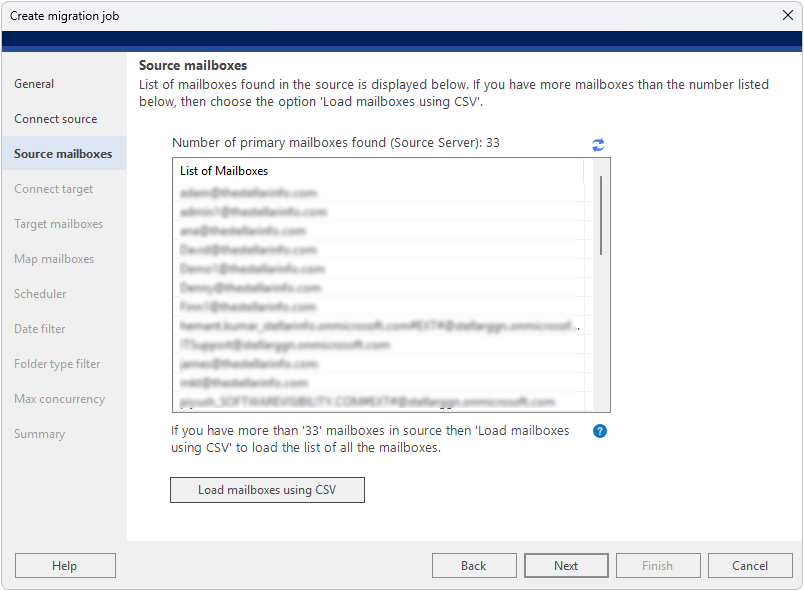
The next screen displays the list of mailboxes found in the source Microsoft 365 tenant. Review the list to confirm all required source mailboxes are present. If you have more mailboxes than the number listed, use the 'Load Mailboxes Using CSV' option and upload a CSV file containing all mailbox addresses.
Step 12
Connect Target
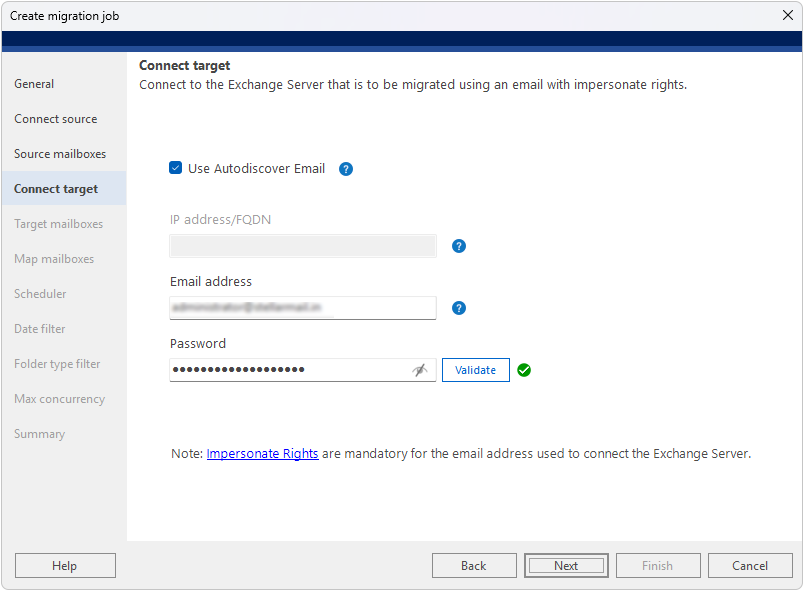
Connect the software to the target Exchange Server. Enable 'Use Autodiscover Email' and enter the Email address and Password — the software will automatically locate and connect to the target server. Alternatively, uncheck Autodiscover and manually enter the IP address/FQDN, Email address, and Password. Click Validate to confirm the connection.
Note: Impersonate Rights are mandatory for the email address used to connect to the Exchange Server.
Step 13
Target Mailboxes
The next screen displays the list of mailboxes found in the target Exchange Server. Review the list to ensure all destination mailboxes are available for mapping. If you have more mailboxes than the number listed, use the 'Load Mailboxes Using CSV' option to load the complete list.
Step 14
Map Mailboxes
The software automatically maps source and target mailboxes by comparing their email addresses. Mailboxes that are successfully matched appear in green; unmatched mailboxes are marked 'Not Mapped' in red. Use the Edit (…) button to manually map any unmatched mailboxes. The status bar at the bottom shows Total mailboxes, Mapped count, and Not mapped count.
Step 15
Scheduler
Configure when the migration job should run. Choose 'Run manually' to start migration on demand, or select 'Schedule job' and click the Scheduler button to set the frequency (Run once, Daily, Weekly, or Monthly), start and end times, and duration. The Description field at the bottom previews the configured schedule. Use the Scheduler dialog to set the exact frequency, occurrence times, start date, and optional end date for the migration run.
Step 16
Date Filter
Apply a date filter to control which mail items are migrated (applies to mail items only). Options include: Migrate all items, Migrate items older than a specific date, Migrate items not older than a specific date, or Migrate only items from a specific date range. This helps reduce migration scope when needed.
Step 17
Folder Type Filter
Select the folder types to include in the migration. Available folder types are: Emails, Contacts, Calendars, Tasks, Notes, and Journals. Special folders include Junk Email, Deleted Items, and Drafts. All are selected by default. Uncheck any folders you want to exclude to ensure only the required data is migrated.
Step 18
Max Concurrency
Configure migration speed and resilience. Set the number of Concurrent mailbox migration threads (5 recommended), Concurrent item migration threads per mailbox (5 recommended), and the number of retry attempts in case of network failure (default: 2). Migration speed depends on system configuration, network speed, and source and destination server performance.
Step 19
Summary
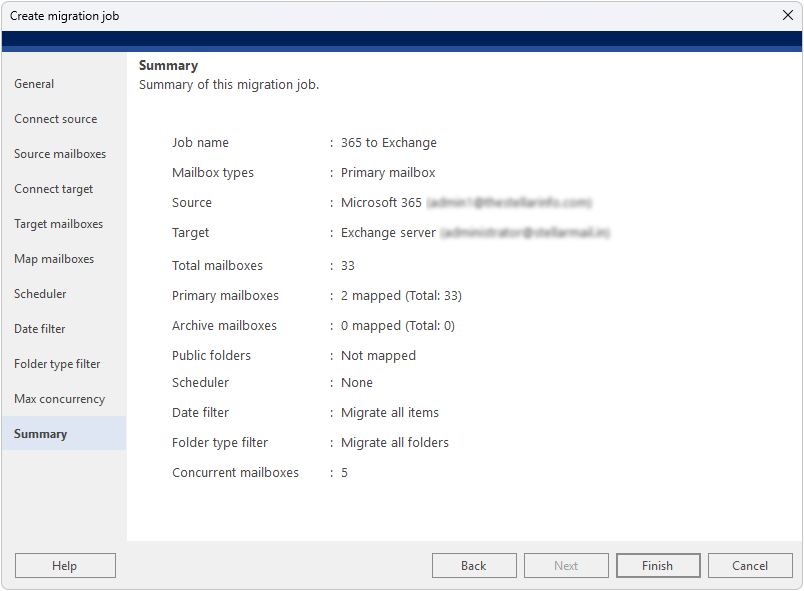
Review the complete job summary before starting migration. The summary displays: Job name, Mailbox types, Source server (Microsoft 365), Target server (Exchange Server), Total mailboxes, Mapped counts for primary/archive mailboxes and public folders, Scheduler setting, Date filter, Folder type filter, and Concurrent mailboxes. If any setting needs correction, click the relevant section in the left panel to go back and edit it. Click Finish to create the migration job.
Step 20
Initiate Migration
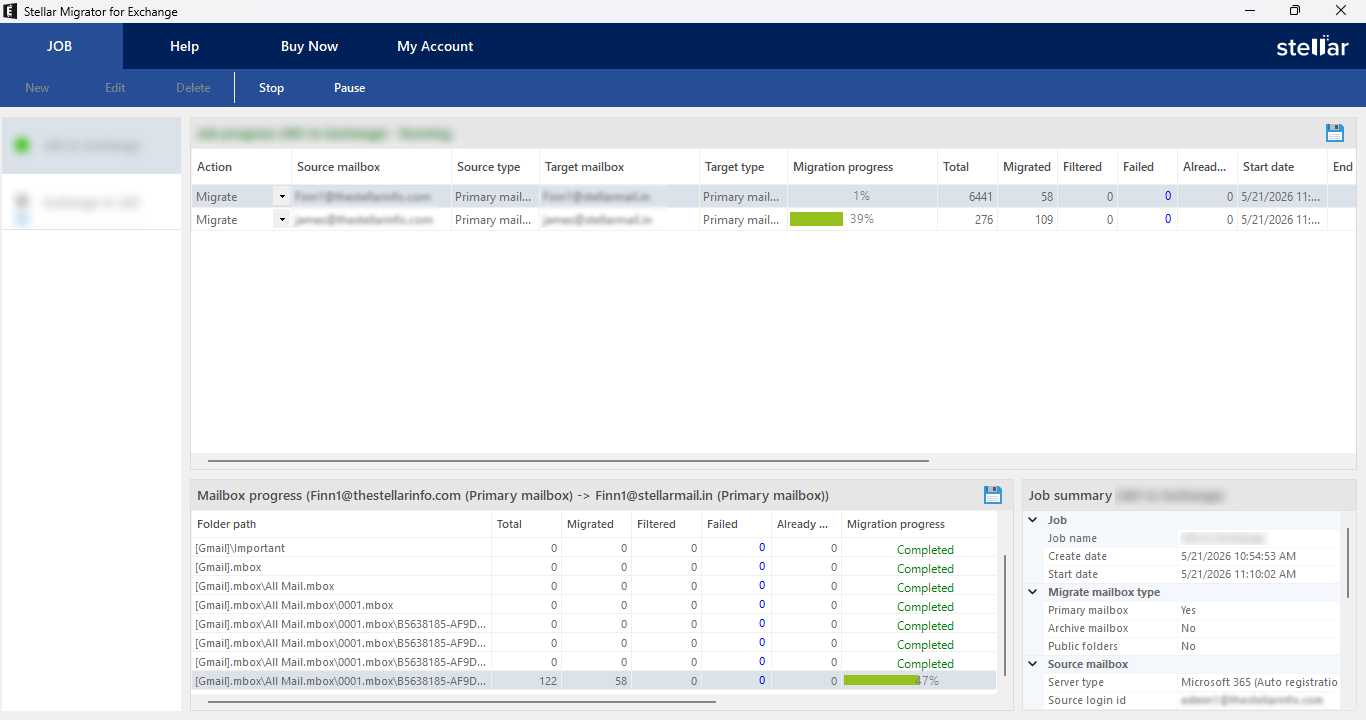
After clicking Finish to create the job, click Start in the JOB ribbon at the top to begin the migration process. The migration dashboard shows real-time Job Progress with columns for Action, Source mailbox, Target mailbox, Migration progress (%), Total items, Migrated, Filtered, Failed, and Start date. The Mailbox Progress panel at the bottom shows folder-level detail. You can Pause or Stop the migration at any time using the buttons in the JOB ribbon.
Step 21
Migration Completed
After completing the migration, the action field in the job progress section will change from Migrate to Don't Migrate. If the job fails to migrate, it will remain in the Migrate state, allowing you to attempt the migration again without making repeated changes.
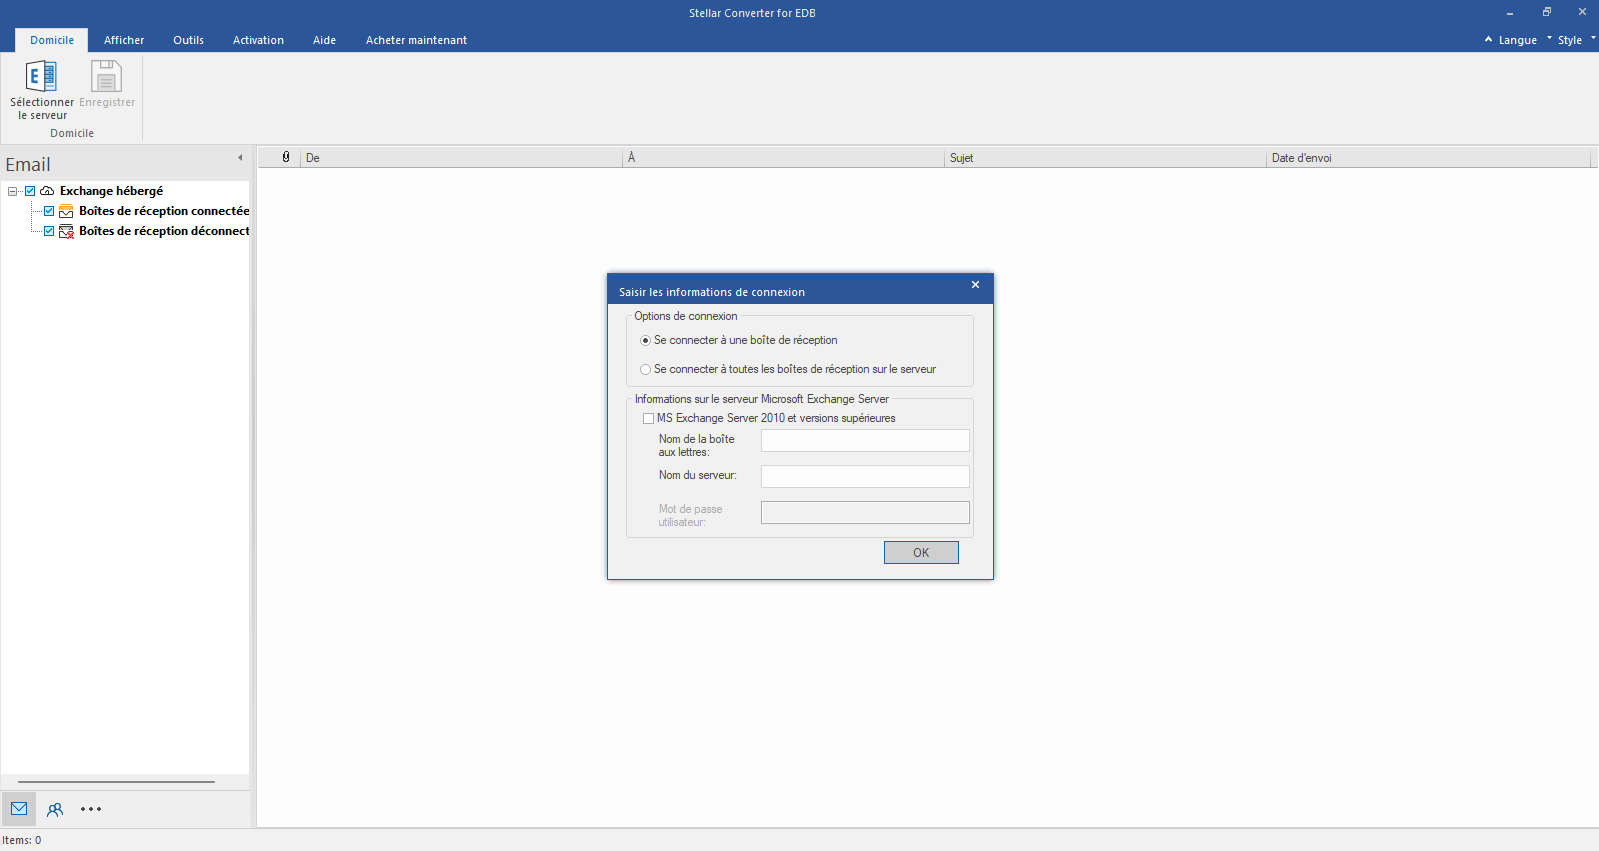
Sélectionnez Hosted Exchange et entrez vos données de connexion.
Sélectionnez Hosted Exchange pour exporter des boîtes aux lettres à partir d'un fichier EDB en ligne. Sélectionnez Connecter à une seule boîte aux lettres ou Connecter à une seule boîte aux lettres dans les options de connexion.
Étape 2
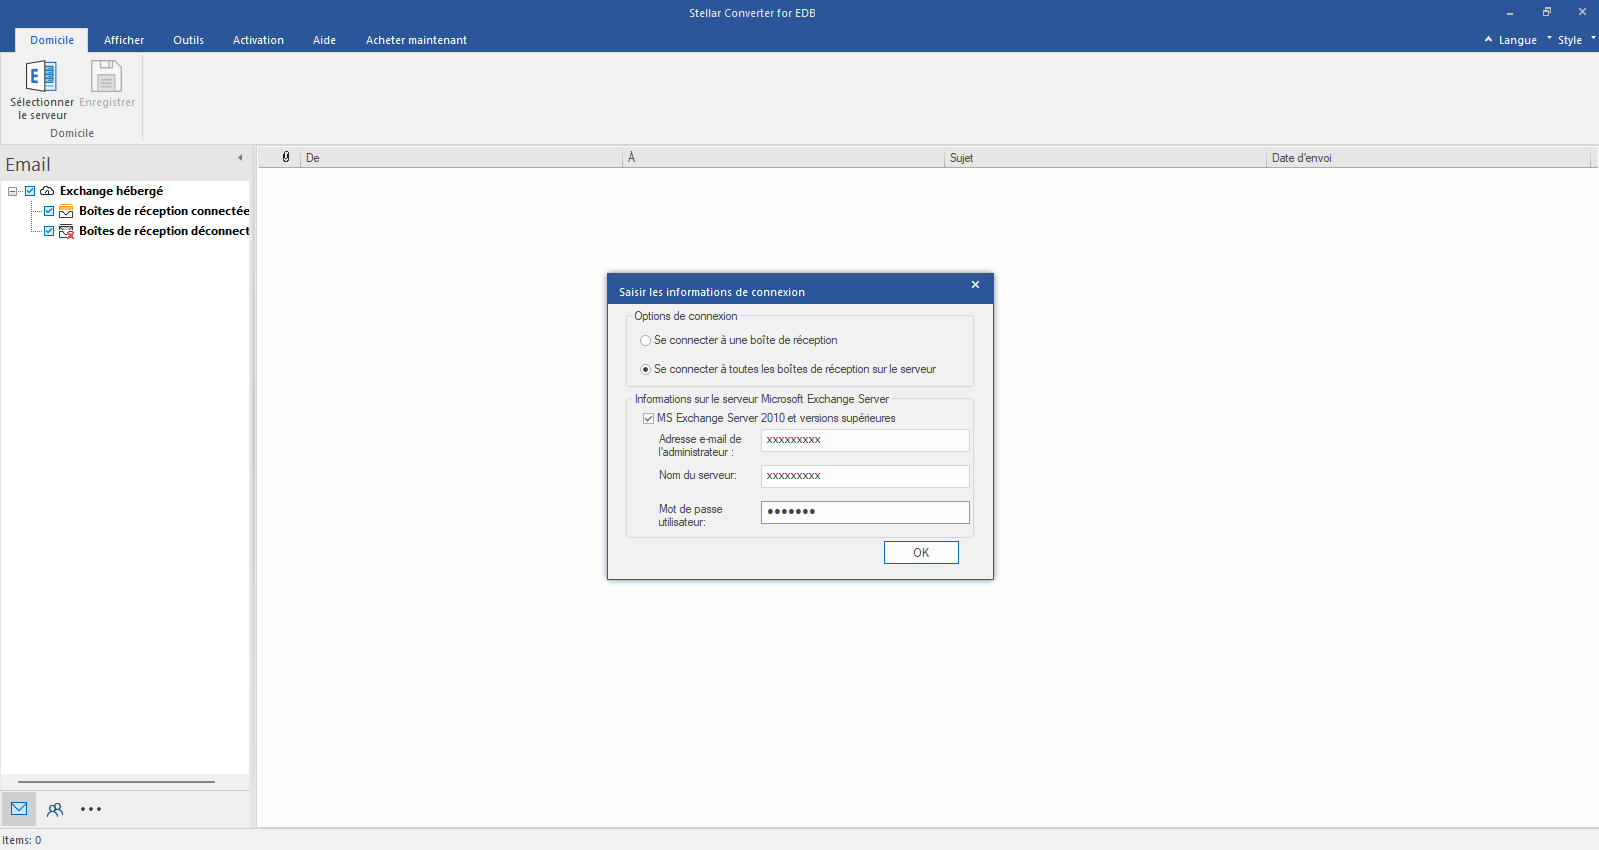
Saisissez l'adresse électronique de l'administrateur et le nom du serveur
Saisissez le courriel de l'administrateur et le nom du serveur (pour Exchange 5.5, 2000, 2003, 2007) ou cochez la case "Exchange Server 2010 and higher" pour saisir le courriel de l'administrateur, le nom du serveur et le mot de passe (pour MS Exchange 2010, 2013, 2016 et 2019). Cliquez sur OK.
Étape 3
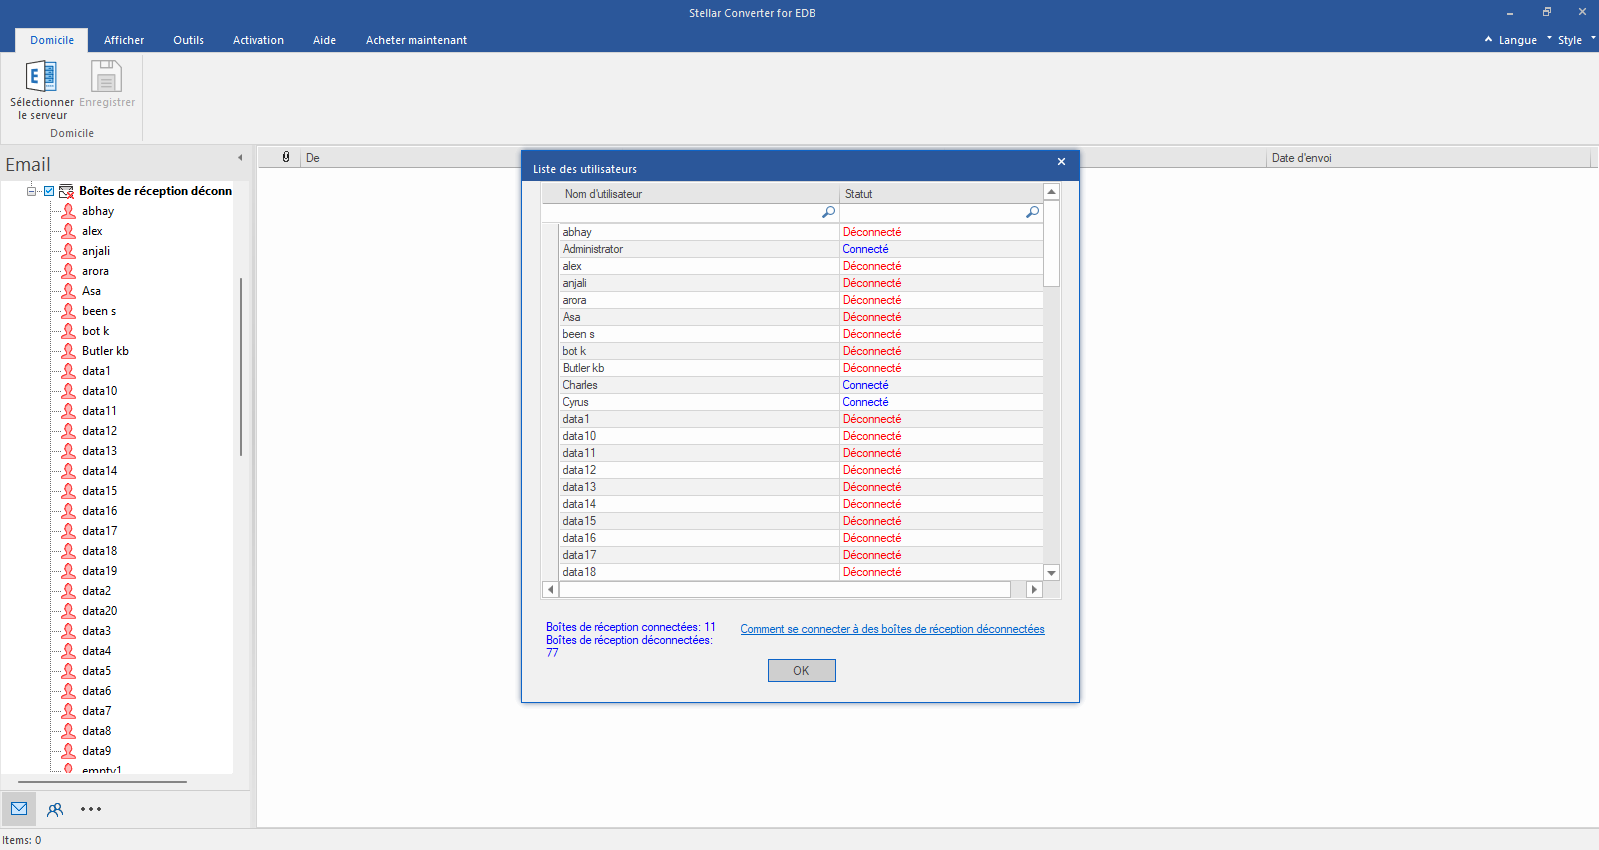
Vérifier l'état de la boîte aux lettres connectée/déconnectée
Une fois la connexion à Exchange Server établie, une liste des boîtes aux lettres connectées et déconnectées s'affiche dans la fenêtre suivante. Cliquez sur "OK" pour continuer.
Étape 4
Vérifier l'aperçu de toutes les boîtes aux lettres
Vérifiez l'aperçu de toutes les boîtes aux lettres - courriels, calendrier, contacts, etc.
Étape 5
Sélectionnez "Enregistrer sous PST".
Cliquez sur Enregistrer dans le ruban Démarrer et sélectionnez l'option Enregistrer sous PST. Cliquez sur "Suivant" pour continuer.
Selezioni Hosted Exchange e inserisca i suoi dati di accesso.
Selezioni Hosted Exchange per esportare le caselle postali da un file EDB online. Selezioni Connetti a una singola casella postale o Connetti a una singola casella postale dalle opzioni di connessione.
Passo 2
Inserisca l'e-mail dell'amministratore e il nome del server
Inserisca il nome dell'amministratore e del server (per Exchange 5.5, 2000, 2003, 2007) o selezioni la casella di controllo "Exchange Server 2010 e superiore" per inserire l'e-mail dell'amministratore, il nome del server e la password (per MS Exchange 2010, 2013, 2016 e 2019). Clicchi su OK.
Passo 3
Controlli lo stato della mailbox collegata/disconnessa.
Una volta stabilita la connessione a Exchange Server, nella finestra successiva viene visualizzato un elenco di caselle postali collegate e scollegate. Clicchi su "OK" per continuare.
Passo 4
Controlli l'anteprima di tutte le cassette postali
Controlli l'anteprima di tutte le caselle di posta elettronica - e-mail, calendario, contatti, ecc.
Passo 5
Selezionare "Salva come PST".
Clicchi su Salva nella barra multifunzione Avvio e selezioni l'opzione Salva come PST. Clicchi su "Avanti" per continuare.
Seleccione Hosted Exchange e introduzca sus datos de acceso.
Seleccione Hosted Exchange para exportar buzones desde un archivo EDB en línea. Seleccione Conectarse a un único buzón o Conectarse a un único buzón en las opciones de conexión.
Paso 2
Introduzca el correo electrónico del administrador y el nombre del servidor
Introduzca el correo electrónico del administrador y el nombre del servidor (para Exchange 5.5, 2000, 2003, 2007) o marque la casilla "Exchange Server 2010 y superior" para introducir el correo electrónico del administrador, el nombre del servidor y la contraseña (para MS Exchange 2010, 2013, 2016 y 2019). Haga clic en Aceptar.
Paso 3
Comprobar el estado del buzón conectado/desconectado
Una vez establecida la conexión con Exchange Server, en la siguiente ventana aparecerá una lista de los buzones conectados y desconectados. Haga clic en "Aceptar" para continuar.
Paso 4
Comprobar la vista previa de todos los buzones
Compruebe la vista previa de todos los buzones: correos electrónicos, calendario, contactos, etc.
Paso 5
Seleccione "Guardar como PST".
Haga clic en Guardar en la cinta Inicio y seleccione la opción Guardar como PST. Haga clic en "Siguiente" para continuar.
Wählen Sie Hosted Exchange und geben Sie Ihre Anmeldedaten ein.
Wählen Sie Hosted Exchange, um Postfächer aus einer Online-EDB-Datei zu exportieren. Wählen Sie Verbinden mit einem einzelnen Postfach oder Verbinden mit einem einzelnen Postfach aus den Verbindungsoptionen
Schritt 2
Admin-E-Mail und Servernamen eingeben
Geben Sie admin und den Servernamen ein (für Exchange 5.5, 2000, 2003, 2007) oder aktivieren Sie das Kontrollkästchen "Exchange Server 2010 und höher", um admin E-Mail, Servernamen und Passwort einzugeben (für MS Exchange 2010, 2013, 2016 und 2019). Klicken Sie auf OK.
Schritt 3
Prüfen Sie den Status der verbundenen/getrennten Mailbox
Sobald die Verbindung zu Exchange Server hergestellt ist, wird im nächsten Fenster eine Liste der verbundenen und nicht verbundenen Postfächer angezeigt. Klicken Sie auf "OK", um fortzufahren.
Schritt 4
Prüfen Sie die Vorschau aller Postfächer
Prüfen Sie die Vorschau aller Postfächer - E-Mails, Kalender, Kontakte, etc.
Schritt 5
Wählen Sie "Als PST speichern".
Klicken Sie im Menüband Start auf Speichern und wählen Sie die Option Als PST speichern. Klicken Sie auf "Weiter", um fortzufahren.
* Laden Sie die kostenlose Testversion von Stellar Repair for Exchange herunter, um Ihre wiederherstellbaren Postfächer zu scannen und in der Vorschau anzuzeigen.
 Für EinzelpersonenZurück zum Hauptmenü
 Datenwiederherstellung
 Dateireparatur
 Datenlöschung
  Für UnternehmenZurück zum Hauptmenü
 Exchange Reparatur
 E-Mail-Konverter
 File & Database Repair
  Toolkit
 Labor-Dienstleistungen
  Unsere Partner
  ÜberZurück zum Hauptmenü
 Ressourcen
 Support
  Kontaktieren Sie uns
  Unternehmen
 Leiterschaft
  Medienberichterstattung
  Pressemitteilungen
  Karriere
  Blogs
Blogs  Artikel
  Videos



 Installation