Outlook not updating or failing to update folders or mail items is a common but serious problem that many Outlook users experience every once in a while. This problem may trigger due to one or more reasons associated with Outlook client, profile, or data file (Offline Storage Table or OST).
Although the mailbox is synchronized and changes can be seen in the Outlook Web App (OWA) or Outlook Web Access and Online Mode, Outlook does not reflect the changes in Cached Mode (also referred to as Offline Mode).
In this blog, we have discussed the reasons for the ‘Outlook in Cached Mode is not updating folders from Exchange’ problem and shared some solutions to resolve the issue.
Why Does Outlook Stop Updating Folders in Cached Exchange Mode?
MS Outlook utilizes Cached Exchange Mode to save a local replica of your mailbox data in an Offline Storage File – OST. This lets you to access the data without internet or server connectivity. However, there might be some situations where such local cache synchronization fails due to multiple internal/external factors, leading to problems in accessing your mailbox items.
The problem may also occur when the messages are stuck in the incoming item processing pipeline due to unexpected conflicts or corrupt data. The pipeline feature was first introduced in Outlook 2007 that uses the hidden ItemProcSearch folder in your mailbox to process messages before showing them in your Outlook Inbox.
Refer to the table below to understand the causes of this issue:
| Cause | What it means |
| Work Offline mode is enabled | Outlook has been manually disconnected from the server, which is the most common cause and also the easiest to fix. |
| Incorrect email sort order | Emails are updating correctly but may appear at the bottom of the mailbox instead of the top. |
| ItemProcSearch pipeline stuck | The incoming mail processing pipeline is stuck, preventing new emails from appearing until it is cleared using the /cleanips switch. |
| Corrupted Outlook cache (RoamCache) | Damaged or outdated cache files interfere with Outlook’s synchronization process. |
| Oversized OST file | An OST file larger than 20–25 GB can slow synchronization and cause Outlook to miss mailbox updates. In severe cases, this can also trigger an Outlook out of memory error. |
| Faulty or incompatible add-ins | A certain Outlook add-in may cause interruptions to the send or receive and the synchronization process. |
| Corrupt Outlook profile | A damaged or corrupt Outlook profile can prevent successful server communication and block authentication attempts. |
| Damaged Outlook program files | Corrupted Outlook installation files can block normal mailbox synchronization operations. |
Which Method Should You Try First?
The below table will help you to quickly choose the most relevant solution based on your situation.
| Situation | Try this method first | Time needed |
| Outlook shows “Working Offline” in the status bar | Method 1 — Disable Work Offline | 1 minute |
| Emails arrive on phone/OWA but not in Outlook desktop | Method 3 — /cleanips switch | 2 minutes |
| Some folders update but one specific folder does not | Method 4 — Clear Offline Items | 3 minutes |
| Outlook is slow and the OST file is over 20 GB | Method 7 — Adjust Sync Slider or Method 8 — Archive | 10 minutes |
| The issue started after installing a new add-in | Method 9 — Remove faulty add-ins | 5 minutes |
| Outlook profile was recently changed or migrated | Method 10 — Create new profile | 10 minutes |
| None of the above apply — general sync failure | Method 1 first, then Method 5, then Method 11 | 15–30 minutes |
| You are an IT admin managing Exchange for multiple users | Method 12 — Force sync via PowerShell | 5 minutes |
Methods to Fix Outlook not Updating Mail Folders in Cached Mode
First check your internet connection. If your network connection is inconsistent or slow, then restart your router or connect with your internet service provider. If the issue persists, follow the solutions mentioned below in sequence to fix this issue in all Outlook versions.
Method 1 – Disable Work Offline and Force an Update
If Work Offline mode is enabled in your Outlook, then it means the application is disconnected from the Exchange Server. This is the reason for Outlook not updating the mail folders issue. You can fix this problem by disabling the mode. Here’s how:
- Launch Outlook.
- Click Send/Receive.
- Make sure Work Offline feature is not enabled.
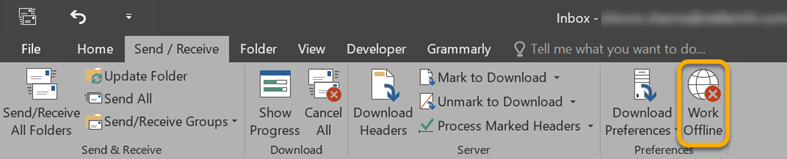
- If it is enabled, disable it.
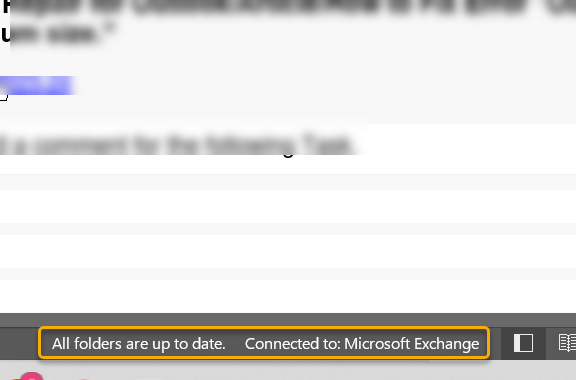
- Then check the status bar. It must show ‘Connected to Microsoft Exchange’.
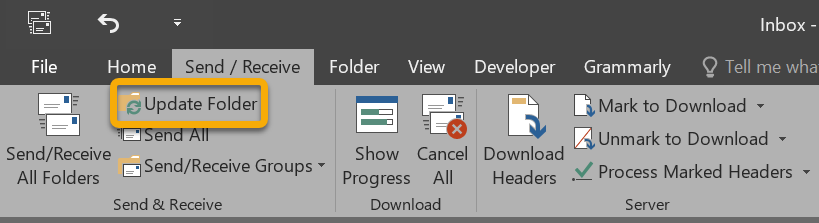
- Click Update Folder in the Send/Receive tab to update the folders.
Note: If the status bar still shows “Disconnected” after disabling Work Offline mode then check your internet connection, VPN, or firewall settings. If it shows “Trying to connect…,” then it indicates that the Exchange Server is temporarily unavailable. If you want to fully disable Cached Exchange Mode instead, see our guide on how to turn off Cached Exchange Mode in Outlook.
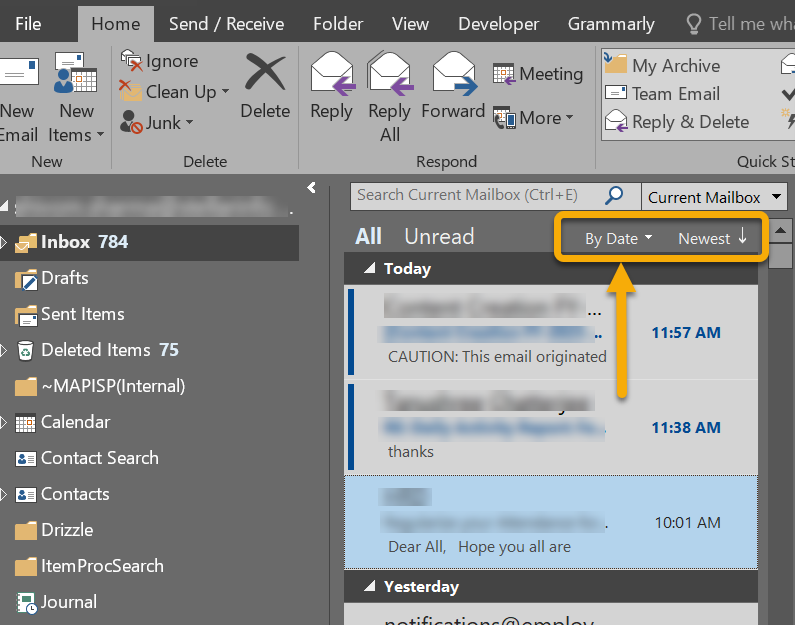
Method 2 – Check the Email Sort Order
At times, your Outlook emails are syncing correctly, but appear at the bottom of the folder instead of the top because the folder is sorted by “Oldest” on top. Due to this, it seems that Outlook is not updating the emails. You can set the order to By Date and Newest. Here’s how to do so:
- Launch Outlook.
- Open the folder that appears not updating (e.g. Inbox).
- Select Newest (or By Date → Newest).
- Check if the new emails are displaying at the top.
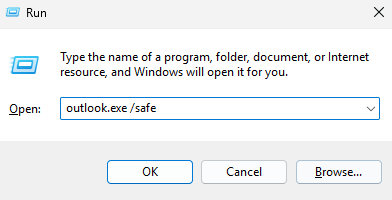
Method 3 – Use the /cleanips Switch to Reset Processing Pipeline
The /cleanips switch clears Outlook’s ItemProcSearch processing pipeline – the hidden folder used by Outlook to process incoming emails before displaying them. If this process gets stuck, then new emails may stop appearing even though they have already been delivered to the mail server. You can reset the processing pipeline by using the cleanips switch. Here’s how to do so:
- Close Outlook.
- Press Windows + R keys.
- Type Outlook.exe /cleanips and press the Enter key or click OK.
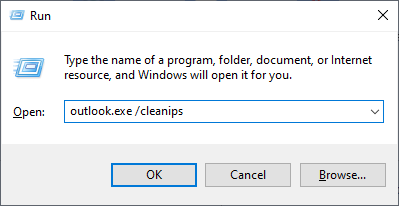
- Outlook will launch and automatically rebuild the ItemProcSearch processing folder.
- Wait until the synchronization process is complete. If your mailbox is large, then this process may take a few minutes to update.
- Check your mailbox, new emails are now appearing in the Inbox.
Note: The /cleanips switch is safe to use. It only resets the mail processing pipeline and does not delete emails, modify mailbox data, or damage the OST file.
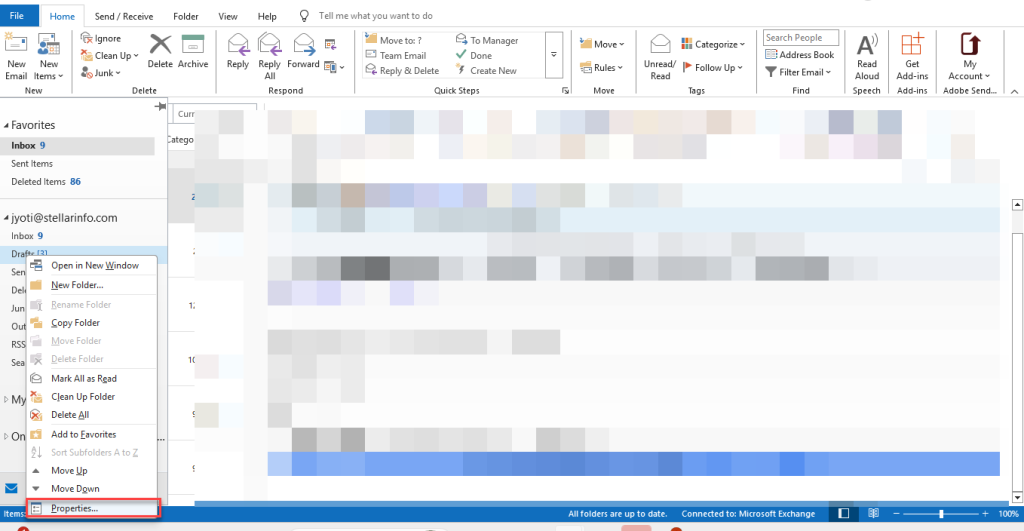
Method 4 – Clear Offline Items and Force Resynchronization
If syncing issues affect only one folder, then you can remove its offline items and force Outlook to download a fresh copy from the server. This is useful when folders, such as Inbox subfolders, shared mailboxes, or custom folders, stop updating correctly. Here’s how:
Note: This method clears the locally stored – offline – cache for the selected folder from your local OST file. Ensure the mailbox information is available on your Exchange Server or backup your data file before attempting this.
- Open Outlook.
- Right-click the folder that is not updating.
- Select Properties.
- Now click Clear Offline Items.
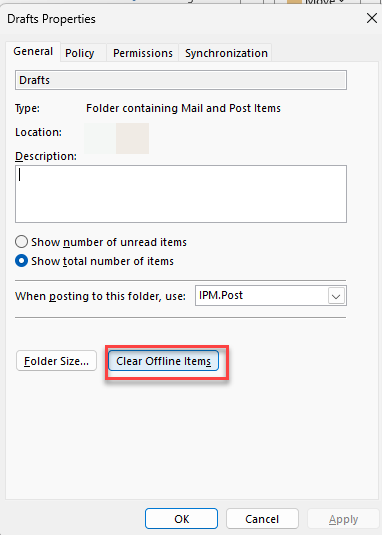
- Click OK to confirm.
- Outlook will remove the offline cache for that folder.
- Select the folder again.
- Press Shift + F9 to force synchronization.
Wait for Outlook to download the latest folder data from the server.
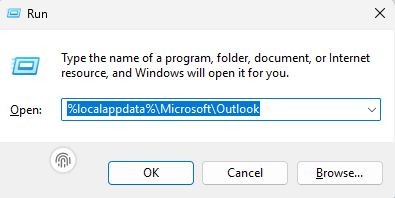
Method 5 – Clear the Outlook RoamCache Folder
To store your temporary data, such as autocomplete entries, recent searches, and cached settings, MS Outlook uses a folder known as RoamCache. If these files become damaged or corrupted, your email client may slow down or/and also prevent syncing of emails properly. You can resolve such an issue by clearing this folder. It removes the faulty data and allows Outlook to rebuild fresh cache files. Here’s how:
- Close Outlook completely.
- Press Windows + R.
- Type %localappdata%\Microsoft\Outlook.
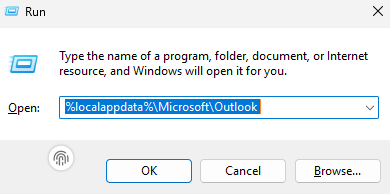
- Press Enter.
- Open the RoamCache folder.
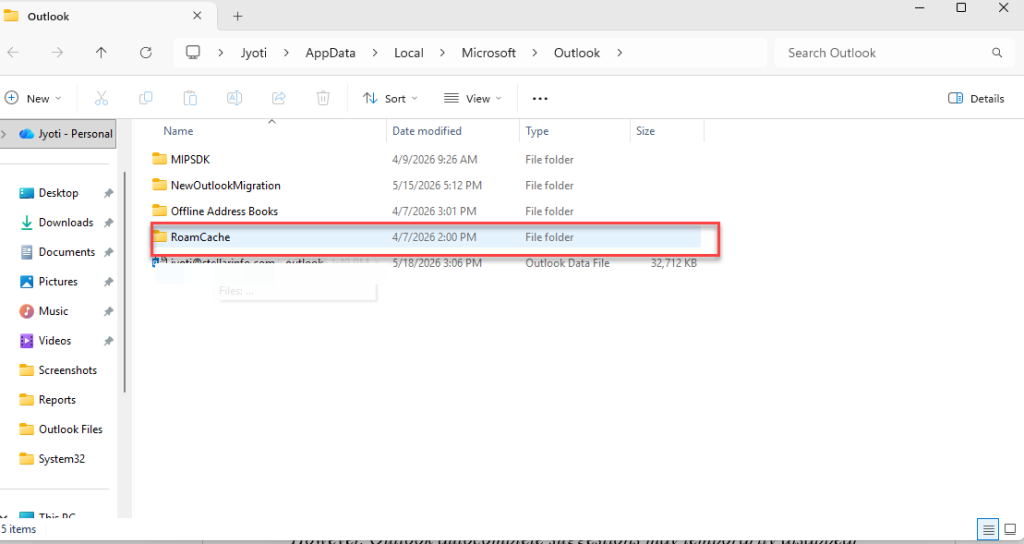
- Press Ctrl + A to select all files.
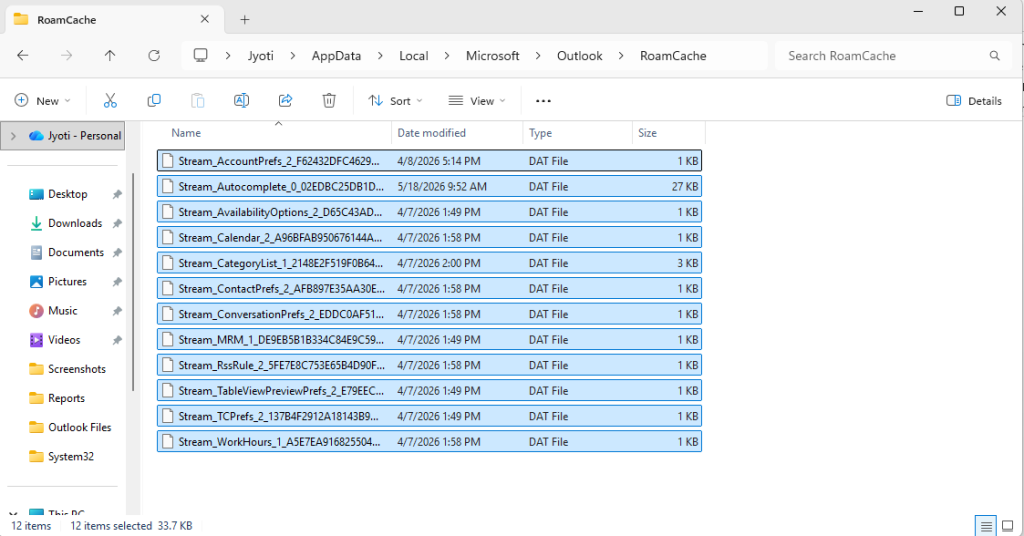
- Then press Delete.
- Start Outlook again. The cache files will be rebuilt automatically.
Note: Deleting RoamCache files does not remove emails or OST data. However, Outlook autocomplete suggestions may temporarily disappear until Outlook rebuilds them.
Method 6 – Enable ‘Send Immediately when Connected’
If your sent emails are not updating or syncing properly, it may be because the option “Send Immediately When Connected” – a simple setting that controls how Outlook handles outgoing messages – is disabled. Enabling this option is the simplest and quickest fix to resolve issues related to sent emails not updating issue. Steps to do this are:
- Go to File > Options.
- Click Advanced.

- Scroll down to the Send and receive section.
- Enable the checkbox – “Send immediately when connected”.
- Click OK.
- Start Outlook again.
Note: This setting only affects outgoing emails. If your incoming emails are also not syncing, move to the next troubleshooting methods.
Method 7 – Reduce the Sync Slider (Mail to Keep Offline)
In case your OST – Offline Storage Table – file becomes too large then there is a chance that your Outlook may slow down, freeze, or stop synchronizing. You can use the sync slider to decrease the amount of mailbox content to be saved in the local data file. It helps to improve the overall sync performance. Below are the instructions for the same:
- Open Outlook.
- Go to File > Info.
- Click Account Settings > Account Settings.
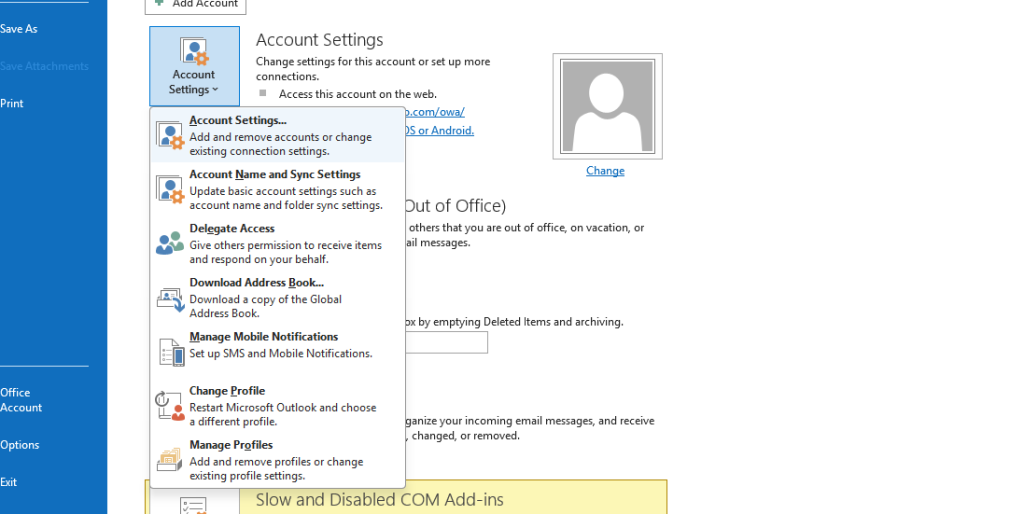
- Double-click your Exchange or Microsoft 365 account.
- Locate the Mail to keep offline slider.
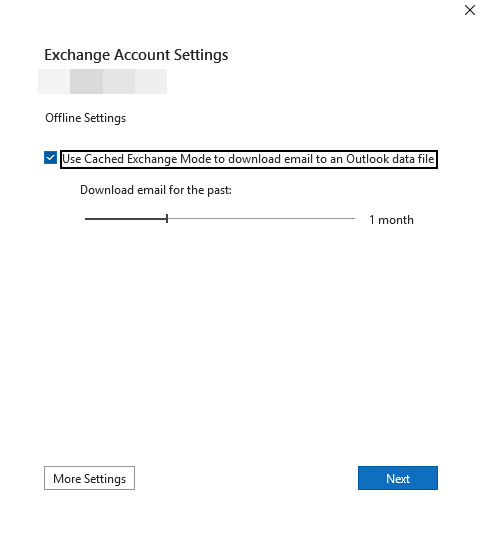
- Move the slider from All to 12 months, 6 months, or 3 months depending on your mailbox size.
- Click Next.
- Then Finish and restart Outlook.
Note: Older emails removed from the local OST file are still available on the mail server and can be accessed through OWA – Outlook Web App. Alternatively, if you need to keep the full sync range, see our guide on how to increase the OST file size limit in Outlook.
For more details about managing large OST files, read: OST file reached the maximum size.
Method 8 – Archive Old Emails to Reduce Mailbox Size
The Archive feature in Outlook moves your older emails from your active mailbox to a new PST file. This reduces your mailbox size as well as your OST file size. It can help fix slow synchronization problems in Cached Exchange Mode. Here’s how to do:
- Go to File > Info >Tools.
- Click Clean up old items.
- Choose the folder you want to archive.
- To archive the entire mailbox, select the top‑level folder.
- Under Archive items older than, set a date.
- Emails older than this date will be moved to the archive file.
- Choose the location to save the PST archive file.
- Click OK.
After archiving, you can also compact the OST file to recover unused space. Read: Compact Outlook OST File
Note: In Outlook 2016/2019, the path is File > Info > Tools > Clean Up Old Items.
Method 9 – Find and Disable Faulty Add-ins
Incompatible or corrupted add-ins can also interfere with mailbox synchronization and stop folders from updating correctly. To check this, you can try to open Outlook in Safe Mode. It temporarily disables all the add‑ins. If everything works fine in safe mode, then it is clear that any add-in is responsible for the problem. You can identify and disable the problematic add-in. Here’s how:
Step A — Open Outlook in Safe Mode
- Close Outlook completely.
- Press Windows + R.
- Type outlook.exe /safe.
- Press Enter.
- Check if your mail folders are updating correctly in Safe Mode.
- If Outlook works normally, an add-in is causing the problem.
Step B — Disable Problematic Add-ins
- Open Outlook normally.
- Go to File > Options > Add-ins.
- Select COM Add-ins from the dropdown menu.
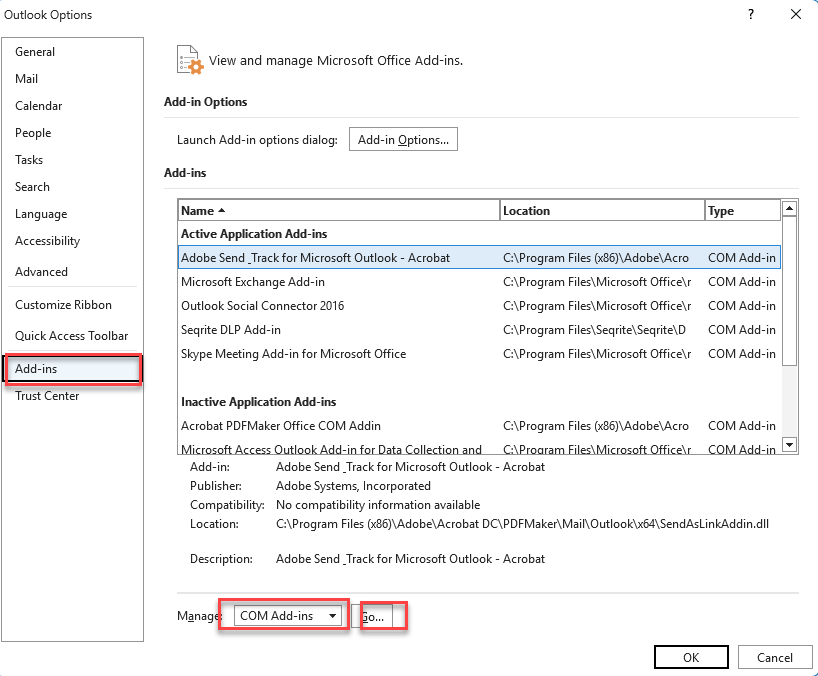
- Click Go.
- Uncheck all add-ins.

- Click OK.
- Restart Outlook
- Check if synchronization works correctly.
- Re-enable the add-ins one at a time to identify the problematic add-in. Once you find the faulty one, disable it.
Note: Antivirus add-ins, CRM tools, and PDF converter plugins are common causes of Outlook sync issues.
Method 10 — Create a New Outlook Profile
The corrupted or damaged Profile can also prevent your Outlook from connecting, and can lead to sync errors. In this case, you can create a new profile. It replaces the corrupted settings, which can help to resolve such a sync issue.
Note: Your old Outlook profile and OST file are not deleted automatically. You can remove the old profile later if the new one works correctly
For detailed instructions, read: Create a New Outlook Profile.
Method 11 – Recreate the OST File
The OST file corruption can also cause Outlook to fail to synchronize the mailbox data. When it happens, it impacts folders, which may result in sync errors, and you may even fail to receive emails. In this case, you can recreate the OST file. If you delete or rename your OST file, the Exchange server automatically recreates it. Here’s how:
Note: Before following the steps, make sure all mailbox data is available on the Exchange Server or backed up safely.
- Close Outlook completely.
- Press Windows + R.
- Type %localappdata%\Microsoft\Outlook.
- Find the OST file associated with your email account.
- Right-click the file and rename it by adding .bak at the end.
- Now restart Outlook.
- A new OST file will be created automatically.
- Wait for a few minutes for Outlook to finish downloading mailbox data from the server.
- Then check whether mail folders are now updating correctly.
Note – Large mailboxes – 10 GB or more – may need 1–3 hours to sync after recreating the OST file. You can continue using Outlook during this time — emails will appear progressively as folders sync from the server.
If your OST file contained mailbox items that are not synced to the server, or your OST file becomes orphaned, then you can use Stellar Converter for OST. This tool can convert your data file to PST and recover all your mailbox items.
For detailed steps, see: Recreate the Outlook Data File (OST)
Method 12 – Force Sync via Exchange Management Shell (IT Admins Only)
If multiple users in your organization are experiencing synchronization problems, then an Exchange administrator can check and fix the mailbox connectivity issue directly from the server using Exchange Management Shell. Here’s how:
- Open EMS – Exchange Management Shell – as Administrator.
- Run the following command to check mailbox synchronization details:
- Get-Mailbox -Identity “user@domain.com” | Get-MailboxStatistics | fl DisplayName,LastLogonTime,TotalItemSize
- This command shows the user’s mailbox name, last login time, and mailbox size.
- Verify that Cached Exchange Mode is enabled in the user’s Outlook profile.
- Run the following command to test MAPI connectivity:
- Test-MAPIConnectivity -Identity “user@domain.com”
- If the connectivity test fails, then check the Exchange Information Store service and restart it, if required.
For more information, check this Microsoft Document.
Note: This method is intended only for Exchange administrators managing enterprise mail environment.
Conclusion
Outlook failing to update folders in Cached Exchange Mode is almost always fixable without data loss. Start with Method 1 (Work Offline) and Method 3 (/cleanips) — these two alone resolve the majority of sync issues in under 5 minutes. If the problem is OST-related, Methods 7 and 8 reduce the file size and restore sync performance. For persistent failures where the OST file is inaccessible or severely corrupted, Stellar Converter for OST can extract all mailbox data to PST format without needing a live Exchange Server connection.
FAQ