Imagine this: You plug in your camera after a long shoot or insert your phone’s SD card into the PC… and instead of reliving your memories, you’re hit with an error: “SD card is full or not accessible.” No preview, no copy, no delete. Just a sinking feeling that your photos might be gone.
Puzzled, you check and see plenty of free space, yet you can’t take any photos. If an SD card shows this error despite having space, it’s a clear sign the card is corrupted but you don’t need to stress. We are here for you. This guide below walks through the following methods, step-by-step instructions on how to fix it and the real reasons why it happens in the first place.
- Try the SD Card in Another Device or Computer
- Clear Cached Data and Show Hidden Files
- Remove Write Protection or Lock
- Run CHKDSK to Repair File System Errors
- Change the SD Card Drive Letter
- Use Windows Built-in Error Checking Tool
- Format the SD Card (Last Resort)
7 Proven Methods to Fix the “SD Card is Full or Not Accessible” Error
Below are step-by-step fixes you can try. Have a go at them one by one until the SD card becomes accessible to you again. Just be sure that you back up any important files (photos, etc.) on the card before attempting fixes that modify it.
Method 1: Try the SD Card in Another Device or Computer
First, just check whether the problem is in the card or the device. Sometimes, a camera or phone won’t read a card but a computer actually will:
- Remove the SD card and insert it into another camera or phone or use an SD card reader on a PC.
- If the card can be read in the other device, copy all your files off the card immediately onto your computer or maybe another safe location.
- If the card is still unreadable, you can maybe try using a different card reader and see if that works for you.
Doing this can clear many issues. If the card works fine in another device or a different card reader, you’ve likely reached the root cause of the issue.
Method 2: Clear Cached Data and Show Hidden Files
On smartphones and computers… clearing cached or hidden files can sometimes refresh storage indexing and can help you get rid of the error. Here’s how you can do that:
On Android phones:
- Go to Settings > Storage.
- Look for an option like Cached data or Cached data (internal).
- Tap it and confirm to clear cached data.
This helps you to manage storage space in Android and removes temporary files that might be filling up space.
On Windows PCs:
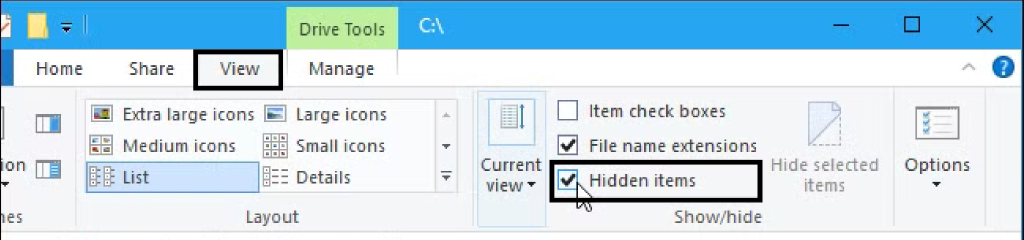
- Open File Explorer and enable viewing hidden files.
- In the View tab, check Hidden items.
- Else, just go to Options > Change folder and search options.
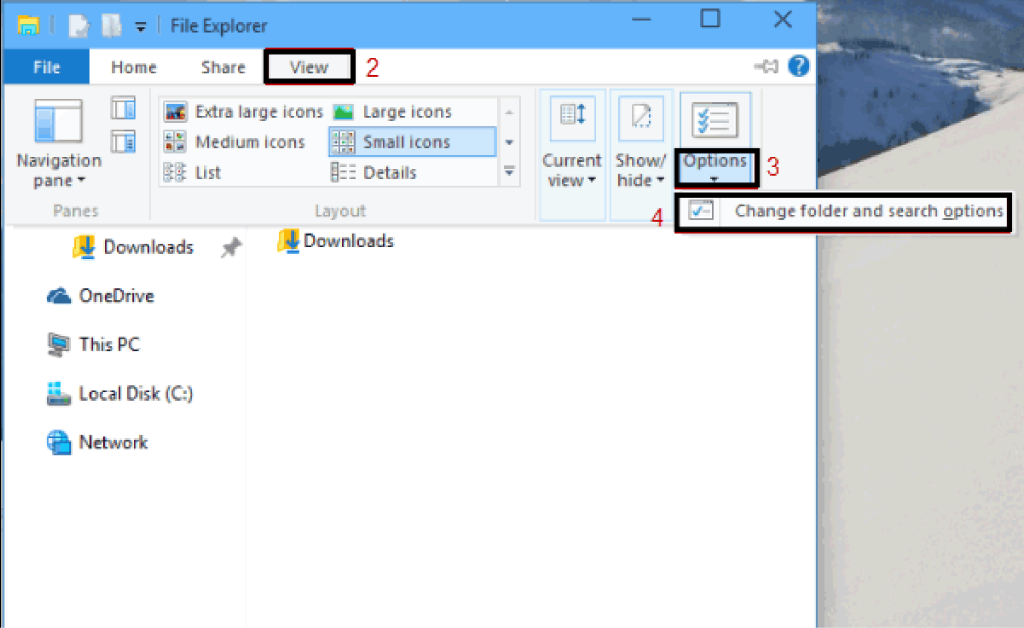
- In the View tab, select “Show hidden files, folders, and drives.”
- Browse the SD card and delete any obvious junk or hidden folders, for example, empty.Trash-1000 or those .temp folders.
By cleaning out these hidden/junk files, you free up space and may resolve the “full” error. After doing this, eject and reinsert the card to see if it’s accessible.
Method 3: Remove Write Protection or Lock
A locked or write-protected card will not allow writing new data, so the device may report it as “full” or inaccessible. To fix this:
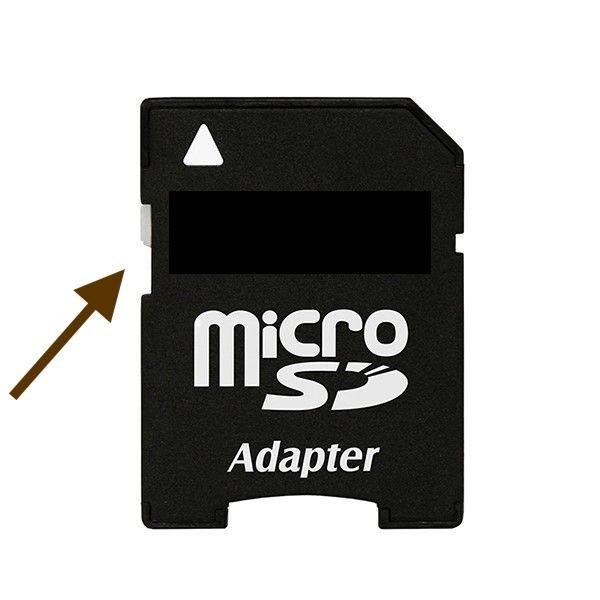
- Unlock the physical lock switch: If you’re using one of those full-size SD card adapters for a microSD card, just slide the tiny switch to the unlocked (up) position. On phones or cameras, check those device settings to make sure your card isn’t software-locked.
- Use DiskPart on Windows:
- Insert the card into your PC.
- Open Command Prompt as Administrator from Start Menu, then type diskpart and press Enter.
- In DISKPART, type list disk and hit that Enter key to see all those disks.
- Identify your SD card by its size.
- Then type select disk N where N is the card’s number.
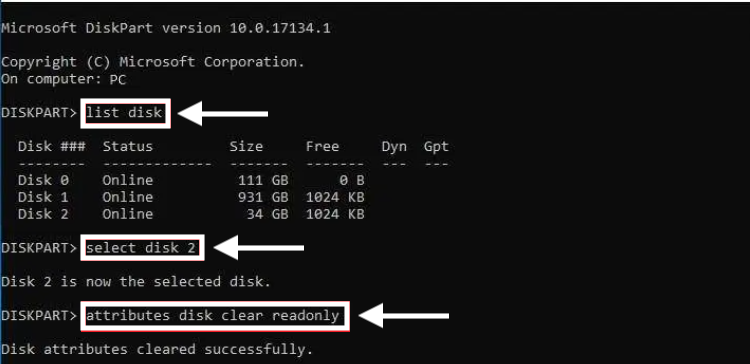
- Finally, just run the command attributes disk clear readonly. This just clears the read-only flag on the card.
Unlocking the adapter switch and using those DISKPART commands above can remove write protection. After doing this, try copying a file onto the card and see if it now accepts data or not.
Method 4: Run CHKDSK to Repair your File System
Windows has got a command-line tool called CHKDSK that is known to scan and fix file system errors, if any exist. It’s quite effective if the SD card file system is corrupted:
- Connect the SD card using a built-in slot or maybe one of those after-market card readers and just note its drive letter (e.g. E:).
- Launch Command Prompt as Administrator (right-click Start, search it and choose it).
- Here, go ahead and type chkdsk e: /r (write your card’s actual drive letter in place of E). The /r switch in this tells CHKDSK to locate those bad sectors and recover readable information from it.

- Press Enter. CHKDSK will now scan the card and actually attempt to fix errors.
- When it finishes, just close Command Prompt and check the card again like you normally do.
CHKDSK basically repairs logical damage on the card so that it becomes accessible again. If the command reports it fixed errors, just safely eject and test the card. But using CHKDSK might result in a data loss scenario… so having a photo recovery tool beforehand can come in handy.
Method 5: Change the SD Card’s Drive Letter
Sometimes, Windows assigns a drive letter that conflicts with another device. Changing it can resolve access issues:
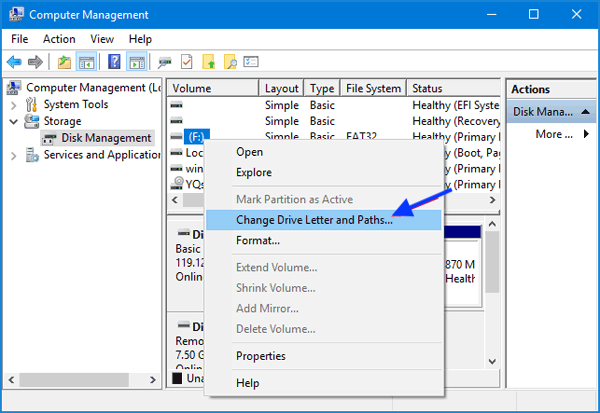
- Press Windows+X and select Disk Management.
- In the Disk Management window, locate your SD card’s partition. Right-click on it and choose “Change Drive Letter and Paths…”.
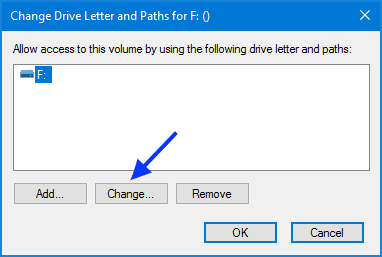
- Choose that drive and click Change.
- Then pick a different (unused) drive letter from the drop-down. Click OK to apply.
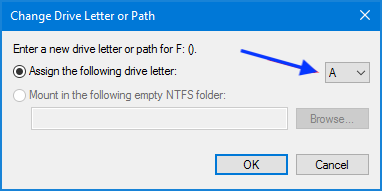
- Confirm any warnings. Once the letter is changed, check if the card becomes accessible with the new letter.
This simple fix can sometimes make Windows recognize and open the card properly.
Method 6: Use Windows’ Built-in Error-Checking Tool
Windows Explorer includes an easy drive repair tool that can find and fix errors on the SD card:
- Open File Explorer through the taskbar and hit This PC from the navigation bar on the left.
- Right-click that SD card drive in there and choose Properties.
- Go to the Tools tab as shown in the screengrab below. Under Error checking, just click Check.
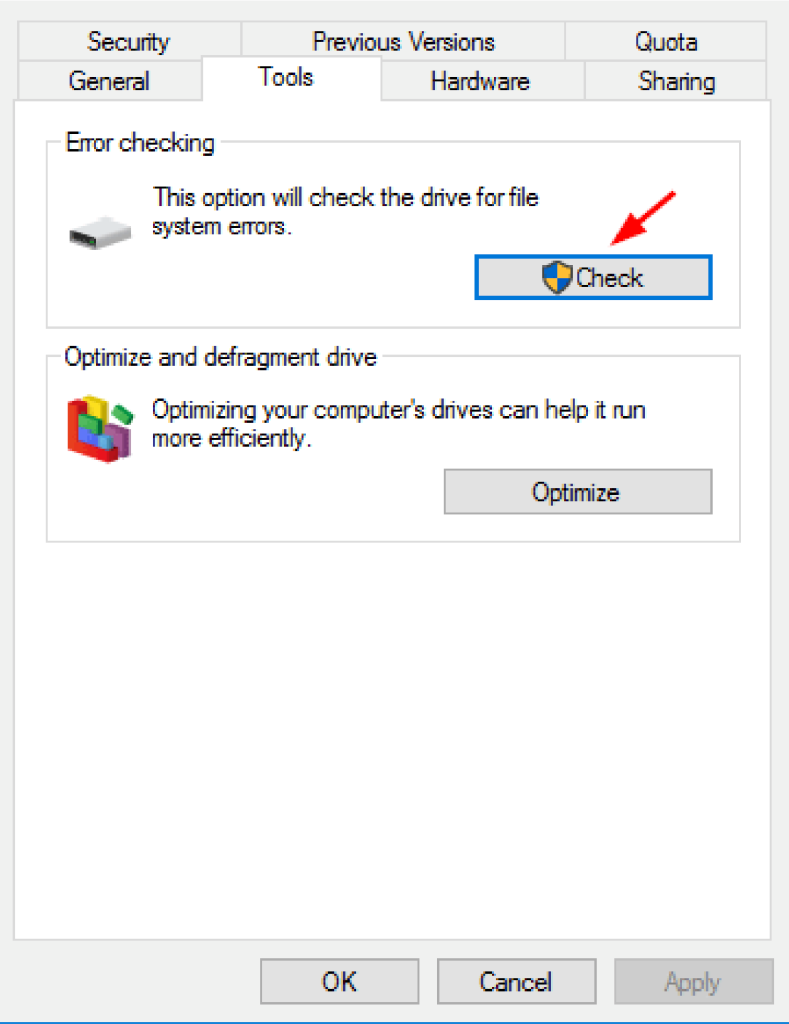
- In the dialog, hit that “Scan and repair drive” button and start the fixing process.
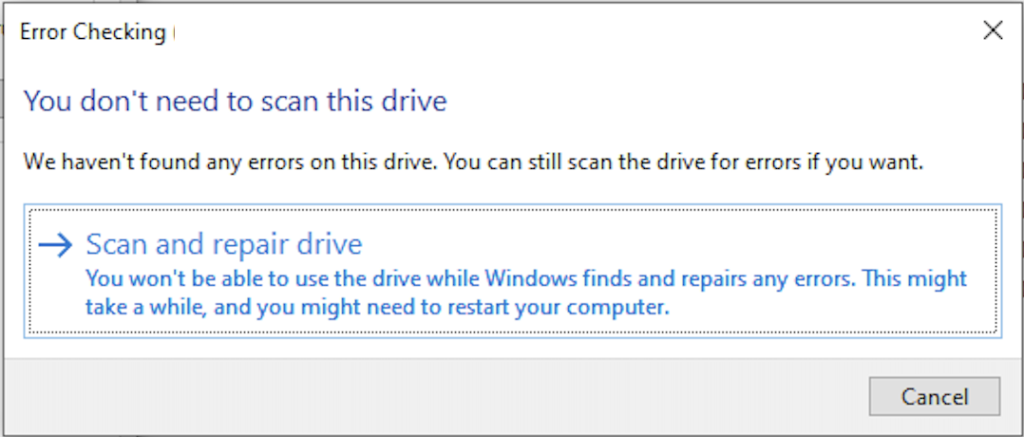
- Let Windows scan the card as it will now attempt to fix any file system errors. Once done, just close those dialogs and try to use the card again.
It can often repair minor corruption without needing those not-so-easy command line tools.
Method 7: Format the SD Card (Last Resort)
If none of the above methods work, go ahead and format the SD Card as it may just be necessary for you.
Warning: This erases all data on the card so just be sure your files are backed up first.
Here are the steps:
- In Windows, open Disk Management or File Explorer.
- Right-click the SD card partition and choose that Format option.
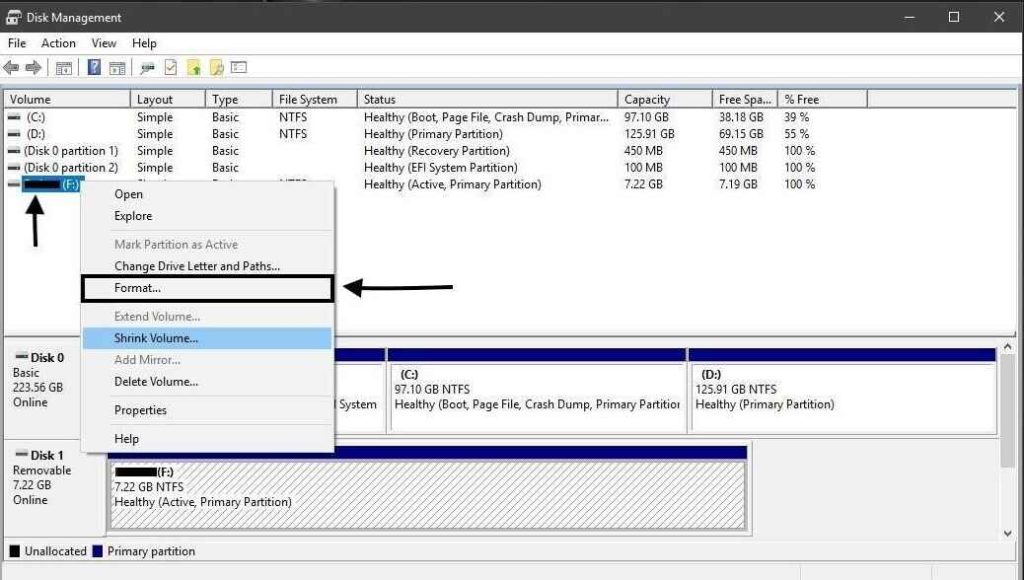
- Choose a File System (for most camera cards use FAT32 or exFAT). You can enter a name as a Volume Label.
- Check that Perform a quick format option and click OK to start formatting.
Pro Tip: If your camera shows these “card full” errors continuously, back up and format the card inside the camera after every major shoot instead of deleting files individually.
Lost Files After SD card Formatting or Corruption?
After formatting completes, the card will be blank and its file system reset. This often fixes any lingering logical issues. Reformatting is actually just the last resort when the card won’t work. However, if your SD card was badly corrupted or if you already formatted it, your photos might be gone from your hands.
If this day comes, don’t overthink and consider using a professional photo recovery tool. Stellar Photo Recovery is once such powerful photo recovery software that is specifically designed to restore those photos from damaged or formatted SD cards. So if you formatted the card without a backup, it shall comb through those memory sectors and bring your lost pictures back. Don’t worry about the SD card brand as it supports SD cards from Samsung, SanDisk, Transcend, Kingston, Polaroid etc. It can safely recover pictures from SD/SDHC/SDXC cards, USB drives and other devices too. This photo recovery tool can be an actual lifesaver if your memories are at stake.
Why the “SD card is full” error happens? Probable Causes for the SD Card Error
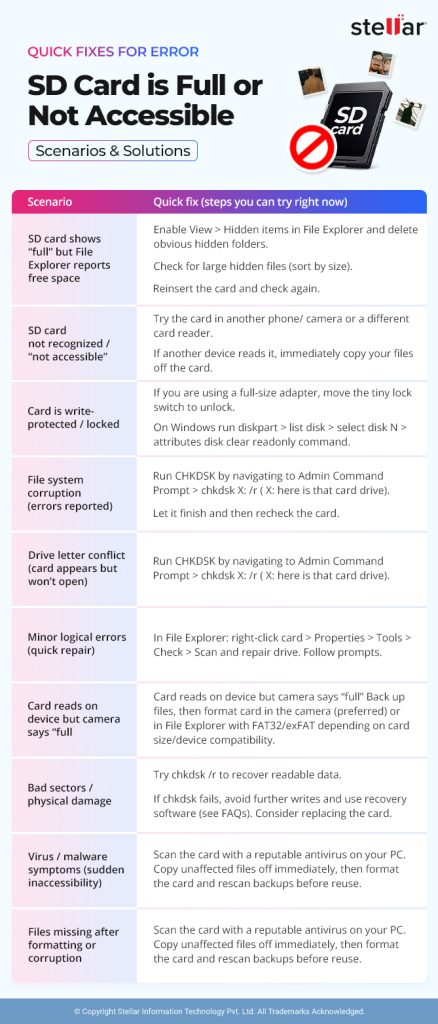
The “full or not accessible” message can come from many issues. Common causes include:
- Card truly full: The SD card may actually not have any free space left.
- Hidden or cached files: Leftover or system files may be occupying that card space.
- File system corruption: Errors or improper formatting can also corrupt the card’s file system and then the card might end up unreadable.
- Bad sectors/Physical damage: Physical shocks or those manufacturing faults can also damage those memory chips and end in bad sectors.
- Virus or malware: Infections of virus can damage the card’s data structures and prevent you access to your stuff.
- Locked or write-protected: A card with a locked switch or read-only flag will maybe appear full as no new data can be written on it due to that protection.
- Wrong format or incompatibility: If your card is formatted in a file system that the device can’t read e.g. NTFS on a camera, it will probably seem like it is inaccessible.
Knowing these causes in your kind helps you to choose the right fix.
Preventive Measures to Avoid “SD Card is Full or Not Accessible”Error
To make sure you don’t see this “SD card is full or not accessible” error in the future, follow these simple preventive steps:
- Always remember to eject the SD card safely before removing it from any of the devices.
- Back up your important files timely and regularly to avoid loss of data.
- Format the SD card in the device you primarily use, camera or phone, always.
- Avoid filling the card completely… ensure some free space is available.
- Use high-quality SD cards from trusted brands like SanDisk and Seagate.
- Scan that SD card of yours for viruses or malware periodically.
- Go ahead and replace the card if you notice it is giving frequent errors or slow performance.
- Protect your card from physical damage, heat and moisture as well.
By following these precautions, you can reduce the chances of corruption and keep your SD card working smoothly.
Conclusion
Getting the “SD card is full or not accessible” error is frustrating for sure but it’s actually quite fixable. First check if that card really has space, then try simple steps like using in another device, clearing local caches, or even running Windows repair tools. Use CHKDSK or maybe change the drive letter as well. As a last resort, just format the card after backing up data of yours. If photos or files do go missing, then photo recovery software can actually bring them back. Always remember… eject your SD card safely, keep backups of important files and keep scanning for malware every now and then. With these precautions and fixes in use… you can basically troubleshoot the error and avoid losing your valuable photos.