Losing files on a Mac that has FileVault enabled raises an immediate question – can you still recover them? Generally speaking, yes. Most often, it’s not encryption that stops recovery. With a Mac that is operational (and where you can sign in), what you can recover depends on where the files lived: data in backups, local snapshots, and iCloud is usually safe, but files deleted from the internal SSD are often cleared within seconds and can’t reliably be recovered by software. Even if you’re dealing with an encrypted external drive, recovery is usually possible as long as you know the password.
The real challenge is knowing what to do next – and acting quickly. This guide explains how to recover data from an encrypted Mac, whether you need to recover deleted files from an encrypted Mac, regain access to a locked system, or restore files from backups and snapshots. There are two situations this guide covers. If your Mac is running and you can sign in, jump straight to the recovery methods for deleted or missing files. If you’re locked out of the Mac entirely, start with the unlock methods first then return to recovery.
Does FileVault Affect Data Recovery?
Yes, if you can still sign in, FileVault doesn’t block recovery, because macOS decrypts the drive for your session. The real limit on a modern Mac is its SSD: deleted files on the internal drive are often wiped within seconds by TRIM, so local snapshots and Time Machine backups are usually more reliable than recovery software. An external encrypted drive is recoverable as long as you have its password.
A feature of macOS is that you must allow Full Disk Access (System Settings > Privacy & Security > Full Disk Access) to the software before it can even scan the drive.
The situation changes if the Mac is locked. If you cannot sign in, recovery software cannot access the encrypted startup volume because the data remains locked behind FileVault encryption. In that case, the first step is not recovery, it is regaining access to the Mac. You’ll need to unlock the system using your FileVault recovery key or an Apple Account recovery option if it was configured when FileVault was enabled.
How to Recover Data from a FileVault Encrypted Mac?
Before you send your Mac to a recovery lab, try these solutions first. Many FileVault data loss cases are actually caused by macOS failing to load properly, even if the data itself is still safe on the drive.
| | Mac is accessible (you can sign in) | Mac is locked (you can’t sign in) |
| First step | Stop using the Mac, then start recovery right away | Regain access first using your FileVault recovery key or Apple Account |
| Does FileVault block recovery? | No. macOS decrypts the drive for your session | Yes. The startup volume stays locked until you unlock it |
| Deleted files on the internal SSD | Often already cleared by TRIM, so act within minutes | Not reachable by any software until the Mac is unlocked |
| Unlocked external drive | Recoverable with the correct password | Recoverable with the password (no Mac sign-in needed) |
| Backups, snapshots & iCloud | Restore from Time Machine, APFS snapshots, or iCloud | iCloud works in a browser; local backups need the Mac unlocked |
| Where to start | Methods 1–5 | Unlock methods, then Methods 1–5 |
Case 1: Your Mac is Accessible
When your Mac works as normal and you are able to log into it, you are in the best possible position for data recovery. At this point, FileVault isn’t the issue. First, find out what happened to those missing files before doing anything else that could lower the chance of recovery.
If the files were deleted, disappeared after an update or computer crash, and you don’t have a backup – follow Method 1. If none of these conditions apply, the other methods listed below can help recover files from backup systems, snapshot locations, cloud storage, and application specific recovery folders.
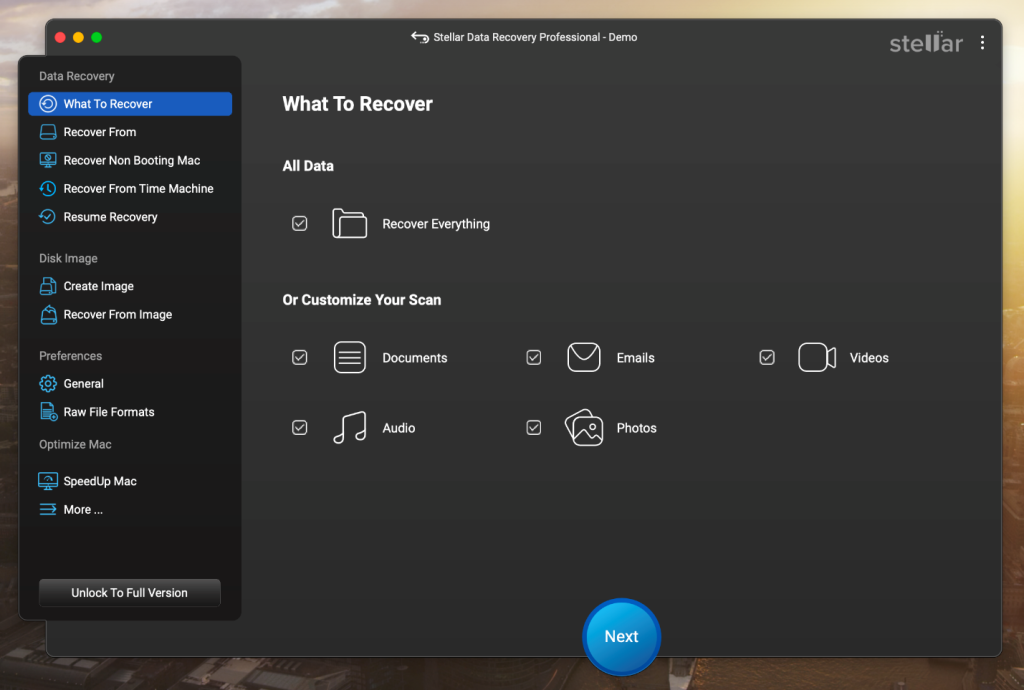
1. Use Data Recovery Software
This method is best for files deleted from Finder, data lost after a macOS crash or update, emptied Trash folders – or any situation where files are missing and no usable backup exists. For most readers trying to recover deleted files from an encrypted Mac, this is the place to start. The method also applies if you want to recover data from an encrypted external drive, all you’d need is the correct password.
The good news is that when your Mac is running and you’re signed in, FileVault data recovery works much the same way as recovery on an unencrypted drive. macOS has already decrypted the startup volume for your session, so Stellar Data Recovery for Mac can read the drive normally. The only extra requirement is granting Full Disk Access so macOS allows the software to perform a complete scan.
- Download, install, and run the software on your Mac.
- On the What to Recover screen, choose the file type you wish to recover and click Next.
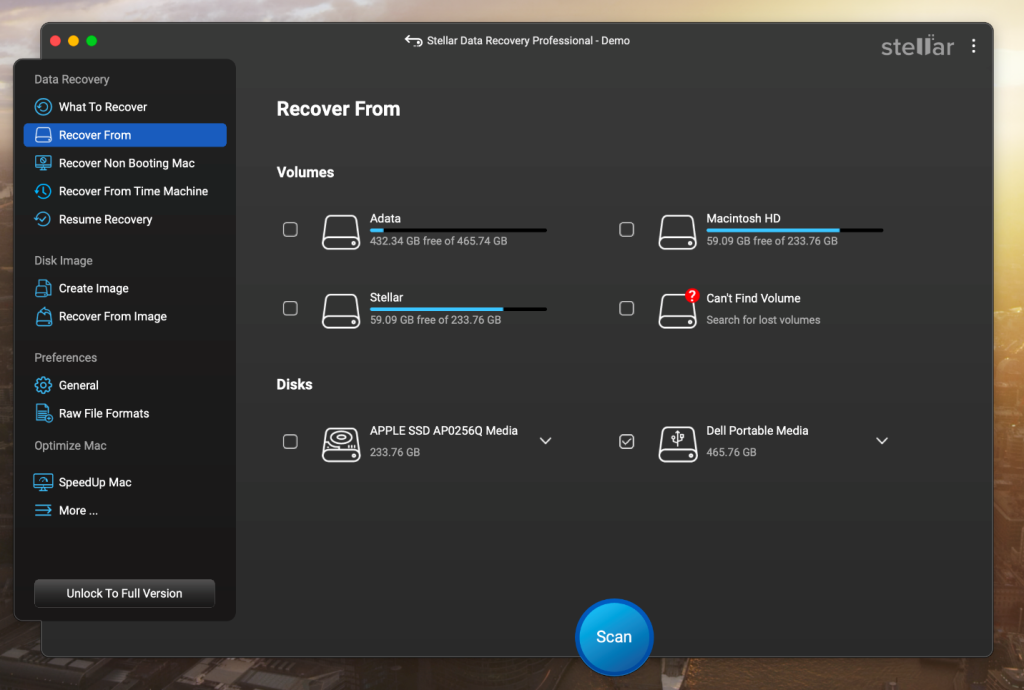
- Then choose the drive to recover from and click Scan.
- The recovered files will be shown for you to Preview.
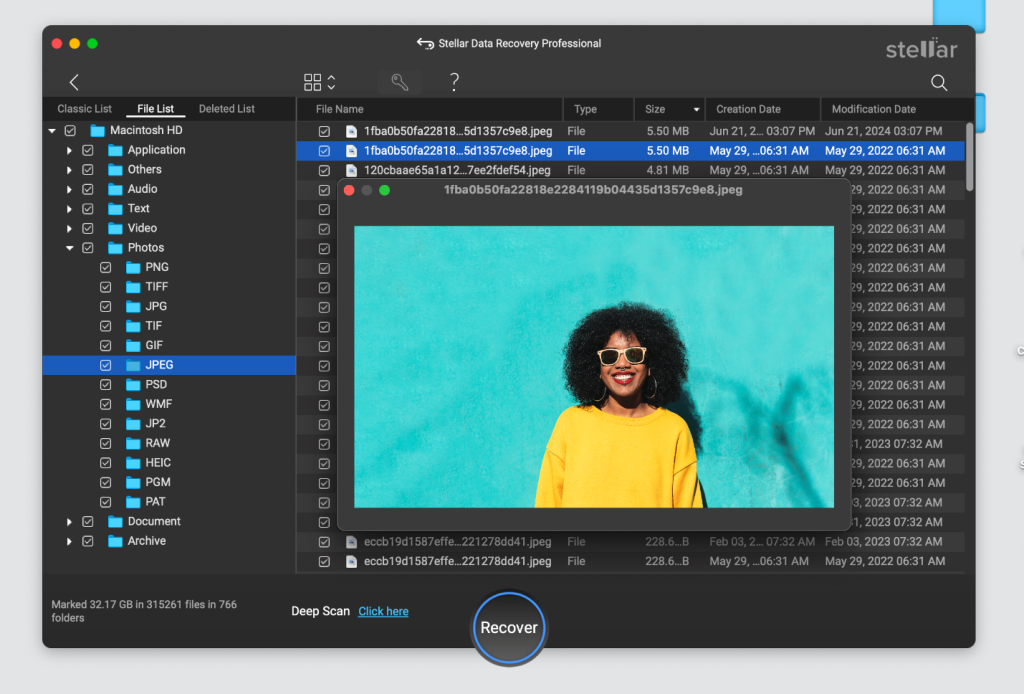
- Choose the files you need and click on Recover to transfer them back to your preferred destination.
2. Restore from Time Machine Backups
This method is the most reliable way to recover your files if you have already enabled Time Machine backup on your system. Unlike recovery software which depends on whether the original data still exists on the drive, Time Machine restores files from a copy that was already saved before the deletion occurred.
- Connect the Time Machine backup drive to your system.
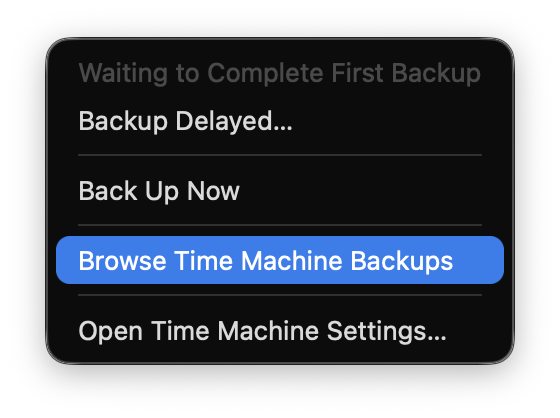
- Click the Time Machine icon in the menu bar.
- Select Browse Time Machine Backups.
- Use the timeline to navigate back to a date before the file was deleted.
- Select the backup files/folders you want and click Restore.

- The file will return to its original location.
One of the most common misconceptions about FileVault – It does not back-up or encrypt Time Machine backups. Separate choices are made to enable encryption for each backup. In addition, if your Time Machine backup is in an un-encrypted state, then it may be accessed from any mac by simply opening the backup. However, if you have enabled encryption for your Time Machine backup, you will require the backup password (and not your login information) to open it.
3. Recover from iCloud Recently Deleted
If your missing files were stored in iCloud Drive and synced before the deletion – you may be able to restore them in just a few minutes. This method works entirely through a web browser, which means it can help even if you’re trying to recover data from a locked encrypted Mac.
- Go to iCloud.com and sign in using your Apple ID.
- Click Drive and open the Recently Deleted folder.
- Select the files you want to restore and click Recover.
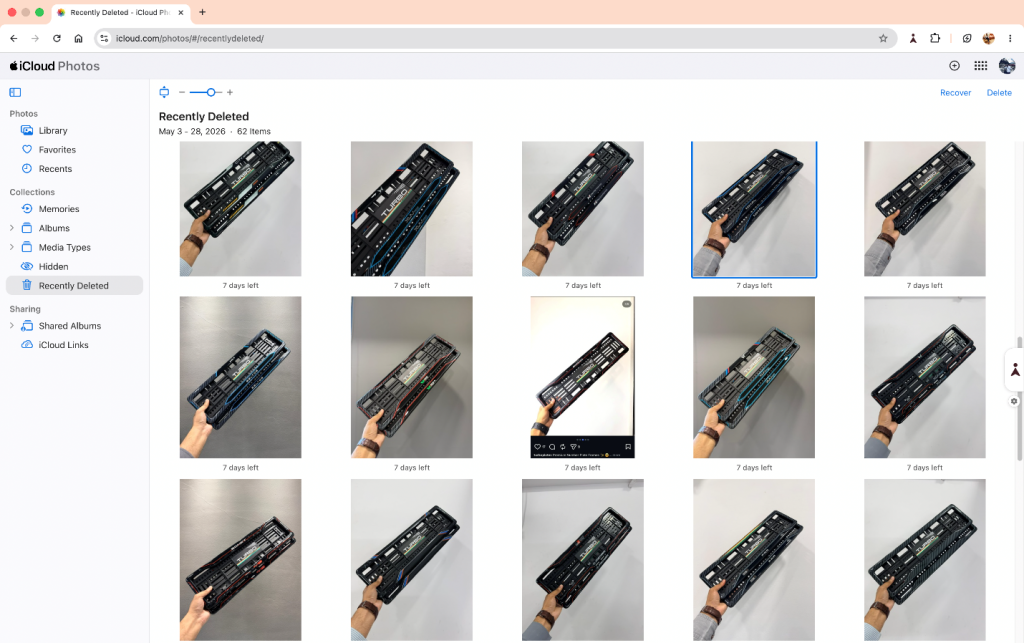
iCloud keeps deleted files for 30 days before clearing them permanently, which gives you a reasonable enough window to act. Similarly, other cloud storage providers like Google Drive, Dropbox, and OneDrive have their own “deleted items” folder with comparable retention periods that you can check.
4. Restore from APFS Local Snapshots
Many of those who use Macs are not aware that Time Machine can store local snapshots on an internal drive with no connection to an external (backup) drive. The snapshots are used for short term restore points and may allow you to quickly recover data that was lost or deleted in the last 24 hours. Hourly snapshots will be saved locally to the internal drive by default while Time Machine is enabled.
- Open terminal on your Mac.
- Type the following command and press Return:
tmutil listlocalsnapshots /
- A list of snapshots with timestamps will be displayed. For example: com.apple.TimeMachine.2026-05-28-155033
- Identify the one from before deletion.
- Open Finder and navigate to the folder that originally contained the deleted file.
- Click the Time Machine icon in the menu bar.
- Select Browse Time Machine Backups.
- Use the timeline to navigate to the snapshot timestamp you just identified.
- Select the file and click Restore.
5. Check App-Specific Recently Deleted Folders
Not every deleted file ends up in the macOS Trash. Photos, Notes, Mail, and Messages each maintain their own Recently Deleted folders – completely separate from Trash.
Photos
Deleted photos & videos are moved to the Recently Deleted album which stores them for 30 days before permanently removing them.
- Open the Photos app.
- Select the Recently Deleted folder.
- Select the photo or video you want.
- Click Recover.
Notes
Deleted notes are kept for 30 days in a dedicated Recently Deleted folder.
- Open the Notes app.
- Go to the Recently Deleted folder.
- Right-click the note you want to recover and select Move To.
- Choose a folder to restore it.
Mail
Deleted emails are moved to the Trash mailbox within Mail – separate from the macOS system Trash entirely.
- Open the Mail app.
- Find and click Trash.
- Right-click on the email you want to recover and select Move To.
- Choose the destination folder.
Messages
Messages keeps deleted conversations in a Recently Deleted folder for up to 30 days (Apple added it in macOS Ventura), so you can usually restore them in a few clicks. .
- Open the Messages app.
- Go to Edit > Undo immediately after deletion (this only works within the same session).
- If that window has passed, check your most recent Time Machine or iCloud backup.
Case 2: Your Mac is Locked
The challenge is completely different when your Mac doesn’t let you sign in. When the encrypted volume remains locked, it means that no recovery software can access the data yet. You must regain access to your Mac before you can recover anything.
The next two methods focus on exactly that: using a FileVault recovery key or an Apple Account recovery option to unlock the Mac and reset the password. Once you’re back in, return to Methods 1-5 to recover your files.
1. Unlock the Mac with a FileVault Recovery Key
If you’ve been locked out of your Mac, the FileVault recovery key is usually the fastest way back in. Once the Mac is unlocked, you can return to Methods 1–5 and recover any deleted or missing files. If you’re looking for the key, check your password manager, any printed records created when FileVault was set up, or your IT administrator if the Mac is managed by an organization. On macOS Tahoe 26 and later, it may also appear in the Passwords app on another device signed in to the same Apple Account. Search for “recovery key” there.
If You Can Reach the Login Screen
The exact screens vary very slightly depending on the Mac model and macOS version, but the process is generally the same.
- Restart your Mac.
- Enter an incorrect password three times or click the question mark in the password field.
- Follow the prompts to reset the password.
On recent Apple Silicon Macs, you’ll usually see Restart and show password reset options, which reboots the Mac into Recovery. On some older Intel Macs, the recovery key field may appear directly at the login screen.
- When prompted, enter the FileVault recovery key.
- Create a new password.
- Sign in normally.
If the Mac Will Not Reach the Login Screen
If the Mac never gets to the sign-in window, you’ll need to start macOS Recovery manually.
Intel Mac: Restart and immediately hold Command + R
Apple Silicon Mac: Shut down your Mac. Press the Power button until Startup Options appear. Select Options and continue
A common point of confusion on Apple Silicon Macs is that Recovery may ask for a user password. If you don’t know the password, click Forgot all passwords? That is where the FileVault recovery key is used. If you reach the Recovery desktop:
- Open Utilities > Terminal.
- Type resetpassword and press Return.
- Select the startup volume.
- Choose I forgot my password.
- Enter the FileVault recovery key.
- Create a new password and restart the Mac.
Once unlocked, go back to Methods 1-5 to recover your files.
2. Unlock the Mac with Your Apple Account
If you don’t have the FileVault recovery key, you may still be able to regain access using your Apple Account. This works only if the iCloud unlock option was configured when FileVault was originally set up.
That requirement is important: Apple Account unlock cannot be added later without reconfiguring FileVault. If it was never enabled and you don’t have a recovery key or backup, skip ahead to When Recovery Is Not Possible.
- Restart the Mac and connect to the internet.
- Enter an incorrect password three times or click the question mark in the password field.
- Select “If you forgot your password, you can reset it using your Apple ID.”
- Follow the prompts to reset the password.
- Restart your Mac.
- Log in using the new password.
- Once access is restored, return to Methods 1-5 to recover your files.
How to Prevent Encrypted Mac Data Loss?
Recovering lost files can be stressful for the average user. A few simple habits can save hours of stress and dramatically improve your chances of getting data back if something goes wrong.
- Store your FileVault recovery key in a password manager and keep a printed copy in a secure location.
- When setting up FileVault, choose the option to allow password recovery using your Apple account.
- Set up Time Machine and let it run automatically to recover files in instances of accidental deletion, hardware failure, or software problems.
- Unexpected shutdowns during macOS updates can leave startup volumes in an inconsistent state and trigger errors like “Macintosh HD Can’t Be Unlocked.” So, make sure the updates don’t get interrupted.
Wrapping Up
Losing files from an encrypted Mac can be alarming, but in most cases, encryption is not what prevents recovery. If your Mac is accessible, stop using it immediately and start the recovery process as soon as possible – the best recovery results are usually achieved in the first hours after data loss.
If you’re locked out of the Mac, try getting back in with either a FileVault Recovery Key or Apple Account Recovery Option. You may also be able to restore files from iCloud or an existing Time Machine backup without unlocking the Mac at all.
For deleted files, emptied Trash folders, and data loss without a backup, Stellar Data Recovery for Mac provides one of the most effective ways to scan an encrypted Mac and recover missing data before it’s permanently lost.
FAQs