Any iMovie experts out there? I have a long video of my granddaughter doing a dance at her dance school and want to trim it to just her 3-minute dance. It came as a 1080p MP4. Loaded it into iMovie and managed to trim it to the required part and exported it. Problem is, the clip is playing the video element very choppy and jerky. Audio is fine.- Anonymous User
Often, MacBook users complain about choppy 4k videos in iMovie, usually after editing or during transfer. Many believe the reason behind this is the frame rate of the entire editing project. In iMovie, you can’t set the frame rate manually; it is done automatically by the application.
If you’ve been facing a similar issue, there’s no need to worry. You can fix it using some easy methods.
A quick checklist before fixing “Choppy Playback in iMovie”
Before you dive into complex fixes, try this quick troubleshooting checklist.
- Close iMovie on your iPhone or Mac and relaunch it.
- Reboot your Mac or iPhone.
- Try playing the same clip in QuickTime or the Photos app to rule out file corruption.
- Check storage space, free up at least a few gigabytes, and then relaunch the app.
- Close background apps and browser tabs that use memory and relaunch the app.
What’s the Primary reason for iMovie playing choppy videos?
Apple’s iMovie application sets project frame rates and formats automatically. While this adds convenience for users, it can cause mismatches with your video clip’s default settings. Let’s understand this with an example – Suppose you shot a video on your camera, and the output was 4K at 60 frames per second. However, the iMovie app defaulted to a lower project setting of 2k 30 fps, and that mismatch made playback choppy. There could be other reasons as well.
Other Reasons for choppy videos on iMovie
You already know about the frame rate limitation of the application that causes glitches in videos. Now, look at several other conditions that can cause lagging when editing video clips in iMovie.
1. Not meeting specifications
You’ll face difficulty if you’re using a MacBook with low RAM, processing power, or outdated software and drivers.
2. Excessive video effects
Adding too many effects in the clip in one go can lead to iMovie freezing during playback.
3. Heavy background load
If you’re using a web browser on a MacBook with several tabs opened or other applications running in the background, the video you’re trying to play could end up being choppy.
4. Malware attacks
If your system files or the structure of your MacBook videos changed due to a malware attack, it could hamper iMovie video playback.
5. Faulty Conversion
While converting a video file to any other format, if the process gets interrupted in between, you might face errors with video playback in iMovie.
Now, let’s move on to the methods to rectify the issue.
How to Fix Choppy Videos on iMovie?
Simply terminating an application can often resolve the glitch it was facing. Try quitting your iMovie application and re-launch it. Then try to replay the video that was witnessing choppy playback. If it still doesn’t play, try playing another video with your iMovie. If that also ends up being choppy, the problem may be in your iMovie player.
1. Update or reinstall iMovie
An outdated application can throw multiple errors, including the “iMovie video error”. Try to update your iMovie application through these steps:
- From your Apple desktop, choose the Apple Menu.
- In the drop-down that opens, click on App Store.
- When the App Store opens, navigate and click on Updates.
- If you see an iMovie update listed, click on it to download and install the update.
Post the update, try to replay the video. If it still doesn’t play, uninstall and then reinstall your iMovie.
2. Change the video’s resolution
Maybe your Mac is unable to handle 4k video editing on iMovie, so changing its default resolution can help you work better.
Follow these steps to convert the video resolution on Mac:
- Go to Finder and search for your video file.
- Right-click on the video file, and click on Open With from the drop-down list.
- Then click on QuickTime Player from the given options list.

- In the QuickTime Player, you will see the File option at the top bar. Click on it, and go to the Export As option in the drop-down list.
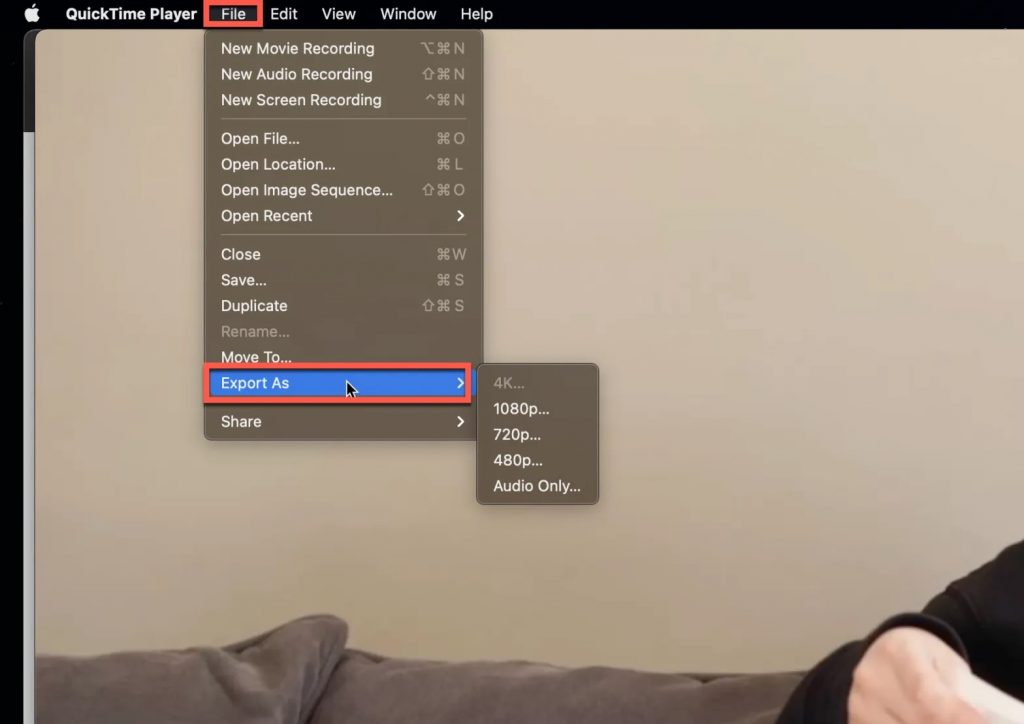
- After that, a resolution list will open to choose from.
- Pick the desired resolution, and the Export Progress dialog box will appear.
- Now drag your video file from Finder to iMovie and play it.
3. Update macOS
Just like any other operating system, macOS also needs timely updates to run applications efficiently. To have iMovie play videos without any jerk, check your Mac or iPhone settings for any available updates, and if a new version of macOS is available, download and install it. Your
4. Free up system resources
Video editing on your device, whether Mac computer or iPhone, involves huge RAM and CPU. Therefore, if you are editing a video file using iMovie on your iPhone or Mac device, ensure closing all other work and releasing system resources. Because while video editing, your device has almost negligible free RAM space and CPU. Therefore, when your system resources are in use and other applications are open in the background, it may disrupt video playback of iMovie application.
If I were in your place, I would start by closing or exiting resource intensive applications, such as, camera, Netflix, Adobe Photoshop, browser windows, and other background apps. Once all these apps are closed and not running in the background, I will re-attempt to play iMovie app once more, and the video may play again.
What to do if a video does not play in iMovie?
If you’ve tried all the above-mentioned techniques and have still not been able to fix choppy playback or freezing issue in iMovie application, there are chances that the video file is itself damaged.
Sometimes, due to incomplete download, improper editing, file conversion errors, and even file header corruption, a video file might get damaged or corrupted. If it’s a downloaded video file, you can re-download it, but if you have shot the video, or it cannot be re-downloaded from anywhere, the only solution is to fix with a video repair tool.
The free online video repair tool from Stellar can help fix video files on the go. The online tool can repair files stored in MP4, MOV, AVI, MPEG, and many others. The online tool can be accessed via any device with an active internet connection, be it Mac, iPhone, Android or Windows, that makes it very easy for individuals with no technical know-how to easily repair badly damaged videos.
All you need to do is go to the online video repair tool page, upload your damaged video file, upload a sample video file taken from the same device, hit repair and wait for the magic to happen. Within a few seconds, your corrupted video files will be repaired. You can preview the repaired files on your device and then download and save.
However, if you have a large sized video file, you can also use the desktop version of the software.
Just download, install, and launch Stellar Repair for Video on your Mac or Windows system and repeat the same process.
Similar to the online tool, once the repair process is completed, you can click on the “Preview” option to see if the repaired video is playable.
Conclusion
While you can try the above solutions to fix iMovie playback errors, some errors are caused due to damaged or corrupted video files. In that case, you can try advanced online video repair tool like Stellar Online Video Repair to help you play for video files smoothly on any player.