Exchange administrators often need to export mailboxes from Exchange database (EDB) files to PST format due to various reasons. Some common reasons include:
- To back up the mailboxes, which are not active anymore.
- To extract data from offline EDB files and access it with MS Outlook.
- To archive mailboxes.
- To migrate mailboxes to another Exchange Server or Office 365 (Microsoft 365).
Whatever be the reason, they can export mailboxes from Exchange Server database to PST by using PowerShell commands in the Exchange Management Shell (EMS) or via the Exchange Admin Center (EAC). Below, we will discuss the step-by-step process to export Exchange mailboxes to PST using the EMS and the EAC in Exchange Server 2010, 2013, 2016, and 2019. We will also mention an EDB to PST converter software that export mailboxes from Exchange EDB file (offline or online) to PST in just a few steps.
Prerequisites to Export Exchange Mailboxes to PST
You need to fulfill some prerequisites before proceeding to export the mailboxes to PST. These are:
1. Assign Permissions to the User Account
To export mailboxes to PST by using the Exchange Admin Center (EAC) or via PowerShell cmdlets in the EMS, your user account must be assigned with the Mailbox Import/Export role. By default, even the admin does not have this permission.
To assign the required permissions using the EAC, follow these steps:
- Open the Exchange Admin Center (EAC).
- After login, click on Permissions > Admin roles.

- Click on the add (+) button and create a new role.
- Assign the Mailbox Import/Export role to the new role and add the user to whom you want to assign this permission.
Alternatively, you can assign the Mailbox Import Export Role to the user using the Exchange Management Shell (EMS). For this, open the PowerShell window and run the below cmdlet:
New-ManagementRoleAssignment –Role "Mailbox Import Export" –User "<Username>"

2. Set up UNC File Path to Save the Exported PST Files
You cannot export directly to a folder (for example, C:\PSTExports). To save the exported mailboxes to PST files, you need to create a UNC file path or a shared folder location. You also need to share the created folder with Exchange Trusted Subsystem and set the permissions to Read/Write. To do this,
- Create a folder at any location on your Exchange Server.
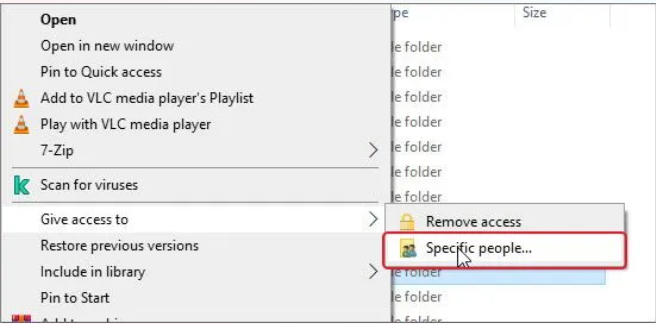
- Then, right-click on the newly created folder and select Give access to > Specific People.
- Select Everyone (not recommended) or your username (recommended) from the dropdown and click Add.
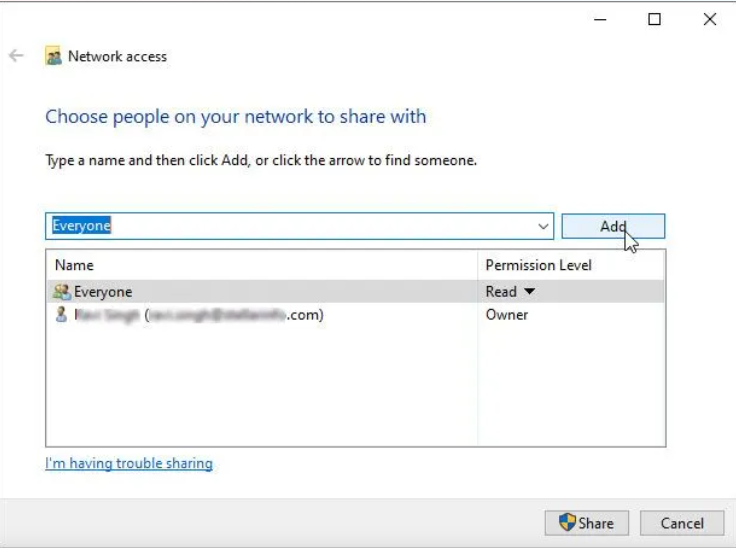
- Select Read/Write permission and click Share.
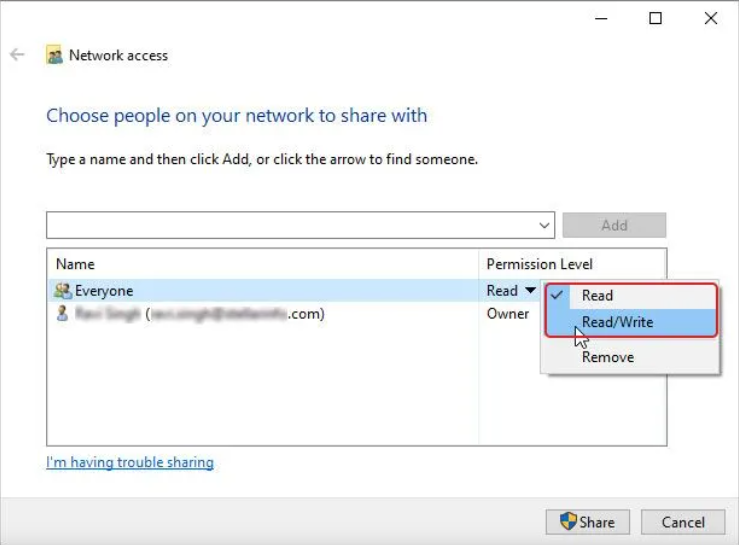
- Note down the shared network path. For example, \\exsrv\d$\pst.
Methods to Export Exchange Mailboxes to PST
After fulfilling the above requisites, you can follow the below methods to export the mailboxes to PST in Exchange Server 2019, 2016, 2013, and 2010.
Method 1: Export Exchange Mailboxes to PST via Exchange Admin Center
You can use the Exchange Admin Center (EAC) to export mailboxes to PST. However, you cannot filter content or include/exclude specific folders that you want to export. To export Exchange mailboxes to PST using the EAC, follow the given steps:
- Log in to the EAC as administrator.
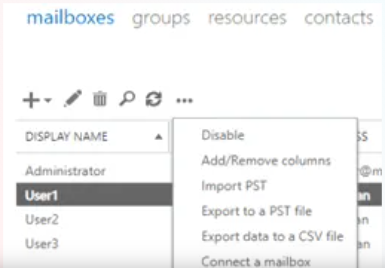
- Navigate to recipients > mailboxes and click on More options (three dots).
- Select the Export to a PST file option from the dropdown.

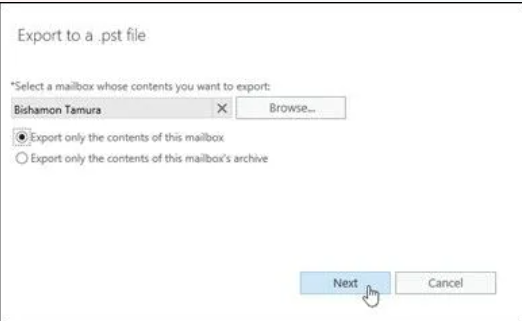
- In Export to a .pst file wizard, browse and choose the mailbox you want to export to PST and select the appropriate options to export only the contents of this mailbox or mailbox’s archive. Click Next.
- In the next window, enter the UNC path (shared folder path on the network) and the name of the .pst file. You can enter any name. Then, click Next.
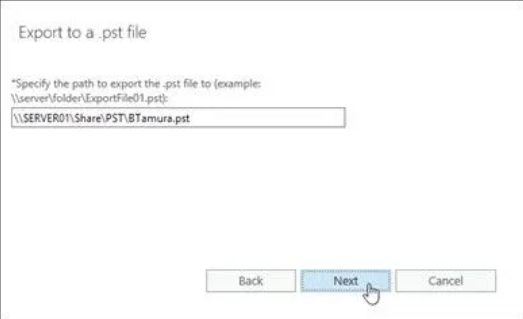
- Click Browse to select your user account. Exchange will send an email when mailbox export to PST is finished.
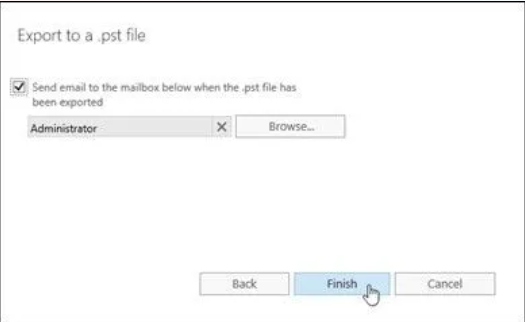
- Click ‘Finish.’ This will start the PST export.
Limitations of this Method
Exporting mailboxes using the EAC has a few drawbacks, such as:
- You cannot export specific content from the mailbox.
- There is no way to check the progress of the export process.
- You cannot export public folders.
- You can use this method if the database is mounted on the server.
Method 2: Export Exchange Mailboxes to PST using Exchange Management Shell
You can also use the PowerShell cmdlets in Exchange Management Shell (EMS) to export mailboxes to PST format. To export a single mailbox, you can use the New-MailboxExportRequest cmdlet as given below.
New-MailboxExportRequest –Mailbox testdummy –FilePath\\exsrv\d$\pst\TestDummy.pst
The above PowerShell command will export the specified mailbox to the mentioned shared folder path as a TestDummy.pst file.
Unlike EAC, while exporting, you can filter the mailbox content by using various parameters with the New-MailboxExportRequest cmdlet.
To export a particular mailbox folder to PST, you can use the –IncludeFolders parameter with the New-MailboxExportRequest as given below:
New-MailboxExportRequest –Mailbox testdummy –FilePath\\exsrv\d$\pst\TestDummy.pst -IncludeFolders “#Inbox#”
The above command will export the Inbox folder in the Exchange mailbox to PST.
You can also exclude a folder from the PST export using the –ExcludeFolders parameter with the New-MailboxExportRequest. For this, you can use the command as given below:
New-MailboxExportRequest –Mailbox testdummy –FilePath\\exsrv\d$\pst\TestDummy.pst -ExcludeFolders “#DeletedItems#”
The above command will export all the folders and mail items from the Exchange mailbox to PST, except the ‘DeletedItems’ folder.
If you want to include or exclude multiple folders in the mailbox, you can use the –IncludeFolder or –ExcludeFolder parameter and list the folder names, separated by commas. Refer to the following example:
New-MailboxExportRequest –Mailbox testdummy –FilePath\\exsrv\d$\pst\TestDummy.pst -ExcludeFolders “#DeletedItems#”, “#Spam#”
The above command will exclude the Deleted Items and Spam folders while exporting the mailbox to PST.
If you want to export only specific items from the mailbox, you can use the –ContentFilter parameter with lt (less than) and gt (greater than) switches. For example, emails received last year or between a certain date.
To export all emails older than a particular date, you can run the cmdlet as given below:
New-MailboxExportRequest -ContentFilter {(Received -lt '01/01/2020')} -Mailbox user-a ' -Filepath "\\Exchange\PST_Export\user-a.pst"
To export all emails newer than a particular date, you can run the cmdlet as given below:
New-MailboxExportRequest -ContentFilter {(Received -gt '01/01/2020')} -Mailbox user-a ' -Filepath "\\Exchange\PST_Export\user-a.pst"
In addition, you can export the mailbox contents based on a date range by using the combination of both lt and gt switches and include the folder parameters too. Here’s an example:
New-MailboxExportRequest -ContentFilter {(Received -gt '01/01/2020') -and (Received -gt '01/07/2020')} -IncludeFolders "#Inbox#" -Mailbox "td1" -FilePath "\localhost\c$\PSTFiles\td1_3.pst"
After creating the PST export requests, you can check the status by using the Get-MailboxExportRequest PowerShell cmdlet.
Once all mailbox export requests are completed, remove the completed mailbox export requests from the server using the Remove-MailboxExportRequest cmdlet as given below.
Get-MailboxExportRequest | where {$_.status -eq "Completed"} | Remove-MailboxExportRequest
An Easy Way to Export Exchange Mailboxes to PST
The above methods work fine and will help you export mailboxes to PST without issues. However, these Exchange native tools will only work if the database is mounted and healthy. If you need to export mailboxes from a failed Exchange Server or database of a decommissioned server, you can’t export by using these native Exchange tools. In addition, you cannot export the public folders using these methods. In such situations, you can use Stellar Converter for EDB – a specialized EDB to PST converter software that can export mailboxes from offline or online database files to PST without any issue.
Unlike EMS, the software is GUI-based and displays the export progress. Apart from user mailboxes, you can export public folders, archives, shared folders, and other EDB file items. Besides PST, you can also save the mailboxes or mail items in multiple file formats, such as EML, MSG, RTF, PDF, and HTML. It can also export the mailboxes directly to a live Exchange Server or Office 365 (Microsoft 365). The software supports all Exchange Server versions, including 2019, 2016, 2013, 2010, 2007, 2003, 2000, and 5.5.
How to Import PST Files into the Exchange Server?
To import the PST files into the Exchange Server, you can use the Exchange Admin Center (EAC) or the Exchange Management Shell (EMS).
To import PST files via the EMS, you need to use the New-MailboxImportRequest PowerShell cmdlet as given below:
New-MailboxImportRequest -FilePath \\Ex01\PSTFiles\User1.pst -Mailbox "User1"

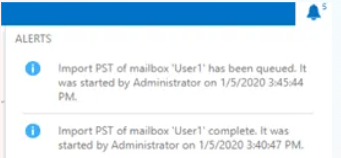
After executing the command, you can track the progress of import request using the Get-MailboxImportRequest PowerShell cmdlet.

To import PST into Exchange Server using the EAC, follow the below steps.
- Login to the EAC, click on Recipients > Mailboxes, and highlight the mailbox to import into.
- Click on More options and click on Import PST.
- Enter the network path where the PST resides and file name. Then, click Next.
- Select the destination mailbox. Choose the Import to this mailbox or Import to this mailbox’s archive option. Click Next.
- If you want to receive notification when the PST file is imported, click the checkbox and select a recipient to receive the notification. Then, click Finish.
Watch Microsoft MVP Hamid Sadeghpour Saleh shares his experience using Stellar Converter for EDB and describes the experience as “incredibly smooth” and appreciates how the tool delivered results without any unnecessary complexity
Final Words
You can export Exchange mailboxes to PST and import the PST files into mailboxes using Exchange Admin Center (EAC) and PowerShell cmdlets in EMS. Above, we have explained the stepwise process to export mailboxes and import PST files using the EAC and EMS. However, these native tools only work when the database is online and healthy and Exchange Server is available. Also, you need various additional permissions and roles to perform the process. Alternatively, you can use an EDB to PST converter tool, such as Stellar Converter for EDB. This tool can export mailboxes from online or offline EDB files to PST and various other formats. It can also export the converted mailboxes (PST files) directly to a live Exchange Server or Office 365.
FAQs