


Microsoft has introduced several noteworthy changes with Windows 11 to offer a better user experience. However, one key aspect remains similar to Windows 10, i.e., Update installation. Like in Windows 10, the Cumulative or Quality updates are automatically installed on your Windows 11. Certainly, updates are released to ensure that your device keeps running smoothly and securely with the required latest features. But sometimes, these updates become a problem themselves.
Users have reported facing glitches such as performance degradation, BSoD errors, frequent system crashes, etc. after installing updates. All these issues put the device and the data at risk. However. The data can be recovered using reliable data recovery software. But to eliminate this vicious cycle of errors, some users decide to turn off any automatic Windows updates. In this article, we’ve shared how to turn off automatic updates. Let’s get started!
How to Turn Off Automatic Updates?
You can choose to disable Windows Update either Temporarily or Permanently.
To Stop Windows Update Temporarily
You can use the following method to turn off the Windows Update only for a particular duration (temporarily).
#1 Use Settings App
This is the most common method to disable Windows updates in Windows 11. Simply go to the Settings app and pause the automatic updates from getting downloaded temporarily. Follow these steps:
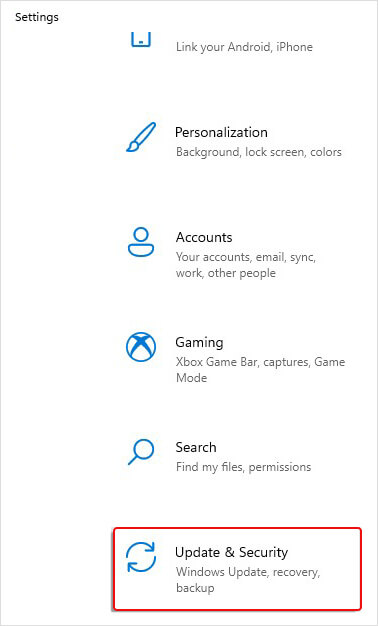
- Open Settings from Start or press Windows + I to access it.
- Next, click Update Security.
- Next, go to Windows Update and there scroll down, and you’ll see the ‘Pause updates for 7 days’ option; click it. This is the default period set in your system to turn off Windows updates.
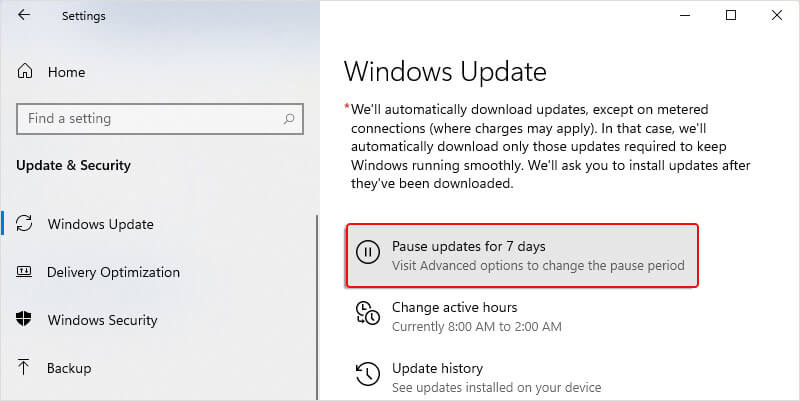
- If you want to change the pause period, access Advanced options.
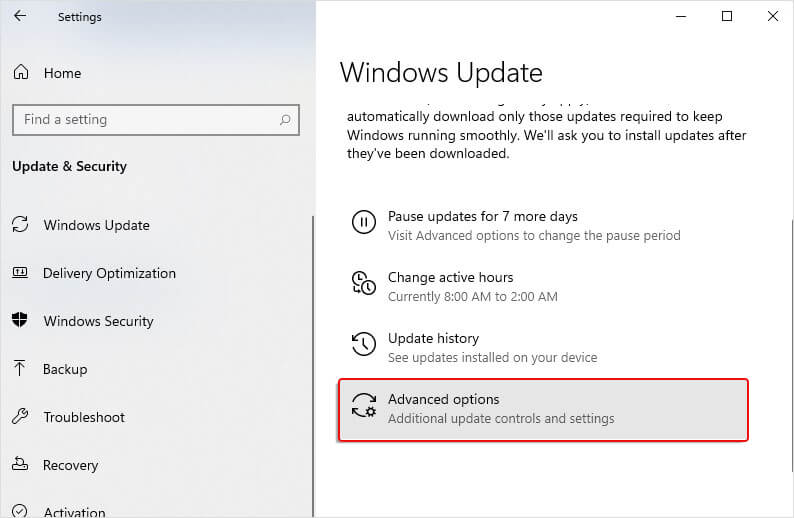
- On the Advanced options screen, scroll down to the Pause updates option and select a date in the drop-down list.
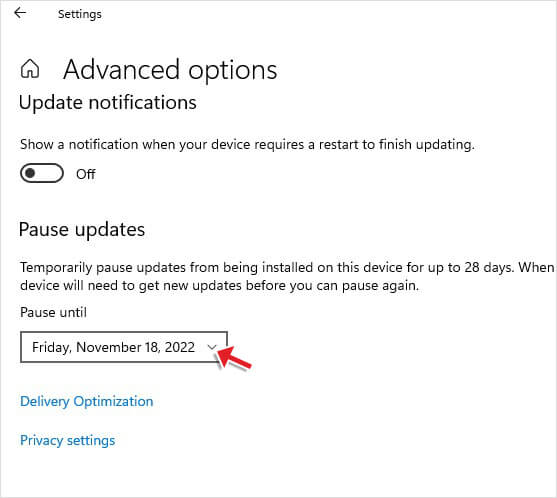
The limit to pause or stop Windows updates is usually 28 days. However, this period may vary from system to system. After completion of the selected date, the system will require updates before turning them off.
Disable Windows Update Permanently
If you want to stop Windows updates permanently, follow the below methods with the instructions against them.
#2 Run Windows Service
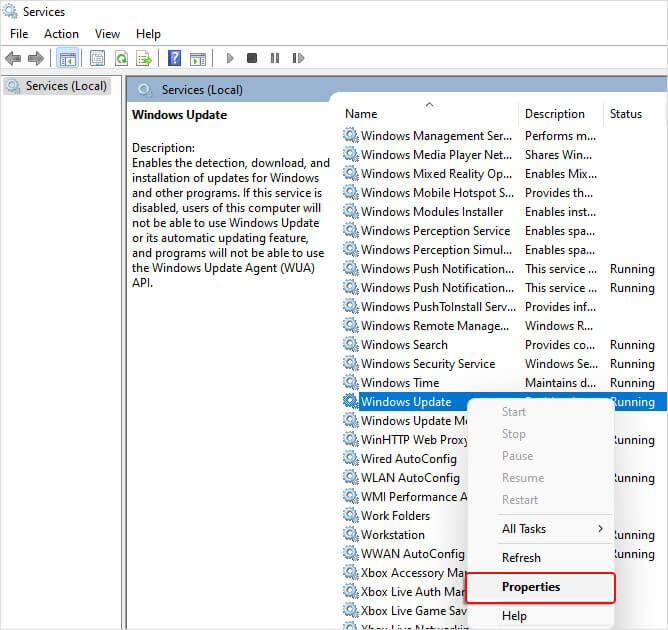
To turn off the Windows update through Windows Service, you can follow the given steps:
- Open the Run dialog box by pressing Windows + R and type services. msc and click OK.
- Next, look for Windows Update on the Windows Services page, right-click, and select Properties.
- Now, on the General tab, locate Startup Type and from the drop-down list given against it, choose Disabled.
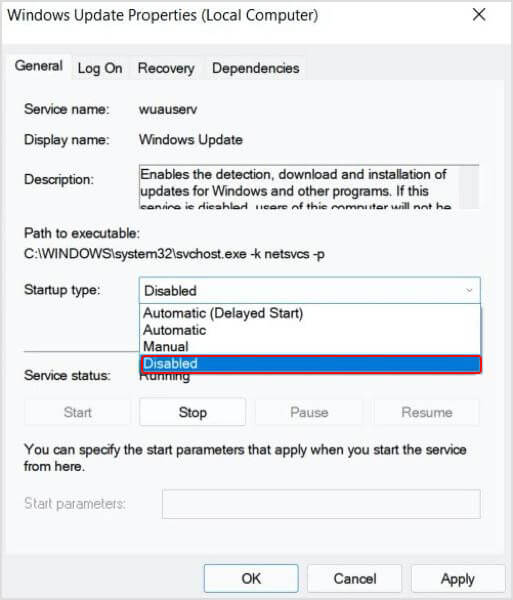
- Finally, click Apply > Ok to complete the process.
The Updates will be turned off. However, you can still download them manually via Settings. If you want to turn it on in the future, choose Manual or Automatic from the Startup Type drop-down list.
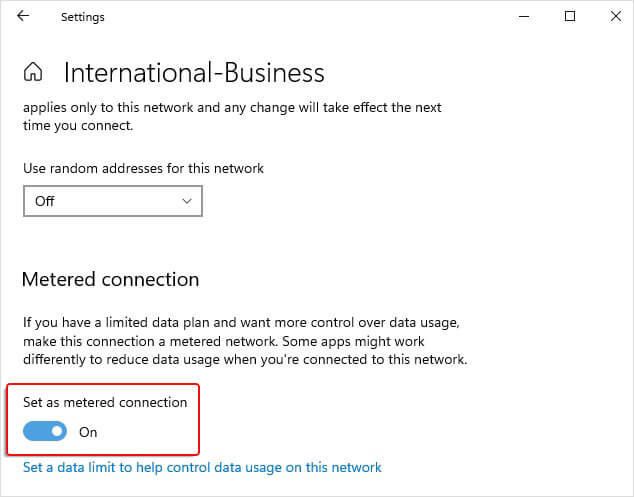
#3 Set up a Metered Connection
You can set up a metered connection if your Windows 11 system runs the Internet using WI-FI. The automatic downloading or installing of priority updates conserves the bandwidth in metered connection. In addition, you can set it up to disable or stop Windows updates. To do so, follow the given steps:
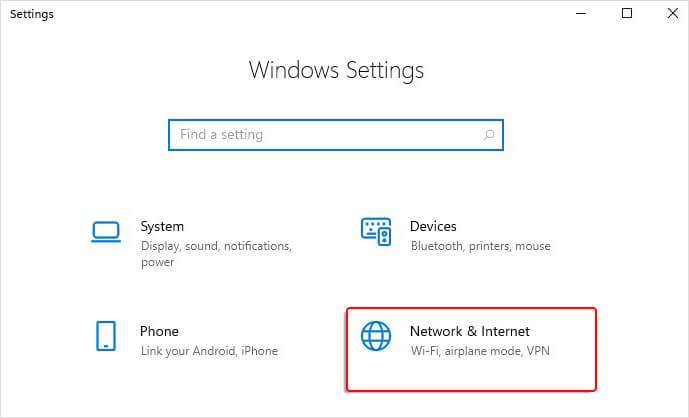
- Open Settings by pressing Windows + I and go to Network & Internet.
- Next, click Wi-Fi from the left panel. It will show you the name of the Wi-Fi from which your system is connected. Click on it.
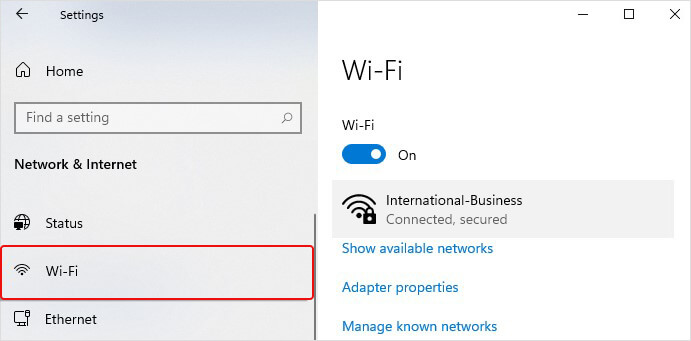
- Next, scroll down and switch on the toggle given under Metered Connection.
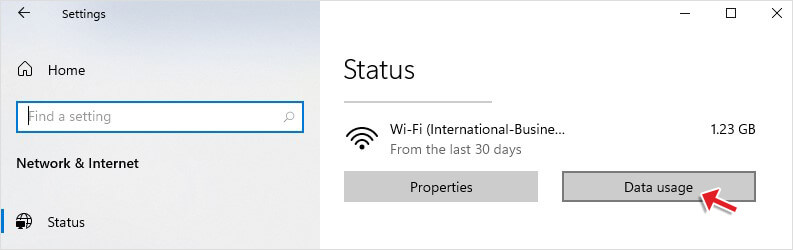
- Now, click Data usage given under the Wi-Fi.
- On the next prompt, click Enter limit under Data limit and then mention the amount of MBs you want to allow for each program running.
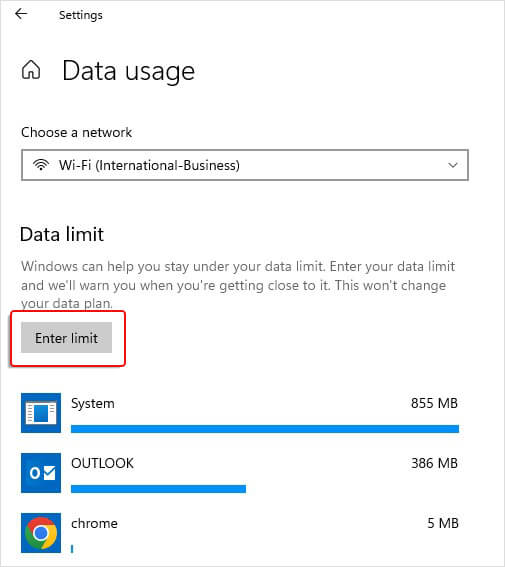
- Remember, setting up a cap over the data usage limit works on data limits for your entire system, not just Windows updates. Hence, if you wish to download something in the future, remove the data limit.
#4 Make Changes in Registry Editor
Modifying Registry Editor is another way to disable Windows updates. First, however, backup and restore the registry, as editing the registry is quite dicey. If anything goes wrong while making changes in the Registry Editor, it can cause serious damage to your system. Even in some cases, your system may not boot at all.
To turn off Windows update in Registry Editor, follow the given steps:
- Open the Run dialog box by pressing Windows + R, type regedit, and click OK.
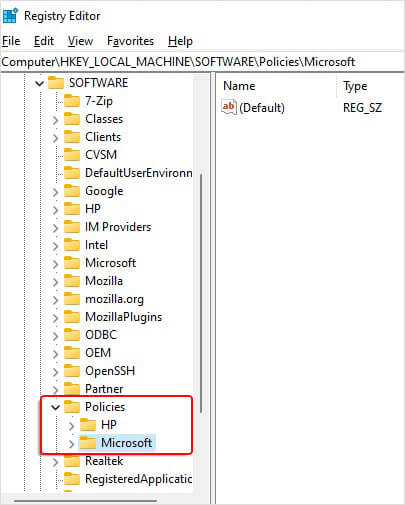
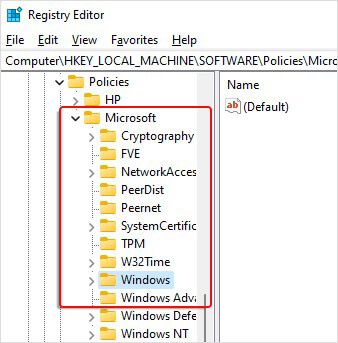
- Locate HKEY_LOCAL_MACHINE, expand it, and then double-click SOFTWARE.

- Now, double-click on Policies > Microsoft.
- In the Microsoft tab, double-click on Windows.
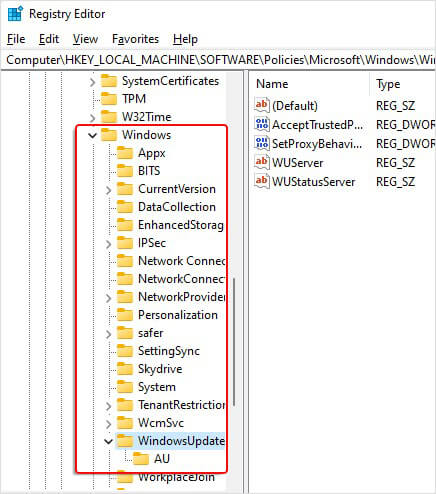
- Now, under the Windows tab, expand WindowsUpdate and then double-click AU.
- Now, in the AU tab, right-click on the blank space and click New > DWORD (32-bit) Value.
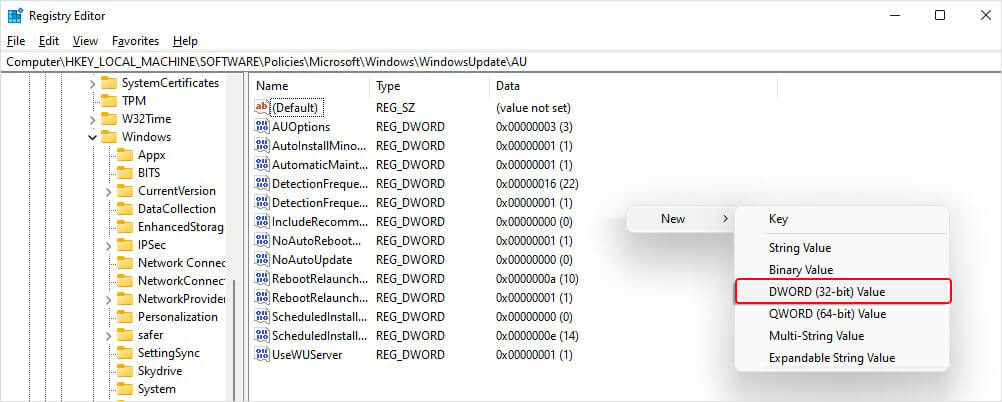
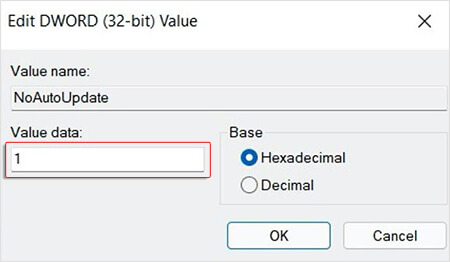
- Name it – NoAutoUpdate and click Enter.
- Now, double-click it, enter 1 in the Value data box, and click OK.
- Once done, close the window. Now restart the system to execute the changes.
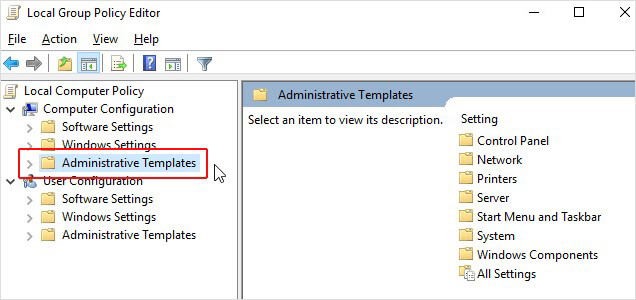
#5 Access Group Policy Editor
Another way to disable automatic Windows Update is using Group Policy Editor in Windows 11. To do so, follow the given steps:
- Press Windows + R to open the Run dialog box, and type gpedit. msc and click OK.
- Follow Local Computer Policy > Computer Configuration > Administrative Templates in the elevated window.
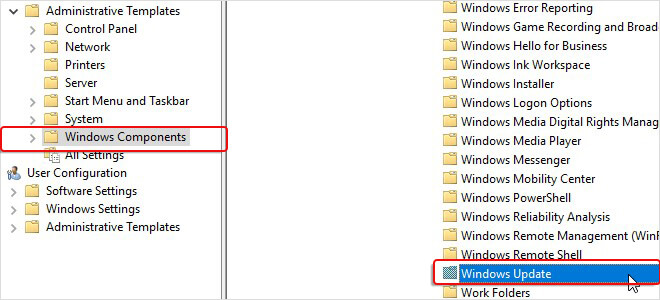
- Afterward, follow Windows Components > Windows Update.
- Now, choose Configure Automatic Updates.
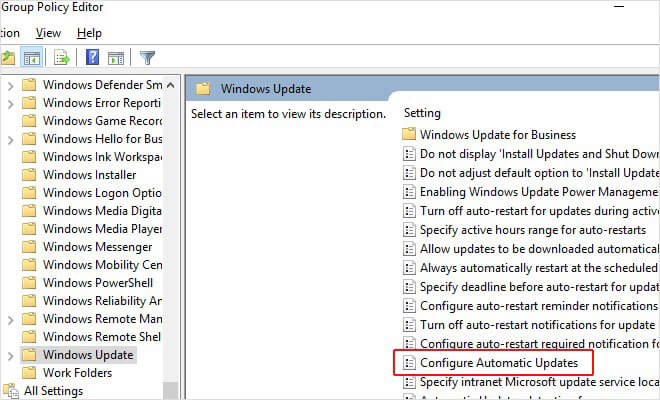
- Right-click on it and choose Disabled.
- Finally, close the window, and it should stop the Windows update.
Now you know how to turn off automatic updates in Windows 11. All the methods discussed in this article are DIY (do-it-yourself). You must be able to perform them easily. However, taking caution is necessary while disabling the updates manually, especially through Registry Editor. Incorrect modification in Registry Editor can damage your system and put your device data at risk.


 8 min read
 (1)-853.jpg)


