With the introduction of the M1 Max chip that according to Apple is the world’s most powerful chip for a Pro Notebook, users are thrilled with expectation of enhanced performance. Although, it yet remains to be practically proven. Similar enthusiasm was shown with the M1 chip but users, later on, reported excessive wear of SSD in a short usage span.
Hector Martin, a senior developer, has claimed in his tweet that the internal SSD usage on his MacBook Pro 2 TB 16 GB model has gone to 3%. These usage stats of M1 Mac SSD reflect that the SSD usage on M1 Mac has even surpassed that on an Intel Mac. Moreover, with such a pace of SSD use, the 256 GB internal storage would last for only six months or less. This is a setback for any M1 Mac user as the SSD lifespan will be diminished.
The issue has been reportedly resolved by introducing macOS 11.4 on the M1 Macs. That being said, it is better to be ready beforehand instead of encountering the problem later. Accordingly, this article will equip you with methods to prevent excessive SSD wear and extend the SSD lifespan on your Mac device.
Check your M1 Mac SSD Health
You can check the status of SSD usage using a free App from Apple called Xcode, but it requires multiple supporting tools to function. Below, we have mentioned two easier methods to check the health of Mac's internal SSD.
Method 1: Check the S.M.A.R.T. Status of your Mac Drive
Apple provides a native utility to check drives' health on Mac systems. You can check the S.M.A.R.T. status using Disk Utility to inspect the health of your Mac and estimate the SSD lifespan. Here is how to do it.
- Open Finder and click Applications > Utilities > Disk Utility.
- Select your SSD drive from the list in the Left Sidebar.
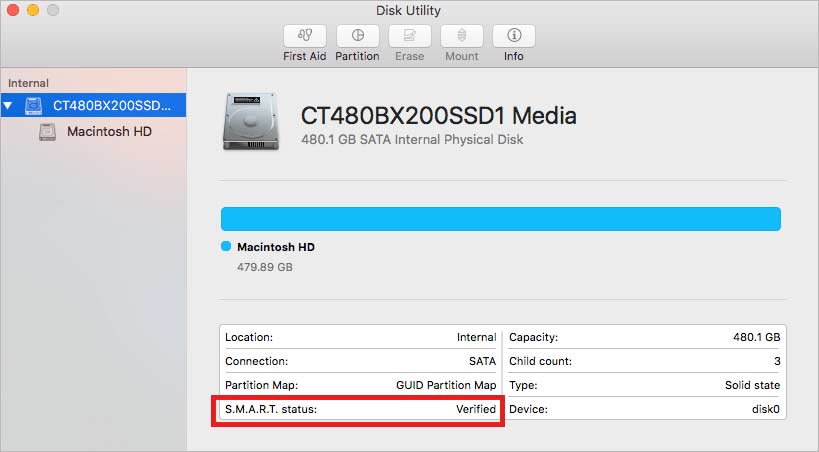
Note: You must select the drive and not the partition on your Mac. The drive is generally represented as Apple SSD SM0256G Media, while the partition is indicated as Macintosh HD. If you select the correct drive, S.M.A.R.T. status will appear in the disk information overview.
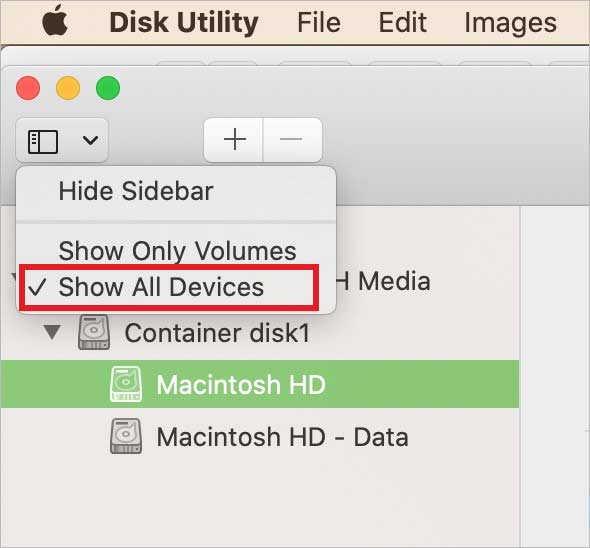
- If you can’t find your internal drive, click View > Show All Devices.
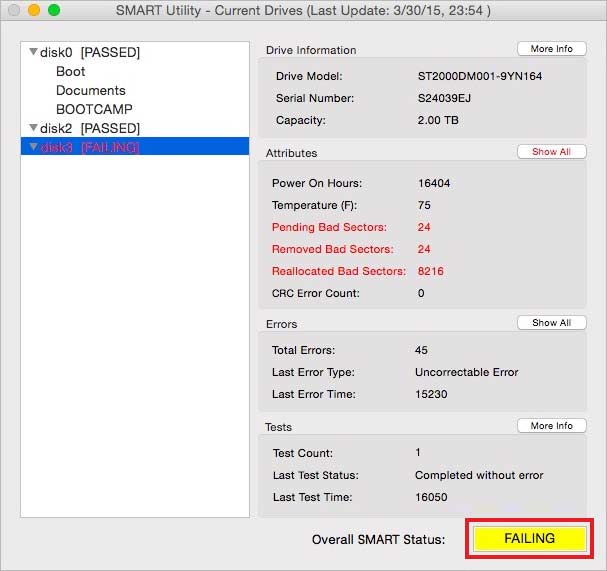
- If the S.M.A.R.T. status is showing Verified, your SSD is in good health. But if it’s showing Failing, you should immediately take a backup before replacing the SSD.
Method 2: Use Stellar Drive Monitor
Stellar Data Recovery Professional for Mac offers Stellar Drive Monitor feature that you can utilize to check the SSD’s health status. Further, you can use the software to recover data in case of SSD failure and data loss. Stellar Data Recovery Professional for Mac accurately monitors the temperature, performance, and health of Mac’s SSD and provides alerts on a real-time basis to the user. Follow the steps below to check the health of SSD internal storage on Mac.
- Download and launch the Stellar Data Recovery Professional on your Mac.
- Activate the software using the activation key received.
- Click the More Tools option and then click Monitor Drive at the top-right corner of the main UI of the software.
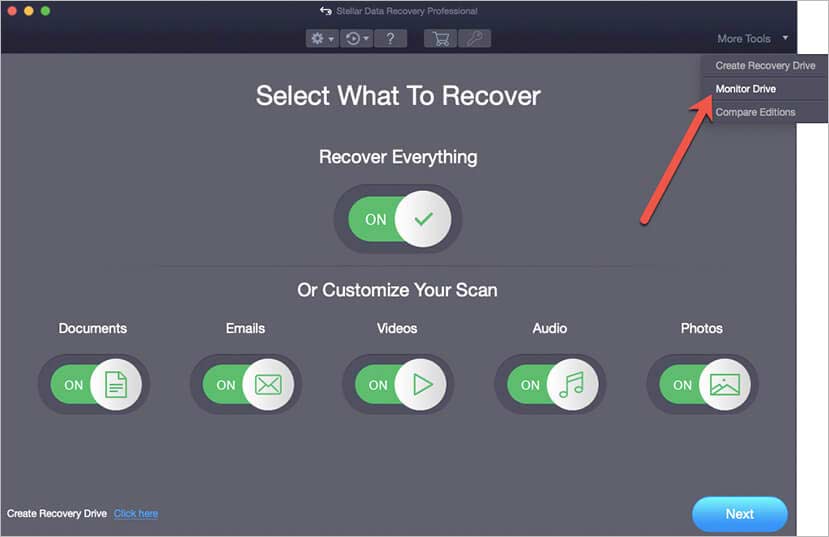
- On the Drive Monitor screen, select the internal SSD.
- The temperature, performance, and health of the drive will appear along with the other details.
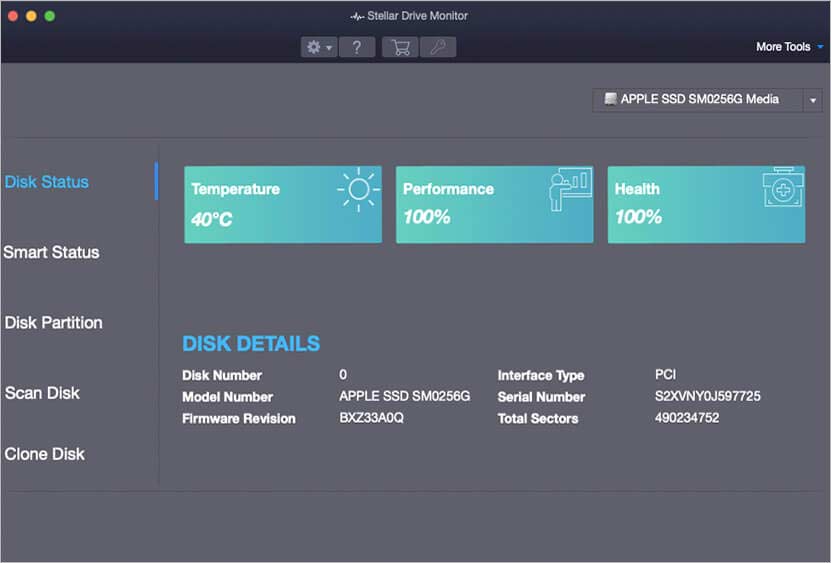
- You can review and analyze your SSD health from the information provided on the software interface.
How to Prevent Excessive SSD Wear and Enhance SSD Lifespan?
The SSD storage works on the P/E cycle or program/erase cycle. This means every time you write data, the SSD first erases the existing data and then store the new data in its place. Moreover, every SSD has a finite P/E cycle limit. Each erasure and writing cycle reduces the cell capacity by a minuscule amount. Therefore, if you spend a little effort to reduce the P/E cycle by managing the operational activities on your Mac, there is no need to worry about your SSD in M1 Mac.
Thus, you need to judiciously use the P/E cycle to prevent excessive wear and enhance SSD lifespan. There are certain methods to accomplish the goal of reducing the P/E cycle usage. These are discussed as follows.
Method 1: Update your macOS
If you are using a macOS earlier than macOS 11.4, then it's better that you update your OS immediately. The issue of excessive usage and wear of SSD has been resolved in the macOS 11.4 update. To update your macOS, follow the steps below:
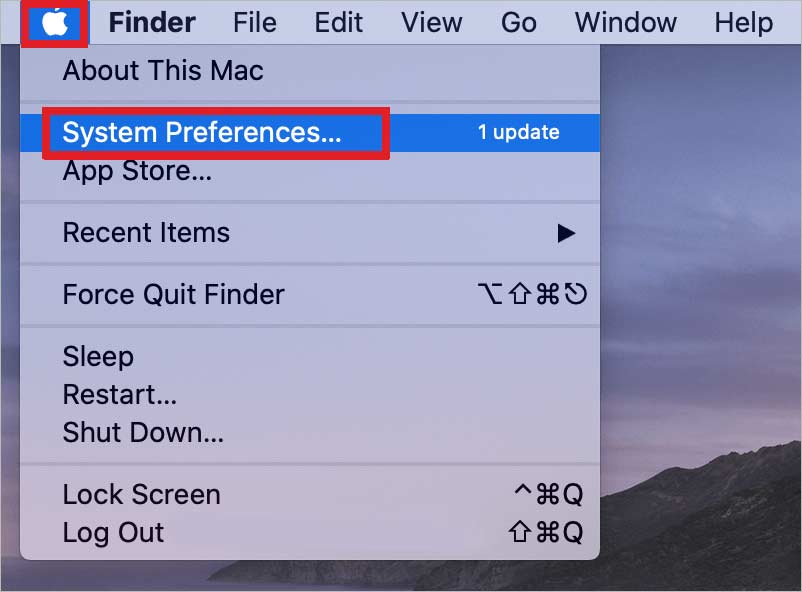
- First, click the Apple menu icon and select System Preferences.
- Then, in the new window, click the Software Update icon.
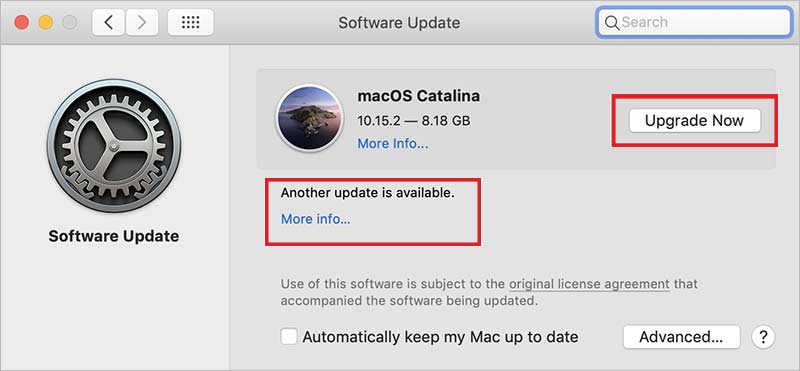
Note: If your System Preferences window is not showing the Software Update icon, go to the App Store to update your OS and update to macOS 11.4 Big Sur or higher version.
- Click Update Now or Upgrade Now.
Once the update is complete, you will see a message showing your Mac is up-to-date. This will prevent excessive wear of SSD.
Note: In general, updating or upgrading the macOS does not affect the data. However, chances of data loss do exist if updating goes wrong. Any malfunction during update may cause damage to the data stored and cause data loss. Therefore, you must take backup of your data before updating. If you cannot take backup of data, you can use Stellar Data Recovery Professional for Mac. The software not only helps you get back your lost or deleted data but also keeps you updated on the health of your internal SSD.
Method 2: Disable TRIM on Mac
The function of the TRIM command is to automate the erase process on SSD, thus improving the writing speed of M1 Mac. However, the faster the writing speed more is the usage of the P/E cycle, thus reducing the SSD’s lifecycle. If you are only concerned with the speed, keep the TRIM enabled. However, if you don’t want your data to be lost forever and want to extend the SSD lifespan, you must disable TRIM on your Mac. The TRIM command comes enabled with the M1 Macs with SSD. You need to disable it to enhance the SSD lifespan. The only way to disable TRIM is by using the Terminal app on Mac. Here are the steps:
- Launch Terminal from the Applications folder.
- Insert the sudo trimforce disable command in the Terminal.
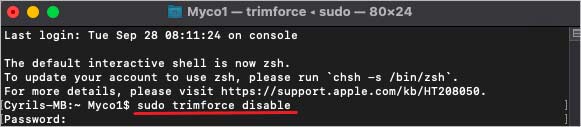
- Press Return and enter the admin password if asked.
- A notice will appear, prompting to confirm the disable TRIM command. Type Y and press Return.
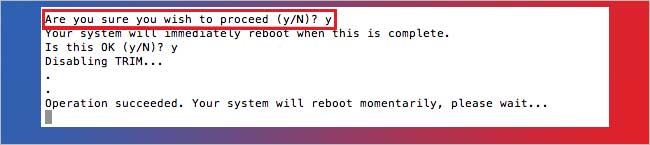
Disabling the TRIM will slow down the writing speed of your M1 Mac slightly. However, it’s a small price to pay if you wish to use your M1 Mac for a longer period.
Conclusion
The mere speculation of a short SSD lifespan is no reason to reject the latest technological innovation of M1 chips abruptly. The generally blamed reasons for avoiding SSD storage are based around the NAND flash storage of SSD. The SSDs had a shorter lifespan in the initial developmental phase, which was due to the locking up of the controller. The modern SSD storage is far more sophisticated, with a sufficiently long lifespan. Nonetheless, you need to lend a helping hand to every technology as it needs maintenance and management to impart optimum level of performance and solid state drives are no exception to this general rule of thumb.


Tech Enthusiast and Senior Writer at Stellar®
 6 min read