BitLocker, a Windows built-in encryption feature, provides an extra layer of protection to your hard drive against unauthorized access. A BitLocker encrypted drive can only be decrypted or unlocked with the 48-digit Recovery Key or BitLocker password. Anyone without authentication will be denied access to the encrypted drive.
Although BitLocker protects sensitive data, entering the BitLocker password or recovery key again after every Startup, hardware change, or BIOS UEFI update can be annoying. You can avoid this by turning off or disabling the BitLocker Encryption.
Continue reading this blog to learn how to turn off BitLocker encryption!
Methods to turn off BitLocker encryption
There are several methods to disable BitLocker in Windows 11. However, if you don't have Administrator rights, you'll be unable to disable the BitLocker encryption. Here, you may only see the Backup your recovery key option. Hence, you need to log in to your system with an administrator account and follow the given methods.
Method 1: Disable BitLocker via Control Panel
Control Panel is the most straightforward way to turn off BitLocker Windows 11. Follow the below steps to disable BitLocker encryption using the Control Panel:
On Home Edition:
- Type and search [Device encryption settings] in the Windows search bar, then click Open.
- On the Device encryption field, set the option to Off.
- Confirm whether you need to turn off device encryption, and select Turn off to disable the device encryption function.
Note: You can also turn off BitLocker in Windows on Home edition by following Start > Settings > Update & Security > Device encryption > select Turn Off.
On Pro Edition:
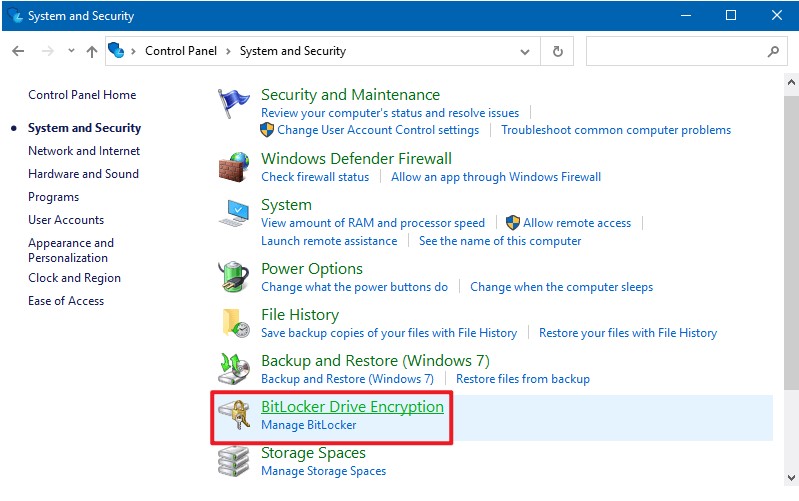
- Go to Windows Search (Windows + S), type Control Panel, and click Open when you see it in the result.
- Then, go to System and Security.
- On the following prompt, locate BitLocker Drive Encryption and select Manage BitLocker.
- Select the BitLocker-encrypted drive and then click Turn off BitLocker.
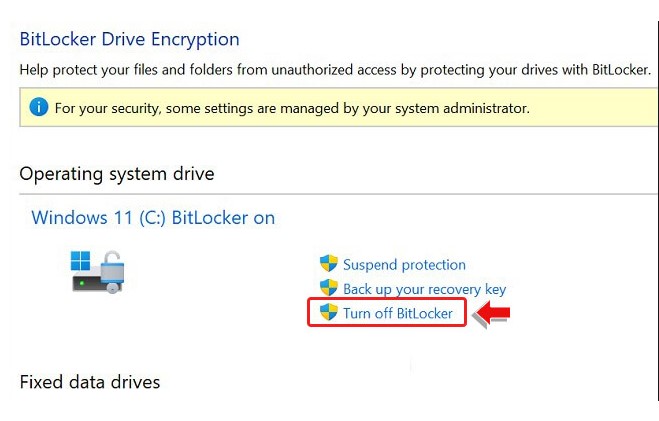
- If the drive is locked, click Unlock drive, and type the password to turn off BitLocker.
- Confirm whether you want to decrypt your drive, then select Turn off BitLocker.
Method 2: Turn Off BitLocker Encryption via Local Group Policy Editor
The Local Group Policy Editor allows the administrator to control various app access and user permissions on your system. It is also used to manage the BitLocker Drive. Let's see the steps:
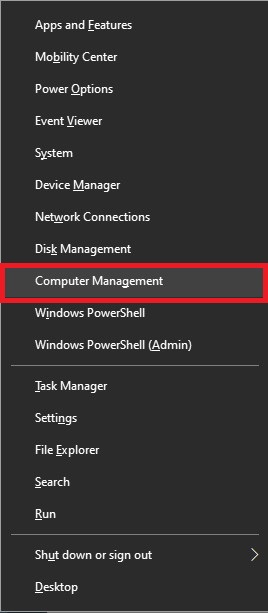
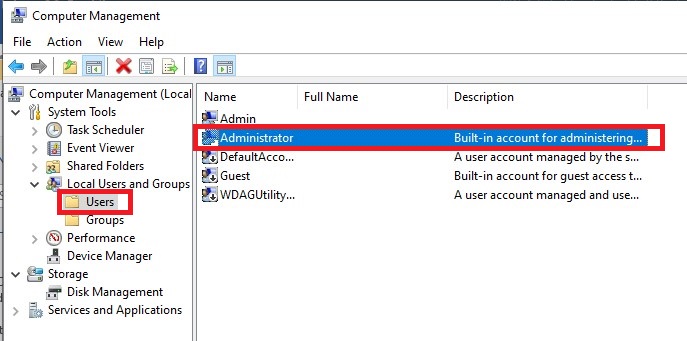
- Access the Start menu by pressing Windows + X and then select Computer Management.
- Double-click Local Users and Groups to expand it.
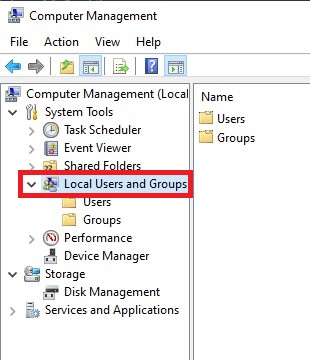
- Now, double-click Users and then locate and double-click the Administrator.
- Deselect Account is disabled and click OK.
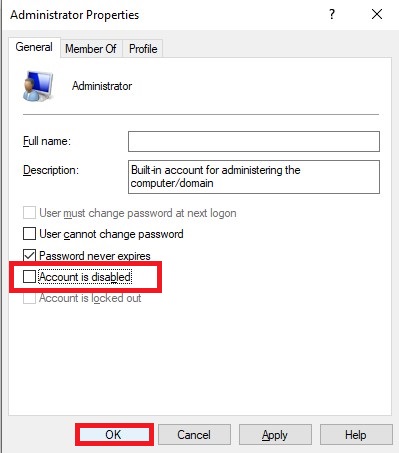
- Once done, reboot your system.
Method 4 - Run Disable-BitLocker Command
The Disable-BitLocker command allows you to turn off or disable the BitLocker Drive Encryption for a volume. This command removes all key protectors and starts decrypting the volume's content.
If you're trying to disable BitLocker encryption for the drive volume containing the OS, you’d need to run the Clear-BitLockerAutoUnlock command to remove all automatic unlocking keys. After this, you'll be able to disable BitLocker for the volume.
Disable BitLocker for a volume
You can disable the BitLocker encryption for a single volume using Command Prompt with the following steps:
- Open Command Prompt from Search and click Run as administrator.
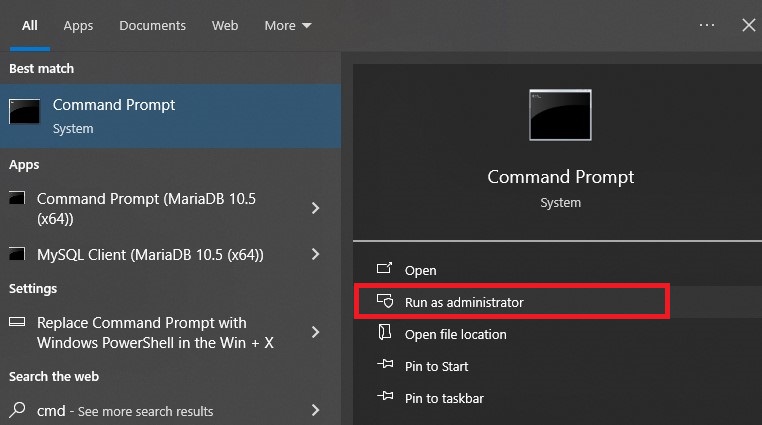
- In the elevated command prompt window, type Disable-BitLocker -MountPoint "C:"
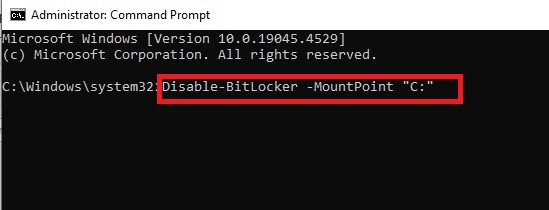
- Let the process complete. Press Y if it asks your permission to proceed with the decryption. Finally, restart your system.
Disable BitLocker for all volumes
- If you want to turn off BitLocker encryption for all the volumes connected to your system, run Command Prompt as administrator and run the following command:
$BLV = Get-BitLockerVolume
Disable-BitLocker -MountPoint $BLV
- The command Get-BitLockerVolume retrieves all the BitLocker volumes connected to your system and stores them in the $BLV variable.
The Disable-BitLocker-MountPoint $BLV command is used to disable the encryption for all the volumes in the $BLV variable.
Let the process finish, and your drive volumes will be decrypted.
Bottom Line
BitLocker is a useful feature to keep your hard drive data protected from unauthorized access. Keep the BitLocker recovery and unlocking key somewhere safe and accessible so that you can quickly access your data.
Moreover, do not worry if you mistakenly delete the data from your BitLocker encrypted drive! Simply use a Windows data recovery software, such as Stellar Data Recovery. It is an easy-to-use yet powerful software that restores data from formatted, corrupted, and even BitLocker-encrypted drives.


Vishakha Singh is a Senior Writer at Stellar with half a decade of experience in writing content in diverse verticals. She loves creating photo/video recovery & repair tutorials. Vishakha also specializes in writing full-blown iPhone and Android guides.
 17 min read
-1918.jpg)