In Database Availability Group (DAG) setup in Exchange Server, you have a failover and replication system. In case of a disk failure or database corruption, you may need to replace the drives and reseed the data from the source. To reseed the data, there is a feature called AutoReseed. This function was introduced first in Exchange Server 2013.
When the data drive is failed which is holding the mailbox database copy, the Exchange Administrator would have to do the following:
- Repair the drive or replace the damaged hard drives
- Setup of the volume
- Remove the database from the Database Availability Group (DAG)Re-instate the database in the Database Availability Group (DAG)
- Seed the data from the source database
The AutoReseed feature will automatically seed the databases once the drive is available, thus reducing the admin work. Let’s see how to use the AutoReseed feature.
How to Use the AutoReseed Function?
The AutoReseed function uses the Windows Server operating system where you can mount a drive as a folder on the operating system drive. Although there is a separate drive on a separate volume, instead of giving it a drive letter, you will give it a folder path. You cannot have the mailbox databases stored on a separate drive. For the feature to work, you need to have the drive mounted as a folder.
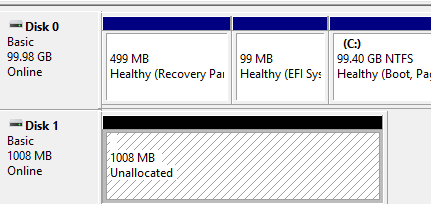
Let’s understand this by way of an example. Here, we are creating a 1 GB drive to illustrate the process.
- There is a disk with no partition or volume (see the below image). So, right-click on the unallocated space and click on New Simple Volume.
- Click Next.
- Select the desired space and click Next.
- Now, click on the Mount in the following empty NTFS folder option.

- Click on Browse.
- Set the desired location and click Next.

- Proceed with the format options and click Next.
- Click Finish. You will notice that the drive doesn’t have a drive letter.

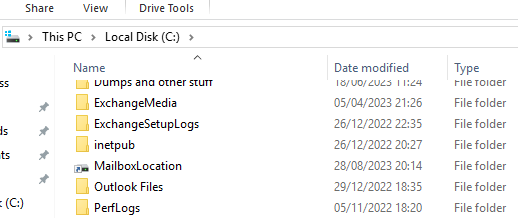
- If you browse to the set location, you will see the location as a folder (in this example, it is C:\MailboxLocation).
Setting up the AutoReseed function
First, you need to configure the root paths or the databases and volumes. To do so, you need to use the Set-DatabaseAvailabilityGroup command. The default locations are C:\ExchangeDatabases and C:\ExchangeVolumes.
To change the root path for the database, you need to run the following command.
/code Set-DatabaseAvailabilityGroup /dag name -AutoDagDatabasesRootFolderPath "location" /location /dag /code

To change the default volume, you need to run the below command.
/code Set-DatabaseAvailabilityGroup /dag name -AutoDagVolumesRootFolderPath "location" /location /dag /code
/code
You can use the following command to configure the AutoReseed setting for the Database Availability Group (DAG), configured with 4 databases per volume.
/code Set-DatabaseAvailabilityGroup /dag name -AutoDagDatabaseCopiesPerVolume number /number /dag /code /code

Now, you need to mount the volumes for the databases with the volumes that will be used as spare. It is recommended to mount the volumes with specific numbers as this will help to identify the volumes easily (see the below example).
C:\MailboxLocation\Volumes\Volume1
C:\MailboxLocation\Volumes\Volume2
C:\MailboxLocation\Volumes\Volume3
In the database location, you need to create the databases folders (see the example below).
C:\MailboxLocation\Databases\DB01
C:\MailboxLocation\Databases\DB02
C:\MailboxLocation\Databases\DB03
C:\MailboxLocation\Databases\DB04
Since you’re setting up different hard drives for each database, you need to mount these drives as the location. You can use the following command. This needs to be done for each drive.
/code Mountvol.exe /location \\?\Volume /drive guid="" /drive /location /code

You can get the GUID by running the following command.
/code GWMI -namespace root\cimv2 -class win32_volume | FL -property DriveLetter, DeviceID /code
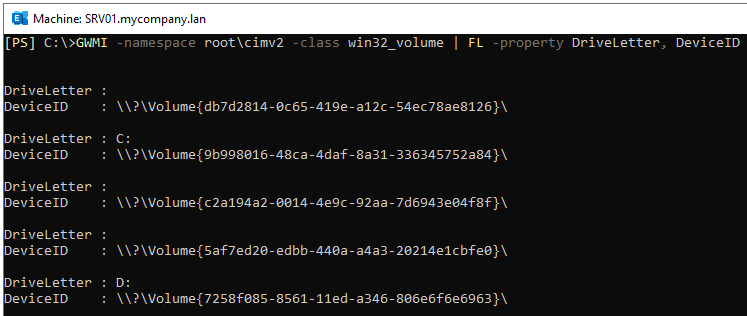
Now, you need to create the folders under each database that will store the data. You need to also create the log and database files (see the examples below).
md C:\MailboxLocation\Databases\DB01\DB01.db
md C:\MailboxLocation\Databases\DB01\DB01.log
This will create the folders needed. You need to repeat the process for all the databases.
Lastly, you need to create the databases. For this, you can run the New-MailboxDatabase command in the Exchange Management Shell (EMS).
/code New-MailboxDatabase -Name database name="" -Server /server name="" -LogFolderPath /log location="" -EdbFilePath /edb file="" location="" /edb /log /server /database /code /server

You need to repeat this for all the databases.
To verify that the changes have been successful and the auto-reseed has been configured, you can use the following command to get the information of the databases.
/code Get-DatabaseAvailabilityGroup /dag name="" | Format-List *auto* /dag /code /code

To Conclude
When you have a full redundant system, you assume that nothing will stop the system or there is no loss of data in case something happens. However, things may still go wrong and there is always a point of failure. The EDB file may get corrupted for any reason. In such cases, you can use specialized Exchange Recovery applications to Recover Exchange Database in any state and without a running Exchange Server. One such specialized application, which is on top of the market, is Stellar Repair for Exchange. It can restore data quickly and with no complications.
With Stellar Repair for Exchange, you can open corrupted databases or orphaned databases with no size limit or version restriction. You can browse the data store after a quick or extensive scan. You can granularly export recovered database to PST and other file formats, or export directly to a live Exchange Server database or Office 365.


 4 min read